
Pros and Cons
PermaLink Review – Pros:
- 100% Fresh NEW PermaLink Software: Push 1 Button to “Perma-Blast” any link to $181 Billion Dollar Buyer Pool for unlimited, *permanent* free buyer traffic & sales in 22 seconds.
- Step-By-Step Training Videos: In these in depth, over the shoulder training videos, you’ll see how everything works inside of the PermaLink App.
- $247 In 24 Hours Real Life Case Study: You’re going to see the exact steps they took to generate $247 within 24 hours using nothing but the PermaLink App to get traffic.
- 7 Ways To Make $500 Daily With PermaLink App: Once you’ve picked up your copy of PermaLink you may be puzzled about what to do next. That’s why they’ve created a guide that details 7 surefire ways to make $500 daily.
- Mastermind Community Group: Get access to a community of like minded individuals to network with for tips and questions.
- 24/7 World Class Support Team: Have any questions or need help? Don’t worry as their world class support team has you covered and ready to help you whenever, wherever you want.
PermaLink Review – Cons:
No significant cons until now
Создать тестовый набор
В тестовых примерах хранятся серии шагов теста и ожидаемые результаты для тестирования определенных сценариев. Следующие шаги объяснят, как создавать тестовые случаи и тестовые шаги.
Шаг 1. Щелкните папку с набором тестов под древовидной структурой папок в левой части панели.
Шаг 2: Щелкните значок настройки на правой панели, на правой панели отобразится список операций теста.
Шаг 3: Нажмите кнопку «Создать» в элементе операции контрольного теста, откроется новое окно для создания контрольного примера.
Шаг 4: Введите подробную информацию на странице теста.
Шаг 5: После ввода подробной информации нажмите кнопку «Создать» для сохранения, контрольный пример GURU99 успешно создан.
Шаг 6: Щелкните тестовый набор в папке, показанной выше, откроется окно, а затем нажмите кнопку «Создать шаг», чтобы открыть редактор шагов тестового набора.
Шаг 7: Откроется другое окно на той же странице. В этом окне вы должны ввести следующие данные: 1. Введите шаги теста; 2. Введите ожидаемый результат действия шага; 3. Нажмите «Сохранить» и добавьте еще одну операцию или нажмите «Сохранить» и «Выйти», если больше нет шагов для добавления.
Шаг 8. После сохранения и выхода из шага теста он будет выглядеть следующим образом:
Нормативная документация
Имеется целый перечень стандартов, посвященный СКС:
- ГОСТ Р 53246-2008 Информационные технологии (ИТ). Системы кабельные структурированные. Проектирование основных узлов системы. Общие требования;
- ГОСТ Р 53245-2008 Информационные технологии (ИТ). Системы кабельные структурированные. Монтаж основных узлов системы. Методы испытания;
- набор международных стандартов ISO/IEC 11801 Information technology — Generic cabling for customer premises (Информационные технологии. Структурированная кабельная система для помещений заказчиков);
- набор американских стандартов TIA-568 revision D.
Есть еще набор европейских стандартов EN 50173, но я их никогда не видел (видимо из-за того, что в России практически никто на них не ссылается, а может из-за того, что они достаточно близки к ISO 11801).
Указанные нормативы описывают топологию и компоненты, но не затрагивают вопросы прокладки кабелей и оформления, тут используем нормативы, которые применяются в других системах связи.
Весьма закономерен вопрос: зачем приведен список международных и американских стандартов, когда есть отечественная нормативная документация? Ответ прост: отечественные нормативы выпущены не понятно кем, имеют массу недостатков, так как фактически являются переработанным пособием по СКС одного из производителей (AESP).
Стоит также обратить внимание, что нельзя спроектировать систему одновременно в соответствии с ISO 11801 и TIA-568, так как в них имеются отличия в терминологии, а также в небольших нюансах. По “технике” различий практически нет – на работоспособность кабелей не влияет. Так какой стандарт выбрать для проектирования? Попробую сориентировать:
Так какой стандарт выбрать для проектирования? Попробую сориентировать:
- если планируется использовать оборудование какого-то конкретного производителя СКС в проекте с последующей сертификацией, то уточняем на соответствие какому стандарту необходимо будет тестировать систему – тот и будет основным;
- работы осуществляются с привлечением государственных бюджетных средств и могут “строго спросить” – указываем отечественные ГОСТ Р;
- “буржуйские” стандарты стоят денег (около 1000$ за набор) и не имеют официального перевода на русский язык, наши распространяются бесплатно и если что, удобно к ним апеллировать.
Все найденные на просторах интернета тексты стандартов (“забугорные” к сожалению не в последней редакции) приведены в конце заметки.
Fluke Test Meaning — Patch Cord, Channel and Permanent Link Testing Defined
Patch Cord Testing
Patch cord testing is a method to measure the performance of the network patch cords themselves, thus it has the highest level of requirements for the cable performance. A network patch cable passing the patch cord testing usually has higher performance and is more durable and reliable to be deployed in high-end data centers because it can avoid packet or data losses. When conducting the patch cord testing, a copper patch cord is connected between two pieces of test equipment including the whole patch cable and the test adapters. Any cable that is longer than 10m is not compliant and should be tested to channel specifications. That’s also why patch cord testing is most adopted to verify the copper patch cables between adjacent racks in the data centers.

Channel Testing
TIA and ISO standards define the channel of copper cabling as the complete end-to-end link over which active equipment on the network communicates. In a copper network, the channel is the connection between two devices, including any patch cords used for cross-connects or interconnects between them. In the LAN, the channel testing could be done from a distribution switch in a telecommunications room all the way to the network card in a laptop. Channel testing can be carried out with Ethernet patch cables, pre-terminated trunk cables and bulk cables. The overall length of the channel, including the cabling and any cords should not exceed 100 meters per industry standard guidelines. The requirements for cable performance in channel testing are less strict than that of the patch cord testing, thus network cables that pass the channel testing can not always pass the patch cord testing.
Permanent Link Testing
The permanent link refers to the ‘permanent’ or fixed part of the copper network which comprises of components that will permanently stay in place such as a patch panel, LAN cable and an outlet. Permanent link testing is used to verify the performance of the installed twisted pair cabling links including pre-terminated trunk cables and bulk cables in the field, thus being considered as the true foundation of the network. In the Fluke test, the permanent link testing excludes the equipment cords because it only measures the fixed portion of the channel, typically patch panel to patch panel in the data center or patch panel in the telecommunications room to work area outlet or consolidation point in the LAN. The maximum permitted length of the permanent link is 90 meters.

Permalink frequently asked questions
Here are some of the most common questions regarding permalinks. Is there is something missing just ask in the comments below.
What is a permalink example?
A permalink is simply just a URL that is unchanged when content is updated.
A permalink example would be: https://www.website.com/this-is-a-permalink-example/
You can see that a permalink use the URL slug format by lowercasing all of the letters and replacing spaces with dashes.
How do I create a permalink?
Creating a permalink will depend entirely on what content management system you are using. If you’re reading this post you likely have a WordPress website. Of course there are plenty of other blogging platforms so I have included some other common platforms.
- WordPress: As displayed above a properly setup WordPress site should have permalinks enabled by default. You can view permalink settings in WordPress by going to Settings > Permalinks. This page in the WordPress dashboard will show you options for changing your permalink structure.
- Wix: You’ll find permalink options in Wix under the SEO basics menu when editing content.
- Squarespace: Permalinks in Squarespace are called slugs and easy to change using their admin interface.
- Drupal: If you’re using Drupal you’ll likely use autopath to generate SEO friendly permalinks. Pathauto module generates a URL/path alias using your taxonomy and node title automatically.
Why is a permalink important?
Permalinks are very important for a website since they allow users to predictably access content on your site. Additionally if a page is shared with a permalink online users can know what to expect when they click it. For example website.com?page=341 vs website.com/about-me/ seeing about me in the URL indicates to the user what the page will be about.
Reports
It results in two reports.
Terminal
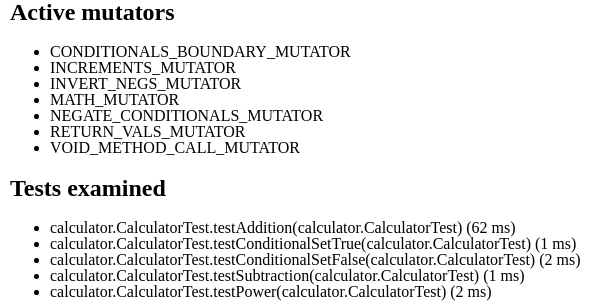
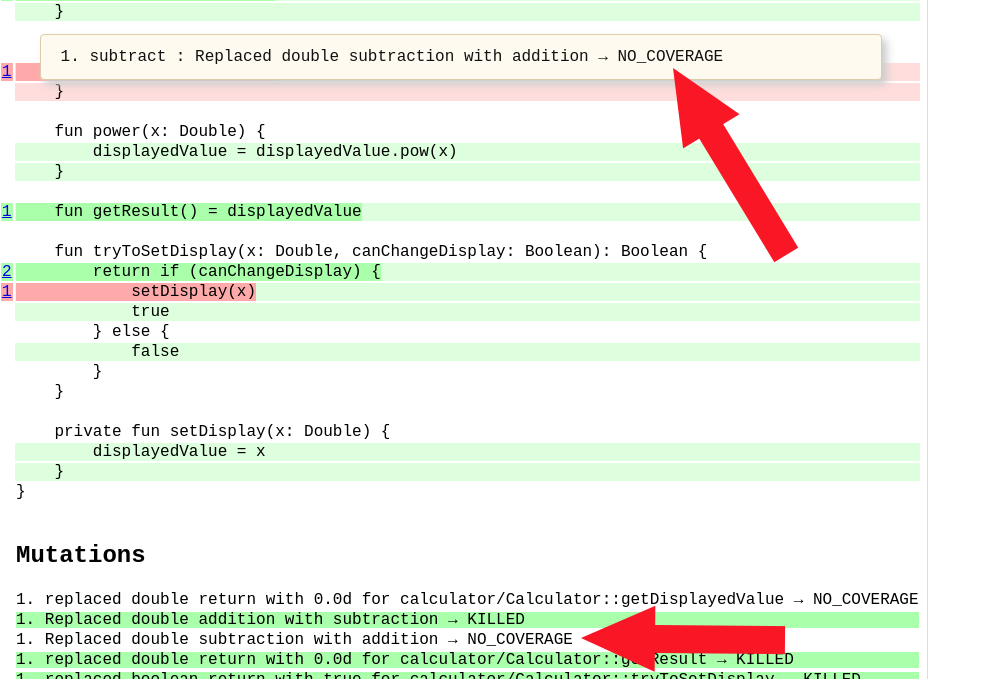
On the terminal, PITest outputs the results for each operator.
For example, below is the output for the , where we can see how many Mutanted Programs were generated by the application of this operator and the results of running all unit checks we had.
These two mutants were related to the and methods. In the first case, the sign was replaced by an ; in the second case, the sign was replaced by an . (More clear view of each mutant can be see on the )
In the end of the terminal report, you can see a summary of the all mutants and their status.
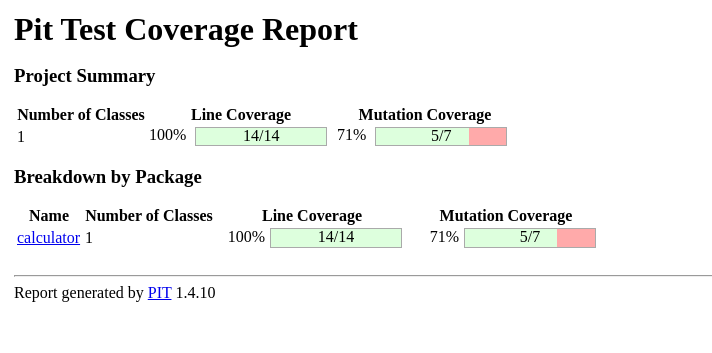
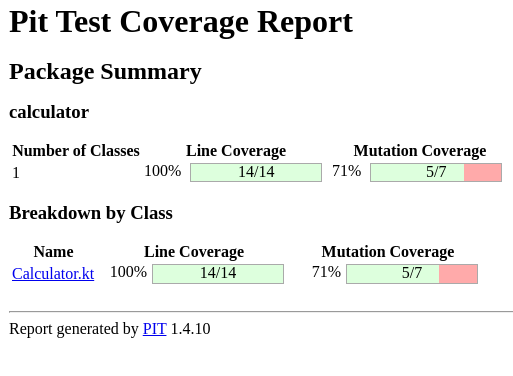
HTML
PITest also generates out-of-the-box HTML reports.
After calculating the mutation coverage, you can navigate through each package and class, examing the “traditional” code coverage (lines) and the mutation coverage of each entity.
And for each class you can see the details of each line and how the operators acted on them.
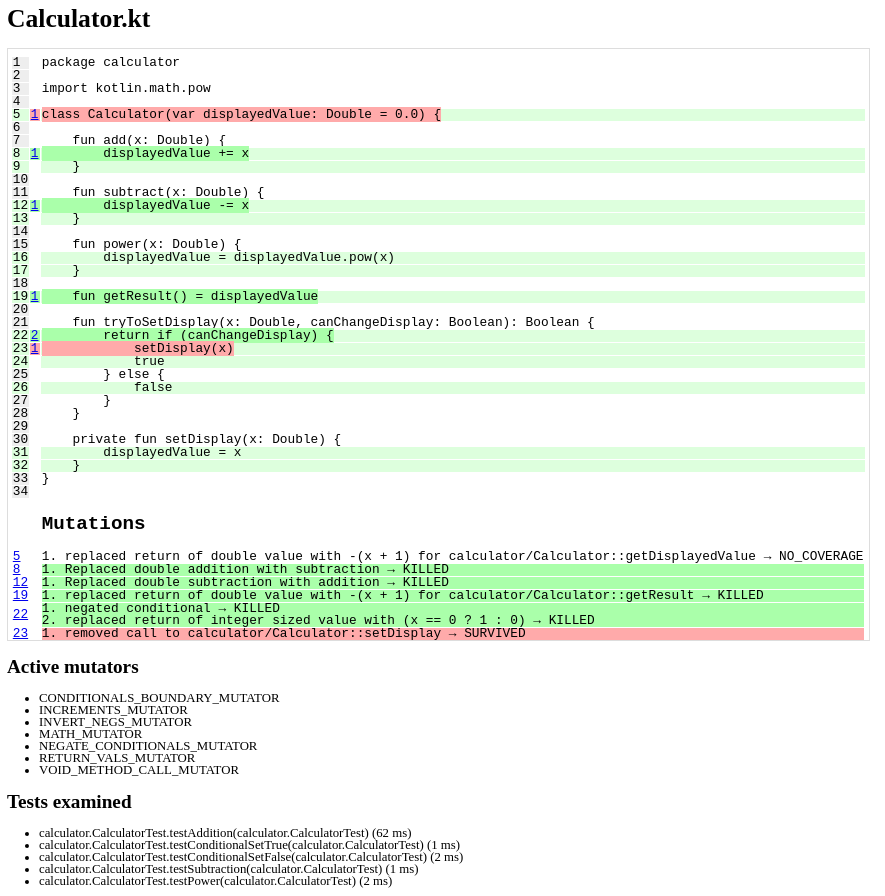
Also a list of Mutation Operators and which checks were involved in this class particurally.
The examination above already integrated the check for subtraction function that we added. If we exam the code without this check, we would see that PITest doesn’t even try to mutate this line, because it already knows that no check will fail.


It’s a important optmization for run-time, but also means that PITest can be integrated well in projects that don’t have good code coverage.
You can download the code here.
Research on Mutation Testing
Mutation Testing is still an area of great development. Every year new frameworks and approaches are created. Papadakis and others have assembled a great summary of recents advances in the area, check it out here.
People are creating libraries based on Recurrent Neural Networks, researching application in particular stacks, such as Android and the Google Query Language, etc.
If you want to stay up-to-date with news in the area, I would suggest creating a Google Scholar alert with Mutation Testing as keywords.
Conclusion
We saw how Code Coverage, although is important, is not sufficient for giving good feedback of the changes developers implement.
Mutation Testing tackle this problem in a systematic way, by applying changes heuristically and validating the suite of checks reaction to them.
With PITest, Mutation Testing becomes a powerful tool for better quality in monitoring of our suite of automated checks. With a few lines, we can plug it to our projects and get fast feedback.
Nonetheless, Mutation Testing is a broad field, with many tools and approaches. It’s our job to understand our context and look for the best approach to support thoroughly development.
Seems interesting? ![]()
How are permalinks formed on posts and pages?

Fortunately post slugs are prettier than this!
If you’ve chosen any of the Pretty permalink structures, the last part of the permalink will be automatically derived from the post slug, which is generated after you create a title.
Each word in the slug is written in lowercase and separated by a hyphen.
The Yoast SEO plugin used to automatically remove “stop words” from your URLs. “Stop words” are small words like “and” or “in”.
Yoast says it removed the clean slugs feature because:
You could still remove stop words yourself by editing the permalink directly, as in the example below.

The title is The Best Way To Keep Your WordPress Site Up To Date (And It’s Free)
The permalink is
The words the, to, your, up, to, and, it’s have all been removed.
However, read this article on why you should not always remove stop words.
Создавайте пользователей и назначайте роли в TestLink
TestLink предоставляет функции управления пользователями и авторизации. Ниже приведен список ролей и разрешений по умолчанию в TestLink:
| Роли | Прецедент | Метрики плана тестирования |
|---|---|---|
| туристский | Посмотреть | Посмотреть |
| Испытатель | выполненный | Посмотреть |
| Тест аналитик | Редактировать и выполнить | Посмотреть |
| Ответственное лицо и администратор | Редактировать и выполнить | Редактировать и выполнить |
Шаг 1. На домашней странице TestLink щелкните значок пользователя / роли на панели навигации.
Шаг 2: Нажмите «Создать».
Шаг 3: Заполните все данные пользователя и нажмите кнопку «Сохранить».
В списке мы видим, что пользователь был создан:
Шаг 4. Назначьте пользователям роли тестового проекта. 1. Перейдите на вкладку «Назначить роли тестового проекта»; 2. Выберите название проекта; 3. Выберите роль пользователя в раскрывающемся меню.
Why should permalinks remain unchanged?
After a particular post or page is published, the permalink for that page shouldn’t be changed without very good cause (and in extreme exceptions). Permalinks should remain unchanged because any incoming links the post or page has from other websites, will suddenly be pointing to a missing URL.
If you do need to change a permalink at some point on your blog, it’s absolutely crucial that you set up a proper 301 redirect in order to clearly tell search engines (like Google) that your the old url of your post, page or article has now moved to the new permalink you’ve set up.
You can use a free WordPress plugin like Quick Page/Post Redirect (like I use), to quickly set up a 301 redirect for a post or page you plan to move to a new URL like so:
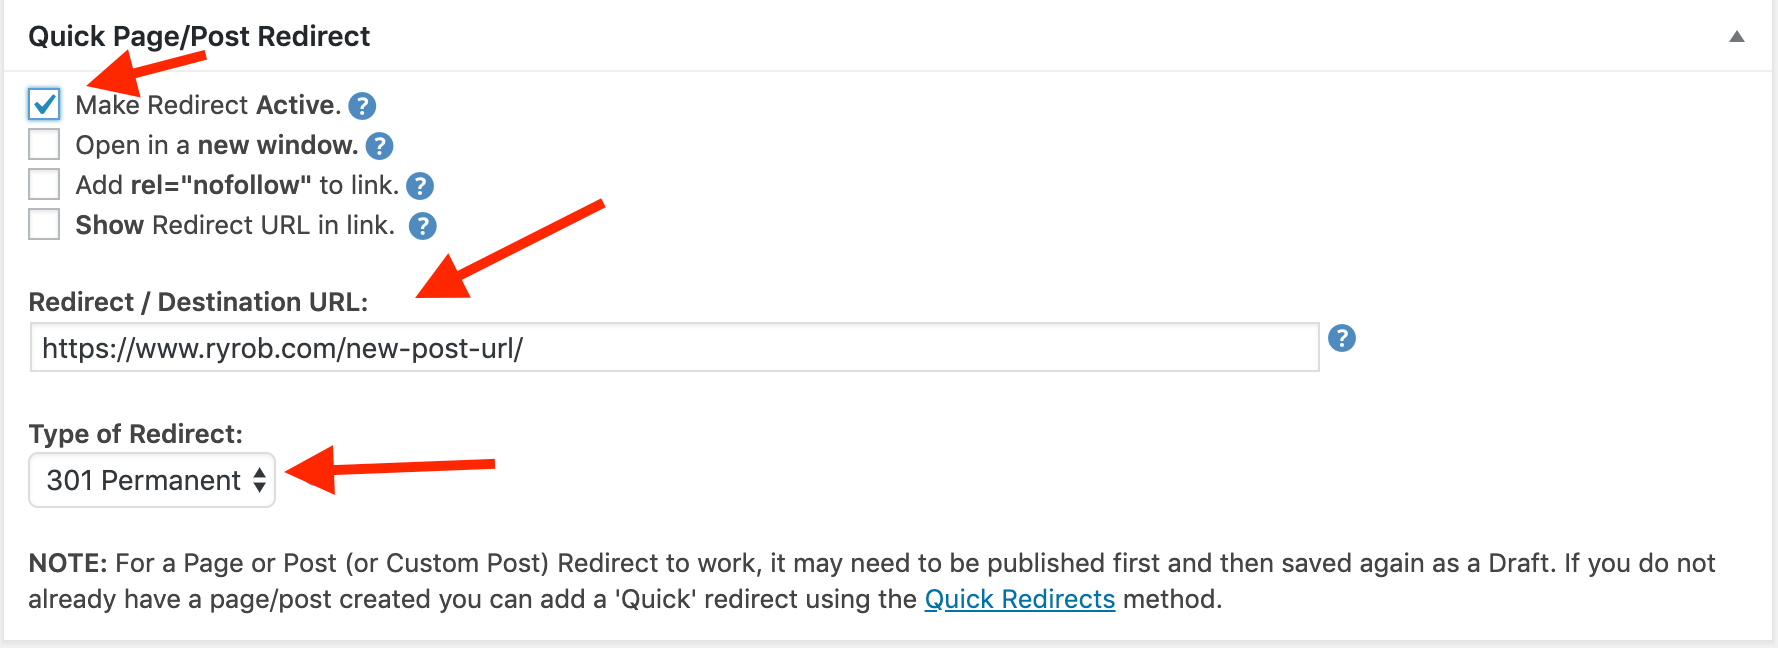
Redirecting a URL with quick redirect plugin
Changing the URL (permalink) of an existing blog post without setting up a 301 redirect will result in what’s called a broken link.
Broken links are very bad for the SEO health of your website—because when someone clicks on a broken link somewhere out on the Internet or in search engine results, they’re essentially landing on a blank page that no longer exists. Especially when external links from other websites exist you don’t want them leading to broken content.
When this happens, it will lead to a high bounce rate because those visitors will immediately leave.
Search engines will notice that and decrease your organic rankings accordingly, so that they’re not sending traffic to an empty page on your website. And if you have multiple broken links on your website, search engines will likely devalue or penalize your website as a whole—resulting in an all around bad situation that’s easy to avoid.
Always 301 redirect any post or page you plan on moving to a new URL. Redirects are essential anytime you change URL structure on your website.
Correct permalink structure and importance for SEO
As a site owner, you should make every effort to ensure permalinks are SEO friendly. This is so because search engines take the URL of a web page into account for indexing and ranking. Moreover, an SEO-friendly permalink is easier to remember for website users, and since visitors can easily get an idea about the content, these permalinks are likely to generate higher click-through rates.
When changing the permalink of a web page for SEO purposes, it is important to add a 301 redirect from the old URL to the new one. If using a content management system, this can usually be done via the permalink settings option. Otherwise, it is possible to redirect a permalink via the .htaccess file.
To improve SEO performance, permalinks should be structured following these recommendations:
- They should be simple, descriptive, and easy to read.
- Keywords that are relevant to searches of potential site visitors should appear and be placed in the first few words of the permalink.
- Ideally, they should have no more than 5 words and contain no stop words.
- Words should be separated by hyphens, not underscores. Search engines treat hyphens as word delimiters, which is not the case with underscores.
PermaLink Review – My experience in using it and How does it work?
I’ve tried this software as a tester recently. I’m going to instruct you how to use this amazingly handy software and make the most honest review for you. Hence, you can trust everything from my review.
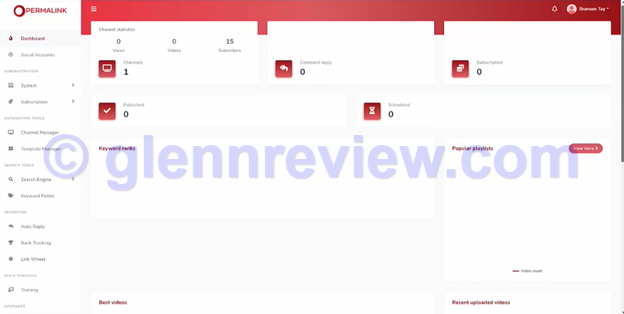
This is the interface of PermaLink once you login in. All the function tabs are on the left of the screen while in the middle is where all the information of your account stays. You can scroll down to see more featured information.
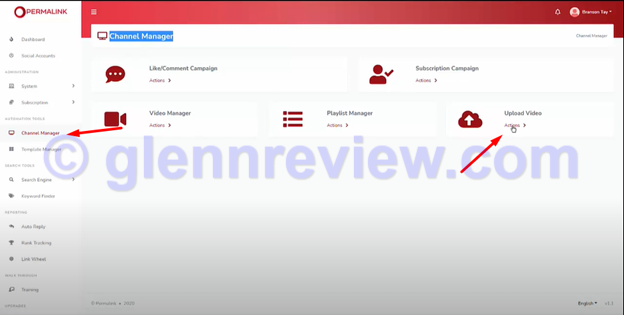
To start gaining traffic and funnel, you will need to find “Channel Manager” and the click the “activites” tab below Upload Video to view your campaigns
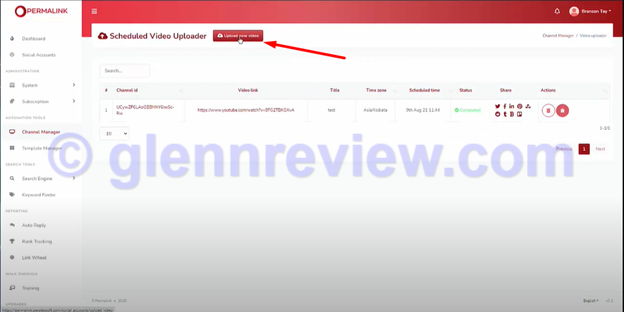
Once you are in the above stage, click “Upload new video” to continue to the next step.
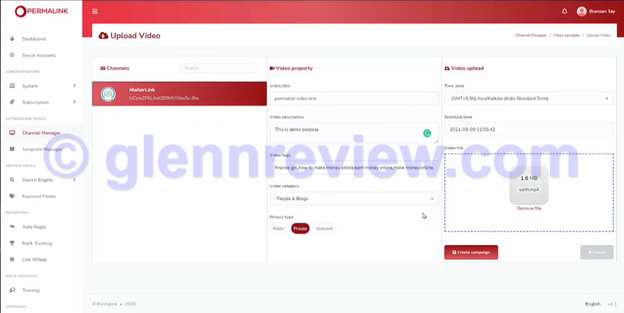
All you need to do is fill in the blanks, upload your video then click on the “Create Campaign” and everything is ready to go. For those who don’t know how to find the video tags, you can go into the “Keyword Finder” on the left.


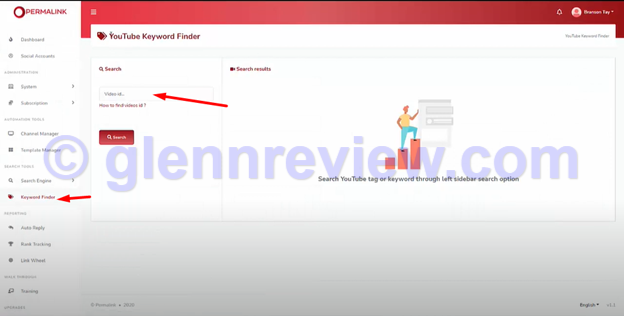
Here you can insert a video link that contains similar content to yours or merely the same and then hit “Search” to continue.
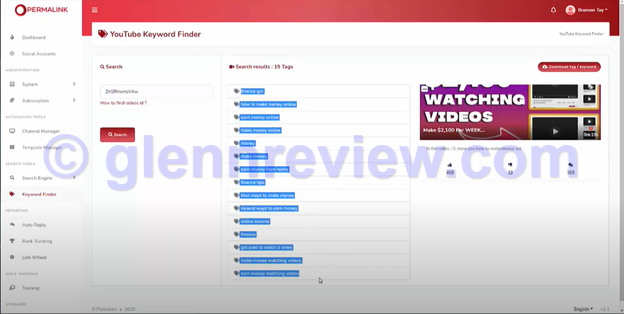
Then you can copy all the tags and paste into the “Video tags” in the “Upload video” section above.
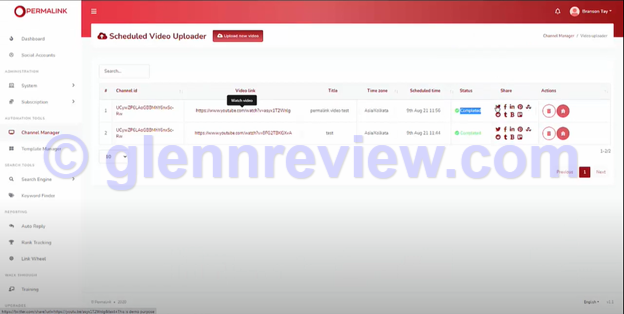
Once your video is upload and stored as a campaign, you can view the video, share it to many leading social platforms or you can take it down once you have finished with your campaign.
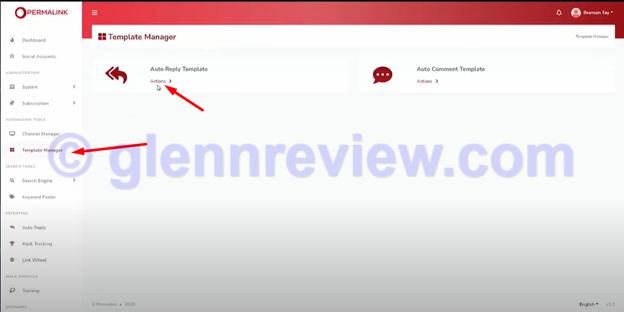
Next, we will have “Template Manager” with the first feature being “Auto Reply Template”
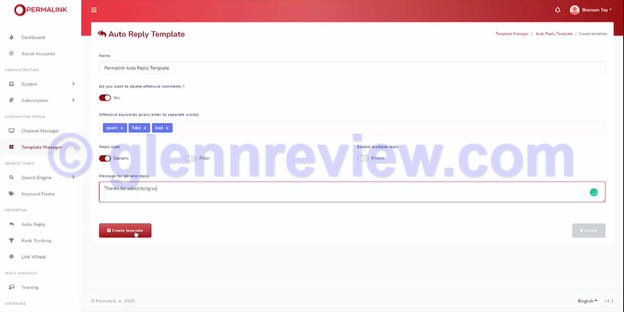
It’s very simple, all you need to do is fill in all the blanks and then “Create Campaign” to create your own auto reply template.
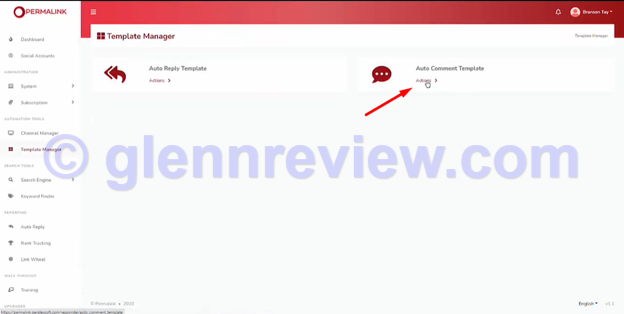
The same thing happens with “Auto Comment Template”, you will create an auto reply for the comments on your video. Click on the “Actions” to continue.
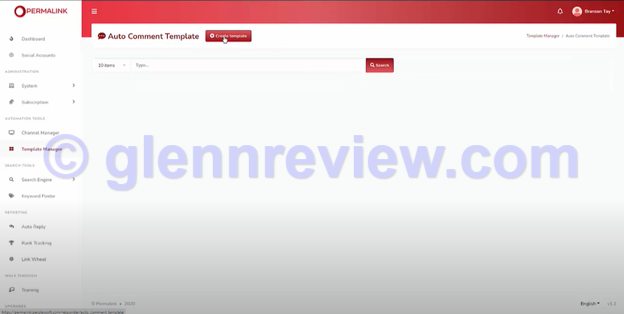
Then “Create Campaign”
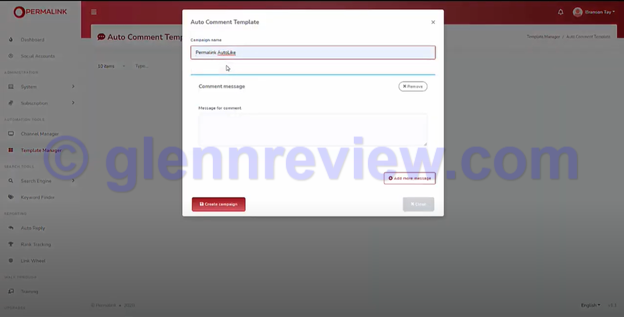
The next thing you need to do is fill in the campaign name and the message for the auto reply and hit the “Create Campaign” to finish.
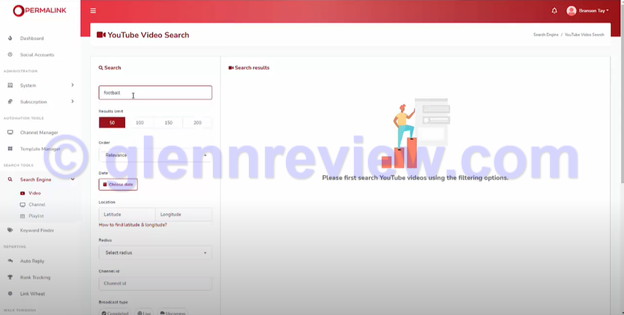
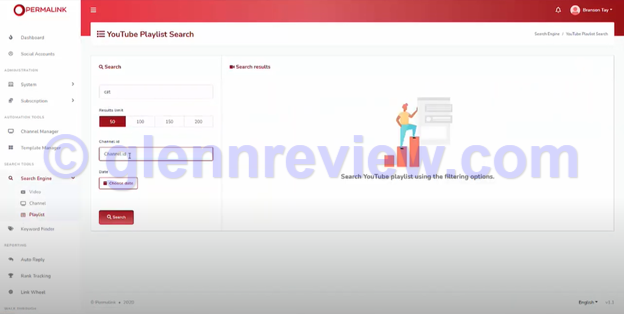
Another interesting feature of PermaLink is “Search Engine”, it will help you to find relevant tags for your videos in the making.
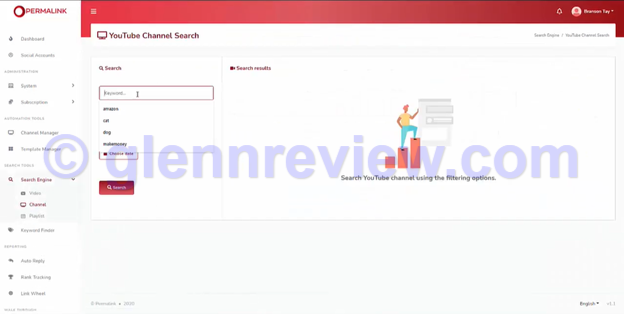
You can also search for channels or playlists as well.
That’s it, those were the main features and functions of PermaLink. If you are interested in this app, please follow the rest of this review for more interesting information.
MY OPINION:
With PermaLink, nothing needs to be worried, the developing team have created guides and training to help you with the basis of the app. It’s very easy to use, with just a few clicks of your mouse you can create traffic and leads from all the top social media outlets.
It’s definitely suitable for newbies that want to start making business, generating unlimited traffic, leads and sales with no SKILLS required. So this is the greatest chance for a newbie in making your own business, take your chance and buy it now!

Презентация на тему: » Локальная сеть в школе Построили… Молодцы! А что дальше. Сертификация СКС.» — Транскрипт:
1 Локальная сеть в школе Построили… Молодцы! А что дальше. Сертификация СКС
2 Структурированная кабельная система (СКС) это единая унифицированная кабельная система для передачи данных, голоса, видео, аудио и других сигналов в пределах локальной сети или сети предприятия. СКС позволяет объединить множество различных по своему функциональному назначению информационных систем и сервисов от различных производителей, с различными типами передающих сред.
3 СКС типичная слаботочная кабельная проводка, предназначена для передачи различных видов информационных сигналов, она не является потенциальным источником опасности для жизни и здоровья людей и не наносит ущерба окружающей среде. Поэтому правильность построения и набор характеристик СКС общего назначения при отсутствии специальных требований не контролируется органами государственного надзора, а сама кабельная система не подлежит обязательной государственной или ведомственной сертификации.
4 Обслуживание СКС IV раздел Статья 225 техническое сопровождение локально- вычислительных сетей настройка и техническая поддержка активного сетевого оборудования техническое сопровождение серверов сопровождение и обслуживание АРМ, подключенного к локальной сети техническое обслуживание устройств бесперебойного питания ремонт серверов
5 Обслуживание СКС IV раздел Статья 225 организация нового рабочего места в составе ЛВС прокладка кабеля прокладка короба разделка разъема проведение замеров кабельной сети разделка розетки установка розетки подключение к локальной сети
6 Обслуживание СКС IV раздел Статья 226 системное сопровождение серверного оборудования настройка оборудования и установка системного ПО сервера подготовка оборудования и установка системного ПО кластерной системы сопровождение и обслуживание серверов и кластерных систем установка и настройка клиент-серверного ПО устранение ошибок при репликации баз данных между серверами мониторинг состояния источника бесперебойного питания (ИБП)
7 Обслуживание СКС IV раздел Статья 226 системное сопровождение активного оборудования вычислительных сетей установка и запуск в эксплуатацию коммутаторов с аппаратно-программой настройкой установка и запуск в эксплуатацию маршрутизаторов и маршрутизирующих коммутаторов сопровождение сетевого оборудования, не требующего аппаратно- программной настройки (концентраторы) сопровождение активного сетевого оборудования с аппаратно-программной настройкой (комутаторы) сопровождение оборудования сетевых центров (модульные маршрутизаторы и коммутаторы, маршрутизирующие коммутаторы) сопровождение активного сетевого оборудования с аппаратно-программной настройкой (маршрутизаторы) сервисное сопровождение и обслуживание программного обеспечения активного сетевого оборудования
8 Если строит фирма… предварительное обследование объекта инженерами и проектировщиками; разработка предпроектной документации; подготовка сметной документации; внедрение структурированных кабельных систем; тестирование и диагностика СКС; создание и предоставление проектной документации; сдача системы в коммерческую эксплуатацию; гарантийное и послегарантийное обслуживание; организация сертификации СКС от вендора;
9 Если строим сами… Эксплуатируем как есть Делаем модернизацию с разработкой технической документации. Проводим тестирование и паспортизацию СКС Пройти сертификацию (получить системную гарантию) не сможем
Современная школа – это новое современное образование, которое можно получить, в том числе, с помощью нового оборудования в новом общественно – культурном пространстве. Чтобы все школьное пространство обеспечить работой различных электронных систем, необходимо установить структурированную кабельную систему в школе.
Задайте сейчас вопрос мастеру по телефону
Создание надежной управляемой системы жизнеобеспечения школы – задача непростая и ответственная. Поэтому для разработки проекта скс школы стоит обращаться к профессионалам, которые не только спроектируют нужную систему, но и установят ее. Все сети связаны воедино и дополняют друг друга, поэтому проводить монтаж разными организациями нецелесообразно. Установка системы самим проектировщиком – это дополнительная гарантия надежности. И, если, в дальнейшем, понадобится выполнить ремонт скс , фирма, устанавливающая скс, сможет разрешить этот вопрос быстрее и качественнее.
Наше портфолио
Все фото смотрите на странице – наша работа .
Небольшие нюансы
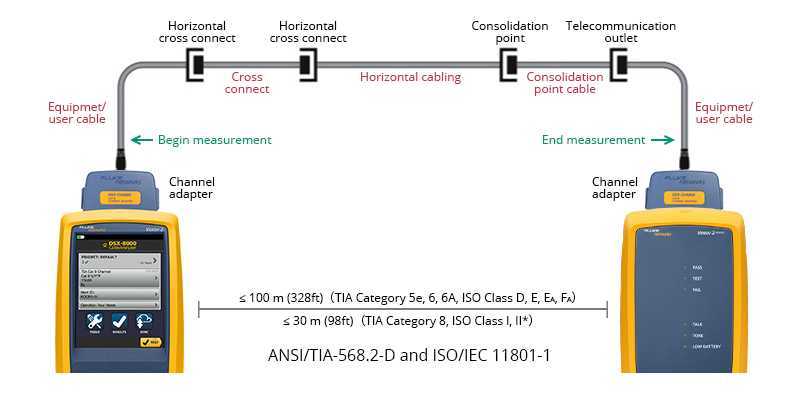
Длина стационарной линии (без коммутационных шнуров) на базе витопарного кабеля должна быть не более 90 м – знают все, но это только “базовая” длина. В случае использования точек консолидации, длинных коммутационных шнуров (более 5 м), а также температуре окружающей среды более 20 °С – используются “чудо”-формулы (в каждом стандарте своя).
Медные кабели нужно жгутовать в пучки не более чем по 24 шт. (ГОСТ Р 56555-2015, п. 4.3).
Для оптических линий необходимо соблюдать полярность – для этого (при использовании разъемов Duplex LC/SC) возможно использовать переворачивание соединителя в оптическом кроссе или переворачивать волокна – более подробные картинки приведены в ANSI/TIA-568-C.0-2009 раздел B.3


Обратите внимание, что основа – “перевернутые” шнуры A-B
При тестировании медных линий необходимо указывать не только стандарт и категорию, но и выставлять параметр NVP для кабеля (берется из документации). Причем тестирование нужно делать с использованием шнуров поставляемых в составе СКС, а не каким-нибудь модным (высокой категории, розового цвета и т.п.). Наиболее распространенная схема тестирования – Permanent link.
Why Should We Do Fluke Test
Users expect their Ethernet network cabling to work perfectly, but some users are likely to cut the corners and skip the cable testing process during installation, which can make them fail to find out the cable issues, directly resulting in network downtime. This problem can be avoided by adopting professional testers (such as Fluke network testers) to help locate faults quickly.
Fluke testers have great capabilities when it comes to troubleshooting cable, all while maintaining a higher grade of accuracy. It can not only graphically display failures including crosstalk, return loss and shield faults, but also analyze the test results and deliver a professional Fluke test report. Besides, Fluke testers will allow you to track and archive your test results for future reference. Having data to reference is especially important, as the same network may be tested multiple times over a span of a few years. Using professional Fluke network testers, you can download software in order to keep all the various test results and network tester information in one place, which makes it easier to manage the job. The following content explains different Fluke tests in detail.
Permalinks in blogs
Permalinks are a common feature in blog sites, although their appearance may vary. For example, a typical URL address for a blog would be:
www.yourwebsite.com/blog.html
For a standalone blog (not associated with a parent website), a typical URL address would look like this:
www.yourblogname.com
Within the first example, a permalink leading to a blog article would be:
www.yourwebsite.com/blog/your-first-blog-post.html
In the second example, the URL permalink would be:
www.yourblogname.com/your-first-blog-post.html
Two of the most common types of blog permalinks are:
www.yourwebsite.com/blog/how-to-improve-your-blog-ranking.html
www.yourwebsite.com/blog.php?artid1
In this case, ‘artid1’ refers to the blog post’s ID number that appears in the database where blog content is stored.
Generally, a semantic description with relevant keywords is often the first choice, depending on the content management system you use. For websites with lots of pages, this can be supplemented by generic number combinations.
In WordPress, for example, the permalink for a new article can be edited right below the title:
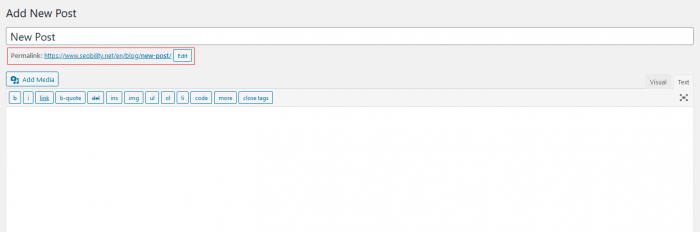
Screenshot of WordPress
Оборудование и материалы
Базовый принцип: все компоненты линии связи должны быть одного производителя (т.е. коммутационные шнуры, разъемы/кросс и кабель).
Для линий связи на базе медных витопарных кабелей рекомендую придерживаться следующих принципов:
- использовать коммутационные панели с кабельной поддержкой сзади модульного типа (наборные) , так как “переразделать” порт в существующей “моноблочной” панели практически нереально (не затронув при этом соседние рабочие порты);
- прежде чем использовать угловые коммутационные панели – пощупайте их и попробуйте вытащить коммутационный шнур из крайних портов;
- применять “безинструментальные” модули RJ45 – можно добиться более “стабильной” разделки;
- экранированные системы использовать только в случае реальной потребности, так как экранированные кабели (в том числе и коммутационные шнуры) менее гибкие и более неудобны в эксплуатации;
- не применять соединители отличные от RJ45 (никаких 110-кроссов и их модификаций, типа VisiPatch 360 от Systimax – хотя выглядит здорово и место неплохо экономит);
- при проектировании сразу закладывать необходимые коммутационные шнуры, а не “лепить” их на месте (что запрещено);
- при проектировании СКС на объектах, отличных от офисов – тщательно продумывать дополнительные аксессуары (например, в школе не лишним будет предусмотреть механическую блокировку разъемов RJ45 – есть например у R&M);
- ознакомиться со статьей Кабель витая пара для сетей Ethernet;
- кабельных организаторов много не бывает (хотя они как таковые не входят в СКС)
Также есть немного комментариев по оптическим линиям:
- для монтажа новых систем не рекомендуется прокладывать волоконно-оптические линии OM1, OM2, и OS1 (ISO11801: 2017);
- на магистральных линиях в офисных зданиях обычно прокладываются многомодовые линии, а вот на заводах – одномодовые;
- если используются наружные магистрали – то использовать кабели в универсальной изоляции (чтобы не делать переходную муфту);
- применять разъемы Duplex LC или SC, а вот MPO/MTP – оставьте “большим” ЦОДам (да и характеристики у много-волоконных разъемов похуже). Использовать кроссы высокой плотности нужно только там, где это обосновано, так как они менее удобны в эксплуатации;
- ознакомиться со статьей Волоконно-оптические линии связи (ВОЛС).
На больших объектах рекомендую избегать “отечественных” производителей СКС (например, ITK, Cabeus, Hyperline – были отрицательные отзывы у монтажников). Но это “имхо”…
В спецификацию оборудования раздела СКС зачастую включают ИБП – это скорее из разряда “всегда так делаем”.


