
Prerequisites and Assumptions
This article assumes the following prerequisites are in place.
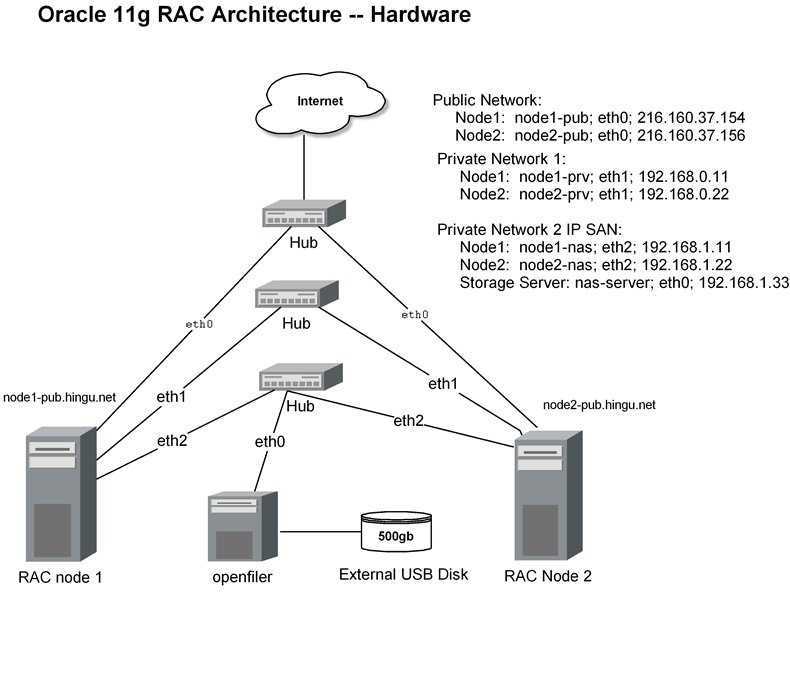
- A functioning database server. In this case we are using Oracle 12c (12.1.0.2) running on Oracle Linux 7 (OL7) and the server name is «ol7-121.localdomain». The setup is the same for other versions of the database and Linux.
- A client machine with an Oracle Client installed. In this case we are using an Oracle 11.2.0.3 client installed on a Windows 7 PC called «my-computer».
- There are no local or network firewalls blocking communication with the server on port 2484.
- The examples in this article use self signed certificates, but you can just as easily use proper certificate authority certificates if you prefer. This is probably not necessary as you will only be using these certificates inside your own organisation, or possibly to communicate between your on-premise and cloud infrastructure.
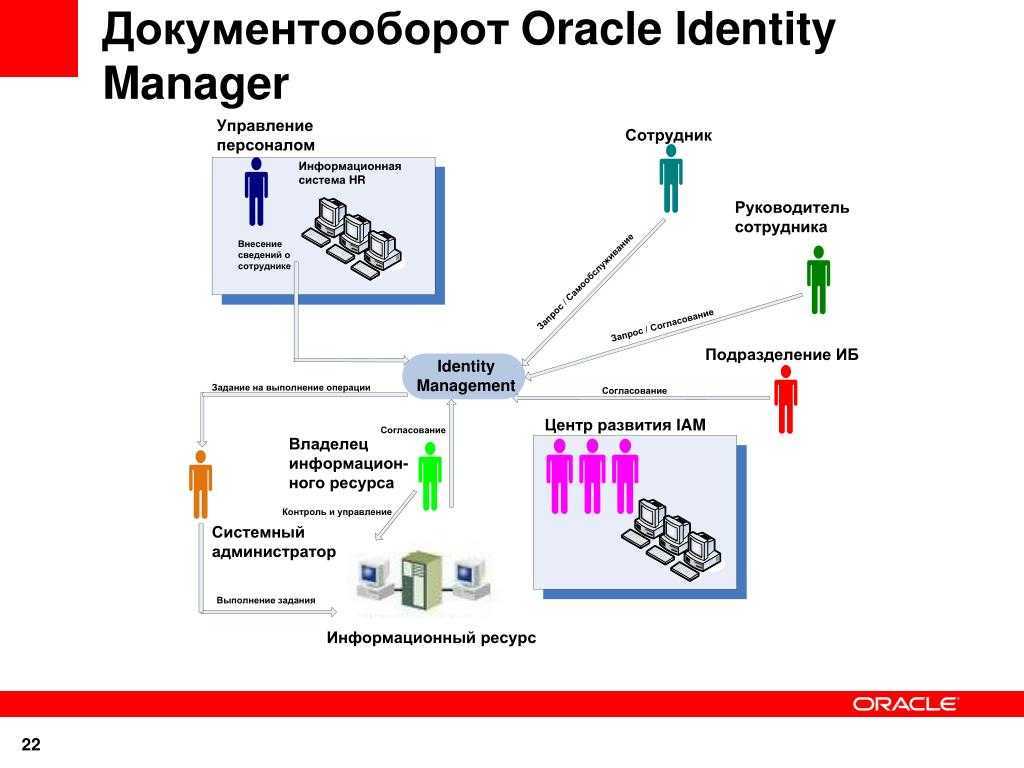
15.3 Configuring Multiple Authentication Methods
Many networks use more than one authentication method on a single security server. Accordingly, Oracle Advanced Security lets you configure your network so that Oracle clients can use a specific authentication method, and Oracle database servers can accept any method specified.
You can set up multiple authentication methods on both client and server systems either by using Oracle Net Manager, or by using any text editor to modify the file.
Use Oracle Net Manager to add authentication methods to both clients and servers (Refer to )
Following steps describe how to configure Multiple authentication Methods.
-
Navigate to the Oracle Advanced Security profile. Refer to . The Oracle Advanced Security tabbed window is displayed as shown in .
-
Click the Authentication tab.
-
Select a method listed in the Available Methods list.
-
Sequentially move selected methods to the Selected Methods list by clicking the right arrow (>).
-
Arrange the selected methods in order of desired use. To do this, select a method in the Selected Methods list, and select Promote or Demote to position it in the list.
-
Select File, then Save Network Configuration.
The file is updated with the following entry, listing the selected authentication methods:
SQLNET.AUTHENTICATION_SERVICES = (KERBEROS5, RADIUS)
Note:
SecurID functionality is available through RADIUS; RADIUS support is built into the RSA ACE/Server.
Внешняя аутентификация
Если аккаунт был создан с директивой внешней аутентификации, Oracle делегирует аутентифкацию внешнему сервису; т.е. не будет запрошен пароль. Если куплена Advanced Security Option, то внешним сервисом может быть сервер Kerberos, сервер RADIUS или сервис аутентификации Windows. Когда пользователь пытается подключиться к аккаунту, вместо аутентификации пользователя, БД будет разрешать (или не разрешать) подключение в зависимости от того авторизован или пользователь во внешнем сервисе. Например если используется Kerberos – БД проверит существует ли у пользователя валидный Kerberos токен. Без Advanced Security Option – единственно доступной формой внешней аутентификации будет аутентификация ОС. Это требует прав SYSDBA или SYSOPER (как описано выше) но может быть использовано и для обычных аккаунтов. Необходимо создать пользователя Oracle с таким же именем как и аккаунт ОС с префиксом указанном в параметре OS_AUTHENT_PREFIX. По умолчанию значение OPS$. Для проверки значения можно использовать запрос
select value from v$parameter where name=’os_authent_prefix’
В Linux/Unix внешняя аутентификация ОС работает очень просто. Предполагая что значение OS_AUTHENT_PREFIX осталось по умолчанию и есть пользователь ОС с именем jwatson, можно создать пользователя Oracle и дать права подключения следующим образом
create user ops$jwatson identified externally;
grant create session to ops$jwatson;
Пользователь подключенный к ОС как jwatson сможет подключиться к БД выполнив команду
sqlplus /
из командной строки ОС и будет подключен к БД как пользователь ops$jwatson.
В Windows обычно используется домен и тогда команда создания пользователя будет вида
create user «OPS$JWACER\JOHN WATSON» identified externally;
TIP
Using external authentication can be very useful, but only if the users
actually log on to the machine hosting the database. Users will rarely do this,
so the technique is more likely to be of value for accounts used for running
maintenance or batch jobs.
Overview of Windows Native Authentication
Oracle Database can use Windows user login to database users. Benefits include:
-
Enabling users to connect to Oracle Database without supplying a or password
-
Centralizing Oracle Database user authentication and role information in Windows, which frees Oracle Database from storing or managing user passwords or information
The Windows native authentication adapter (automatically installed with ) enables database user authentication through Windows. This enables client computers to make secure connections to Oracle Database on a Windows server. The server then permits the user to perform database actions on the server.
About Administrative Accounts and Privileges
Administrative accounts and privileges enable you to perform administrative functions like managing users, managing database memory, and starting up and shutting down the database.
This section contains the following topics:
See Also:
The SYS and SYSTEM Users
The following administrative user accounts are automatically created when you install Oracle Database Express Edition (Oracle Database XE). They are both created with the password that you supplied upon installation (Windows operating systems) or configuration (Linux operating systems).
-
This is the user account that you log in with to perform all administrative functions other than starting up and shutting down the database.
-
All base tables and views for the database data dictionary are stored in the schema. These base tables and views are critical for the operation of Oracle Database XE. To maintain the integrity of the data dictionary, tables in the schema are manipulated only by the database. They should never be modified by any user or database administrator. You must not create any tables in the schema.
There is typically no reason to log in as user . User is preferred for all administrative tasks except starting up and shutting down. See for more information.
See Also:
The SYSDBA System Privilege
is a system privilege that is assigned only to user . It enables to perform high-level administrative tasks such as starting up and shutting down the database.
Although under typical circumstances it is not necessary to log in to the database as user , if you want to log in as with the SQL Command Line (SQL*Plus), you must connect to the database » .» Connecting invokes the privilege. If you omit the clause when logging in as user , the SQL Command Line rejects the login attempt.
The following example illustrates how to connect to the database with the privilege from the SQL Command Line:
SQL > connect sys/password as sysdba
is the password for the user account.
Caution:
When you connect as user , you have unlimited privileges on data dictionary tables. Be certain that you do not modify any data dictionary tables.
See Also:
2.1 Network Encryption and Strong Authentication Configuration Tools
Oracle Net Services can be configured to encrypt data using standard encryption algorithms, and for strong authentication methods, such as Kerberos, RADIUS, and SSL. The following sections introduce the Oracle tools you can use to configure these advanced security features for an Oracle Database:
2.1.1 Oracle Net Manager
Oracle Net Manager is a graphical user interface tool, primarily used to configure Oracle Net Services for an Oracle home on a local client or server host.
Although you can use Oracle Net Manager to configure Oracle Net Services, such as naming, listeners, and general network settings, it also enables you to configure the following Oracle Advanced Security features, which use the Oracle Net protocol:
-
Strong authentication (Kerberos, RADIUS, and Secure Sockets Layer)
-
Network encryption (Triple-DES and AES)
-
Checksumming for data integrity (SHA-1)
This section introduces you to the features of Oracle Net Manager that are used to configure Oracle Advanced Security. It contains the following topics:
-
See Also:
-
for information about the tasks you can perform with this tool that configure advanced security features
-
Oracle Database Net Services Administrator’s Guide and Oracle Net Manager online Help for complete documentation of this tool
-
2.1.1.1 Starting Oracle Net Manager
You can start Oracle Net Manager by using Oracle Enterprise Manager Console or as a standalone application. However, you must use the standalone application to access the Oracle Advanced Security Profile where you can configure Oracle Advanced Security features.


To start Oracle Net Manager as a standalone application:
-
(UNIX) From , enter the following at the command line:
netmgr
-
(Windows) Select Start, Programs, Oracle — HOME_NAME, Configuration and Migration Tools, Net Manager
2.1.1.2 Navigating to the Oracle Advanced Security Profile
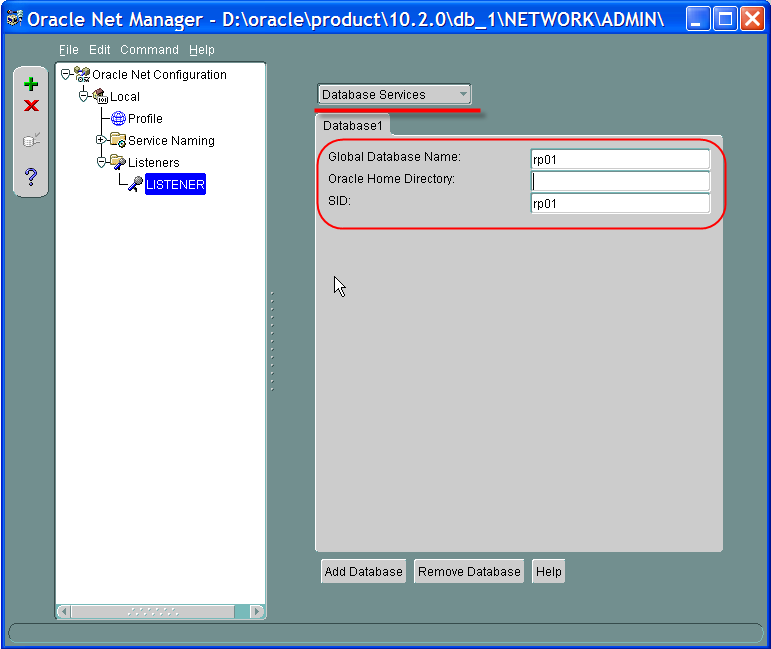
The Oracle Net Manager interface window contains two panes: the navigator pane and the right pane.The interface displays various property sheets that enable you to configure network components. When you select a network object in the navigator pane, its associated property sheets displays in the right pane. To configure Oracle Advanced Security features, select the Profile object in the navigator pane, and then select Oracle Advanced Security from the list in the right pane, as shown in .
Figure 2-1 Oracle Advanced Security Profile in Oracle Net Manager
 Description of »Figure 2-1 Oracle Advanced Security Profile in Oracle Net Manager»
2.1.1.3.1 Authentication Property Sheet
Use this property sheet to select a strong authentication method, such as Kerberos Version 5 (KERBEROS5), Windows native authentication (NTS), or RADIUS.
2.1.1.3.2 Other Params Property Sheet
Use this property sheet to set other parameters for the authentication method you selected on the Authentication property sheet.
2.1.1.3.3 Integrity Property Sheet
Use this property sheet to enable checksumming on the client or the server and to select an encryption algorithm for generating secure message digests.
2.1.1.3.4 Encryption Property Sheet
Use this property sheet to select one or more s to encrypt client or server connections with native encryption algorithms.
Аутентификация ОС и файлом паролей
Для разрешения аккаунту использования этих методов аутентификации (эти два типа используется вместе) необходимо назначить аккаунта расширенные права SYSDBA или SYSOPER
GRANT TO username;
Назначение этих прав скопирует пароль аккаунта из словаря данных во внешний файл паролей, откуда он может быть считан экземпляром даже если БД ещё не открыта. Это также позволит экземпляру аутентифицировать пользователей путём проверки принадлежит ли пользователь группе-владельцу программ Oracle. После установки БД единственный аккаунт с этими правами – это SYS.
Для использования файла паролей можно использоуть следующий синтаксис
CONNECT username/password AS ;
Аутентификация с помощью файла паролей можно использовать для подключения к удалённой БД используя Oracle Net
Чтобы использовать авторизацию ОС пользователсь должен быть авторизован ОС с доступом к исполняемым файлам Oracle и затем можно выполнить команду
CONNECT / AS
Пароли ОС не хранятся Oracle и поэтому не может быть проблем со сменой пароля.
Эквивалентом этой команды может быть подключения через Database Control при выбранном значении SYSDBA в списке Connect As. Для определения у кого есть пава SYSDBA и SYSOPER можно выполнить запрос к представлению V$PWFILE_USERS. Подключение с использованием аутентифкации файлом паролей или ОС всегда доступно вне зависимости от состояния экземпляра и БД и такой вид подключения необходим для выполнения команд STARTUP и SHUTDOWN.
Третий вид привилегий SYSASM но это выходит за рамки этого курса.
Support for Oracle Advanced Security
Oracle Advanced Security provides the following security features:
-
Data Encryption
Sensitive information communicated over enterprise networks and the Internet can be protected by using encryption algorithms, which transform information into a form that can be deciphered only with a decryption key. Some of the supported encryption algorithms are RC4, DES, 3DES, and AES.
To ensure data integrity during transmission, Oracle Advanced Security generates a cryptographically secure message digest. Starting from Oracle Database 12c Release 1 (12.1), the SHA-2 list of hashing algorithms are also supported and Oracle Advanced Security uses the following hashing algorithms to generate the secure message digest and includes it with each message sent across a network:
-
MD5
-
SHA1
-
SHA256
-
SHA384
-
SHA512
This protects the communicated data from attacks, such as data modification, deleted packets, and replay attacks.
The following code snippet shows how to calculate the checksum using any of the algorithms mentioned previously:
prop.setProperty(OracleConnection.CONNECTION_PROPERTY_THIN_NET_CHECKSUM_TYPES, "( MD5, SHA1, SHA256, SHA384 or SHA512 )");
prop.setProperty(OracleConnection.CONNECTION_PROPERTY_THIN_NET_CHECKSUM_LEVEL, "REQUIRED");
-
-
Strong Authentication
To ensure network security in distributed environments, it is necessary to authenticate the user and check his credentials. Password authentication is the most common means of authentication. Oracle Database enables strong authentication with Oracle authentication adapters, which support various third-party authentication services, including SSL with digital certificates. Oracle Database supports the following industry-standard authentication methods:
-
Kerberos
-
Remote Authentication Dial-In User Service (RADIUS)
-
Secure Sockets Layer (SSL)
-
See Also:
JDBC OCI Driver Support for Oracle Advanced Security
If you are using the JDBC OCI driver, which presumes that you are running from a computer with an Oracle client installation, then support for Oracle Advanced Security and incorporated third-party features is fairly similar to the support provided by in any Oracle client situation. Your use of Advanced Security features is determined by related settings in the file on the client computer.
Note:
Starting from Oracle Database 12c Release 1 (12.1), Oracle recommends you to use the configuration parameters present in the new XML configuration file instead of the OCI-specific configuration parameters present in the file. However, the configuration parameters present in the file are still supported. For more information about the file, see .
Starting from Oracle Database 11g Release 1, the JDBC OCI driver attempts to use external authentication if you try connecting to a database without providing a password. The following are some examples using the JDBC OCI driver to connect to a database without providing a password:
SSL Authentication
Using SSL authentication to connect to the database.
Example 9-1 Using SSL Authentication to Connect to the Database
import java.sql.*;
import java.util.Properties;

public class test
{
    public static void main( String [] args ) throws Exception
    {
        String url = "jdbc:oracle:oci:@"
         +"(DESCRIPTION=(ADDRESS=(PROTOCOL=tcps)(HOST=localhost)(PORT=5221))"
         +"(CONNECT_DATA=(SERVICE_NAME=orcl)))";
        Driver driver = new oracle.jdbc.OracleDriver();
        Properties props = new Properties();
        Connection conn = driver.connect( url, props );
        conn.close();
    }
}
Using Data Source
uses a data source to connect to the database.
Example 9-2 Using a Data Source to Connect to the Database
import java.sql.*;
import javax.sql.*;
import java.util.Properties;
import oracle.jdbc.pool.*;

public class testpool {
    public static void main( String args ) throws Exception
    { String url = "jdbc:oracle:oci:@" +"(DESCRIPTION=(ADDRESS=(PROTOCOL=tcps)(HOST=localhost)(PORT=5221))"
 +"(CONNECT_DATA=(SERVICE_NAME=orcl)))";
    OracleConnectionPoolDataSource ocpds = new OracleConnectionPoolDataSource();
    ocpds.setURL(url);
    PooledConnection pc = ocpds.getPooledConnection();
    Connection conn = pc.getConnection();
    }
    }
JDBC Thin Driver Support for Oracle Advanced Security
Support for Kerberos
Kerberos is a network authentication protocol that provides the tools of authentication and strong cryptography over the network. Kerberos helps you secure your information systems across your entire enterprise by using secret-key cryptography. The Kerberos protocol uses strong cryptography so that a client or a server can prove its identity to its server or client across an insecure network connection. After a client and server have used Kerberos to prove their identity, they can also encrypt all of their communications to assure privacy and data integrity as they go about their business.
The Kerberos architecture is centered around a trusted authentication service called the key distribution center, or KDC. Users and services in a Kerberos environment are referred to as principals; each principal shares a secret, such as a password, with the KDC. A principal can be a user such as or a database server instance.
Starting from 12c Release 1, Oracle Database also supports cross-realm authentication for Kerberos. If you add the referred realm appropriately in the section of the kerberos configuration file, then being in one particular realm, you can access the services of another realm.
This section contains the following subsections:
Configuring Windows to Use Kerberos
A good Kerberos client providing and other tools, can be found at the following link:
http://web.mit.edu/kerberos/dist/index.html
This client also provides a nice GUI.
You need to make the following changes to configure Kerberos on your Windows machine:
-
Right-click the My Computer icon on your desktop.
-
Select Properties. The System Properties dialog box is displayed.
-
Select the Advanced tab.
-
Click Environment Variables. The Environment Variables dialog box is displayed.
-
Click New to add a new user variable. The New User Variable dialog box is displayed.
-
Enter in the Variable name field.
-
Enter in the Variable value field.
-
Click OK to close the New User Variable dialog box.
-
Click OK to close the Environment Variables dialog box.
-
Click OK to close the System Properties dialog box.
Note:
file has the same content as file.
Configuring Oracle Database to Use Kerberos
Perform the following steps to configure Oracle Database to use Kerberos:
-
Use the following command to connect to the database:
SQL> connect system
Enter password: password
-
Use the following commands to create a user that is identified externally:
SQL> create user "CLIENT@US.ORACLE.COM" identified externally;
SQL> grant create session to "CLIENT@US.ORACLE.COM";
-
Use the following commands to connect to the database as and dismount it:
SQL> connect / as sysdba
SQL> shutdown immediate;
-
Add the following line to file:
OS_AUTHENT_PREFIX=""
-
Use the following command to restart the database:
SQL> startup pfile=t_init1.ora
-
Modify the file to include the following lines:
names.directory_path = (tnsnames)
#Kerberos
sqlnet.authentication_services = (beq,kerberos5)
sqlnet.authentication_kerberos5_service = dbji
sqlnet.kerberos5_conf = /home/Jdbc/Security/kerberos/krb5.conf
sqlnet.kerberos5_keytab = /home/Jdbc/Security/kerberos/dbji.oracleserver
sqlnet.kerberos5_conf_mit = true
sqlnet.kerberos_cc_name = /tmp/krb5cc_5088
# logging (optional):
trace_level_server=16
trace_directory_server=/scratch/sqlnet/
-
Use the following commands to verify that you can connect through SQL*Plus:
> kinit client
> klist
     Ticket cache: FILE:/tmp/krb5cc_5088
     Default principal: client@US.ORACLE.COM

     Valid starting     Expires            Service principal
     06/22/06 07:13:29  06/22/06 17:13:29  krbtgt/US.ORACLE.COM@US.ORACLE.COM


     Kerberos 4 ticket cache: /tmp/tkt5088
     klist: You have no tickets cached
> sqlplus '/@(DESCRIPTION=(ADDRESS=(PROTOCOL=tcp)(HOST=oracleserver.mydomain.com)(PORT=5221))
(CONNECT_DATA=(SERVICE_NAME=orcl)))'
Note:
For information about using Kerberos, refer to the following web sites
http://technet.microsoft.com/en-us/windowsserver/bb512919
http://access.redhat.com/knowledge/docs/
Client Wallet and Certificate
Create a new auto-login wallet.
c:\>mkdir -p c:\app\oracle\wallet

c:\>orapki wallet create -wallet "c:\app\oracle\wallet" -pwd WalletPasswd123 -auto_login_local
Oracle PKI Tool : Version 11.2.0.3.0 - Production
Copyright (c) 2004, 2011, Oracle and/or its affiliates. All rights reserved.

c:\>
Create a self-signed certificate and load it into the wallet.
c:\>orapki wallet add -wallet "c:\app\oracle\wallet" -pwd WalletPasswd123 -dn "CN=%computername%" -keysize 1024 -self_signed -validity 3650
Oracle PKI Tool : Version 11.2.0.3.0 - Production
Copyright (c) 2004, 2011, Oracle and/or its affiliates. All rights reserved.

c:\>
Check the contents of the wallet. Notice the self-signed certificate is both a user and trusted certificate.
c:\>orapki wallet display -wallet "c:\app\oracle\wallet" -pwd WalletPasswd123
Oracle PKI Tool : Version 11.2.0.3.0 - Production
Copyright (c) 2004, 2011, Oracle and/or its affiliates. All rights reserved.

Requested Certificates:
User Certificates:
Subject:        CN=my-computer
Trusted Certificates:
Subject:        OU=Class 2 Public Primary Certification Authority,O=VeriSign\, Inc.,C=US
Subject:        OU=Secure Server Certification Authority,O=RSA Data Security\, Inc.,C=US
Subject:        CN=GTE CyberTrust Global Root,OU=GTE CyberTrust Solutions\, Inc.,O=GTE Corporation,C=US
Subject:        CN=my-computer
Subject:        OU=Class 3 Public Primary Certification Authority,O=VeriSign\, Inc.,C=US
Subject:        OU=Class 1 Public Primary Certification Authority,O=VeriSign\, Inc.,C=US

c:\>
Export the certificate so we can load it into the server later.
c:\>orapki wallet export -wallet "c:\app\oracle\wallet" -pwd WalletPasswd123 -dn "CN=%computername%" -cert c:\%computername%-certificate.crt
Oracle PKI Tool : Version 11.2.0.3.0 - Production
Copyright (c) 2004, 2011, Oracle and/or its affiliates. All rights reserved.

c:\>
Check the certificate.
c:\>more c:\%computername%-certificate.crt
-----BEGIN CERTIFICATE-----
MIIBmzCCAQQCAQAwDQYJKoZIhvcNAQEEBQAwFjEUMBIGA1UEAxMLSVRTLUYxTUxDNUowHhcNMTUw
NjI2MDkzMzE2WhcNMjUwNjIzMDkzMzE2WjAWMRQwEgYDVQQDEwtJVFMtRjFNTEM1SjCBnzANBgkq
hkiG9w0BAQEFAAOBjQAwgYkCgYEAk/oX7ulDhW+DKXdD+qYC9DN7DoTsmeGZaW7EwYr48sw2qQWK
HP3pFb8/eVLHuqd2tX8RCniI6Dy5iMe7aM+BOvtGDT2bkCENO7xflww+L/Jp1JeF4OCawE36/Coy
sWAu4yom7n109ioT2rQsN62ERj8wPa53r8KAB12UnidBzRECAwEAATANBgkqhkiG9w0BAQQFAAOB
gQB7hbEUXM3ur2H2osuaX24mxmw83yxLnvx9BDi10kbTdH02St/EfCNlCWc69L5iAeJVESvaVgJQ
u1AZEeD3jPYMFWTnGfX4txo7+GJWwpxCJXqYYrmYQL2h1W6UtTVsJgQ08wo2bTHTjII6HB6wt8CK
OU46CFGLL+7B7Xrpnk1UwA==
-----END CERTIFICATE-----

c:\>
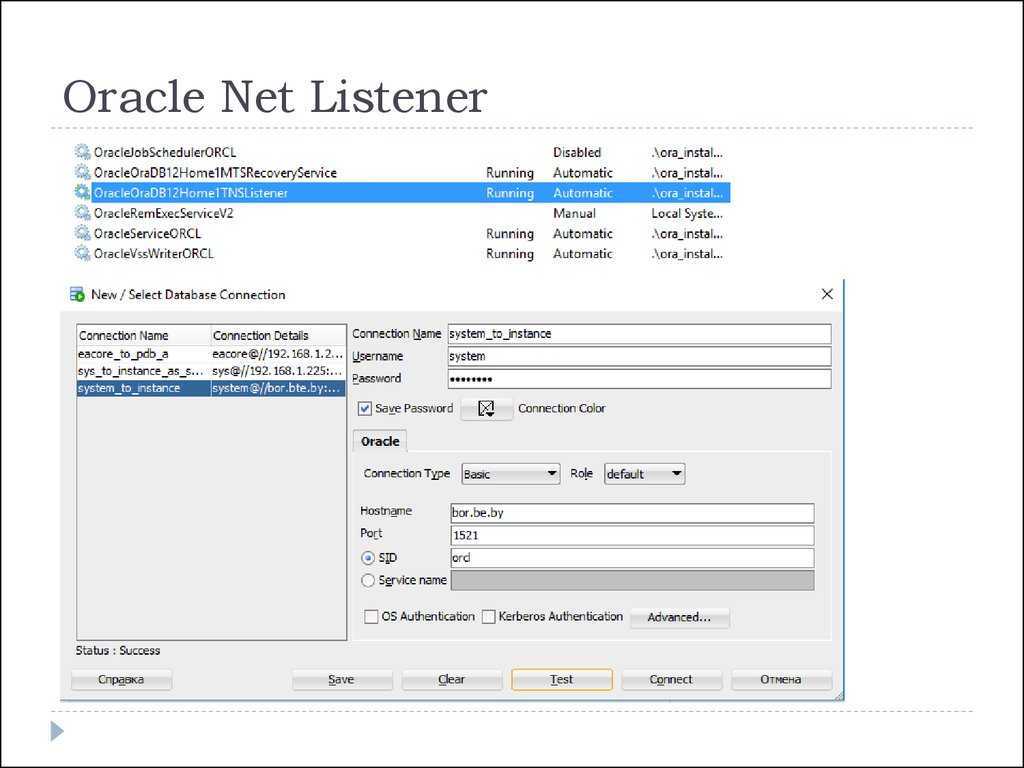
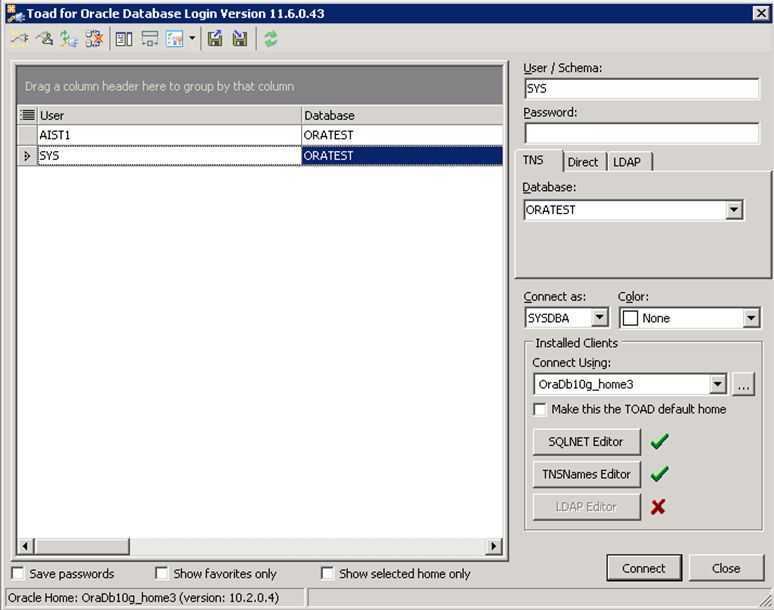
6. Соединение с инстансом (instance).
Запустите SQL*Plus и присоединитесь к экземпляру (instance) базы данных Oracle с системными привилегиями .
-
Для аутентификации с помощью password file, введите следующие команды, затем введите пароль.
$ sqlplus /nolog
SQL> CONNECT SYS AS SYSDBA
-
Для аутентификации с помощью ОС, введите такие команды:
$ sqlplus /nolog
SQL> CONNECT / AS SYSDBA
SQL*Plus выдаст следующее сообщение:
Connected to an idle instance.
Внимание. SQL*Plus может выдать следующее сообщение:
Сonnected to:
Oracle Database 11g Enterprise Edition Release 11.1.0.6.0 - Production
With the Partitioning, OLAP and Data Mining options
Это значит, что экземпляр уже запущен. Возможно, Вы присоединились к неверному экземпляру. Выйдите из SQL*Plus с помощью команды , проверьте правильно ли указан и повторите попытку.
Advanced Network Configuration
The following sections describe advanced configuration procedures specifically for Oracle Net Services on Windows operating systems:
Configuring Authentication Method
Oracle Net Services provides authentication methods for Windows operating systems using Windows Native Authentication.
Configuring Security for Named Pipes Protocol
The network listener service may be unable to open the Named Pipe created by Oracle Names unless service has a valid user ID and password associated with it.
See Also:
Your operating system documentation for instructions on setting up network listener permissions
Modifying Configuration of External Procedures for Higher Security
This section supplements generic information provided in to configure a listener on Windows operating systems to exclusively handle external procedures. For a higher level of security, you are instructed to start the listener for external procedures from a user account with lower privileges than the user. For Windows operating systems, this requires that you change the user account from LocalSystem to a local, unprivileged user for the .
Note:
The following instructions assume that you have performed steps 1 through 5 in the section «Modifying Configuration of External Procedures for Higher Security» in .
To change the listener account:
-
Create a new user account and grant it Log on as a Service privilege.
Note:
Ensure that this user account does not have general access to files owned by . Specifically, this user should not have permission to read or write to database files or to the Oracle Database server address space. In addition, this user should have read access to the file, but must not have write access to it.
-
Stop service .
See Also:
Your operating system documentation for instructions on accessing the Services dialog and stopping services
Note:
If the service does not exist, issue the following command from the command prompt:
lsnrctl start extproc_listener_name
This creates the service. When you return to the list of services, stop this service before proceeding to the next step of this procedure.
-
Select service in the Services dialog and then display the properties of the service.
-
Select This Account and enter the user name and password.
-
Start the listener by clicking Start. You must start the listener in this way because you cannot use the Listener Control utility to start the listener as an unprivileged local user.
Note:
You can also use to start the listener from the command prompt. the listener with lower privileges prevents you from using Listener Control utility commands to alter the configuration of this listener in file . You can perform other administrative tasks on this listener with the Listener Control utility, including stopping the listener. Oracle recommends that you complete file configuration before the listener.
-
Создание аккаунтов
У команды CREATE USER всего два обязательных параметра: имя и метод аутентификации. Дополнительно, можно указать табличное пространство по умолчанию и временное табличное пространство, лимиты, профили и команды блокировки аккаута и управления паролем. Пример команды (номера строк добавлены для удобства)
1 create user scott identified by tiger
2 default tablespace users temporary tablespace temp
3 quota 100m on users, quota unlimited on example
4 profile developer_profile
5 password expire
6 account unlock;
Только первая строка обязательна – существуют значения по умолчанию для всего остального. Рассмотрим пример построчно
- Имя и пароль для аутентификации паролем
- Табличное пространство по умолчанию и временное табличное пространство
- Лимиты
- Профиль для управления паролем и ресурсами
- Принудительное изменение пароля при первом подключении
- Аккаунт готов к использованию (команда по умолчанию)
Каждый параметр может быть изменён командой ALTER USER кроме имени. Для смены пароля выполните команду
alter user scott identified by lion;
Смена табличных пространств
alter user scott default tablespace store_data temporary tablespace temp;
Смена лимитов
alter user scott quota unlimited on store_data, quota 0 on users;
Смена профиля
alter user scott profile prod_profile;
Бывает необходимо удалить аккаунт, используется команда
drop user scott;
Эта команда будет выполнена успешно только если у аккаунта нет объектов: схема пуста. Если вы не хотите вначале удалять все объекты пользователя, можно использовать директиву CASCADE
drop user scott cascade;
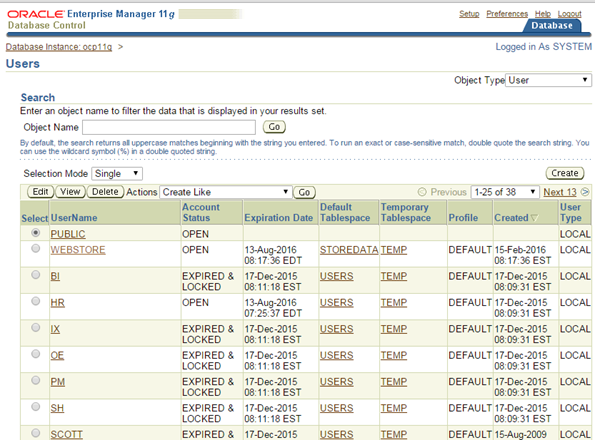 рисунок 6-3 Окно управления пользователя в Database Control
Первый аккаунт на рисунке – PUBLIC. Это формальный пользователь которому необходимо назначить права для применения прав ко всем пользователям. Кнопки CREATE и DELETE позволяют создавать и удалять пользователей.
Для изменения аттрибутов аккаунта можно выделить пользователя и нажать EDIT. Октроется окно Edit User, показанное на рисунке 6-4. Это окно можно использовать для изменения аттрибутов кроме лимитов табличных пространств. Для этого есть отдельное окно. Также здесь можно назначать и удалять права и роли.
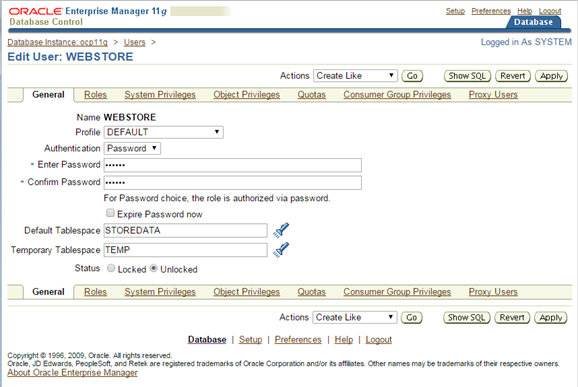 Рисунок 6-4 Редактирование аккаунта


