
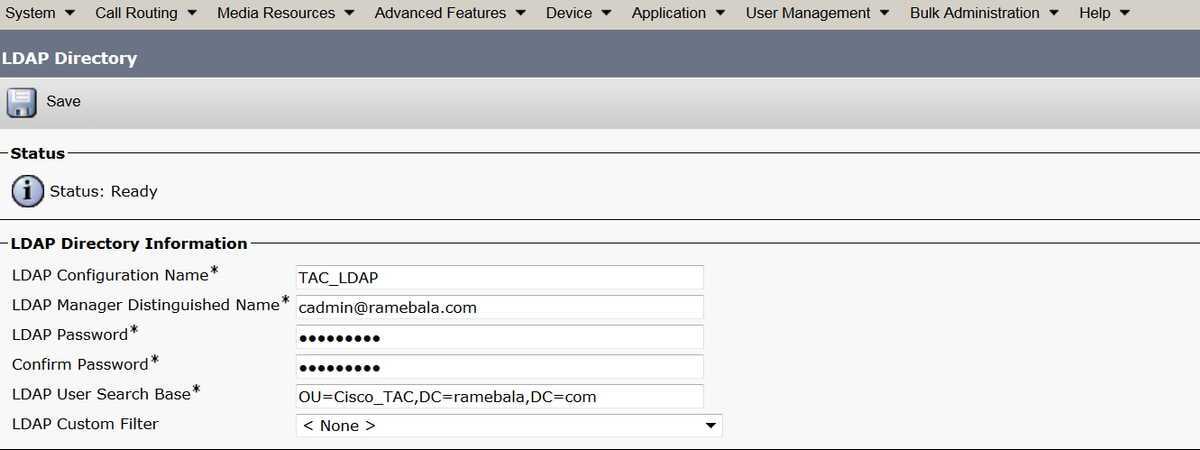
Basic LDAP Authentication
Before you begin setting up LDAP authentication you need the following information:
- Format of DNs since it will vary from company to company
- The URL of the LDAP server and corresponding firewall permissions to access it
- The port of the LDAP service – 389 by default
- An authorized LDAP DN to begin testing with
- OpenLDAP’s client tools installed on the master server for testing and debugging
OpenLDAP is an open source project that implements LDAP. Their software includes a stand-alone LDAP server as well as a set of client tools for working with LDAP servers. These client tools are extremely useful when configuring LDAP authentication with Greenplum or PostgreSQL. These tools can be downloaded here and should be installed on your cluster’s master server to aid in testing and debugging of the LDAP connection.
First, make sure networking between the LDAP server and the Greenplum master is configured correctly by using the netcat utility from the master. Telnet could also be used if netcat is not available. If this command fails then you should troubleshoot your network connection.
Next, use the ‘ldapsearch’ utility (provided by OpenLDAP) to test binding to the LDAP server. This will ensure the format of your DN is correct and your permissions have been configured correctly on the LDAP server.
If the bind was successful you should see output similar to the following. Pay special attention to the ‘search result’ section, which should show ‘0 Success’ as the result:
Now that we have verified that master has connectivity to the LDAP server and our user has permission to bind, we can configure Greenplum to use LDAP as the authentication method.
For basic authentication, the database username must be part of the LDAP DN. If your database usernames are not part of the DN, see the below section that describes how to . In the example above our dn is “uid=john,ou=People,dc=example,dc=com” so we must make sure the username “john” exists in the database.
Once we are sure the user exists we can modify the pg_hba.conf configuration file to set the authentication method for our user. Since the DN is different from the database username, and the structure of DNs can vary drastically between organizations, we must instruct Greenplum on how to construct the DN based on the username. We do this by specifying the “ldapprefix” and “ldapsuffix” parameters in our configuration. Greenplum will concatenate the ldapprefix, database username, and ldapsuffix to create the DN it sends to the LDAP server. For our example the pg_hba.conf entry should look as follows:
At this point LDAP authentication is configured and you should be able to login to the Greenplum or PostgreSQL server as normal.
Periodic Synchronization
Advanced Configuration
The configuration must be done in the handler configuration. An example can be found here (i-doit < 1.15. This file can be extended and customized with login data, tenant and attributes. The configuration file is then moved to /src/handler/config/. So that this file is considered e.g. with the ldap-sync Command, this must be indicated with the sync over a further parameter (-c /path/) also (further information to the Console).
| Parameter | Purpose |
|---|---|
|
When set to “true”, also rooms are created with the synchronization.(Default: ) |
|
|
Through this the users added by the LDAP synchronization are assigned automatically to the configured organization. (Default: ) e.g . |
|
|
Can be set to or to set users to the status archived or deleted when they cannot be found anymore via the synchronization. A user that is archived or deleted cannot log in to i-doit anymore! Or you just deactivate the login for the users. (Default: ) e.g. |
|
|
Can be set to , or to set users to the status archived or deleted when they cannot be found anymore via the synchronization. A user that is archived or deleted cannot log in to i-doit anymore! Or you just deactivate the login for the users. e.g. |
|
|
As seen in the example, an assignment of an user to a can be predefined here. The assignment is carried out via the contact assignment without a role. e.g. |
|
|
The respective fields from the directory are linked with attributes in i-doit using the “Attributes”. These complement the assigned attributes described in the above mentioned part of the guide. e.g. |
|
|
This is only relevant for Novel Directory Services (NDS) and OpenLDAP. During synchronization all users are activated again with this and deactivated according to the common principle, if applicable. e.g. |
|
|
This function helps to prevent synchronization of unwanted directory objects. The user will not be synchronized if the fails for all selected attributes. e.g. ignoreUsersWithAttributes[]=»samaccountname» |
|
|
This can be any function name which can be called through call_user_func or the defined functions. Defined functions: empty!emptyisset!isset e.g, ignoreFunction=empty |
|
|
syncEmptyAttributes |
If values were deleted/emptied from fields in AD, they are transferred to i-doit. syncEmptyAttributes=true |
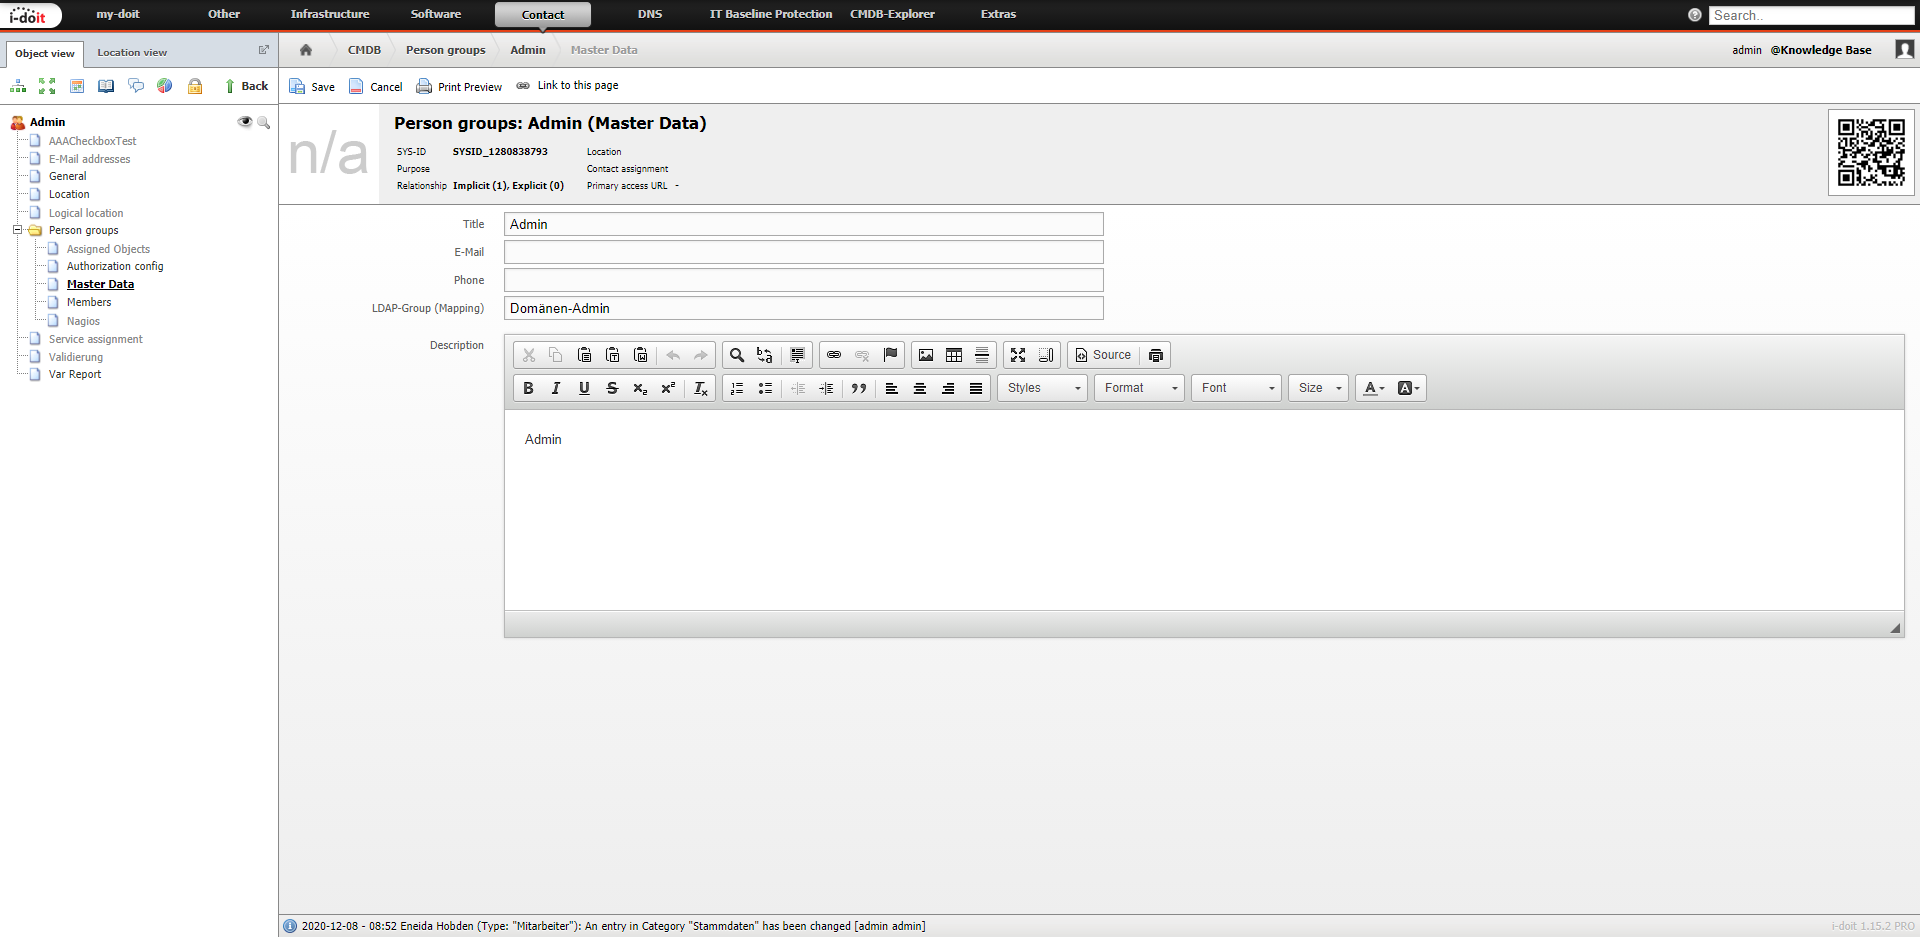
Automated Assignment of Persons to Person Groups
The automated assignment makes sure that the specified permissions of the person group are assigned automatically upon log in. The attribute in the of a has to be filled with a valid group from your directory in order for the assignment to happen. The groups assigned to the user object in the directory are queried and compared to the attribute of the i-doit person groups once a user is logging in or the synchronization is initiated. If there is a match, the group is assigned and the other groups are queried.
Let’s go
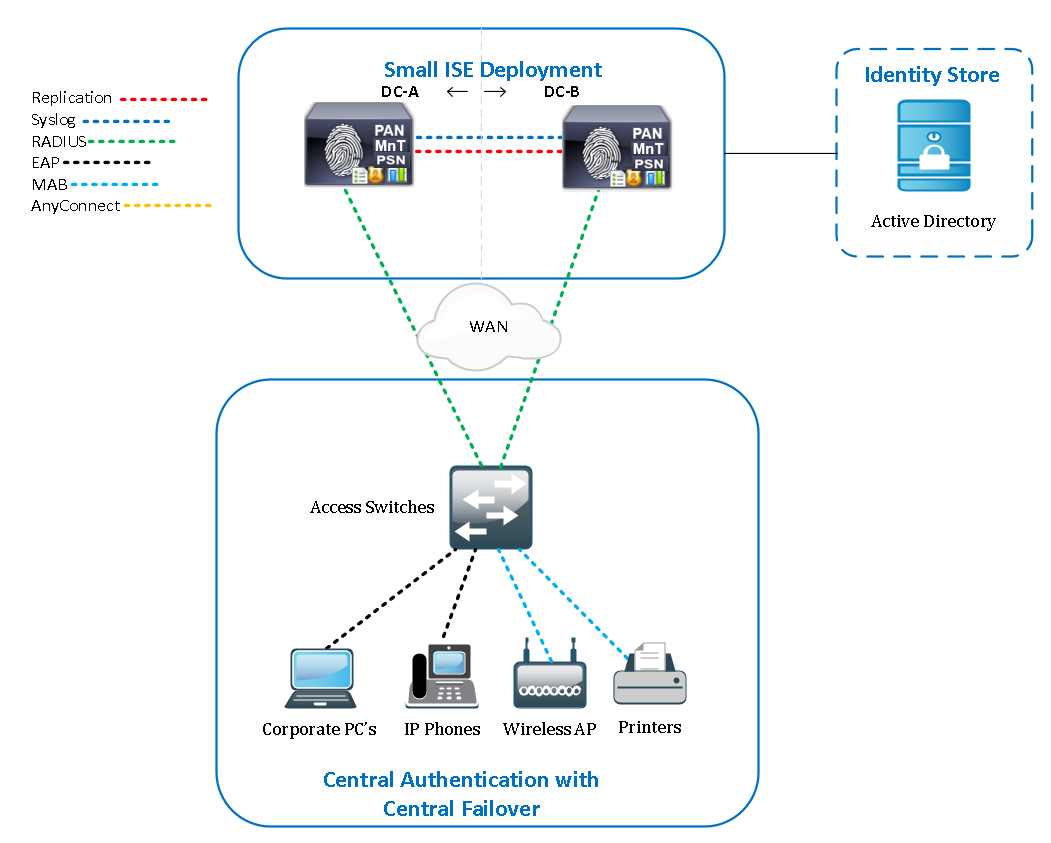
This tutorial explain how to synchronize groups from an OpenLDAP directory to Active Directory. It should be easy to adapt to your own needs.
Task
Create a task ‘group’ as a standard LSC task:
    <task>
      <name>group</name>
      <bean>org.lsc.beans.SimpleBean</bean>

      ...

      </task>
Services
We define here a source service that will read OpenLDAP groups, and a destination service that will manage AD groups. OpenLDAP groups are ‘groupsOfUniqueNames’ with ‘uniqueMember’ attribute, AD groups are ‘group’ with ‘member attribute. We choose to keep ‘cn’ as RDN on both sides:
       <asyncLdapSourceService>
        <name>group-source-service</name>
        <connection reference="openldap" />
        <baseDn>ou=groups,dc=example,dc=com</baseDn>
        <pivotAttributes>
          <string>cn</string>
        </pivotAttributes>
        <fetchedAttributes>
          <string>cn</string>
          <string>description</string>
          <string>uniqueMember</string>
        </fetchedAttributes>
        <getAllFilter><!]></getAllFilter>
        <getOneFilter><!]></getOneFilter>
        <cleanFilter><!]></cleanFilter>
        <serverType>OpenLDAP</serverType>
      </asyncLdapSourceService>
      <ldapDestinationService>
        <name>group-dst-service</name>
        <connection reference="ad" />
        <baseDn>OU=groups,OU=demo,DC=example,DC=com</baseDn>
        <pivotAttributes>
          <string>cn</string>
        </pivotAttributes>
        <fetchedAttributes>
          <string>cn</string>
          <string>description</string>
          <string>member</string>
          <string>objectClass</string>
        </fetchedAttributes>
        <getAllFilter><!]></getAllFilter>
        <getOneFilter><!]></getOneFilter>
      </ldapDestinationService>
We will now define properties:
   <propertiesBasedSyncOptions>
   ...
   </propertiesBasedSyncOptions>
We define mainIdentifier and conditions:
        <mainIdentifier>js:"cn=" + javax.naming.ldap.Rdn.escapeValue(srcBean.getDatasetFirstValueById("cn")) + ",OU=groups,OU=demo,DC=example,DC=com"</mainIdentifier>
        <defaultDelimiter>;</defaultDelimiter>
        <defaultPolicy>FORCE</defaultPolicy>
        <conditions>
          <create>true</create>
          <update>true</update>
          <delete>true</delete>
          <changeId>true</changeId>
        </conditions>
Object Class
We force the values of objectClass attribute in AD:
        <dataset>
          <name>objectclass</name>
          <policy>KEEP</policy>
          <createValues>
            <string>"group"</string>
            <string>"top"</string>
          </createValues>
        </dataset>
member
Here is the tricky part: a javascript code that will parse source members and transform them into destination members:
        <dataset>
         <name>member</name>
         <policy>FORCE</policy>
         <forceValues>
           <string>
           <!;
                for  (var i=0; i<membersSrcDn.size(); i++) {
                        var memberSrcDn = membersSrcDn.get(i);
                        var uid = "";
                        try {
                                uid = srcLdap.attribute(memberSrcDn, "uid").get(0);
                        } catch(e) {
                                continue;
                        }
                        var destDn = ldap.search("ou=users,ou=demo", "(sAMAccountName=" + uid + ")");
                        if (destDn.size() == 0 || destDn.size() > 1) {
                                continue;
                        }
                        var destMemberDn = destDn.get(0) + "," +  ldap.getContextDn();
                        membersDstDn.push(destMemberDn);
                }
                membersDstDn
           ]]>
           </string>
         </forceValues>
      </dataset>
Some explanations on this script:
-
We get DN of members in source in
- For each value, a search is done in source LDAP () to get its uid
- A search is done on destination LDAP () on sAMAccountName to get the DN corresponding to the uid value (sAMAccountName and uid are the pivot values of the user task)
- The DN found is computed with context DN () to get the real DN
- The DN is inserted into array
- The array is returned to LSC
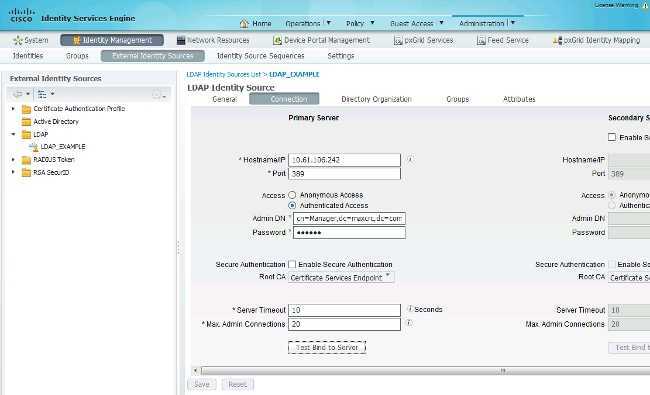
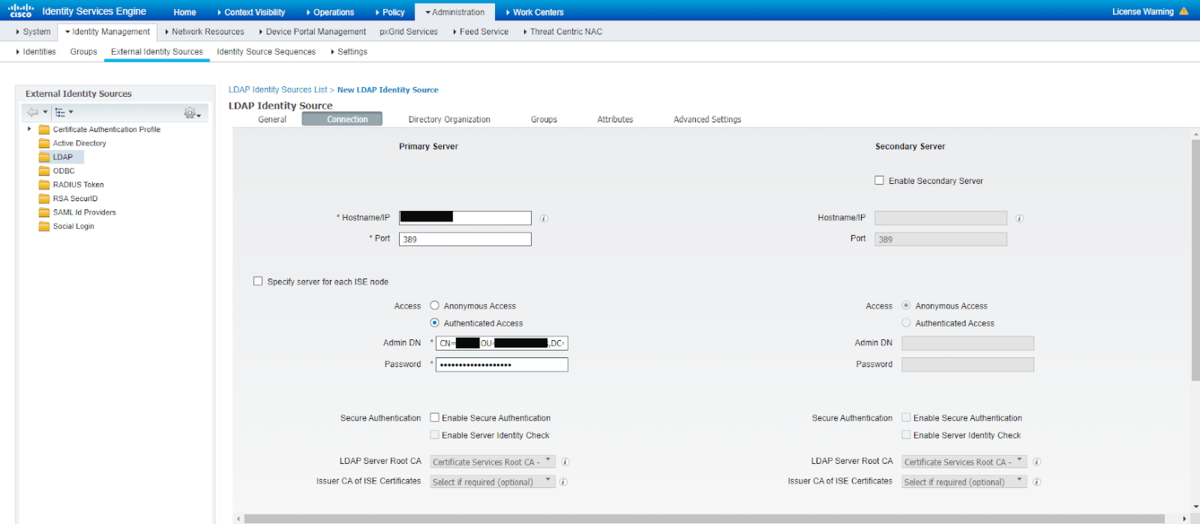
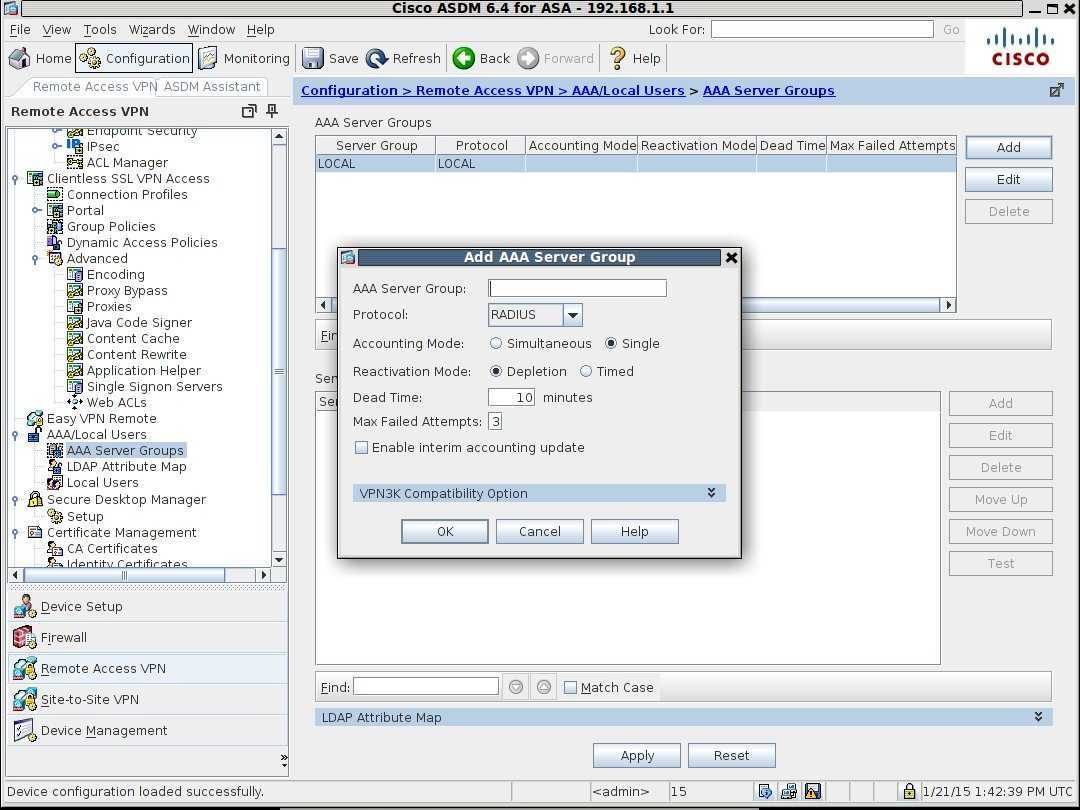
Основные настройки
Основные настройки влияют на все основные параметры доступа к серверу LDAP. Они обязательны для правильно работающей интеграции LDAP.
Главное
- LDAP сервер и порт
- Введите здесь адрес сервера LDAP (имя хоста или IP-адрес). Если используется порт, отличный от порта LDAP 389 по умолчанию, параметр порта должен быть соответствующим образом скорректирован.
- Анонимная привязка / Использование учетных данных привязки
- В зависимости от среды и конфигурации сервера LDAP запросы LDAP могут выполняться либо от имени анонимного пользователя, либо только с действительными именами пользователей и паролями. Если для доступа к серверу требуется имя пользователя и пароль, необходимо выбрать опцию Use bind credentials и ввести учетные данные в поля ввода ниже. В противном случае можно использовать параметр по умолчанию Anonymous bind.
- Привязка через DN
- Привязка через DN — это имя пользователя, используемое для входа на сервер для выполнения операций LDAP. Однако требуемый формат в значительной степени зависит от сервера LDAP и его конфигурации. Возможные форматы включают , или .
- Пароль привязки
- В дополнение к DN привязке необходимо ввести соответствующий пароль.
Вы можете использовать кнопку Test, чтобы проверить, работает ли доступ к серверу с предоставленными параметрами.
Подсказка
Veyon требует только доступа на чтение к каталогу LDAP. В качестве дополнительной меры безопасности на сервере LDAP может быть создан выделенный пользователь с доступом только для чтения к каталогу LDAP, например «Veyon-LDAP-RO». Доступ к соответствующим атрибутам может быть дополнительно ограничен для этого пользователя.
Защита соединения
Veyon может устанавливать зашифрованные соединения с сервером LDAP. Для этого в разделе Connection security доступны соответствующие настройки.
- Протокол шифрования
-
Вы можете выбрать между протоколами шифрования None, TLS и SSL. Рекомендуется использовать современный протокол TLS.
Default: None
- Проверка сертификата TLS
-
Этот параметр определяет, как должен проверяться сертификат безопасности сервера LDAP при установлении зашифрованного соединения. При настройке по умолчанию System defaults, в зависимости от операционной системы, выполняется попытка проверки сертификата с использованием корневых сертификатов, установленных в масштабах всей системы. Хранилище сертификатов Windows здесь не учитывается, поэтому, возможно, придется хранить отдельный файл сертификата CA. При установке параметра Never сертификат сервера вообще не проверяется. Это, однако, допускает атаки типа человек-посередине и поэтому должно использоваться только в исключительных случаях. Параметр User-defined CA certificate file гарантирует, что проверка сертификата выполняется на основе указанного файла сертификата CA.
Default: System defaults
- Необычный файл службы сертификации (CA)
- Если вы используете свой собственный центр сертификации (CA), может потребоваться сохранить их сертификат в формате файла PEM, чтобы Veyon мог проверить сертификат сервера LDAP.
Example 2: LDAP number filter
Here you have to specify your search criteria for number look ups.
When you type in this field for example:(|(telephoneNumber=%)(Mobile=%)(ipPhone=%))the result of your search will be all LDAP records which have the “telephoneNumber” OR “Mobile” OR “ipPhone” field equal to the entered prefix.
When you type in this field: (&(telephoneNumber=%)(sn=*))the result of your search will be all LDAP records which have the “sn” field set AND the “telephoneNumber” field equal to the entered prefix.
Additionally as of version 10.1.27.0 the greater or equal, less or equal and approximate filters are supported. What is returned is dependent on the server implementation. When you type (telephoneNumber >= 5) , it could result in a numeric or lexicographic comparison, and the subsequent result. Likewise

![Руководство по настройке интеграции с active directory [wiki]](https://robotrackkursk.ru/wp-content/uploads/1/0/b/10b3d2b9380022bd8b5026a6fe13742a.jpeg)

![Утилита ldapsearch (клиент openldap) и проверка подключения к контроллеру домена active directory [вики it-kb]](https://robotrackkursk.ru/wp-content/uploads/a/3/f/a3fb3e113be07e50a1ec116d947749e3.png)
Package your application
When your connector is ready, you have to prepare it’s deployment. A shell script is available to make a complete archive, including java dependencies, that avoid installing Maven and Ant on the target server.
This script is named make-lsc-archive.sh and is in the src/install directory. You have to edit it to configure the deployment for your needs:
$ vi src/install/make-lsc-archive.sh
#====================================================================
# Configuration
#====================================================================
# Connector name (please provide different names for each connector
# installed on the same machine)
LSCNAME="lsc-my-connector"
# Connector version
LSCVERSION="1.0"
# Target directory to create archive (relative to lsc-sample root)
TGTDIR="target"
# Distribution dir (LSC container in target directory)
LSCDIR=$LSCNAME
DSTDIR=$TGTDIR/$LSCDIR
# Target installation dir (where will be LSC deployed)
INSTDIR="/usr/local/$LSCNAME"
# Target JAVA_HOME dir
INSTJAVAHOME="/usr/java/jdk1.5.0_16"
# Archive name
ARCNAME="$LSCNAME-$LSCVERSION"
# Script name
SCRIPTFILENAME=$LSCNAME
# Other
CFGPATH="etc"
CFGDIR=$DSTDIR/$CFGPATH
BINPATH="bin"
BINDIR=$DSTDIR/$BINPATH
LIBPATH="lib"
LIBDIR=$DSTDIR/$LIBPATH
RSCPATH="$CFGPATH/resources"
RSCDIR=$DSTDIR/$RSCPATH
# Log and cron
LOGDIR="/var/log"
#LOGDIR=$DSTDIR/log
LOGFILE=$LOGDIR/$LSCNAME.log
LOGROTATEFILENAME=$LSCNAME
CRONFILENAME=$LSCNAME
For default installation, just replace LSC_NAME with “lsc-openldap2ad” for example. This will install the connector in /usr/local/lsc-openldap2ad.
Make the archive:
src/install/make-lsc-archive.sh
The connector archive is now in target/ directory, under the name lsc-openldap2ad-1.0.tar.gz.
Настройки схемы членства
|
Настройка |
Описание |
|
Атрибут участников группы |
Поле атрибута, используемое при загрузке членов группы. Пример: member |
|
Атрибут членства пользователя |
Поле атрибута, используемое при загрузке групп пользователей. Пример: memberOf |
|
Используйте атрибут членства пользователя при поиске членства в группе пользователя |
Проверьте это, если ваш сервер каталогов поддерживает атрибут членства группы для пользователя. (По умолчанию это атрибут memberOf.)
|
|
Используйте атрибут членства пользователя при поиске членов группы |
Проверьте это, если ваш сервер каталогов поддерживает атрибут членства пользователя в группе. (По умолчанию это атрибут ‘member’.)
|
Dovecot + Active Directory
Откроем файл с настройками подключения Dovecot к Active Directory:
vi /etc/dovecot/dovecot-ldap.conf
Заменяем его содержимое на:
hosts = dmosk.ru:389
ldap_version = 3
auth_bind = yes
dn = vmail
dnpass = vmail_password
base = cn=users,dc=dmosk,dc=ru
scope = subtree
deref = never
iterate_attrs = mail=user
iterate_filter = (&(objectClass=person)(mail=*))
user_filter = (&(objectClass=person)(mail=%u))
pass_filter = (&(objectClass=person)(mail=%u))
pass_attrs = userPassword=password
default_pass_scheme = CRYPT
user_attrs = mail=master_user,mail=user,=home=/var/vmail/vmail1/%Ld/%Ln/,=mail=maildir:~/Maildir/
* обратите особое внимание на опции:
- hosts — адрес контроллера домена. Мы указали домен, который разрешается в один из активных контроллеров, который обслуживает данный домен.
- dnpass — учетная запись для привязки к ldap.
- bind_pw — пароль для учетной записи привязки к ldap.
- base — адрес организационного подразделения в ldap, откуда будет вестись поиск. Есть ограничение по значению — оно не должно вести только на домен (например, dc=dmosk,dc=ru работать не будет).
Перезапускаем dovecot:
systemctl restart dovecot
Проверим наши настройки. Подключимся к нашему SMTP телнетом:
telnet localhost 143
Мы должны увидеть что-то на подобие:
Trying 127.0.0.1…
Connected to localhost.
Escape character is ‘^]’.
* OK … ready.
После вводим команду для аутентификации (точка в начале обязательна):
. login user@dmosk.ru user_password
* где user@dmosk.ru — созданный в AD пользователь для теста; user_password — его пароль.
Если все корректно работает, мы должны увидеть:
. OK … Logged in
Идем дальше.
Права, связанные с группами
Основные права
- только чтение — права только на чтение заявки в данной группе/очереди
- переместить — права на перемещение заявок в эту группу/очередь
- создание — права на создание заявок в этой группе/очереди
- заметка — права на добавление заметок в заявки в этой группе/очереди
- владелец — права на смену владельца заявок в этой группе/очереди
- приоритет — права на смену приоритета заявок в этой группе/очереди
- чтение/запись — полные права на чтение и запись для заявок в данной группе/очереди
Дополнительные права
- отчеты — предоставляет доступ к странице отчетов
- перенаправить — право перенаправить/bounce почтовое сообщение (ссылка перенаправить/bounce в ticketZoom)
- создать — право составления ответа на заявку
- клиент — право изменить клиента для этой заявки
- переслать — право пересылать сообщения (с помощью кнопки Переслать)
- в ожидании — право перевести заявку в ожидание
- телефон — право добавить содержание звонка клиента к заявке в виде сообщения/заметки
- ответственный — Право изменить ответственного за заявку
- каждый клиент может быть включен в одну или несколько групп, изначально все клиенты входят в группу users
- каждая очередь заявок связывается с какой-либо одной из групп
- через веб-интерфейс клиент может делать заявки в тех очередях, к которым имеют доступ группы, в которые он включен
- при отправке клиентом заявки по электронной почте существует возможность на основании анализа атрибутов письма (например, адреса отправителя или заголовка письма) изменять характеристики заявки, в том числе и очередь, в которую попадет заявка
- если клиент позвонил по телефону, агент может завести заявку вручную, выбрав любую из доступных агенту очередей
- желательно, чтобы заявка клиента всегда была в очередях, доступных клиенту, иначе он не сможет получить доступ к ней через веб-интерфейс
- агенты могут производить действия в заявками в соответствии с правами на очередь, в которой находится заявка
Настраиваем RBAC-авторизацию
-
Для примера привяжем статического пользователя к системной роли cluster-admin, а пользователей группы developers – к роли view, позволяющей только просматривать ресурсы. Тогда содержимое файла crb.yml должно быть таким:
—
apiVersion: rbac.authorization.k8s.io/v1beta1
kind: ClusterRoleBinding
metadata:
name: dex-admin
namespace: kube-system
roleRef:
apiGroup: rbac.authorization.k8s.io
kind: ClusterRole
name: cluster-admin
subjects:
— kind: User
name: «admin@dtln.cloud»
—
apiVersion: rbac.authorization.k8s.io/v1beta1
kind: ClusterRoleBinding
metadata:
name: dex-developers
namespace: kube-system
roleRef:
apiGroup: rbac.authorization.k8s.io
kind: ClusterRole
name: view
subjects:
— kind: Group
name: «developers»
-
-
Переключаемся на основной контекст и применяем созданный yaml-файл на кластер:
kubectl config set-context default
kubectl apply -f crb.yml
-
Смотрим доступные контексты и переключаемся обратно на нашего пользователя:
kubectl config get-contexts
kubectl config set-context johndoe-ash.dtln.cloud
На этом настройка Dex в связке с OpenLDAP закончена.
Пара советов напоследок:
Если возникают проблемы, первым делом нужно проверить форматирование yaml-файлов и обратить внимание на отступы.
Слэши в адресах должны соответствовать примерам.
Не забудьте посмотреть логи pod’ов Dex, Dex-auth, а также журналы юнитов kube-api на мастерах.
Интерфейс командной строки
Veyon позволяет выполнять некоторые операции, специфичные для LDAP. Все операции доступны с помощью модуля . Список всех поддерживаемых команд отображается через , в то время как тексты справки по конкретным командам могут отображаться через .
-
Эта команда может быть использована для автоматического определения используемого базового DN и постоянной записи его в конфигурацию. В качестве параметров необходимо указать URL-адрес сервера LDAP и, необязательно, атрибут контекста именования:
veyon-cli ldap autoconfigurebasedn ldap://192.168.1.2/ namingContexts
veyon-cli ldap autoconfigurebasedn ldap://Administrator:MYPASSWORD@192.168.1.2:389/
Подсказка
Специальные символы, такие как или – особенно в пароле — могут быть указаны с помощью URL-процентной кодировки.
-
Эта команда позволяет запрашивать объекты LDAP (, , , ) и в основном используется для тестирования. Эта функция также может быть использована для разработки сценариев для задач системной интеграции.
veyon-cli ldap query users
veyon-cli ldap query computers
Project details
Statistics
GitHub statistics:
-
Stars:
-
Forks:
-
Open issues/PRs:
View statistics for this project via Libraries.io, or by using our public dataset on Google BigQuery
License: Apache Software License
Author: Jeff Katcher, Brian Hodges
Classifiers
-
Development Status
5 — Production/Stable
-
Environment
Console
-
Intended Audience
-
Customer Service
-
Developers
-
Education
-
End Users/Desktop
-
Information Technology
-
Science/Research
-
System Administrators
-
-
License
OSI Approved :: Apache Software License
-
Natural Language
English
-
Operating System
-
MacOS :: MacOS X
-
POSIX
-
POSIX :: Linux
-
POSIX :: Other
-
Unix
-
-
Programming Language
-
Python :: 3
-
Python :: 3.4
-
Python :: 3.5
-
Python :: 3.6
-
Python :: Implementation :: CPython
-
Unix Shell
-
-
Topic
-
Software Development :: Libraries :: Python Modules
-
System :: Systems Administration
-
Utilities
-
Connecting to an LDAP Directory in Jira
-
In the upper-right corner of the screen, select Administration > User Management.
- Select User Directories.
-
Add a directory and select one of these types:
- Microsoft Active Directory – This option provides a quick way to select Active Directory, because it is the most popular LDAP directory type.
- LDAP – You will be able to choose a specific LDAP directory type on the next screen.
- Enter the values for the settings, as described in the following sections.
- Save the directory settings.
- Define the directory order by clicking the blue up- and down-arrows next to each directory on the User Directories screen. Here is a summary of how the directory order affects the processing:
- The order of the directories is the order in which they will be searched for users and groups.
- Changes to users and groups will be made only in the first directory where the application has permission to make changes.
For details, see Managing multiple directories.
synchronizing data from external directories
Adding new user/group to OpenLDAP server
This step describes how to add a new users or create a new groups in OpenLDAP server. This is still only OpenLDAP configuration and should be known before we will continue in further configuration steps. The example uses simple objectClass’es which may vary accross LDAP implementations. In case you already use some users/group definition proceed to .
Objects can be easily imported to the OpenLDAP directory using LDIF file. The LDIF file is a text file in a format containing data to import/modify/remove objects. This article will not describe the structure of this file, but you can use example files provided in this article. To import a test user account download the user.ldif file and execute following command or use your LDAP browser to import the LDIF file:
linux:/etc/openldap #linux:/etc/openldap # ldapadd -f user.ldif -h 127.0.0.1 -D «cn=Manager,
dc=my-domain,dc=com» -x -W
Enter LDAP Password:
adding new entry «uid=test_user,dc=my-domain,dc=com»
linux:/etc/openldap #
The password is requested interactivelly ( option), but you can provide it by parameter. This password is LDAP administrators password provided in the slapd.conf file. The parameter specifies the LDIF file to import and the specifies the IP addressAn identifier assigned to devices connected to a TCP/IP network. or a hostname of the LDAP server (in our example both Kerio Connect and OpenLDAP are installed on the same computer, so localhost address is used).
user.ldif file example:
dn: uid=test_user,dc=my-domain,dc=com
uid: test_user
sn: User
cn: Test User
objectClass: person
objectClass: organizationalPerson
objectClass: posixAccount
objectClass: top
loginShell: /bin/bash
homeDirectory: /home/testuser
uidNumber: 1001
gidNumber: 1001
Almost the same applies to groups, but the format is slightly different. See example LDIF file named group.ldif for more information. To add a group to your OpenLDAP server download the group.ldif file and execute following command:
linux:/etc/openldap #linux:/etc/openldap # ldapadd -f group.ldif -h 127.0.0.1 -D «cn=Manager
,dc=my-domain,dc=com» -x -W
Enter LDAP Password:
adding new entry «uid=Group1,dc=my-domain,dc=com»
linux:/etc/openldap #
group.ldif file example:
dn: cn=Group1,dc=my-domain,dc=com
cn: Group1
objectClass: top
objectClass: groupOfNames
objectClass: posixGroup
member: uid=test_user,dc=my-domain,dc=com
gidNumber: 100
memberUid: test_user
There are two independent group definitions — — in the group.ldif file. The groupOfNames class and posixGroup class. It is not necessary to use both of them, even both are used in this example. Choose one which fits your needs. According to choosed group specify users using the attribute — in case of objectClass definition. Or using the attribute — in case of objectClass definition.

Расширенные настройки
С помощью расширенных настроек интеграция LDAP и использование информации из каталога LDAP могут быть настроены в соответствии с индивидуальными потребностями.
Опциональные фильтры объектов
С помощью фильтров LDAP объекты LDAP, используемые Veyon, могут быть сужены, если, например, компьютерные объекты, такие как принтеры, не должны отображаться в Veyon Master. Рядом с каждым полем ввода есть кнопка для проверки соответствующего фильтра объектов.
Начиная с версии Veyon 4.1 дополнительные фильтры следуют хорошо известной схеме для фильтров LDAP (см. например, RFC 2254 или Active Directory: Синтаксис фильтров LDAP ), такие как .
- Фильтр для пользователей
- Вы можете определить фильтр LDAP для пользователей здесь, например или .
- Фильтр для групп пользователей
- Вы можете определить фильтр LDAP для групп пользователей здесь, например или .
- Фильтр для компьютеров
- Вы можете определить фильтр LDAP для компьютеров здесь, например или .
- Фильтр для групп компьютеров
- Вы можете определить фильтр LDAP для компьютерных групп здесь, например или . Если в качестве местоположений используются группы компьютеров, вы можете отфильтровать отображаемые местоположения таким образом.
- Фильтр для контейнеров компьютеров
- Вы можете определить фильтр LDAP для компьютерных контейнеров здесь, например или . Если в качестве местоположений используются контейнеры/подразделения, вы можете отфильтровать отображаемые местоположения таким образом.
Параметры запроса
- Опросить вложенные группы пользователей (поддерживается только AD)
- Если у вас есть вложенные группы пользователей (в настоящее время поддерживаются только Active Directory), вы можете включить эту опцию, чтобы заставить Veyon запрашивать все (даже косвенные) группы пользователя. Если эта функция включена, вы можете, например, создать группу с существующими группами пользователей и в качестве участников. Группа затем может быть использована для целей .
Идентификация участников группы
Содержимое атрибутов членства в группе варьируется в разных реализациях LDAP. В то время как в Active Directory различимое имя (DN) объекта хранится в атрибуте участника, OpenLDAP обычно хранит имя пользователя для входа ( или аналогичное) или имя компьютера. Чтобы Veyon использовал правильное значение для запроса групп пользователя или компьютера, здесь необходимо выбрать соответствующую настройку.
- Уникальное имя (Samba/AD)
- Этот параметр должен быть выбран, если различимое имя (DN) объекта хранится в атрибуте члена группы. Обычно Samba и AD server используют эту схему.
- Настроенный атрибут для имени пользователя для входа или имени хоста компьютера (OpenLDAP)
- Этот параметр необходимо выбрать, если имя входа пользователя (username) или имя хоста компьютера хранятся в атрибутах участника группы. Обычно сервер OpenLDAP использует эту схему.
Server settings
|
Setting |
Description |
|---|---|
|
Name |
Enter a meaningful name to help you identify the LDAP directory server. Examples: |
|
Directory type |
Select the type of LDAP directory that you will connect to. If you are adding a new LDAP connection, the value you select here will determine the default values for many of the options on the rest of screen. Examples:
|
|
Hostname |
The host name of your directory server. Examples: |
|
Port |
The port on which your directory server is listening. Examples:
|
|
Use SSL |
Check this if the connection to the directory server is an SSL (Secure Sockets Layer) connection. Note that you will need to configure an SSL certificate to use this setting. |
|
Username |
The distinguished name of the user that the application will use when connecting to the directory server. Examples: By default, all users can read the uSNChanged attribute; however, only administrators or users with relevant permissions can access the Deleted Objects container. The specific privileges required by the user to connect to LDAP are «Bind» and «Read» (user info, group info, group membership, update sequence number, deleted objects), which the user can obtain by being a member of the Active Directory’s built-in administrators group. |
|
Password |
The password of the user specified above. Note: Connecting to an LDAP server requires that this application log in to the server with the username and password configured here. As a result, this password cannot be one-way hashed — it must be recoverable in the context of this application. The password is currently stored in the database in plain text without obfuscation. To guarantee its security, you need to ensure that other processes do not have OS-level read permissions for this application’s database or configuration files. |
Install and run
On the target server, just unpack the connector:
$ sudo tar -zxf lsc-openldap2ad-1.0.tar.gz -C /usr/local
Install cronjob and logrotate scripts:
$ sudo cp /usr/local/lsc-openldap2ad/etc/cron.d/lsc-openldap2ad /etc/cron.d
$ sudo cp /usr/local/lsc-openldap2ad/etc/logrotate.d/lsc-openldap2ad /etc/logrotate.d
Now your connector will run every hour, but you can also launch it manually:
$ sudo /usr/local/lsc-openldap2ad/bin/lsc-openldap2ad -s all -c all
A Nagios script is also installed in /usr/local/lsc-openldap2ad/bin/check-lsc.sh, that you can call with a check_ssh service.


