
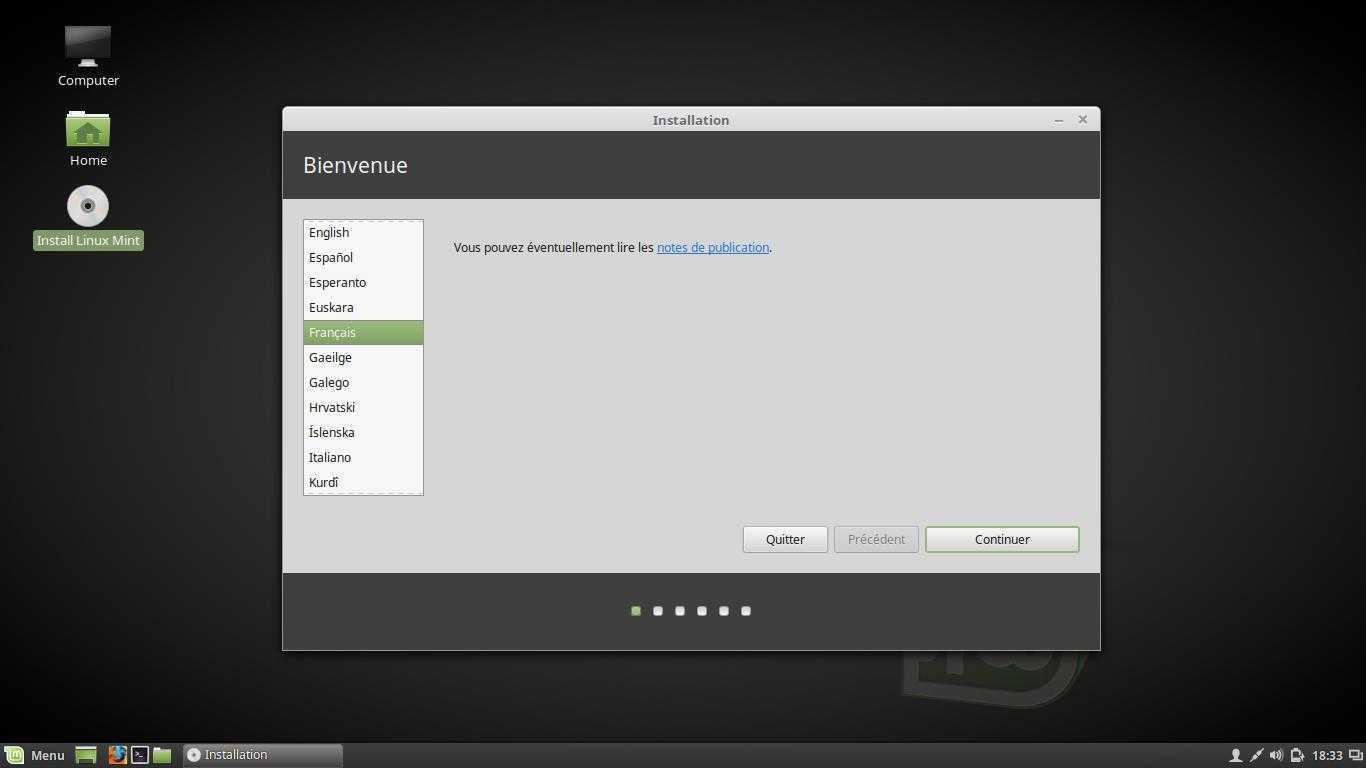
1. Select Zabbix Version
Head down to zabbix.com/download and select the Zabbix Version, OS Distribution, OS Version, Database and Web Server. I will be using the following:
| ZABBIX VERSION | OS DISTRIBUTION | OS VERSION | DATABASE | WEB SERVER |
| 5.0 LTS | Ubuntu | 20.04 (Focal) | MySQL | Apache |
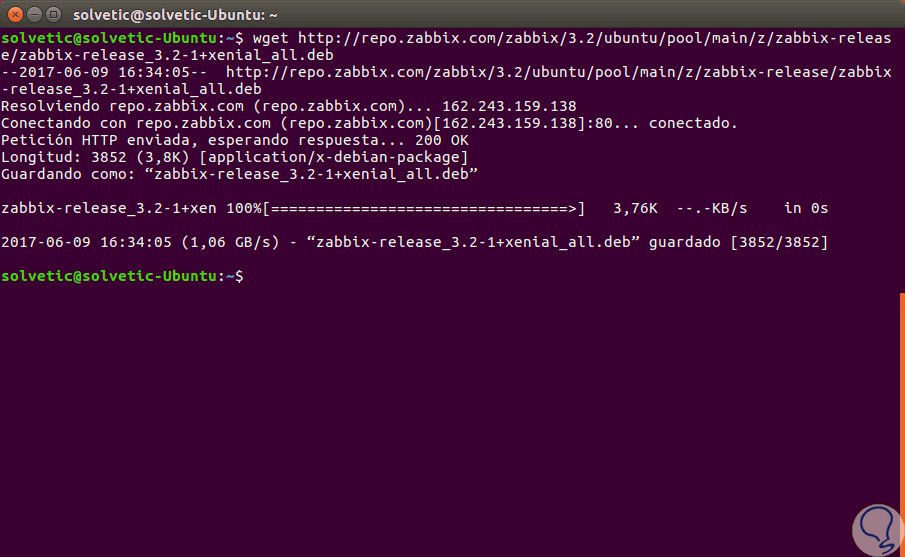
Perform the first step and Install the Zabbix repository. In my case, it is Zabbix 5.0 and it could be different when you are following this blog.
wget https://repo.zabbix.com/zabbix/5.0/ubuntu/pool/main/z/zabbix-release/zabbix-release_5.0-1+focal_all.deb
Once the repository is downloaded, run the following command to install it.
dpkg -i zabbix-release_5.0-1+focal_all.deb
This is important, otherwise, you will run into problems. Update/Upgrade the installed packages with the following command.
sudo apt update && sudo apt upgrade
Prerequisites
To follow this tutorial, you will need:
-
Two Ubuntu 18.04 servers set up by following the Initial Server Setup Guide for Ubuntu 18.04, including a non-root user with sudo privileges and a firewall configured with . On one server, you will install Zabbix; this tutorial will refer to this as the Zabbix server. It will monitor your second server; this second server will be referred to as the second Ubuntu server.
-
The server that will run the Zabbix server needs Apache, MySQL, and PHP installed. Follow this guide to configure those on your Zabbix server.
Additionally, because the Zabbix Server is used to access valuable information about your infrastructure that you would not want unauthorized users to access, it’s important that you keep your server secure by installing a TLS/SSL certificate. This is optional but strongly encouraged. You can follow the Let’s Encrypt on Ubuntu 18.04 guide to obtain the free TLS/SSL certificate.
Step 2 — Configuring the MySQL Database for Zabbix
You need to create a new MySQL database and populate it with some basic information in order to make it suitable for Zabbix. You’ll also create a specific user for this database so Zabbix isn’t logging into MySQL with the account.
Log into MySQL as the root user using the root password that you set up during the MySQL server installation:
Create the Zabbix database with UTF-8 character support:
Then create a user that the Zabbix server will use, give it access to the new database, and set the password for the user:
Then apply these new permissions:
That takes care of the user and the database. Exit out of the database console.
Next you have to import the initial schema and data. The Zabbix installation provided you with a file that sets this up.
Run the following command to set up the schema and import the data into the database. Use since the data in the file is compressed.
Enter the password for the MySQL user that you configured when prompted.
This command will not output any errors if it was successful. If you see the error zabbix then make sure you used the password for the zabbix user and not the root user.
In order for the Zabbix server to use this database, you need to set the database password in the Zabbix server configuration file. Open the configuration file in your preferred text editor. This tutorial will use :
Look for the following section of the file:
/etc/zabbix/zabbix_server.conf
These comments in the file explain how to connect to the database. You need to set the value in the file to the password for your database user. Add this line below those comments to configure the database:
/etc/zabbix/zabbix_server.conf
Save and close by pressing , followed by and then if you’re using .
That takes care of the Zabbix server configuration. Next, you will make some modifications to your PHP setup in order for the Zabbix web interface to work properly.
Run Web Setup of Zabbix Server:
Open URL http://zabbix-01.centlinux.com/zabbix/ in a web browser.
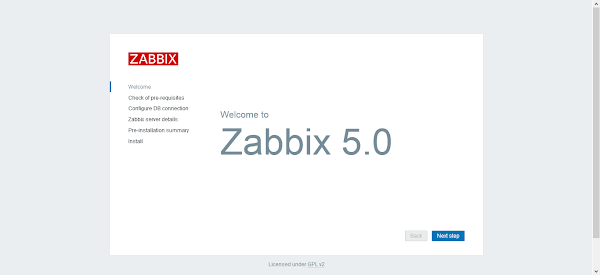
If you have performed the installation as described above, then you will see this welcome page of Zabbix web setup.
Click on ‘Next Step’.
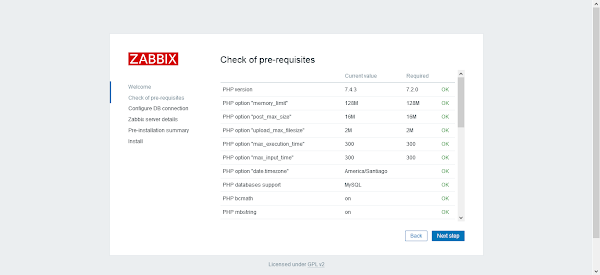
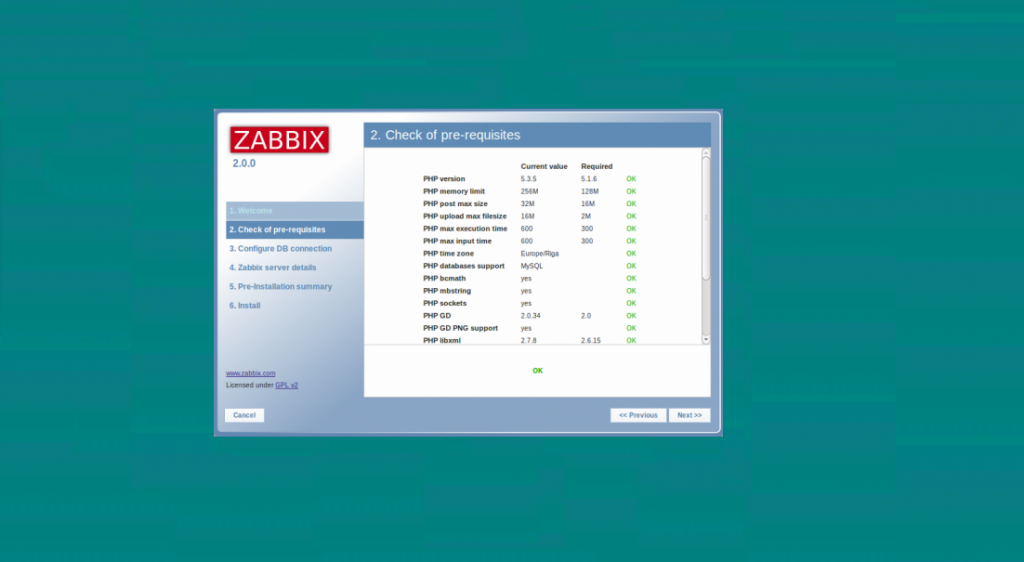
If you have performed the configurations correctly, then you will get the ‘OK’ status for all the Zabbix perquisites.
Move on to ‘Next Step’.
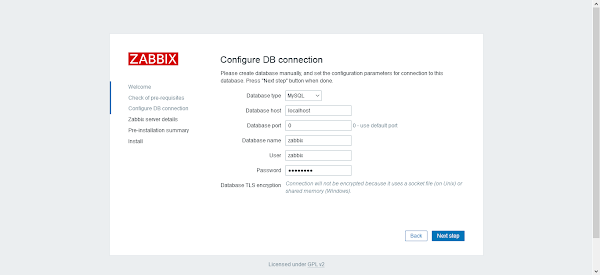
Provide the connection details of your MySQL server, including database and user credentials.
Click on ‘Next Step’.
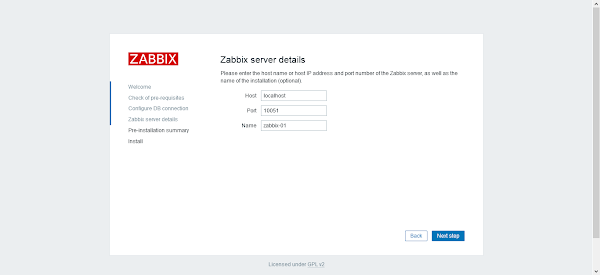
Enter the hostname/IP address and port number of the Linux server. You are required to provide the name of the installation (optional).
Continue to ‘Next Step’.
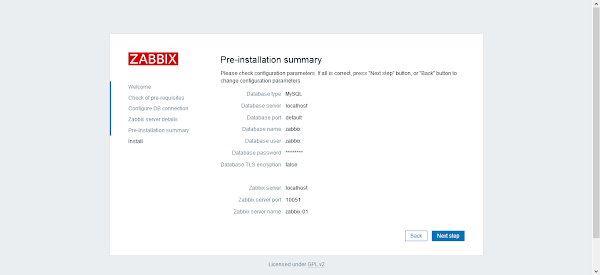
Web setup will display the configurations, that you have made so far.
Click on ‘Next Step’ if you are happy with them, otherwise go back and adjust them as per your requirement.
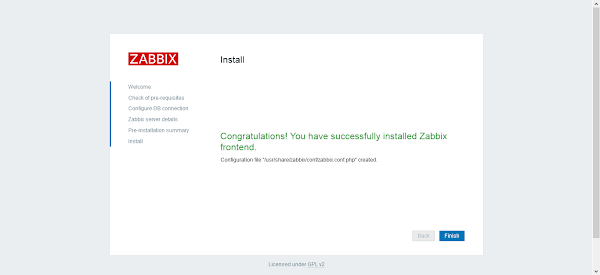
Configuration file has been created and the installation of Zabbix frontend completed successfully.
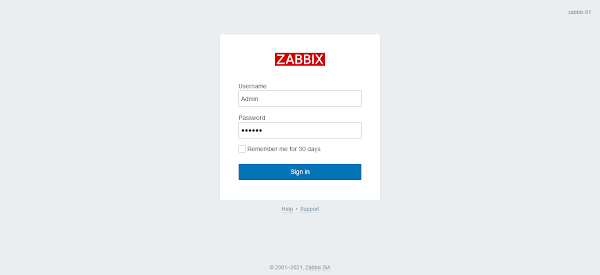
Login as default Zabbix user/password i.e. admin/zabbix.
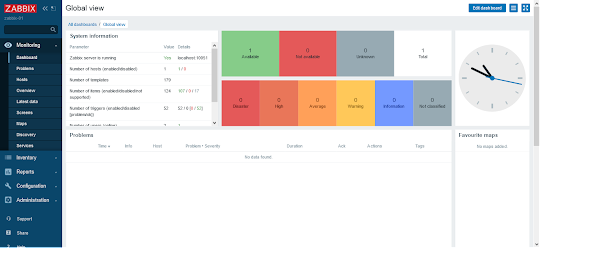
After successful login, you will reach at the Zabbix dashboard.
10. Configure Front End
All the hard work is done and now let’s finish it off through a web browser. Make sure your system can ping the Ubuntu server from where you are accessing the browser.
- Open your favourite browser and open Zabbix by typing the following:http://Your_IP_Address/zabbixIn my case, it will look like http://10.0.0.8/zabbix. You should see the front end welcome screen.
- You will check of pre-requisites step and make sure everything is ok before proceeding further
- Provide the details of zabbix database we configured earlier and click on the next step
- Update the name, I will call it TEKNEX-NETMON01 and click on the next step
- Here you will see a summary of the settings which you selected and provided. Click next and finish
Step 5 — Configuring Settings for the Zabbix Web Interface
The web interface lets you see reports and add hosts that you want to monitor, but it needs some initial setup before you can use it. Launch your browser and go to the address or if you set up Let’s Encrypt. On the first screen, you will see a welcome message. Click Next step to continue.
On the next screen, you will see the table that lists all of the prerequisites to run Zabbix.
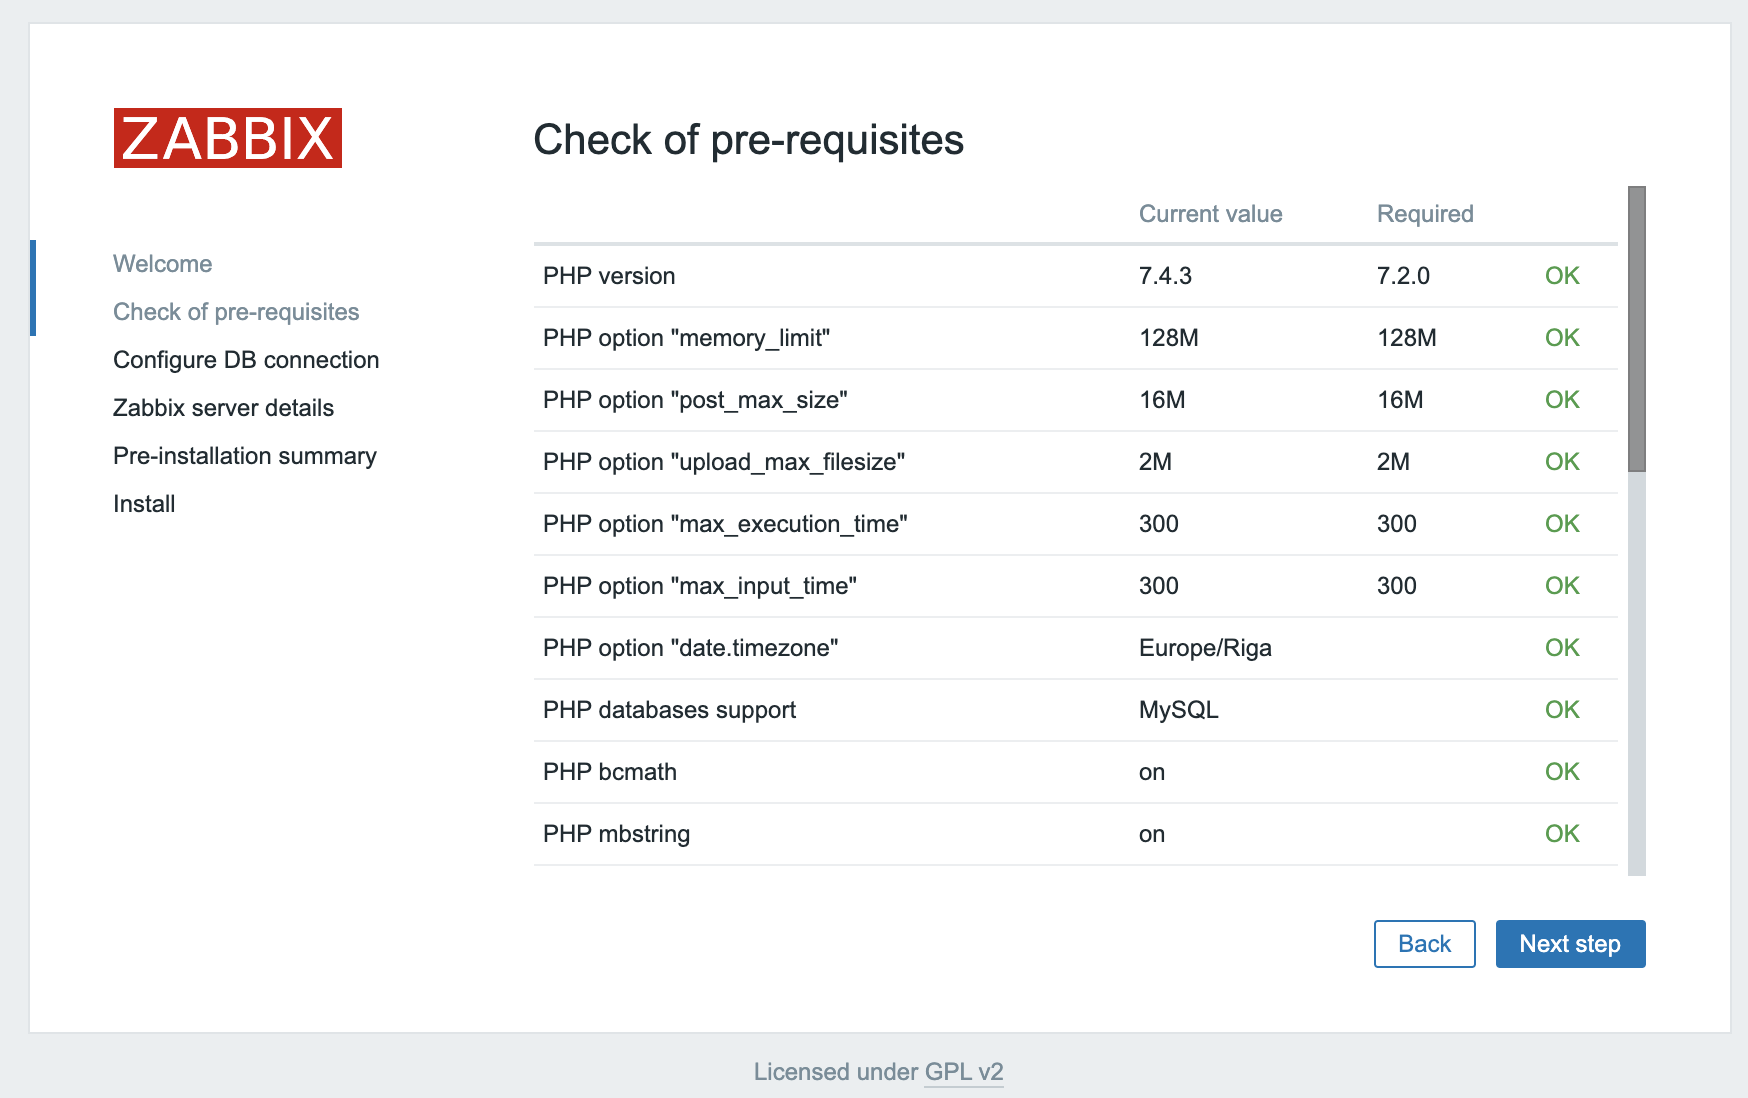
All of the values in this table must be OK, so verify that they are. Be sure to scroll down and look at all of the prerequisites. Once you’ve verified that everything is ready to go, click Next step to proceed.
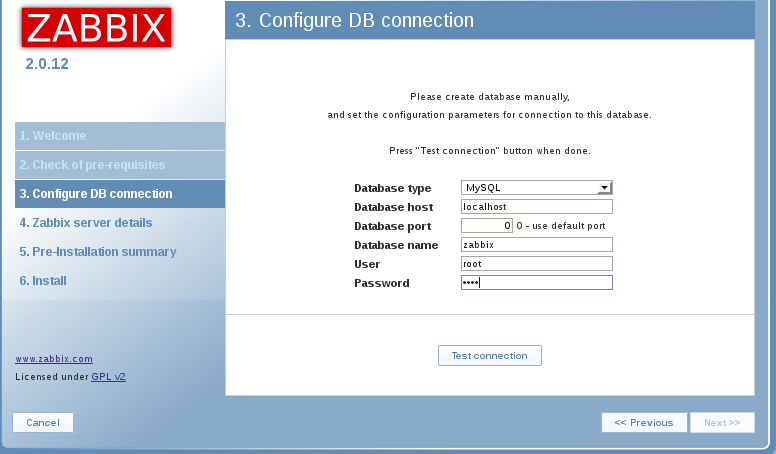
The next screen asks for database connection information.

You told the Zabbix server about your database, but the Zabbix web interface also needs access to the database to manage hosts and read data. Therefore enter the MySQL credentials you configured in Step 2. Click Next step to proceed.
On the next screen, you can leave the options at their default values.
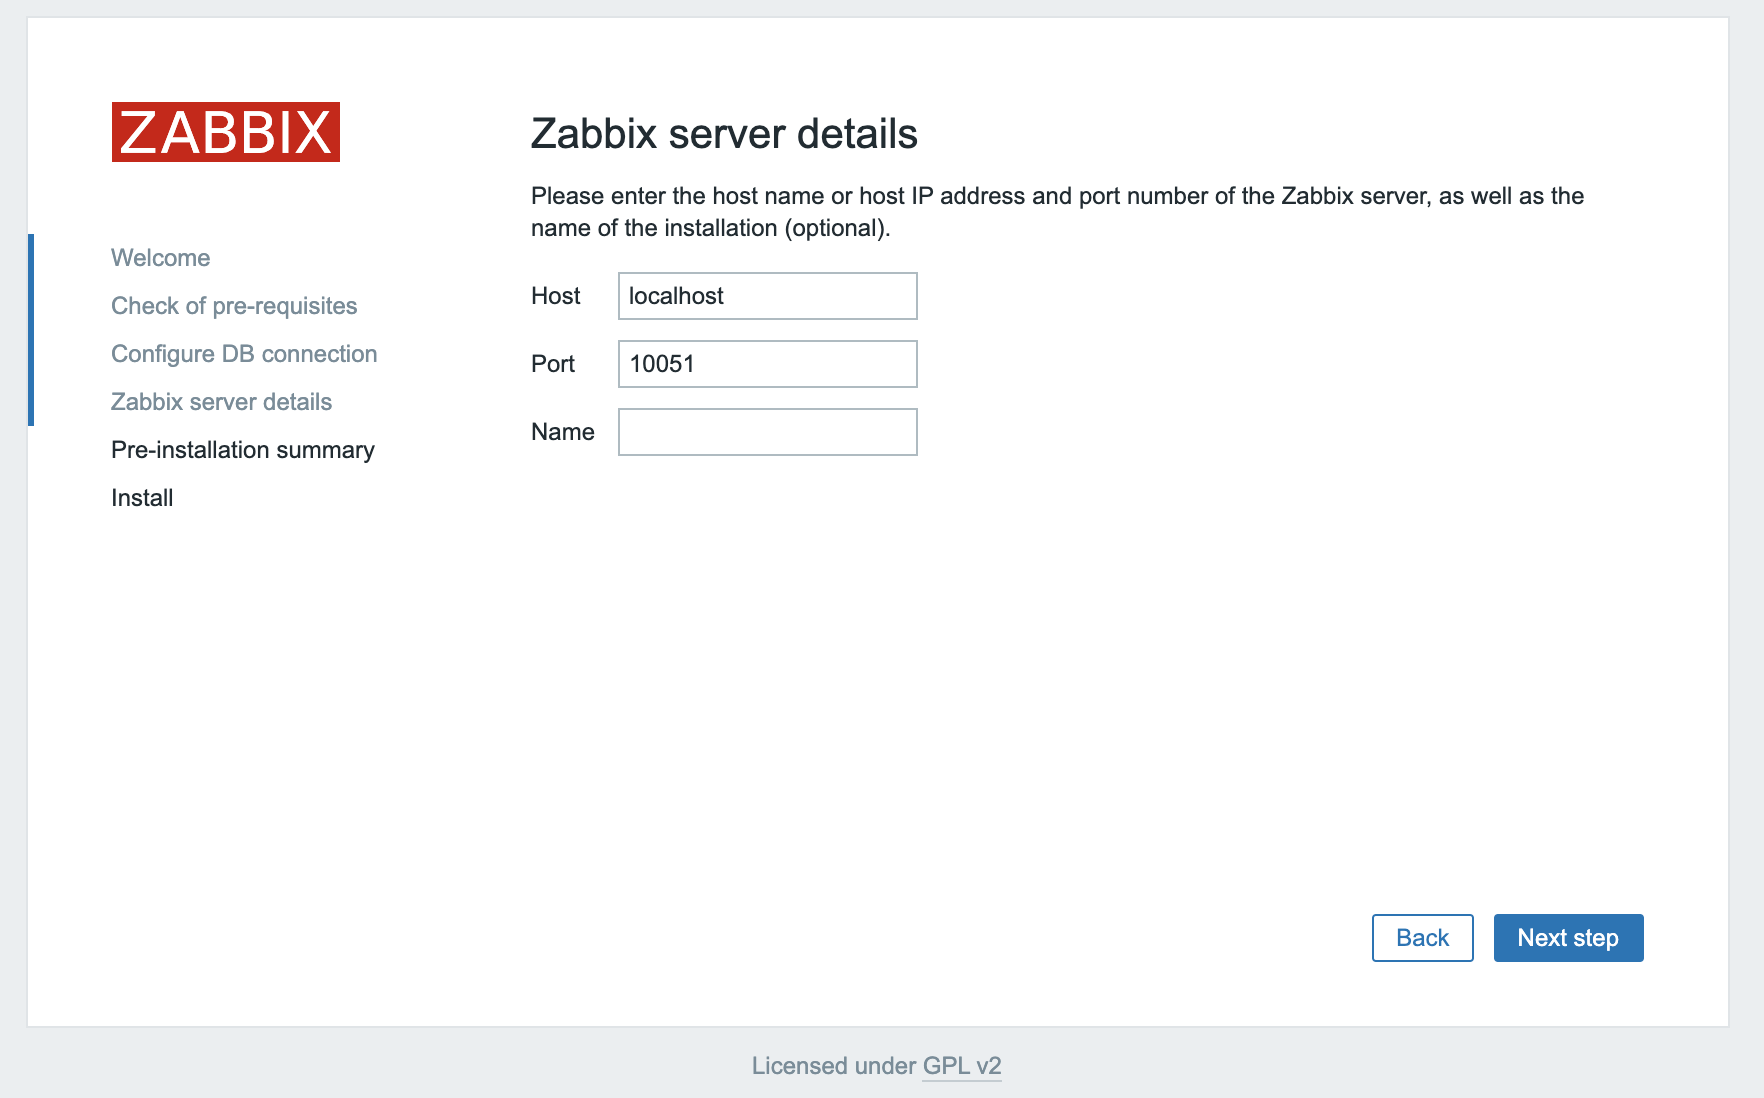
The Name is optional; it is used in the web interface to distinguish one server from another in case you have several monitoring servers. Click Next step to proceed.
The next screen will show the pre-installation summary so you can confirm everything is correct.

Click Next step to proceed to the final screen.
The web interface setup is now complete. This process creates the configuration file , which you could back up and use in the future. Click Finish to proceed to the login screen. The default user is Admin and the password is zabbix.
Before you log in, set up the Zabbix agent on your second Ubuntu server.
Add Zabbix Official Repository in Ubuntu:
Zabbix website provides installation package for various Linux distros. You can install this package to add it’s official repository in Package Management System of your Ubuntu operating system.
Download software package for Zabbix 5.0 repository from their official website.
$ wget https://repo.zabbix.com/zabbix/5.0/ubuntu/pool/main/z/zabbix-release/zabbix-release_5.0-1+focal_all.deb
Use dpkg command to install download package.
$ sudo dpkg -i zabbix-release_5.0-1+focal_all.deb
Update list of available software packages for your Ubuntu operating system by using apt command.
$ sudo apt update
Step 1 — Installing the Zabbix Server
First, you need to install Zabbix on the server where you installed MySQL, Apache, and PHP. Log into this machine as your non-root user:
Zabbix is available in Ubuntu’s package manager, but it’s outdated, so use the official Zabbix repository to install the latest stable version. Download and install the repository configuration package:
You will see the following output:
Update the package index so the new repository is included:
Then install the Zabbix server and web frontend with MySQL database support:
Also, install the Zabbix agent, which will let you collect data about the Zabbix server status itself.
Before you can use Zabbix, you have to set up a database to hold the data that the Zabbix server will collect from its agents. You can do this in the next step.


Подготовка сервера
Перед установкой Zabbix выполняем подготовительные процедуры.
1. Правильное время
Для получения актуальной информации необходимо, чтобы на сервере было правильное время.
Для этого сначала задаем правильную временную зону:
\cp /usr/share/zoneinfo/Europe/Moscow /etc/localtime
* в данном примере задается московское время.
Затем устанавливаем и запускаем сервис синхронизации времени:
yum install chrony
systemctl enable chronyd
systemctl start chronyd
2. Настройка брандмауэра
Для работы сервера, открываем следующие порты:
firewall-cmd —permanent —add-port={80/tcp,443/tcp,10051/tcp,10050/tcp,10050/udp,10051/udp}
firewall-cmd —reload
* где 80 — порт для http запросов (веб-интерфейс); 443 — для https запросов (веб-интерфейс); 10050 — порты для получения информации от zabbix агентов.
3. SELinux
В данной инструкции выполняется установка Zabbix на сервере с отключенным SELinux. Если есть желание его настроить, читаем статью Настройка SELinux в CentOS.
Для отключения SELinux вводим две команды:
setenforce 0
sed -i «s/SELINUX=enforcing/SELINUX=disabled/» /etc/selinux/config
* первая команда отключает SELinux для текущей загрузки сервера, вторая — перманентно.
Step 5: Configure Zabbix frontend
a. Configure PHP for Zabbix frontend
Edit file /etc/zabbix/apache.conf:
Uncomment 2 lines in apache.conf that starts with “” by removing symbol and set the right timezone for your country, for example:
Save and exit file (ctrl+x, followed by y and enter)
c. Configure web frontend
Connect to your newly installed Zabbix frontend using URL “http://server_ip_or_dns_name/zabbix” to initiate the Zabbix installation wizard.
In my case, that URL would be “http://192.168.1.161/zabbix” because I have installed Zabbix on the server with IP address 192.168.1.161 (you can find the IP address of your server by typing “” command in the terminal).
Basically, in this wizard you only need to enter a password for Zabbix DB user and just click “Next step” for everything else. In this guide, I have used a zabbixDBpass as a database password, but if you set something else, be sure to enter the correct password when prompted by the wizard.
1. Installation step: Welcome screen
2. Installation step: Pre-requisites check
3. Installation step: Configure DB connection
4. Installation step: Configure Zabbix server
5. Installation step: Pre-installation summary
6. Installation step: Finish
That’s it, you have installed Zabbix monitoring system!
Step 3 — Configuring PHP for Zabbix
The Zabbix web interface is written in PHP and requires some special PHP server settings. The Zabbix installation process created an Apache configuration file that contains these settings. It is located in the directory and is loaded automatically by Apache. You need to make a small change to this file, so open it up with the following:
The file contains PHP settings that meet the necessary requirements for the Zabbix web interface. However, the timezone setting is commented out by default. To make sure that Zabbix uses the correct time, you need to set the appropriate timezone.
/etc/zabbix/apache.conf
Uncomment the timezone line, highlighted in the preceding code block, and change it to your timezone. You can use this list of supported time zones to find the right one for you. Then save and close the file.
Now restart Apache to apply these new settings.
You can now start the Zabbix server.
Then check whether the Zabbix server is running properly:
You will see the following status:
Finally, enable the server to start at boot time:
The server is set up and connected to the database. Next, set up the web frontend.
Note: As mentioned in the Prerequisites section, it is recommended that you enable SSL/TLS on your server. You can follow this tutorial now to obtain a free SSL certificate for Apache on Ubuntu 18.04. After obtaining your SSL/TLS certificates, you can come back and complete this tutorial.
Step 2 — Configuring the MySQL Database for Zabbix
You need to create a new MySQL database and populate it with some basic information in order to make it suitable for Zabbix. You’ll also create a specific user for this database so Zabbix isn’t logging in to MySQL with the account.
Log in to MySQL as the root user:
Create the Zabbix database with UTF-8 character support:
Then create a user that the Zabbix server will use, give it access to the new database, and set the password for the user:
That takes care of the user and the database. Exit out of the database console.
Next you have to import the initial schema and data. The Zabbix installation provided you with a file that sets this up.
Run the following command to set up the schema and import the data into the database. Use since the data in the file is compressed:
Enter the password for the MySQL user that you configured when prompted.
This command may take a minute or two to execute. If you see the error then make sure you used the right password for the zabbix user.
In order for the Zabbix server to use this database, you need to set the database password in the Zabbix server configuration file. Open the configuration file in your preferred text editor. This tutorial will use :
Look for the following section of the file:
/etc/zabbix/zabbix_server.conf
These comments in the file explain how to connect to the database. You need to set the value in the file to the password for your database user. Add this line after those comments to configure the database:
/etc/zabbix/zabbix_server.conf
Save and close by pressing , followed by and then if you’re using .
You’ve now configured the Zabbix server to connect to the database. Next, you will configure the Nginx web server to serve the Zabbix frontend.
Step 4 — Configuring PHP for Zabbix
The Zabbix web interface is written in PHP and requires some special PHP server settings. The Zabbix installation process created a PHP-FPM configuration file that contains these settings. It is located in the directory and is loaded automatically by PHP-FPM. You need to make a small change to this file, so open it up with the following:
The file contains PHP settings that meet the necessary requirements for the Zabbix web interface. However, the timezone setting is commented out by default. To make sure that Zabbix uses the correct time, you need to set the appropriate timezone:
/etc/zabbix/php-fpm.conf
Uncomment the timezone line highlighted in the preceding code block and change it to your timezone. You can use this list of supported time zones to find the right one for you. Then save and close the file.
Now restart PHP-FPM to apply these new settings:
You can now start the Zabbix server:
Then check whether the Zabbix server is running properly:
You will see the following status:
Finally, enable the server to start at boot time:
The server is set up and connected to the database. Next, set up the web frontend.
Step 8 — Configuring Email Notifications
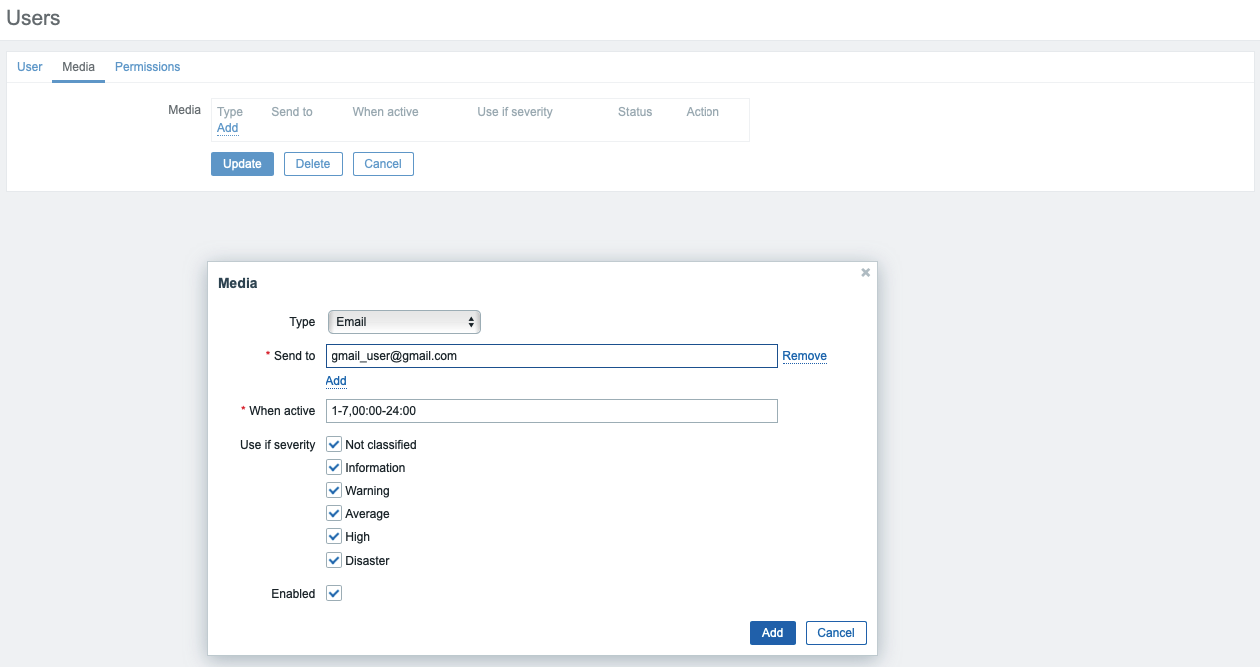
Note: If you use 2-Step Verification with Gmail, you need to generate an App Password for Zabbix. You’ll only have to enter an App password once during setup. You will find instructions on how to generate this password in the Google Help Center.
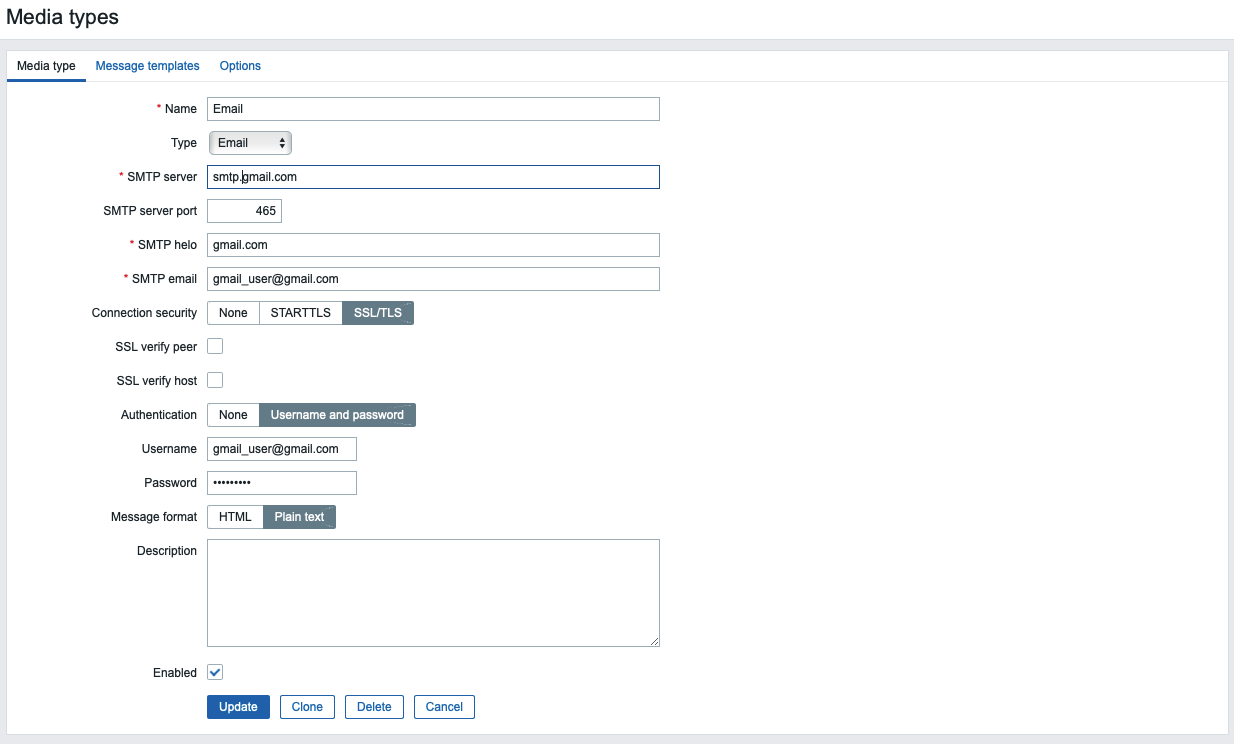
Now you can test sending notifications. To do this, click the Test underlined link in the corresponding line.

![[howto] установка и настройка zabbix 4.4 на ubuntu | мишка на сервере](https://robotrackkursk.ru/wp-content/uploads/0/3/1/031107bc92fb6178751b8ddf1c28ec1b.jpeg)
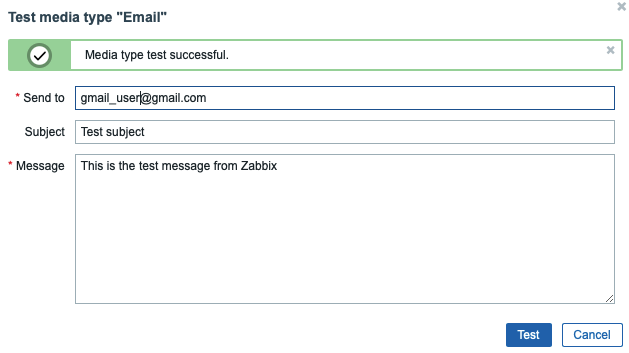
Close the pop-up by clicking the Cancel button.
Now, create a new user. Click on Administration, and then Users in the left navigation bar. You will see the list of users. Then click the Create user button in the top right corner of the screen. This will open the user configuration page:
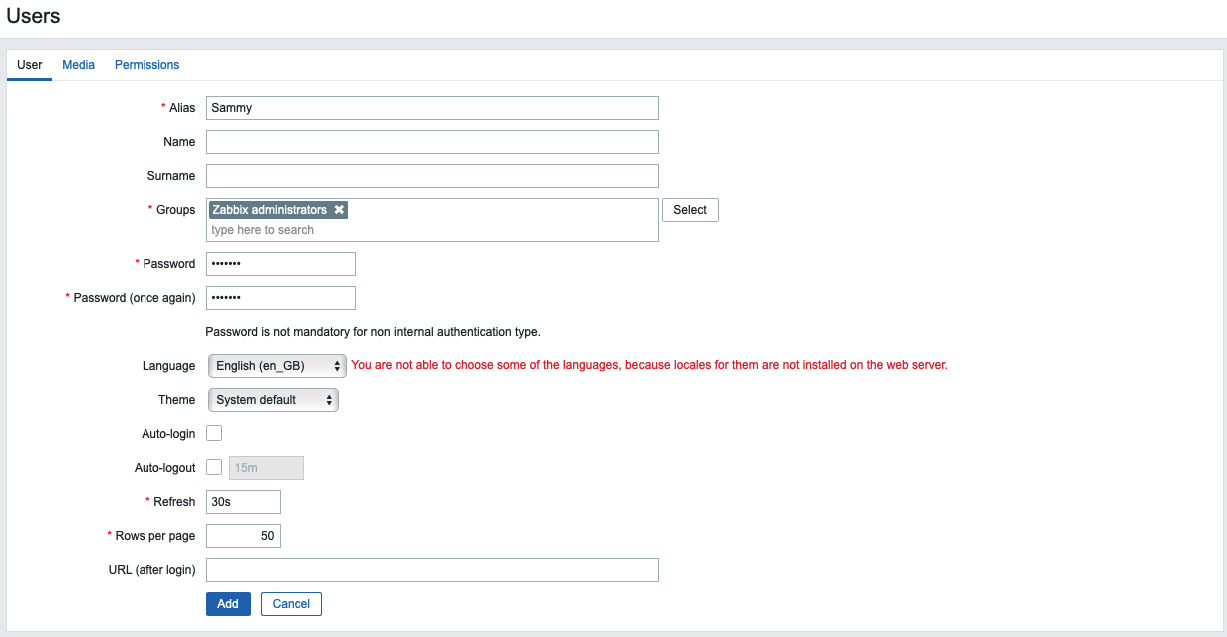
Enter the new username in the Alias field and set up a new password. Next, add the user to the administrator’s group. Type in the Groups field and select it from the proposed list.
Once you’ve added the group, click the Media tab and click on the Add underlined link (not the Add button below it). You will see a pop-up window.
Now navigate to the Permissions tab. Select Zabbix Super Admin from the User type drop-down menu.
Finally, click the Add button at the bottom of the form to create the user.
Note: Using the default password is not safe. In order to change the password of the built-in user Admin click on the alias in the list of users. Then click Change password, enter a new password, and confirm the changes by clicking Update button.
Now you need to enable notifications. Click on the Configuration tab and then Actions in the left navigation bar. You will see a pre-configured action, which is responsible for sending notifications to all Zabbix administrators. You can review and change the settings by clicking on its name. For the purposes of this tutorial, use the default parameters. To enable the action, click on the red Disabled link in the Status column.
Now you are ready to receive alerts. In the next step, you will generate one to test your notification setup.
5. Create an initial database and a user
| Database | zabbix |
| User | zabbix |
| Password | password |
1. Let’s login to MySQL server and provide the MySQL root password which you entered in the previous step.
sudo mysql -u root -p
2. Create a database and name it zabbix.
create database zabbix character set utf8 collate utf8_bin;
3. Create a new user and name it zabbix. Also, pick a password for this user. We will need this password later on for Zabbix server config file.
create user zabbix@localhost identified by 'password';
4. Now grant permissions on zabbix database to user zabbix.
grant all privileges on zabbix.* to zabbix@localhost;
5. Once done, flush the privileges.
flush privileges;
6. Confirm privileges for user zabbix on database zabbix.
show GRANTS FOR 'zabbix'@'localhost';
7. Let’s get out of MySQL
quit;
Prerequisites
To follow this tutorial, you will need:
-
Two Ubuntu 20.04 servers set up by following the Initial Server Setup Guide for Ubuntu 20.04, including a non-root user with privileges and a firewall configured with . On one server, you will install Zabbix; this tutorial will refer to this as the Zabbix server. It will monitor your second server; this second server will be referred to as the second Ubuntu server.
-
The server that will run the Zabbix server needs Nginx, MySQL, and PHP installed. Follow Steps 1–3 of our Ubuntu 20.04 LEMP Stack guide to configure those on your Zabbix server.
-
A registered domain name. This tutorial will use throughout. You can purchase a domain name from Namecheap, get one for free with Freenom, or use the domain registrar of your choice.
-
Both of the following DNS records set up for your Zabbix server. If you are using DigitalOcean, please see our DNS documentation for details on how to add them.
- An A record with pointing to your Zabbix server’s public IP address.
- An A record with pointing to your Zabbix server’s public IP address.
Additionally, because the Zabbix Server is used to access valuable information about your infrastructure that you would not want unauthorized users to access, it’s important that you keep your server secure by installing a TLS/SSL certificate. This is optional but strongly encouraged. If you would like to secure your server, follow the Let’s Encrypt on Ubuntu 20.04 guide after Step 3 of this tutorial.
Установка веб-сервера
Управление сервером Zabbix будет осуществляться посредством веб-интерфейса. Для этого необходимо установить и настроить веб-сервер, СУБД и PHP.
СУБД
В данному инструкции мы будем использовать сервер баз данных mariadb.
Для установки вводим:
yum install mariadb mariadb-server
Разрешаем автозапуск сервера баз данных и запускаем mariadb:
systemctl enable mariadb
systemctl start mariadb
Задаем пароль для суперпользователя СУБД:
mysqladmin -u root password
* после ввода команды система потребует ввести пароль два раза.
Веб-сервер
Для наших целей будем использовать веб-сервер NGINX.
Для его установки необходимо добавить новый репозиторий:
yum install epel-release
Теперь вводим команду:
yum install nginx
Запускаем nginx и разрешаем его автозапуск:
systemctl enable nginx
systemctl start nginx
* в вашем случае, данная страница может иметь другой вид.
PHP и PHP-FPM
Интерфейс zabbix разработан на PHP — наш веб-сервер должен обрабатывать скрипы, написанные на нем
Очень важно установить подходящую версию PHP. Узнать требуемую версию можно на странице с документацией — раздел «Frontend»
Для CentOS 7 максимально возможная версия для установки Zabbix с веб-интерфейсом — 4.2
Обратите на это внимание
Для Zabbix версии 4.2, требуется PHP версии 5. Данная версия устанавливается в CentOS 7 из коробки.
Устанавливаем php и необходимые компоненты:
yum install php php-fpm php-mysql php-pear php-cgi php-common php-ldap php-mbstring php-snmp php-gd php-xml php-gettext php-bcmath
Для настройки php, открываем файл:
vi /etc/php.ini
Редактируем следующие параметры:
date.timezone = «Europe/Moscow»
max_execution_time = 300
post_max_size = 16M
max_input_time = 300
max_input_vars = 10000
Запустим php-fpm:
systemctl enable php-fpm
systemctl start php-fpm
NGINX + PHP
Для того, чтобы NGINX обрабатывал PHP, открываем конфигурационный файл:
vi /etc/nginx/nginx.conf
И приводим его к виду:
server {
listen 80 default_server;
server_name _;
set $root_path /usr/share/nginx/html;
root $root_path;
location / {
index index.php;
}
location ~ \.php$ {
fastcgi_pass 127.0.0.1:9000;
fastcgi_buffer_size 32k;
fastcgi_buffers 4 32k;
fastcgi_index index.php;
fastcgi_param SCRIPT_FILENAME $root_path$fastcgi_script_name;
include fastcgi_params;
fastcgi_param DOCUMENT_ROOT $root_path;
fastcgi_read_timeout 300;
}
}
* где /usr/share/nginx/html — корневой путь хранения скриптов; 9000 — порт php-fpm.
Проверяем настройки nginx:
nginx -t
И перезагружаем его:
systemctl restart nginx
Заходим в каталог хранения настроенного сайта:
cd /usr/share/nginx/html
Создаем index.php со следующим содержимым:
vi index.php
<?php phpinfo(); ?>
Веб-сервер готов для работы с Zabbix Web.
Step 8 — Generating a Test Alert
In this step, you will generate a test alert to ensure everything is connected. By default, Zabbix keeps track of the amount of free disk space on your server. It automatically detects all disk mounts and adds the corresponding checks. This discovery is executed every hour, so you need to wait a while for the notification to be triggered.

Create a temporary file that’s large enough to trigger Zabbix’s file system usage alert. To do this, log in to your second Ubuntu server if you’re not already connected.
Next, determine how much free space you have on the server. You can use the command to find out:
The command will report the disk space usage of your file system, and the will make the output human-readable. You’ll see output like the following:
In this case, the free space is 23GB. Your free space may differ.
Use the command, which allows you to pre-allocate or de-allocate space to a file, to create a file that takes up more than 80% of the available disk space. This will be enough to trigger the alert:
After around an hour, Zabbix will trigger an alert about the amount of free disk space and will run the action you configured, sending the notification message. You can check your inbox for the message from the Zabbix server. You will see a message like:
You can also navigate to the Monitoring tab, and then Dashboard to see the notification and its details.

Now that you know the alerts are working, delete the temporary file you created so you can reclaim your disk space:
After a minute Zabbix will send the recovery message and the alert will disappear from main dashboard.
7. Update Zabbix Server Config file
Well! this file has a lot of stuff. We will update only one thing, however, this is the place where you tune up your Zabbix server. We will update the zabbix server password only. If you have used different zabbix database name, consider updating that as well.
sudo nano /etc/zabbix/zabbix_server.conf
Let’s find the keyword DBPasswordHit Ctrl + W on your keyboard, type DBPassword, and then hit Enter on your keyboard. You should see #DBPassword. Update it as follows:
DBPassword=password
Once you have made the above change, then use the following on your keyboard to save the file:Ctrl + O and Ctrl + X
Step 6: Login to frontend using Zabbix default login credentials
Use Zabbix default admin username “Admin” and password “zabbix” (without quotes) to login to Zabbix frontend at URL “http://server_ip_or_dns_name/zabbix” via your browser.
ZABBIX LOGIN PAGE
In my example, I have installed Zabbix on server 192.168.1.161 so I will enter in my browsers URL field http://192.168.1.161/zabbix (you can find the IP address of your server by typing “” command in the terminal)
Zabbix 6.0 dashboard
CONGRATULATIONS!You have successfully installed Zabbix 6 on Ubuntu and now you can monitor anything!No need to change anything else as other steps are optional.CONTINUE TO LEARN MORE:Optimizing Zabbix server and MySQL databaseHow to create MySQL partitions on History and Events tablesManaging Zabbix / MySQL / Apache service
Step 1 — Installing the Zabbix Server
First, you need to install Zabbix on the server where you installed MySQL, Nginx, and PHP. Log in to this machine as your non-root user:
Zabbix is available in Ubuntu’s package manager, but it’s outdated, so use the official Zabbix repository to install the latest stable version. Download and install the repository configuration package:
You will see the following output:
Update the package index so the new repository is included:
Then install the Zabbix server and web frontend with MySQL database support:
Also, install the Zabbix agent, which will let you collect data about the Zabbix server status itself.
Before you can use Zabbix, you have to set up a database to hold the data that the Zabbix server will collect from its agents. You can do this in the next step.


