Installation
Configure your Ubuntu repositories
Configure your Ubuntu repositories to allow «restricted,» «universe,» and «multiverse.» You can follow the Ubuntu guide for instructions on doing this.
Setup your sources.list
Setup your computer to accept software from packages.ros.org.
sudo sh -c ‘echo «deb http://packages.ros.org/ros/ubuntu $(lsb_release -sc) main» > /etc/apt/sources.list.d/ros-latest.list’
|
Source Debs are also available |
Set up your keys
sudo apt install curl # if you haven’t already installed curl
curl -s https://raw.githubusercontent.com/ros/rosdistro/master/ros.asc | sudo apt-key add —
Installation
First, make sure your Debian package index is up-to-date:
sudo apt update
There are many different libraries and tools in ROS. We provided four default configurations to get you started. You can also install ROS packages individually.
In case of problems with the next step, you can use following repositories instead of the ones mentioned above ros-shadow-fixed
-
Desktop-Full Install: (Recommended) : ROS, rqt, rviz, robot-generic libraries, 2D/3D simulators and 2D/3D perception
sudo apt install ros-melodic-desktop-full
or click hereDesktop Install: ROS, rqt, rviz, and robot-generic libraries
sudo apt install ros-melodic-desktop
or click hereROS-Base: (Bare Bones) ROS package, build, and communication libraries. No GUI tools.
sudo apt install ros-melodic-ros-base
or click hereIndividual Package: You can also install a specific ROS package (replace underscores with dashes of the package name):
sudo apt install ros-melodic-PACKAGE e.g.sudo apt install ros-melodic-slam-gmapping
To find available packages, use:
apt search ros-melodic
Environment setup
It’s convenient if the ROS environment variables are automatically added to your bash session every time a new shell is launched:
echo "source /opt/ros/melodic/setup.bash" >> ~/.bashrc
source ~/.bashrc
If you have more than one ROS distribution installed, ~/.bashrc must only source the setup.bash for the version you are currently using.
If you just want to change the environment of your current shell, instead of the above you can type:
source /opt/ros/melodic/setup.bash
If you use zsh instead of bash you need to run the following commands to set up your shell:
echo "source /opt/ros/melodic/setup.zsh" >> ~/.zshrc
source ~/.zshrc
Dependencies for building packages
Up to now you have installed what you need to run the core ROS packages. To create and manage your own ROS workspaces, there are various tools and requirements that are distributed separately. For example, rosinstall is a frequently used command-line tool that enables you to easily download many source trees for ROS packages with one command.
To install this tool and other dependencies for building ROS packages, run:
sudo apt install python-rosdep python-rosinstall python-rosinstall-generator python-wstool build-essential
Initialize rosdep
Before you can use many ROS tools, you will need to initialize rosdep. rosdep enables you to easily install system dependencies for source you want to compile and is required to run some core components in ROS. If you have not yet installed rosdep, do so as follows.
sudo apt install python-rosdep
With the following, you can initialize rosdep.
sudo rosdep init
rosdep update
Build farm status
The packages that you installed were built by the ROS build farm. You can check the status of individual packages here.
Now, to test your installation, please proceed to the ROS Tutorials.
Setuptools instead of Distutils
Catkin prefers to use setuptools instead of distutils since ros/catkin#1048. See ros/genlisp#17 for an example of how to update your package.
In your setup.py import setup from setuptools instead of distutils-core.
## Replace this line in your setup.py
# from distutils.core import setup
## With this one
from setuptools import setup
If your repository uses the same branch to release to multiple ROS distros (Melodic, Noetic, etc), then use add conditional build tool dependencies on python-setuptools and python3-setuptools to your package.xml using format 3.
<?xml version="1.0"?>
<?xml-model
  href="http://download.ros.org/schema/package_format3.xsd"
  schematypens="http://www.w3.org/2001/XMLSchema"?>
<package format="3">

<!- ... ->

  <buildtool_depend condition="$ROS_PYTHON_VERSION == 2">python-setuptools</buildtool_depend>
  <buildtool_depend condition="$ROS_PYTHON_VERSION == 3">python3-setuptools</buildtool_depend>
Installation
Start by building the core ROS packages.
Create a catkin Workspace
In order to build the core packages, you will need a catkin workspace. Create one now:
$ mkdir ~/ros_catkin_ws
$ cd ~/ros_catkin_ws
Next we will want to download the source code for ROS packages so we can build them. We will use vcstool for this. For the purpose of this guide, we’ll assume you’d like to build all of Desktop.
$ rosinstall_generator desktop —rosdistro noetic —deps —tar > noetic-desktop.rosinstall
$ mkdir ./src
$ vcs import —input noetic-desktop.rosinstall ./src
This will download all of the source code for packages part of Desktop into the ~/ros_catkin_ws/src directory. The command will take a few minutes to download everything.
Looking for something other than Desktop? More variants are defined in REP 150 such as desktop_full, robot, perception, etc. Just change the package path above from desktop to the one you want.
Resolving Dependencies
Before you can build your catkin workspace you need to make sure that you have all the system dependencies on your platform. We use the rosdep tool for this:
$ rosdep install —from-paths ./src —ignore-packages-from-source —rosdistro noetic -y
rosdep looks at all the packages in the src directory and tries to find and install their dependencies on your platform. After a while (and maybe some prompts for your password) rosdep will finish installing system dependencies and you can continue.
Building the catkin Workspace
By now you have a workspace with all of the source code, and all required system dependencies have been installed. Now it’s time to build the code. ROS 1 packages use CMake; however, calling cmake by hand on all the packages by hand would be tedious. There are tools we can use to build all the packages in the right order. The tool we’ll use is catkin_make_isolated.
catkin_make_isolated isn’t the only tool we could use. There are other tools that would work, like catkin_make or catkin_tools (which has a command line executable called catkin), or colcon. Some of those might be better for your use case, but we’ll use catkin_make_isolated here since that’s what the ROS buildfarm uses.
This command will build everything in the workspace. It may take a while. The command is running catkin_make_isolated command from the source folder because it has not been installed yet. Once installed it can be called using just catkin_make_isolated.
$ ./src/catkin/bin/catkin_make_isolated —install -DCMAKE_BUILD_TYPE=Release
Note: If you see an error relating to the EMPY module being missing you may be building using Python 2 rather than Python 3. To ensure you are using the latter, append the the following to the command above. If you have Python 3 installed elsewhere, update the path accordingly.
-DPYTHON_EXECUTABLE=/usr/bin/python3
Note: Want debug symbols? You might want to select a different CMake build type.
When the above command finishes, it will have installed everything into ~/ros_catkin_ws/install_isolated. If you would like to install somewhere else then add --install-space path/to/somewhere/else to the catkin_make_isolated call.
For usage on a robot without Ubuntu, it is recommended to install compiled code into /opt/ros/noetic just as the Ubuntu packages would do. Of course, don’t do this in Ubuntu, as the packages would collide with apt-get packages.
Now the packages should have been installed to ~/ros_catkin_ws/install_isolated or to wherever you specified with the --install-space argument. If you look in that directory you will see that a setup.bash file have been generated. To utilize the things installed there simply source that file like so:
$ source ~/ros_catkin_ws/install_isolated/setup.bash
Post-build Steps
Your workspace build should have generated a file called ~/catkin_ws/devel/setup.bash which sets up environment variables for user packages, the same way the file /opt/ros/melodic/setup.bash sets up the environment variables for the system packages. You should source both of these in your ~/.bashrc as the documentation describes, adding to the bottom of ~/.bashrc the following:
source /opt/ros/melodic/setup.bash # change melodic to noetic if necessary
source ~/catkin_ws/devel/setup.bash
To quickly test your build and environment, try running
roscd ainstein_radar_drivers
If the package was build correctly and the environment variables have been set up properly, this command should change directory to the drivers subpackage. You can find other useful ROS commands for working in terminal in the main ROS documentation.
Running Behavior Metrics Containers
Open up a terminal a paste the following command. Creating a volume is recommended so you can add models or datasets easily.
To create the volume update to yur local directory where your datasets and models are located and to the
directory you want them to be stored inside the container.
For GPU support (CUDA 10.1 Cudnn 7)
Some extra packages are needed for Ubuntu 16.04/18.04/20.04, more about installation in nvidia-docker docs.
The flag is added along with the correct image that contains cuda drivers.
For GPU support on WSL refer Getting started with CUDA on Ubuntu on WSL 2.
Using VNC to visualize container
To connect to our container RealVNC can be installed to access the GUI through the port 5900.

Once vnc-viewer is open fill in in the address and then press connect.
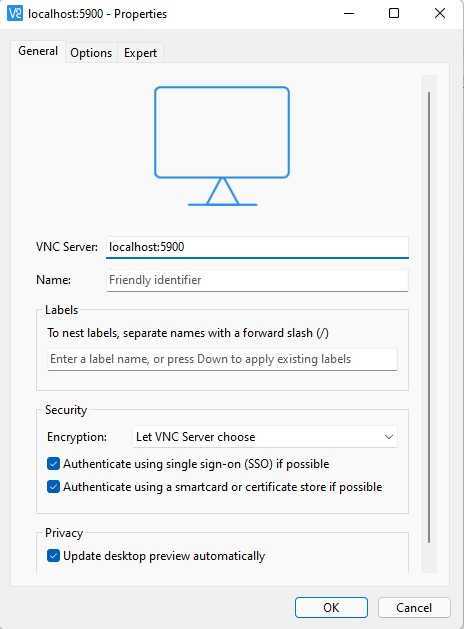
You will need to authenticate, the current password is jderobot, although it can be changed in the script .
Using terminal in container
The recommended way to work, is by writing down and you will get an URL, which will take you to notebook, double click on the last URL to open Jupyter.

Go to that URL in the browser (outside VNC) and once you are in the notebook you can open up a terminal by clicking in Terminal.
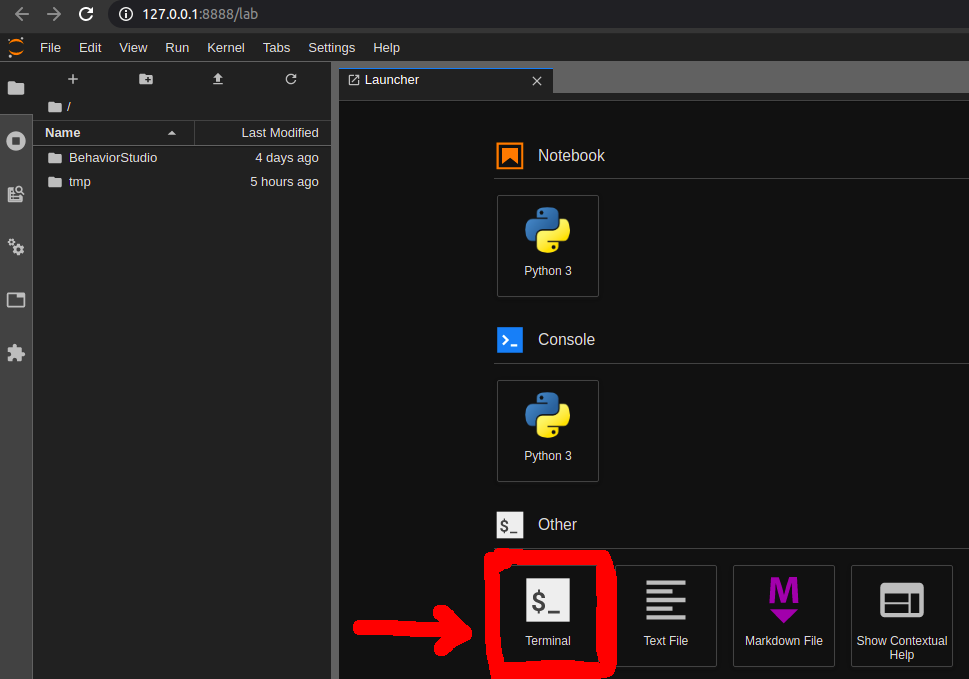
A terminal window will open. Type
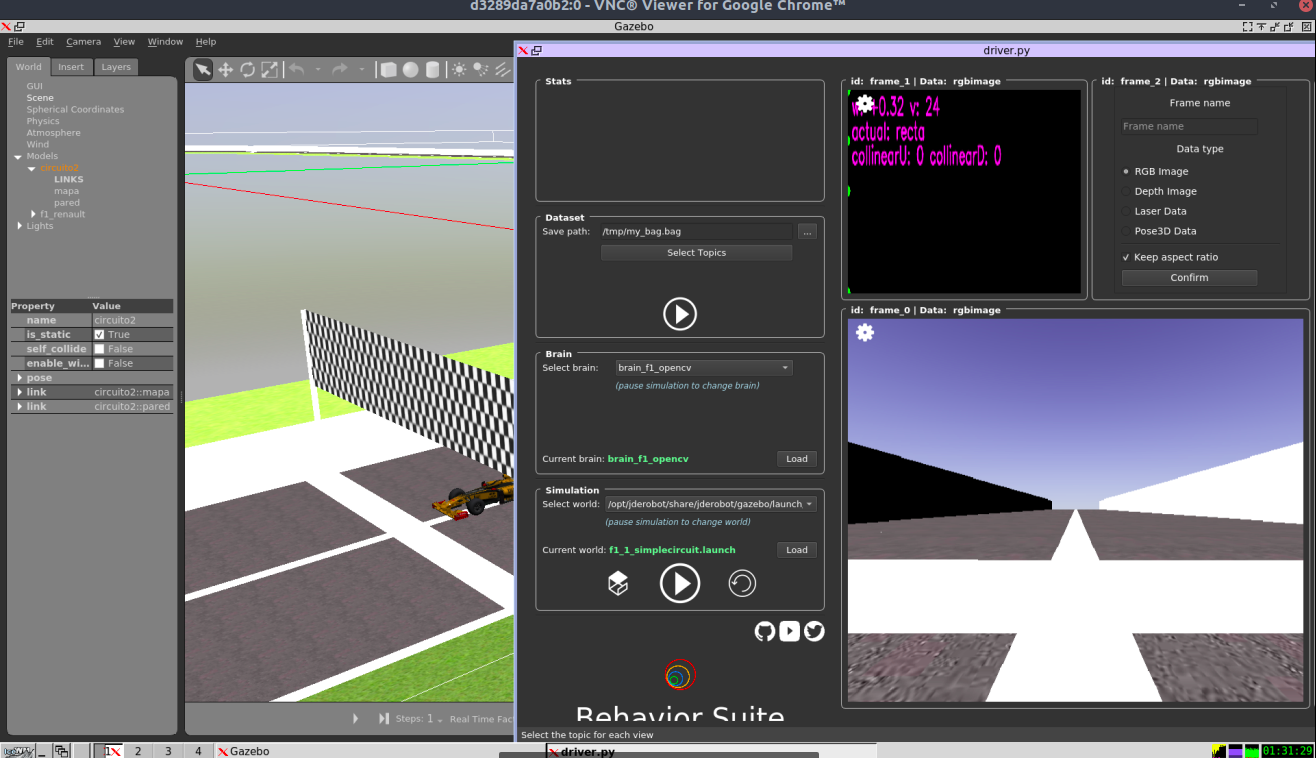
and this window will behave as any other Ubuntu terminal, so you are ready to run Behavior Metrics, once the GUI is opened it will be displayed in the VNC window.
This command will open the Gazebo Simulation in the VNC window. You can also directly run the previous command inside VNC window in a terminal.
IF THE PREVIOUS COMMAND FAILS try the following and try again:
Resuming container
should be replace with the name of your container, this command is similar to so now you can run to get a new link for jupyter, and then connect as usual to your VNC viewer.
2. What’s new in ROS Noetic?
In this section, we are planning to compare ROS Noetic and ROS Melodic. I am mainly planning to compare the software versions of both the distributions. Important changes are marked as red color.
The comparison between ROS Noetic and Melodic is shown below
| No | Features | ROS Noetic | ROS Melodic |
|---|---|---|---|
| 1 | Fully supported OS | Ubuntu Focal Fossa (20.04) | Ubuntu Bionic (18.04) |
| 2 | Supported OS | Debian Buster, Fedora 32 | Ubuntu Artful (17.10), Debian Stretch, Fedora 28 |
| 3 | Architecture Support | amd64, arm32, arm64 | arm64, arm32, arm64 |
| 4 | C++ | C++ 14 | C++ 14 |
| 5 | Python | Python 3.8 | Python 2.7 |
| 6 | Gazebo | 11.x | 9.0 |
| 7 | OpenCV | 4.2 | 3.2 |
| 8 | PCL | 1.10 | 1.8.1 |
| 9 | Qt | 5.12.5 | 5.9.5 |
| 10 | PyQt | 5.14.1 | 5.10.1 |
| 11 | Boost | 1.71 | 1.65.1 |
| 12 | CMake | 3.16.3 | 3.10.2 |
| 13 | OGRE | 1.9 | 1.9 |
| 14 | Ignition | Citadel | — |
| 15 | Lisp | Lisp SBCL 1.3.14 | Lisp SBCL 1.4.16 |
2.1 Python Support
One of the popular versions of Python was 2.7. On January 1st, 2020, Python 2.x stopped its official support. Till ROS melodic, the Python 2.7 support was there, but in Noetic, we are getting Python 3 exclusive support.
Step 21: RPLiDAR Ubuntu 20.04
Open your terminal and run the following command.
ls -l /dev | grep ttyUSB
Output of the following command must be:
crw-rw---- 1 root dialout 188, 0 Jan 3 14:59 ttyUSB
Run below command to change permission:
sudo chmod 666 /dev/ttyUSB0
Install RPLIDAR ROS Package
mkdir -p ~/catkin_ws/src
cd ~/catkin_ws/
Configure the catkin workspace
catkin_init_workspace
And source it to bashrc:
echo "source $HOME/catkin_ws/devel/setup.bash" >> ~/.bashrc
Okay, we’re ready to start installing RPLIDAR ROS package.
Go to the source folder of the catkin workspace that you just created:
cd src
Clone the ROS node for the Lidar in the catkin workspace.
After that build with catkin.
cd ~/catkin_ws/
Run catkin_make to compile your catkin workspace.
catkin_make
Then run to source the environment with your current terminal. Don’t close the terminal.
source devel/setup.bash
and launch RPILIDAR launch file
roslaunch rplidar_ros rplidar.launch
ROS Noetic packages: What are available?
It is also helpful to check out the ROS Noetic distribution file on GitHub to see all the packages currently available: https://github.com/ros/rosdistro/blob/master/noetic/distribution.yaml. Each package occupies 15 lines, so you can get a rough number by having the total line number divide by 15. You can also use the history function to check what are the packages released for ROS Noetic.
You can also check the status page for the unreleased packages that are blocking their dependent packages: http://repositories.ros.org/status_page/blocked_releases_noetic.html?s=6&r=1.
Use fcl rosdep key instead of libfcl-dev
ROS Noetic provides FCL 0.6, which is ABI and API-incompatible to FCL 0.5. The system-installed libfcl-dev might be version 0.5 or 0.6, depending on the particular OS (e.g. Ubuntu Focal has 0.5). To avoid any conflicts in downstream packages, when linking package libraries that are in turn linked against different FCL versions, we suggest to upgrade to FCL 0.6 and use the new rosdep key fcl instead of libfcl-dev (the fcl key corresponds to system package ros-noetic-fcl).
. Keep in mind that except changing the package.xml keys, you also might need to edit CMakeLists.txt to search for version 0.6, and then edit all files that directly use FCL to be compatible with the 0.6 API.
Set up ROS packages sources
In order to install the required ROS packages for running TIAGo’s simulation first, as explained in ROS Melodic installation, it is required to include packages.ros.org in the debian sources:
Configure your Ubuntu repositories
Configure your Ubuntu repositories to allow «restricted,» «universe,» and «multiverse.» You can follow the Ubuntu guide for instructions on doing this.
Setup your sources.list
Setup your computer to accept software from packages.ros.org.
sudo sh -c ‘echo «deb http://packages.ros.org/ros/ubuntu $(lsb_release -sc) main» > /etc/apt/sources.list.d/ros-latest.list’
|
Source Debs are also available |
Set up your keys
sudo apt install curl # if you haven’t already installed curl
curl -s https://raw.githubusercontent.com/ros/rosdistro/master/ros.asc | sudo apt-key add —
3 ways to install ROS Noetic
ROS Noetic is mainly developed for Ubuntu 20.04, so Ubuntu is the recommended Linux OS for installation. Learn how to install it on Ubuntu 20.04 or use Docker for the install Noetic. In the latter option, Docker allows you to run ROS on any operating system that you can install Docker to. However, having Ubuntu 20.04 will give you the most support as it is more popular. If you have a Raspberry Pi, you will need to compile from source to install ROS Noetic packages. Learn how to do this in our guide on How to Install ROS Noetic on Raspberry Pi 4.
In fact, you can also install ROS Noetic on Debian 10 Buster, but Ubuntu has a much larger userbase and Ubuntu is designed to be user friendly and based on Debian.
Installing the ARIAC 2017 packages from Binaries
You can either install the ARIAC packages from binaries (recommended) or by building the software locally on your machine.
Please select a supported ROS version at the top of the page.
sudo apt-get install ariac
To finish your install, source the ROS setup.bash file:
source /opt/ros/$ROS_DISTRO/setup.bash
This sets up your shell to run the ROS commands needed to run ARIAC. There is also a setup.zsh if you are using that shell.
So that the above line will be automatically run when you open new terminal windows, put it in your bashrc:
echo «source /opt/ros/$ROS_DISTRO/setup.bash» >> ~/.bashrc
Remove unnecessary package_dir option from setup.py
If your ROS package has a setup.py includes package_dir={'': ''} and you are seeing the following build error, then remove the package_dir argument. Example commit doing this.
running install_egg_info
error: error in 'egg_base' option: '' does not exist or is not a directory
CMake Error at catkin_generated/safe_execute_install.cmake:4 (message):

  execute_process(/tmp/ws/build_isolated/kdl_parser_py/catkin_generated/python_distutils_install.sh)
  returned error code
Call Stack (most recent call first):
  cmake_install.cmake:147 (include)
This option tells Python where to look for Python packages relative to the setup.py. The argument package_dir={'': ''} says the Python packages are in the same directory as the setup.py, but in this case it can be removed because . DO NOT REMOVE if your packages are in another folder next to your setup.py, such as src/my_python_pkg/__init__.py
Create a profile
All LXD containers have a defined profile. A default profile was created when LXD was first set installed, but we will create a ROS specific profile. This will support running ROS (either version 1 or 2) on an Ubuntu image.
The profile contains four specific configuration features:
- ROS software repositories
- Run X apps within the container
- Networking
- A disk storage device
Gather data
In order to set up the profile properly, we must first collect your workstation’s network adapter, and the user/group ID for your account. Find your network adapter using the command:
The above example shows three network adapters: loopback, wireless and ethernet (respectively). Select the adapter to use for the container; for this case we will use the wired adapter
To find the id of your non-root account, use the command:
In the example above my user id “sid” has a uid and gid of 1001.
Create the ROS Profile
Armed with these two key facts, we can create and edit the LXD profile for our ROS containers:
This brings up a default profile template for editing within vi. Update the file as follows, then save and exit vi:
Let’s break down the configuration file and look at each part individually.
Configure the environment
The following line sets the DISPLAY environment variable required by X. The display within the container is always mapped to ”’:0”’.
Our linux containers will run under the security context of the current user, but all work within the Ubuntu containers will be done under the default user account. The setting maps our workstation’s user and group ID (1001 in this example) into the container’s user and group ID (always 1000 for the default user):
Configure ROS repositories
The ROS software repositories can be added to the container every time a new container is launched. The simplest way to achieve this is to use cloud-init, and add a to the user-data section of the profile. Each of these commands will be executed whenever a new container is initialized using this profile.
The apt-key command pulls the ROS distribution signing key from github, while the two add-repository commands add the ROS 1 and ROS 2 software repositories.
Configure devices
Adding the X0 device to the profile allows X data to flow between the container (“path”) and the host (“source”). If you have multiple graphics cards check the contents of to make sure you’re mapping to the correct source; the source should mirror the environment variable from your host.
If you have a separate graphics card with a discrete GPU, you may also find it necessary to add the GPU as a device:
To learn more about running graphical apps in LXD containers, including some caveats when working with an NVidia GPU, take a look at this blog post by Simos Xenitellis.
Multiple options exist for networking. Although a container can use LXD’s built in address translation or a bridge device, our profile will use the macvlan network driver. Macvlan creates a simple bridge between the parent network adapter and the container so the container receives its own IP address on the host network. With this setup no additional configuration (e.g., port forwarding) is required for either ROS 1 or ROS 2.
The network interface (nic) device configured here uses macvlan to connect the parent network adapter to the container’s eth0 interface:
Take a look at this post if you need more information about LXD networking with macvlan.
A disk image must be connected to the container. This disk device simply uses the lxd default data pool:
Запустите детеныша черепахи.
Turtlesim — это программа моделирования маленькой черепахи, которая поставляется с системой ROS. Шаги следующие:
1. Запустите диспетчер узлов.
Чтобы запустить turtlesim, сначала запустите roscore, чтобы запустить диспетчер узлов ROS. Метод и результаты следующие:
roscore запустит мастер ROS, сервер параметров ROS и узел журнала с именем rosout. ROS Master по умолчанию работает на порту 11311. Если вы хотите указать порт, вы можете обратиться к следующему:
2. Запустите узел ros
Используйте сочетание клавиш Ctrl + Shift + T, чтобы открыть другой терминал и запустить узел turtlesim_node, команда выглядит следующим образом:
3. Используйте клавиатуру
Если вы хотите, чтобы маленькая черепашка могла двигаться, вы можете запустить узел управления turtle_teleop_key клавиатуры turtlesim, использовать сочетание клавиш Ctrl + Shift + T, чтобы открыть другой терминал, и введите команду:
В текущем терминале нажмите и удерживайте клавиши со стрелками для управления перемещением черепахи, скриншот выглядит следующим образом: Хорошо, поторопитесь и попробуйте, можете оставить сообщение для обсуждения ~
Set up ROS Melodic environment
After installing the Melodic desktop package, all the ROS commands are actually not in the PATH variable, which means you won’t be able to run any ROS commands or won’t be able to find your ROS program files such as header files in your includes directory, then the compiling process will fail. Indeed, all the installation files are installed in . We will need to manually set up the ROS environment by either running or put this command in file because we don’t want to run that setup.bash script every time we open a new terminal tab or window.
To add the file to , run
After this echo command, you can run to double check if it works. You will see the following output:
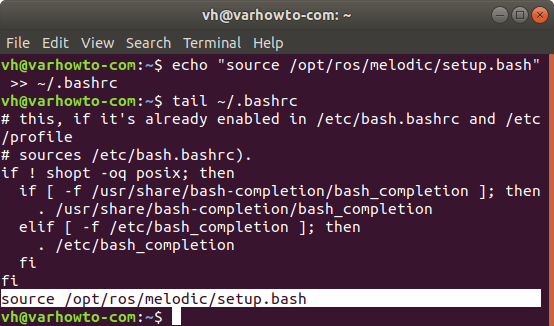
Now you can open a new terminal tab (Ctrl-Shift-t) or new window (Ctrl-Shift-n) to make it take effect.
If you are using instead of , you can run to put to your file in your Linux home directory.
Step 2 — Add official ROS Melodic repo keyring
Next, we will add the official ROS key to download authentic ROS Melodic packages to your Ubuntu 18.04 OS. Adding the key in important to avoid man-in-middle attack.
You can add the official ROS key in two methods and any of them will work. If you are not sure, follow the first method.
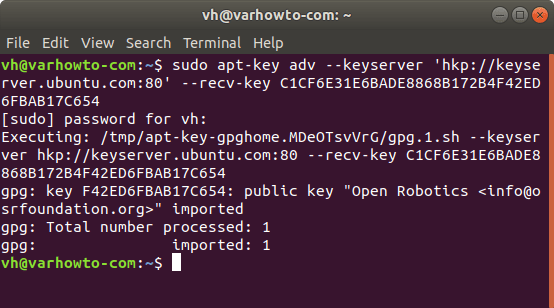
The first method uses , a dedicated command for APT key management. APT here means Advanced Package Tool, which is used for package management on Ubuntu and any other Debian based Linux distribution. If the following command does not work, which might be caused by network issue preventing you access , you can replace with the MIT equivalent :
The key is successfully added if you will see output like below, starting with . From the output, we can see the ROS key is issued by Open Robotics who is the developer of ROS. You will also notice it automatically download the keyring file to the directory.
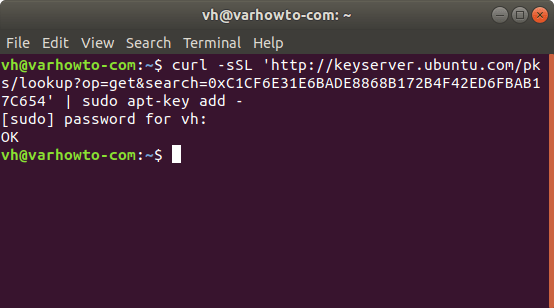
The second approach is to use to manually download the key and call to add it. If you don’t have it on your system, you can install it by sudo apt install curl). This is preferred if you are installing Melodic without an Internet connection or you won’t be able to access ubuntu.com if you are behind a security system.
Installation
Configure your Ubuntu repositories
Configure your Ubuntu repositories to allow «restricted,» «universe,» and «multiverse.» You can follow the Ubuntu guide for instructions on doing this.
Setup your sources.list
Setup your computer to accept software from packages.ros.org.
sudo sh -c ‘echo «deb http://packages.ros.org/ros/ubuntu $(lsb_release -sc) main» > /etc/apt/sources.list.d/ros-latest.list’
|
Source Debs are also available |
Set up your keys
sudo apt install curl # if you haven’t already installed curl
curl -s https://raw.githubusercontent.com/ros/rosdistro/master/ros.asc | sudo apt-key add —
Installation
First, make sure your Debian package index is up-to-date:
sudo apt update
Now pick how much of ROS you would like to install.
-
Desktop-Full Install: (Recommended) : Everything in Desktop plus 2D/3D simulators and 2D/3D perception packages
sudo apt install ros-noetic-desktop-full
or click hereDesktop Install: Everything in ROS-Base plus tools like rqt and rviz
sudo apt install ros-noetic-desktop
or click hereROS-Base: (Bare Bones) ROS packaging, build, and communication libraries. No GUI tools.
sudo apt install ros-noetic-ros-base
or click here
There are even more packages available in ROS. You can always install a specific package directly.
sudo apt install ros-noetic-PACKAGE e.g.sudo apt install ros-noetic-slam-gmapping
To find available packages, see or use:
apt search ros-noetic
Environment setup
You must source this script in every bash terminal you use ROS in.
source /opt/ros/noetic/setup.bash
It can be convenient to automatically source this script every time a new shell is launched. These commands will do that for you.
Bash
If you have more than one ROS distribution installed, ~/.bashrc must only source the setup.bash for the version you are currently using.
echo "source /opt/ros/noetic/setup.bash" >> ~/.bashrc
source ~/.bashrc
zsh
echo "source /opt/ros/noetic/setup.zsh" >> ~/.zshrc
source ~/.zshrc
Dependencies for building packages
Up to now you have installed what you need to run the core ROS packages. To create and manage your own ROS workspaces, there are various tools and requirements that are distributed separately. For example, rosinstall is a frequently used command-line tool that enables you to easily download many source trees for ROS packages with one command.
To install this tool and other dependencies for building ROS packages, run:
sudo apt install python3-rosdep python3-rosinstall python3-rosinstall-generator python3-wstool build-essential
Initialize rosdep
Before you can use many ROS tools, you will need to initialize rosdep. rosdep enables you to easily install system dependencies for source you want to compile and is required to run some core components in ROS. If you have not yet installed rosdep, do so as follows.
sudo apt install python3-rosdep
With the following, you can initialize rosdep.
sudo rosdep init
rosdep update
Step 12: RPLiDAR Ubuntu 18.04
We Connected our RPLiDAR to Raspberry Pi 4 Model B using Micro USB Cable. Flashing green light indicates normal activity of sensor. Following command line to check the permissions:
Open your terminal and run the following command.
ls -l /dev | grep ttyUSB
Output of the following command must be:
crw-rw---- 1 root dialout 188, 0 Jan 3 14:59 ttyUSB
Run below command to change permission:
sudo chmod 666 /dev/ttyUSB0
Now you are able to read and write with this device using the USB port.
Install the following dependencies. Open a new terminal and type:
sudo apt-get install cmake python-catkin-pkg python-empy python- nose python-setuptools libgtest-dev python-rosinstall python- rosinstall-generator python-wstool build-essential git
Create the catkin root and source folders
mkdir -p ~/catkin_ws/src
This workspace can be compiled even it is empty. Go to the source folder of the catkin workspace that you just created In your terminal, run
cd ~/catkin_ws/src
Clone the github repository of RPLIDAR ROS package.
And then
cd ~/catkin_ws
Then, run catkin_make to compile your catkin workspace.
catkin_make
Then run to source the environment with your current terminal. Don’t close the terminal.
source devel/setup.bash
To start ROS, run the following command in a new terminal:
roscore
In the terminal which you sourced the environment, run below command
roslaunch rplidar_ros view_rplidar.launch
An instance of Rviz will then open with a map of the RPLIDAR’s surroundings.
Launch a container
The command is used to launch a container for the first time. Use the following command to create and run an Ubuntu 20.04 container named “ros-foxy”:
Once the container is running, logging in is achieved by simply executing a shell within the container:
This connects to a shell on the container under the root userid; however, our configuration uses the ubuntu user account. In order to connect to a shell as the ubuntu user, execute the su command within the container:
This tends to be a bit cumbersome to type for every connection to the container. LXD aliases provide an easy way to simplify the command, and also make it more generally applicable. Shorten the command and make it more robust by creating an LXD alias using this command:
For more information about the options used with this alias, see this blog post from Simos Xenitellis.
Now connecting to an Ubuntu container with the proper context is as simple as the following command:
