Установка GLPI
Создание базы данных
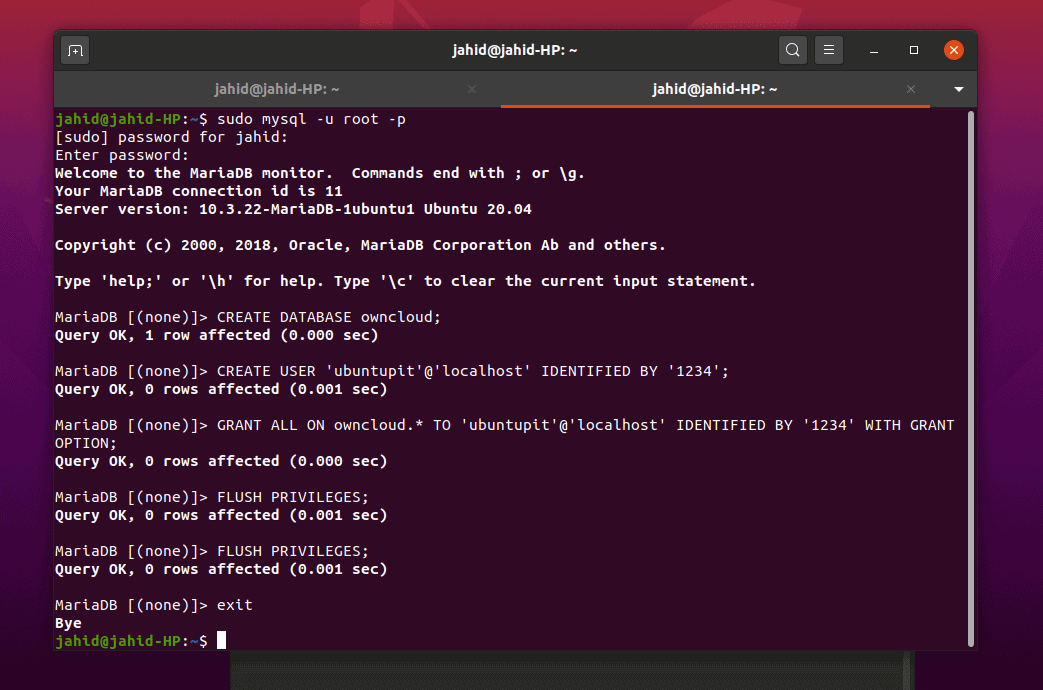
Подключаемся к СУБД:
mysql -uroot -p
Создаем базу данных:
> CREATE DATABASE glpi DEFAULT CHARACTER SET utf8 DEFAULT COLLATE utf8_general_ci;
* где glpi — имя базы.
Создаем пользователя с доступом к этой базе:
> GRANT ALL PRIVILEGES ON glpi.* TO glpi@localhost IDENTIFIED BY ‘glpi123’;
* где glpi@localhost — пользователь с логином glpi и доступом с локального сервера; glpi123 — пароль для пользователя.
Отключаемся от MariaDB:
> \q
Загрузка
Установим пакет для загрузки файлов:
yum install wget
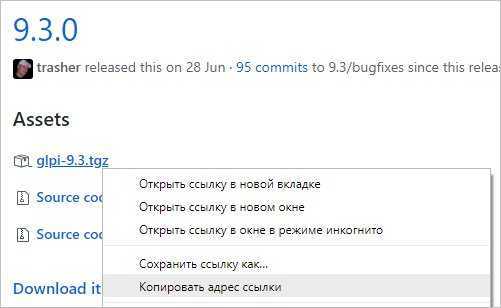
Переходим на страницу загрузки GLPI — github.com/glpi-project/glpi/releases и копируем ссылку на новую версию пакета:
Скачиваем GLPI:
wget https://github.com/glpi-project/glpi/releases/download/9.3.0/glpi-9.3.tgz
Установка
Устанавливаем php-расширения, необходимые для GLPI:
yum —enablerepo=remi-php72 install php-mbstring php-gd php-simplexml php-intl
Устанавливаем рекомендованные php-расширения:
yum —enablerepo=remi-php72 install php-ldap php-imap php-pecl-zendopcache php-pecl-apcu php-xmlrpc php-pear-CAS php-zip php-sodium
Перезапускаем apache:
systemctl restart httpd
Распаковываем архив в каталог виртуального домена (настраивали в Apache):
tar -xvzf glpi-*.tgz -C /var/www/glpi —strip-components 1
Задаем владельца apache для данного каталога:
chown -R apache:apache /var/www/glpi
Запускаем браузер и снова открываем портал по имени виртуального домена. В открывшемся окне выбираем русский язык (или любой из возможных вариантов) и нажимаем OK:

Принимаем лицензионное соглашение и нажимаем Продолжить:

Из двух вариантов (установить или обновить) выбираем Установить:

Система проверить, что наши настройки соответствуют рекомендованным. Если все хорошо, нажимаем Продолжить.
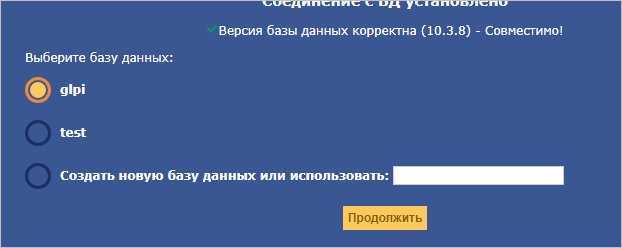
На следующем шаге вводим данные для подключения к базе данных:

Далее выбираем базу, созданную ранее:
Несколько раз нажимаем Продолжить и на последнем этапе Запустить GLPI.
Готово. Для первого входа используем логин и пароль по умолчанию — glpi/glpi.
Защищенное соединение (https)
Для настройки https нам нужен сертификат. Его можно создать с помощью внутреннего центра сертификации, купить, получить бесплатно у Let’s Encrypt или, в качестве тестового варианта, создать самозаверенный сертификат командами:
mkdir /etc/httpd/ssl/
openssl req -new -x509 -days 1461 -nodes -out /etc/httpd/ssl/cert.pem -keyout /etc/httpd/ssl/cert.key -subj «/C=RU/ST=SPb/L=SPb/O=Global Security/OU=IT Department/CN=test.admins24.local/CN=test»
Добавляем виртуальный домен:
vi /etc/httpd/conf.d/glpi.conf
<VirtualHost *:80> Define root_domain test-glpi.admins24.local Define root_path /var/www/glpi
ServerName ${root_domain} DocumentRoot ${root_path}
RewriteEngine On RewriteCond %{HTTPS} off RewriteRule (.*) https://%{HTTP_HOST}%{REQUEST_URI}</VirtualHost>
<VirtualHost *:443> Define root_domain test-glpi.admins24.local Define root_path /var/www/glpi
ServerName ${root_domain} DocumentRoot ${root_path}
SSLEngine on SSLCertificateFile ssl/cert.pem SSLCertificateKeyFile ssl/cert.key</VirtualHost>
* в данном примере мы добавили виртуальный домен для 443 порта и добавили правило перенаправления всех запросов с http (80) на https (443).
Добавляем порт 443 в брандмауэр (если этого не было сделано при подготовке сервера):
firewall-cmd —permanent —add-port=443/tcp
firewall-cmd —reload
Устанавливаем модуль mod_ssl:
yum install mod_ssl
Перезапускаем apache:
systemctl restart httpd
HTTP/2
Для поддержки http2, добавляем новый репозиторий:
cd /etc/yum.repos.d
wget https://repo.codeit.guru/codeit.el`rpm -q —qf «%{VERSION}» $(rpm -q —whatprovides redhat-release)`.repo
Устанавливаем модуль mod_http2:
yum install mod_http2
В конфиг виртуального домена добавим:
Protocols h2 http/1.1
Перезапустим httpd:
systemctl restart httpd
Подробнее про настройку HTTP/2 на Apache.
Package Management

- Use Add a Package to create a new package.
- Click on an existing package to edit that package.
Edit package
You can add checks before running the package, but you can prefer to do
that with the deployed scripts.

- Select to upload a file. You can upload a number of files, but must upload one at a time. You can also elect to
upload a zip file. - Select to get the file “From this computer”. Use the browse button to select the file.
- With P2P enabled, computers will keep and share the downloaded files to the other computers of the LAN.
This allow you to speed up a large download. - If Extract is enabled, FusionInventory will try to extract the archive (.7z, .zip, tar.gz, .tar)
- With P2P enabled, computers will keep and share the downloaded files to the other computers of the LAN.
- Click OK and the file will be uploaded.
- Click on “Add command”, select “execute a command” then type in the command you want, you can use the script
name here, but if you’re doing something else, any valid windows command (use full path names) can be used.
If you use “move” command, use “*” in case from if the agent get the file from GLPI
5. Finish the GLPI installation
The rest of the installation needs to be done from the web browser. If you are on the same machine as the glpi installation got to http://127.0.0.1/glpi/install/install.php if you are installing glpi on a remote machine go to http://serverip/glpi/install/install.php
This will bring up the following page:
 Installing GLPI on Ubuntu 20.04 4
Select you language and click the OK button this will bring the following screen:
 Accept the license agreement and click Continue:
 Installing GLPI on Ubuntu 20.04 5
Click Install:
 Installing GLPI on Ubuntu 20.04 6
This will show any issues that need fixing:
 Installing GLPI on Ubuntu 20.04 7
To fix the error about Web access edit the /etc/apache2/apache2.conf file so that the following text is changed from:
To:
Save the changes and restart Apache2 with:
Now there are no-more errors:
 Installing GLPI on Ubuntu 20.04 8
Click Continue.
 Installing GLPI on Ubuntu 20.04 9
Add the details of the root user and press Continue:
 Installing GLPI on Ubuntu 20.04 10
Select the GLPI database and click Continue:
 Installing GLPI on Ubuntu 20.04 11
Wait for the database to initialize:
 Installing GLPI on Ubuntu 20.04 12
Click Continue:
 Installing GLPI on Ubuntu 20.04 13
Untick Send “usage Statistics” and click Continue:
 Installing GLPI on Ubuntu 20.04 14
Click Continue again:
 Installing GLPI on Ubuntu 20.04 15
The installation is now complete. click on use GLPI to access GLPI:
 Installing GLPI on Ubuntu 20.04 16
Log in with one of the glpi user and click Post:
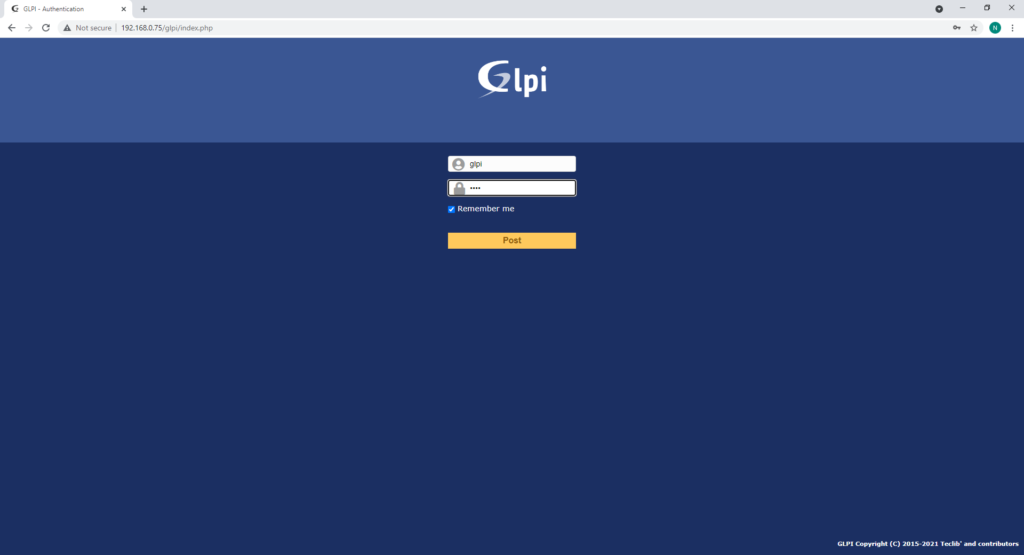 Installing GLPI on Ubuntu 20.04 17
You will now be logged into GLPI and on the dashboard:
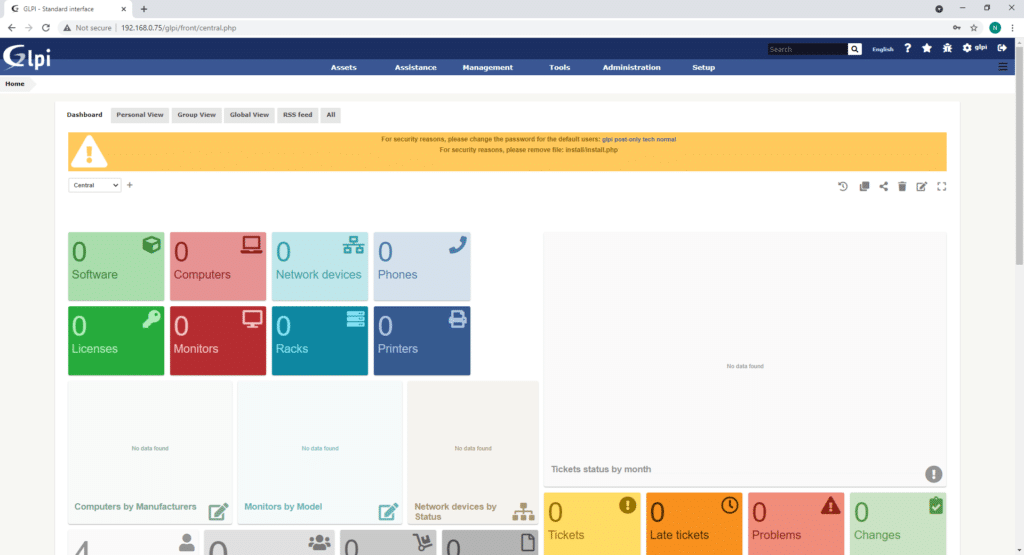 Installing GLPI on Ubuntu 20.04 18
Go to the next post to learn how to change all of the default user passwords and to remove the install.php file to clear the orange banner at the top of the page.
GLPI
GLPI(Gestionnaire libre de parc informatique) — система инвентаризации компьютерной и оргтехники. GLPI русифицирована, создана на PHP и использует СУБД MySQL.
GLPI кроме задач по учету компьютеров и входящих в их состав комплектующих, позволяет инвентаризировать прочее оборудование, включая расходные материалы (например, картриджи), а также организовать службу технической поддержки, автоматизируя обработку обращений пользователей. Теперь пользователь, вместо того чтобы бежать или звонить админу, заполняет, зайдя по адресу ресурса, заявку.
GLPI. Полезные советы
Обращения обрабатываются с учетом их важности или в порядке очередности. Администратор выигрывает вдвойне – все обращения документируются, и можно спокойно отчитаться перед начальством о проделанной работе и затраченном времени, пользователи по этой же причине перестанут обращаться по мелочам
Не говоря уже о том, что звонки обычно отвлекают от выполнения текущей работы.
Также с его помощью можно сформировать базу знаний, которая будет состоять из заметок, статей и ЧаВО, вести учет поставщиков, договоров. Доступно большое количество отчетов (по договорам, финансовая, за год) и статистик (по заявкам, оборудованию, элементам).
Поддерживается синхронизация календаря по протоколам Ical, Webcal. Функциональность GLPI можно расширить при помощи большого набора плагинов от сторонних разработчиков!
Установка
Системное окружение: Ubuntu Server 9.10 x86_64 GNU/Linux
# wget https://forge.indepnet.net/attachments/download/597/glpi-0.72.4.tar.gz # tar xzvf glpi-0.72.4.tar.gz -C /var/www/ # cd /var/www/glpi/ # chown www-data:www-data config files files/* inc
Далее набираем в браузере http://localhost/glpi выбираем язык (в списке есть русский), принимаем условия GPL и следуем указаниям мастера установки.
# nano /etc/php5/apache2/php.ini memory_limit = 128M # /etc/init.d/apache2 restart
По умолчанию, пользователь ‘glpi’ и пароль ‘glpi’ для входа в систему с правами администратора.
По умолчанию логины / пароли: * glpi/glpi для административной учетной записи * tech/tech для технической учетной записи * normal для обычной учетной записи * post-only/post-only только создание заявок Вы можете изменить или удалить эти учетные записи также как и первые записи в БД.
Чтобы GLPI автоматически проверял почту, отправлял уведомления следует создать задание для пользователя от имени которого работает веб-сервер (нужен пакет php5-cli):
$ sudo crontab -u www-data -e */5 * * * * /usr/bin/php5 /var/www/glpi/front/cron.php &>/dev/null
Интеграция GLPI с OCS Inventory
Логинемся под правами администратора GLPI. В меню Установки → Общие → Ограничения включаем параметр «Активировать режим OCSNG». Появляется новая пункт расположенный Установки →Режим OCSNG.
Если OCSNG и MySQL установлены на локальной машине, то данные для подключения к OCSNG будут найдены автоматически. Иначе необходимо будет заполнить информацию о сервере OCSNG вручную. По умолчанию синхронизируется только часть параметров, чтобы в базу данных GLPI были перенесены и компоненты компьютеров, следует разрешить их синхронизацию, установив флажок напротив нужного в положение «Глобальный импорт».
Во вкладке «Инструментарий» появится пункт OCSNG, при помощи имеющихся здесь ссылок можно производить синхронизацию и импортирование компьютеров между OCSNG и GLPI. Полученные данные появляются во вкладке «Оборудование». Здесь несколько подпунктов, переход в некоторые из них позволяет получить список некоторых компонентов, входящих в компьютер («Мониторы», «Принтеры»), отдельного оборудования («Картриджи», «Телефоны»), а также ПО. Импортированные компьютеры доступны в одноименном подпункте. Выбрав компьютер или устройство, мы получаем доступ к 12 вкладкам, в которых можно просмотреть и скорректировать данные об оборудовании, сопоставить ответственного, просмотреть заявки, добавить заметки, сделать отметку о выдаче во временное использование, просмотреть историю и так далее.
Install OCSInventory
Install Server
Some repos need to be added to download the necessary files
Install the Repo RPM’s
Install yum-utils and enable the Remi repo
Have Remi supply the PHP
On CentOs there is a repo named PowerTools, this isn’t available on RHEL8, use the following instead or there will be issues trying to install the OCSserver package.
Install OCS
Start MariaDB
Set the Root password
Start Apache
Start PHP-FPM
Enable the Firewall
Open your Web browser and head over to
Fill in the information to connect to MySQL database server with a user who has the ability to create database, tables, indexes, etc (usually root):
- MySQL user name: root
- MySQL user password: root password
- MySQL hostname: localhost
- MySQL Database: ocsweb
Don’t enable SSL
Once the install has complete (may require a Db files update, this needs to be run)
Point your browser to the URL and login in with admin as user and admin as password.

Install Agents
There are details on the OCS page for installing agents on various platforms, for this example I’m using RHEL8 and ProxMox machines.
Setting up the UNIX agent using repository on client computers – OCS Inventory Documentation
OCS Inventory Documentation
Installing UNIX Agent with APT
On Debian-based distributions such as Proxmox you can install the agent with APT
You need to add a repository using the following command
You will have to replace by one of the following term depending on the installation context :
- buster | stable
- stretch | oldstable
- sid | unstable
Then install the agent using :
On Ubuntu-based distributions you can install the agent with APT
You need to add our repository using the following command
You will have to replace by one of the following term depending on the installation context :
- focal | stable
- bionic | oldstable
- xenial | backport
Then install the agent using :
Установка инвентаря OCS
Вы должны загрузить установочный пакет с сервера OCS:
wget https://github.com/OCSInventory-NG/OCSInventory-ocsreports/releases/download/2.5/OCSNG_UNIX_SERVER_2.5.tar.gz .
![Service:glpi [вячеслав булынкин]](https://robotrackkursk.ru/wp-content/uploads/4/1/c/41c7c724b236ffdc0ea314a149cedf20.jpeg)
После установки он должен быть распакован с помощью: tar -xvf OCSNG_UNIX_SERVER_2.5 .tar.gz.
Когда распаковка завершена, мы входим в папку OCSNG_UNIX_SERVER_2.5 и запускаем скрипт установки с помощью команды ./setup.sh
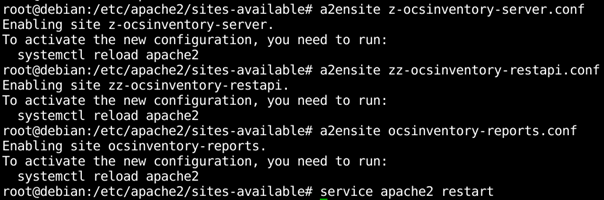
После того, как вы ответили на все вопросы и установка была завершена, в сообщении говорится, что файлы, которые должен принять Daemon, находятся в папке conf. доступно от apache2.
Мы должны скопировать их и поместить в доступный сайт, чтобы демон мог выполнить свою задачу.
![]()
Оказавшись на сайте, мы создаем a2ensite для каждого файла, затем перезапускаем службу apache.
III. Modification du script VBS
Le script VBS doit être adapté à votre environnement notamment pour indiquer le partage sur lequel vous hébergez le fichier EXE, la version que vous souhaitez installer ou encore l’architecture de la machine cible.
Voici les différentes modifications à effectuer :
Pour indiquer la version :
SetupVersion = "2.3.17"
Pour l’architecture (x86, x64, auto) :
SetupArchitecture = "Auto"
Pour les options d’exécutions :
SetupOptions = "/acceptlicense /runnow /execmode=service /add-firewall-exception /tag=VOTRE-TAG /server='VOTRE-SERVEUR' /S"
On décide de réaliser une installation silencieuse et d’exécuter l’agent en tant que service, une exception sera ajoutée dans le firewall pour autoriser l’agent à communiquer. Le TAG et le serveur sont à adapter à votre configuration bien entendu, mais de toute manière on va les forcer par la suite dans notre GPO.
C’est tout ce qu’il faut modifier dans le script.
I. Présentation
Fusion Inventory est une application réputée pour faciliter l’inventaire d’un parc informatique, mais pour remonter les informations liées à vos postes de travail et serveurs, un agent Fusion Inventory doit être installé et configuré. Pour réaliser cette opération, vous pouvez l’inclure dans votre master de déploiement pour vos futurs postes ou mises à jour, mais si vous souhaitez l’installer sur un parc existant, le déploiement par GPO est possible (bien que ce ne soit pas la seule possibilité).
Dans cette optique, sur le site de Fusion Inventory, on retrouve divers éléments utiles :
- L’exécutable de l’agent Fusion Inventory — Télécharger
- Un fichier ADMX pour configurer l’agent dans une GPO — Télécharger ADMX — Télécharger ADML
- Un script VBS pour exécuter une installation silencieuse de l’agent — Télécharger
Profitez des liens que j’ai placé ci-dessus pour récupérer les éléments si besoin, sachant qu’il s’agit de l’agent Fusion Inventory 2.5, la plus récente à ce jour.
J’en profite aussi pour vous proposer mon script PowerShell pour l’installation de Fusion Inventory, basé sur le même principe que celui en VBS : PowerShell Fusion Inventory
Pour revenir sur le script VBS, au total j’en ai trouvé 3 différents sur le site de Fusion Inventory, rien ne vous empêche de créer le votre… — Voici le lien vers le deux autres si vous voulez :
- Fusion Inventory VBS
- Fusion Inventory VBS by ZenAdm
Post installation
Once GLPI has been installed, you’re almost done.
An extra step would be to secure (or remove) installation directory. As an example, you can consider adding the following to your Apache virtual host configuration (or in the file):
<IfModule mod_authz_core.c>
    Require local
</IfModule>
<IfModule !mod_authz_core.c>
    order deny, allow
    deny from all
    allow from 127.0.0.1
    allow from ::1
</IfModule>
ErrorDocument 403 "<p><b>Restricted area.</b><br />Only local access allowed.<br />Check your configuration or contact your administrator.</p>"
With this example, the install directory access will be limited to localhost only and will display an error message otherwise. Of course, you may have to adapt this to your needs; refer to your web server’s documentation.
Install GLPI:
After configuring the MariaDB database we will install and prestage GLPI.
wget https://github.com/glpi-project/glpi/releases/download/9.5.5/glpi-9.5.5.tgz
tar -xvf glpi-9.5.5.tgz
mv glpi /var/www/html
Since we are installing GLPI from the source, the folder permissions will need to be modified.
chmod -R 755 /var/www/html/glpi && chown -R www-data:www-data /var/www/html/glpi
Installing GLPI: Command Details
-
Command Block #01
-
wget https://website-name/package
wget is a package for retrieving files using HTTP, HTTPS, FTP and FTPS
-
tar -xvf
- tar stands for tape archive and is used to create an archive and extract archived files
- -x is used to extract the archive
- -v is used to verbosely show information
- -f is used to create a destination folder with the same name
-
mv
mv is used to rename and move files and directories from one location to another
-
wget https://website-name/package
-
Command Block #02
-
chmod -R
- chmod changes the file mode bits of each given file
- -R is used to do it recursively
-
chown -R
- chown changes the user and/or group ownership of each given file
- -R is used to do it recursively
- www-data:www-data is used to give permission to the apache user and group.
-
chmod -R
GLPI и UltraVNC
У меня в конторе 120 компов, чтобы не бегать по этажам, на них был поставлен UltraVNC. Кроме того был настроен GLPI для учёта оргтехники. В последнее время через него же отслеживаем заявки на ремонт компьютеров. Обычно заявка юзера обрабатывается таким образом: звонит тётка, описывает проблему, называет фамилию, эникейщик ищет в GLPI по фамилии, какой комп к ней прицеплен, затем открывает vnc-viewer, цепляется к этому компьютеру и пытается проблему устранить. В GLPI в тикетах регистрируется проблема. Недавно я случайно обнаружил, что UltraVNC умеет поднимать ещё web-сервер на порту 5800, что позволяет удалённо коннектиться к десктопу с помощью java-апплета через браузер. Мне подумалось, что с помощью этой фичи можно уменьшить количество кликов для доступа специалиста к десктопу и сократить время, которое юзерам приходится проводить на телефоне с момента озвучивания своей фамилии и до того, как проблема будет устранена. Итак, заходим в GLPI, идём в меню «Установки» -> «Внешние ссылки». Нажимаем плюсик, чтобы добавить новую ссылку. Пишем имя, например, «Управление через VNC». В поле «ссылка» пишем «http://:5800». Вместо он будет подставлять имя компьютера — у меня они в glpi названы так же, как в сети. Можно написать так: «http://.:5800», тогда к имени он будет добавлять домен, к которому приписан комп в glpi.
Затем возвращаемся к списку ссылок и видим нашу новую ссылку.
Клацаем по ней. Внизу видим раздел «связанный тип аппаратного обеспечения».
Установка обновления
Далее возможны два варианта:
- Обновление поверх существующих файлов. Распаковка портала происходит в уже существующий каталог с GLPI. Плюс: нет необходимости копировать данные с предыдущей папки, минус: не во всех случаях обновления это возможно, например, в случае радикального изменения кода мы получим ошибку при обновлении.
- Обновление только базы данных. Распаковываем GLPI в пустой каталог и выполняем установку в режиме обновления базы данных.
Разберем оба варианта.
1. Обновление поверх существующих файлов
Скачанный архив нужно распаковать в каталог с порталом. Определить его можно, посмотрев конфигурацию веб-сервера: в nginx параметр root, в apache — DocumentRoot. Например, если GLPI размещен в каталоге /var/www/glpi, распаковываем архив следующей командой:
tar -xvzf glpi-*.tgz -C /var/www/glpi —strip-components 1
Затем переходим на наш портал GLPI — откроется страница обновления. Если возникнут ошибки, устраняем их:

После появится возможность нажать на кнопку Обновление:

Произойдут изменения структуры базы данных и установка новой версии программы. Процесс может занять несколько минут.
2. Обновление только базы данных
Переносим каталог с порталом. Определить его расположение можно посмотрев конфигурацию веб-сервера: в nginx параметр root, в apache — DocumentRoot. Например, если GLPI размещен в каталоге /var/www/glpi, выполняем такую команду:
mv /var/www/glpi /var/www/back_glpi
* в данном примере мы переименуем каталог для портала с glpi в back_glpi.
Создаем новый каталог:
mkdir /var/www/glpi
Распакуем в него скачанный архив:
tar -xvzf glpi-*.tgz -C /var/www/glpi —strip-components 1
Зададим владельца для созданного каталога и распакованных файлов:
chown apache:apache /var/www/glpi
* как правило, обработка php-скриптов выполняется программами, которые работают от пользователя apache.
Переходим на наш портал GLPI — откроется страница установки. Выбираем язык установки и нажимаем OK:
Принимаем лицензионное соглашение — Продолжить и в следующем окне Обновление:

Если есть, исправляем ошибки и нажимаем Продолжить:
Прописываем настройки для сервера баз данных:
* в данном примере используется локальная СУБД (localhost); glpi — имя пользователя с правами на базу данных.
В следующем окне выбираем базу данных, которая на данный момент используется для GLPI, и на следующей странице подтверждаем выбор.
Ждем обновления базы и после его окончания — Запустить GLPI.

После обновления базы нужно перенести оставшиеся файлы проекта (./files) и плагины (./plugins).
Install GLPI on Ubuntu 22.04
As it is a web application, we have to deploy a functional web server along with a database handler such as MySQL or MariaDB.
Install Apache and PHP on Ubuntu 22.04
The first thing is to deploy the web server and PHP. Fortunately, recent versions of GLPI support PHP 8.1 natively so we don’t have to do much.
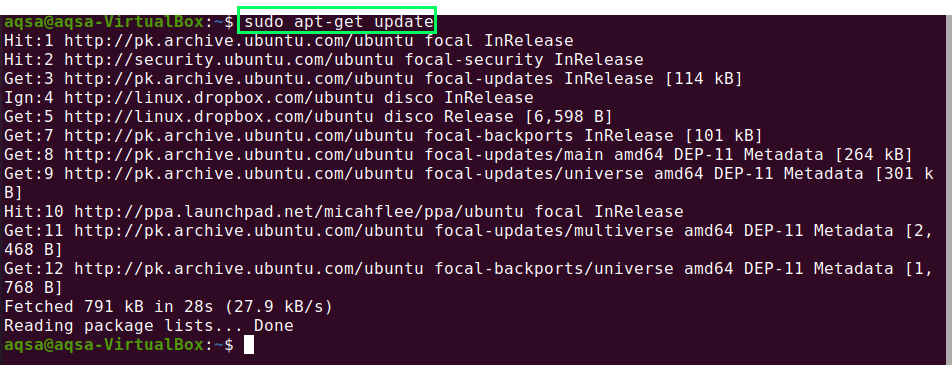
First, open a terminal or connect via SSH to the server and update the system
Then, you can install Apache and PHP together with the necessary modules.
This way, you already have the basics. Next, set up the rules in the firewall.
Now we can continue.
Install MariaDB on Ubuntu 22.04
Currently, GLPI supports only MySQL and MariaDB, so we have to install one of them. So, let’s install MariaDB.
After it is installed and configured, you can create the database and the user for GLPI.
Access the console:
Create the new database:
You can change the database name. Then, it is the user’s turn. Again, you can assign another username and password.
Now refresh the permissions and finally exit the console:
Download GLPI on Ubuntu 22.04
Now we can download the latest stable version of GLPI.
Now unzip the archive
Move it to the Apache root directory:
Assign appropriate permissions
And make Apache the owner of it:
Now create a new virtualhost for GLPI
Add the following:
This is a very basic configuration that clearly can be improved. The important things are the , and the logs.
Save the changes and close the editor.
Finally, enable the new site and the module
Optional: Enable HTTPS
Optionally and highly recommended is to enable HTTPS on the server. To achieve this, install Let’s Encrypt certificates with Certbot.
Now generate and install these certificates:
And finally, you can restart Apache to apply all the changes
Install GLPI on Ubuntu 22.04
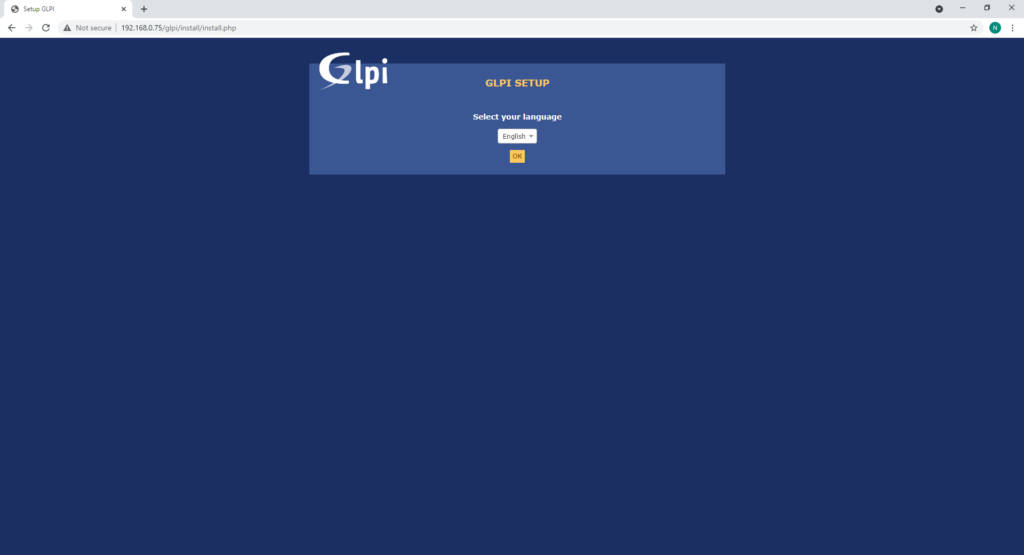
Now open a web browser and go to and the installation will start.
First, with the language
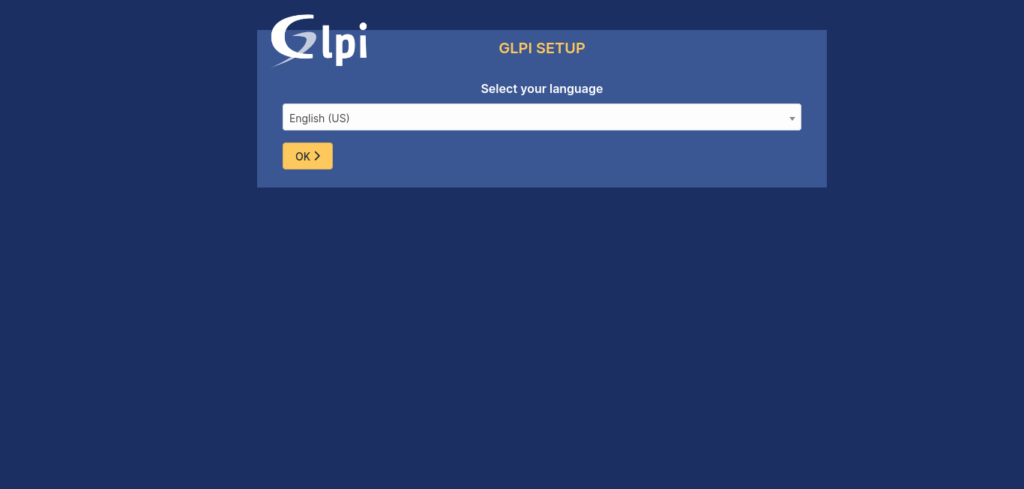 GLPI Setup
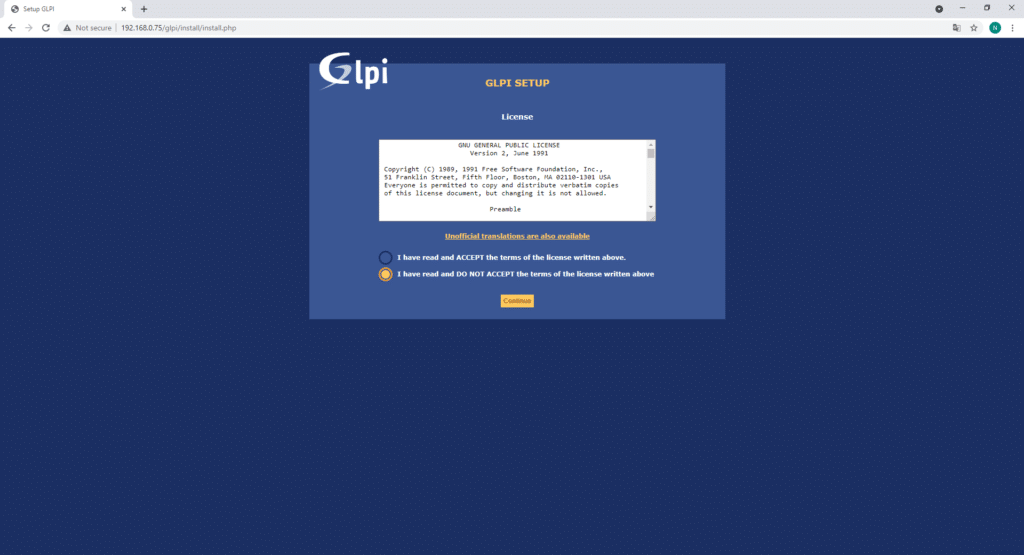
Then with the license which you will have to accept.
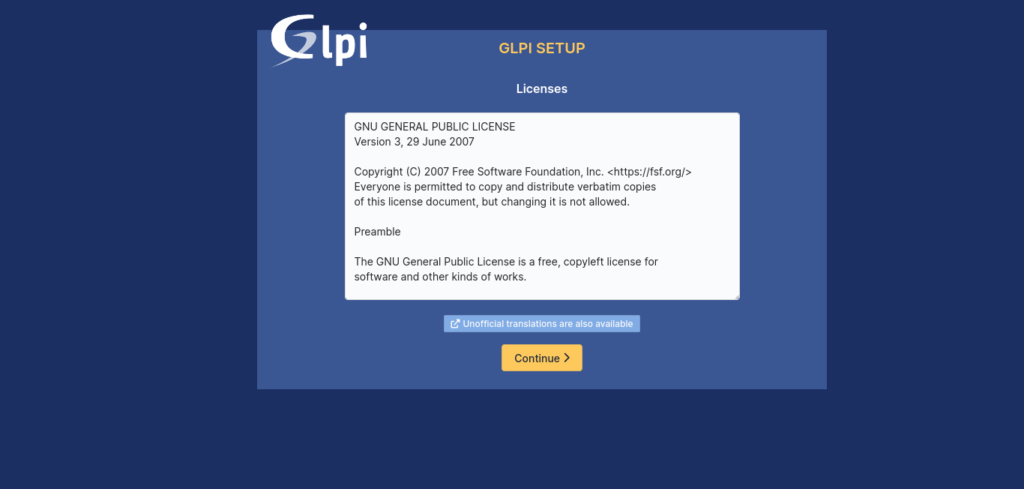 Terms of licenses
Then you will be given the option to do a fresh install or upgrade from a previous one. In this case, it is an installation from scratch.
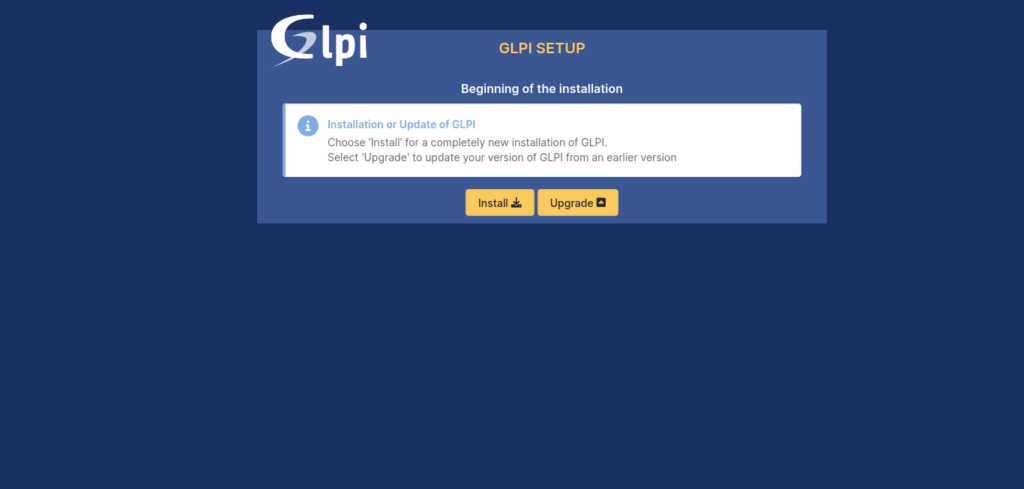 Beginning of the installation
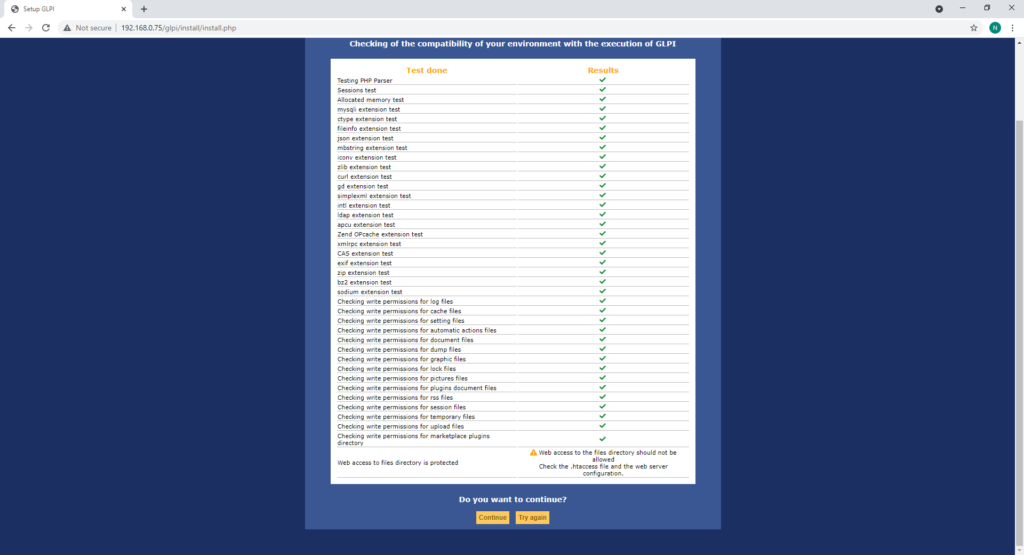
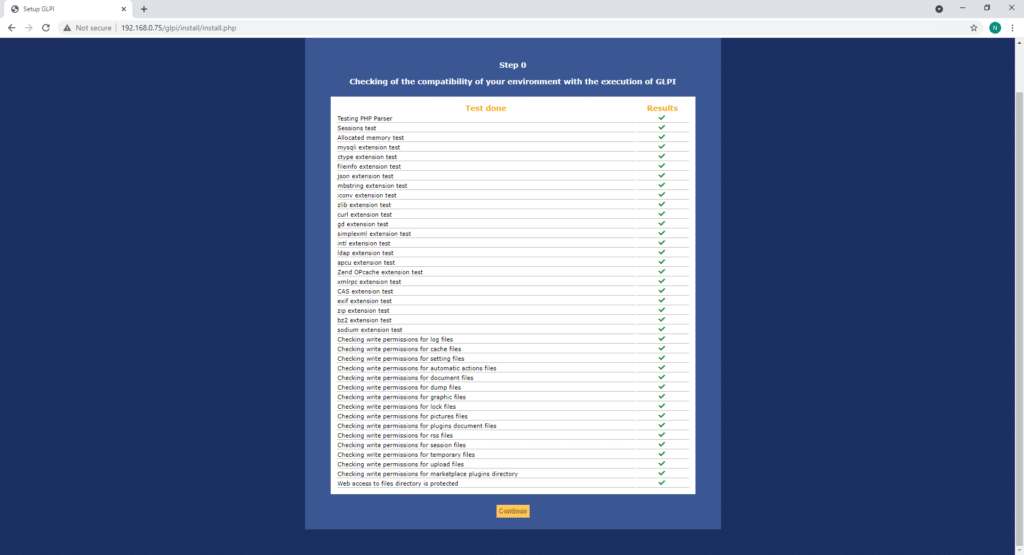
Next, you will be shown a screen where the installer will verify all the dependencies.
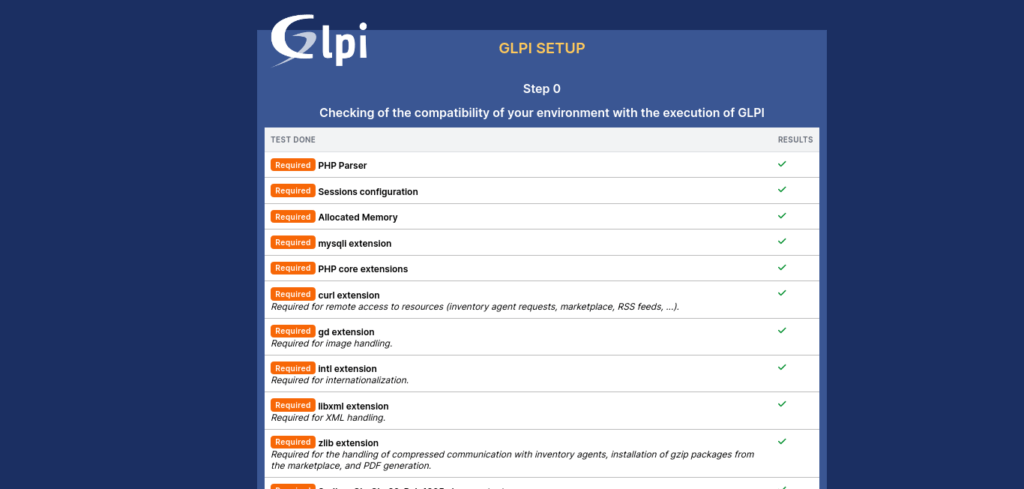 Checking the requisites
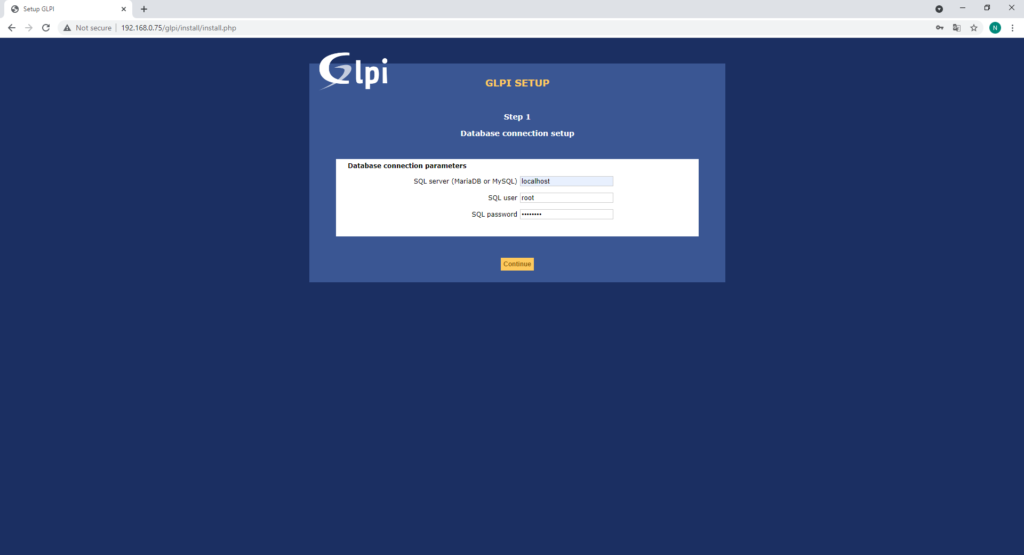
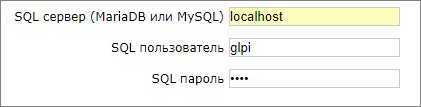
Next, it is time to connect to the database. First the server (localhost) and then the user with the password.
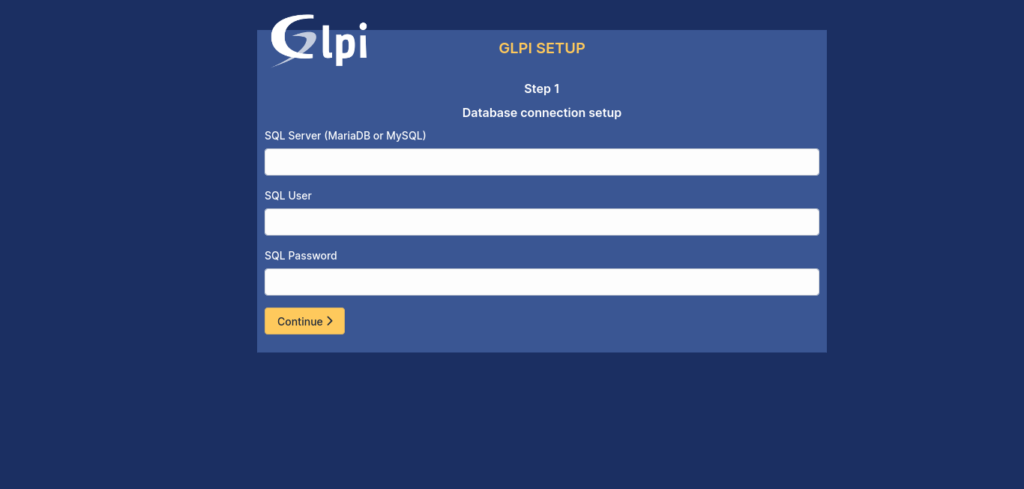 Configuring the database
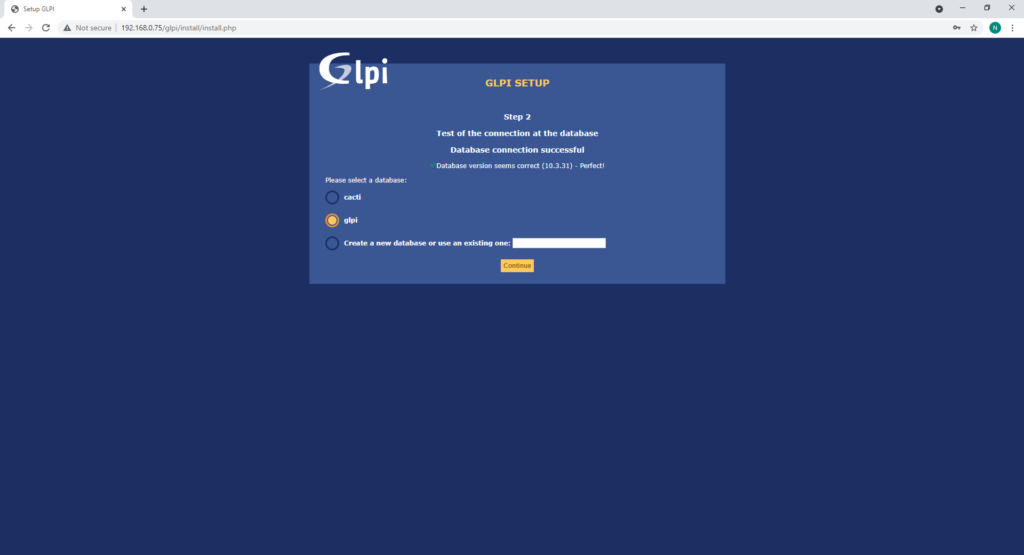
When connecting, you will be given the option to create a new database or use the one we have created.
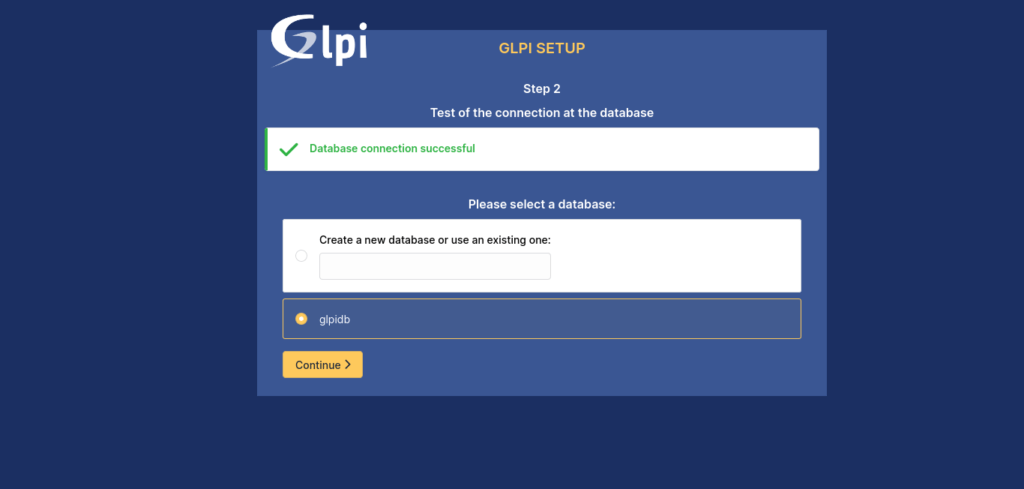 Connection successful
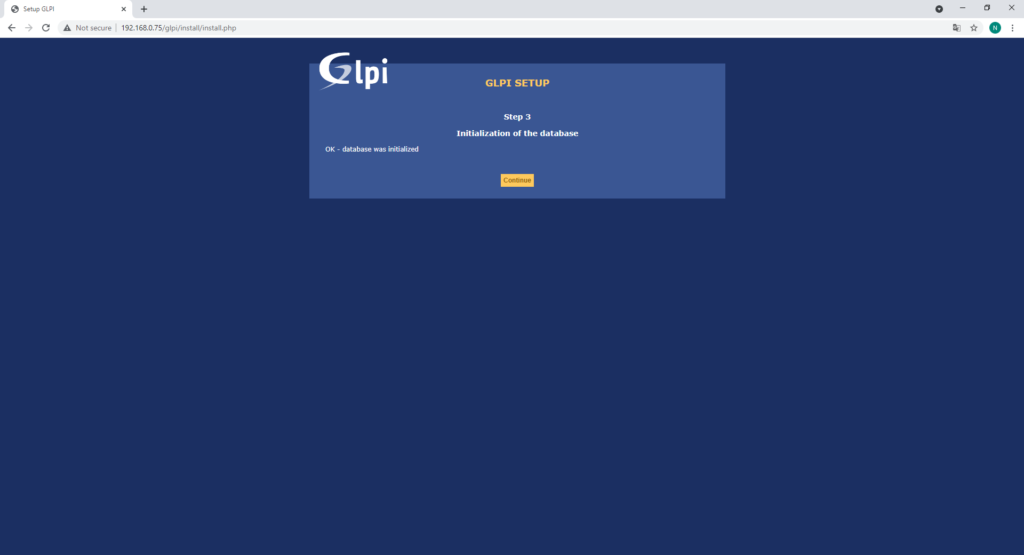
You will be informed that everything went well with the database.
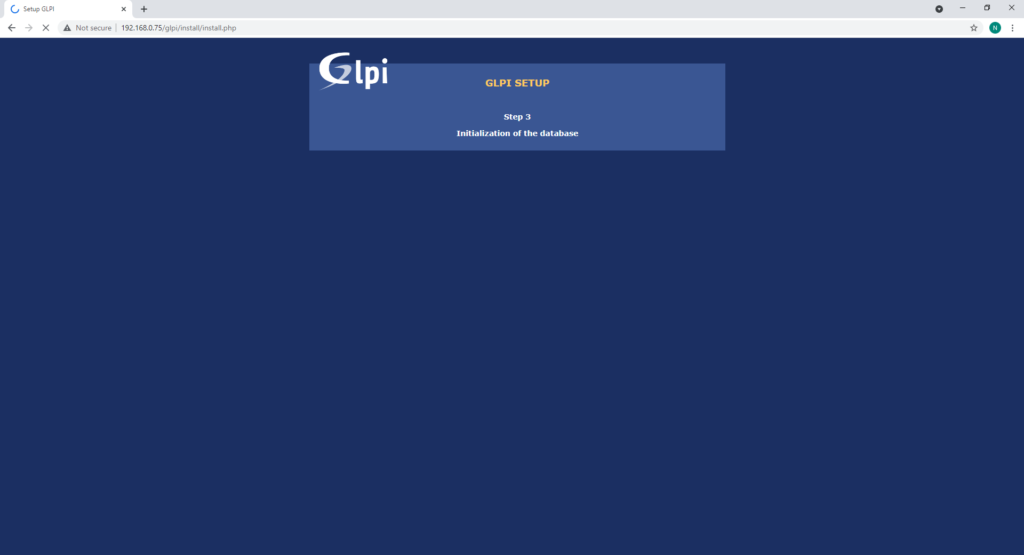
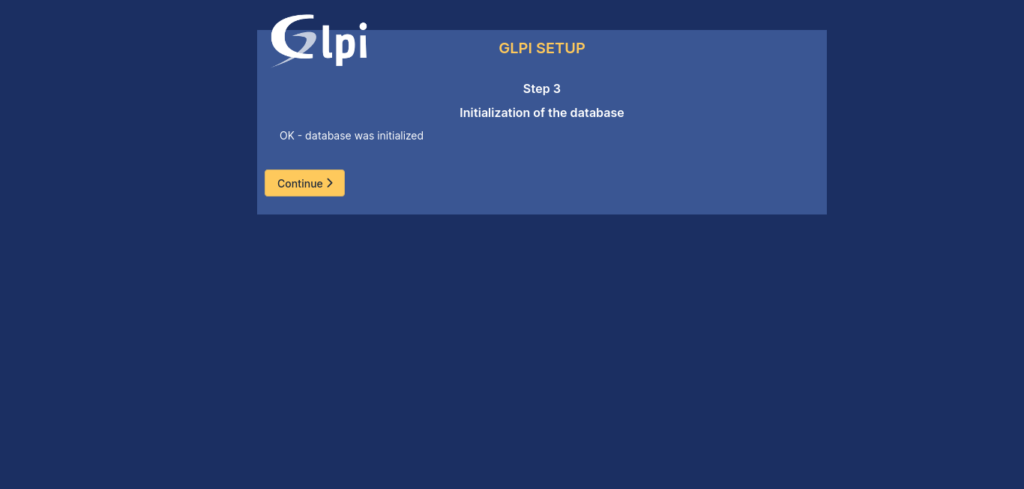 Database initialized
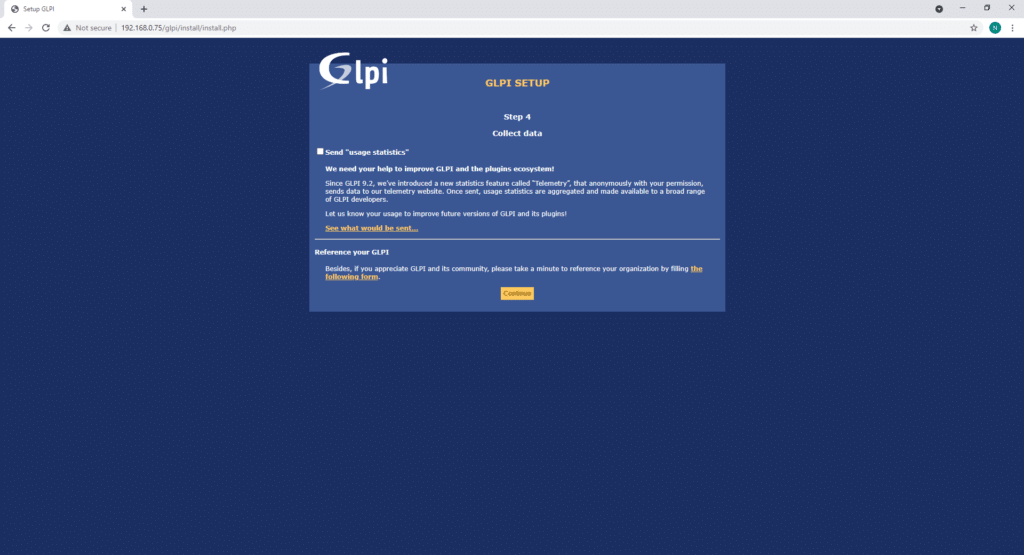
You will then be asked if you wish to contribute to the project by submitting anonymous usage statistics.
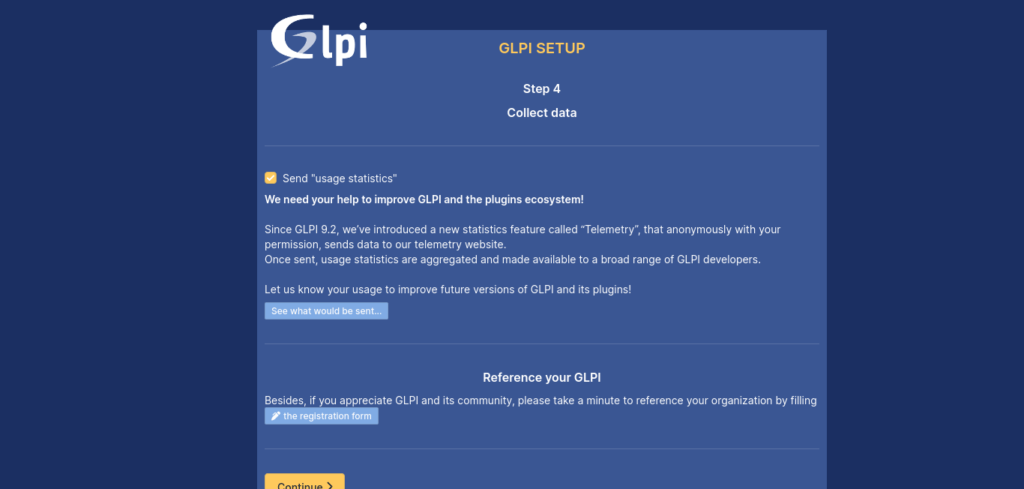 Installing GLPI on Ubuntu 22.04
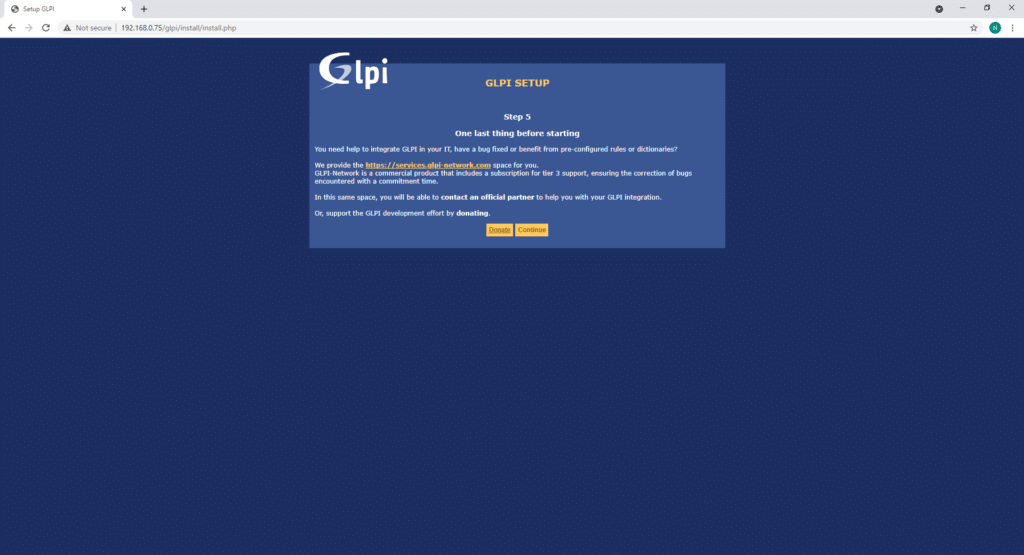
Likewise, you will then be offered information about GLPI.
 Setup GLPI
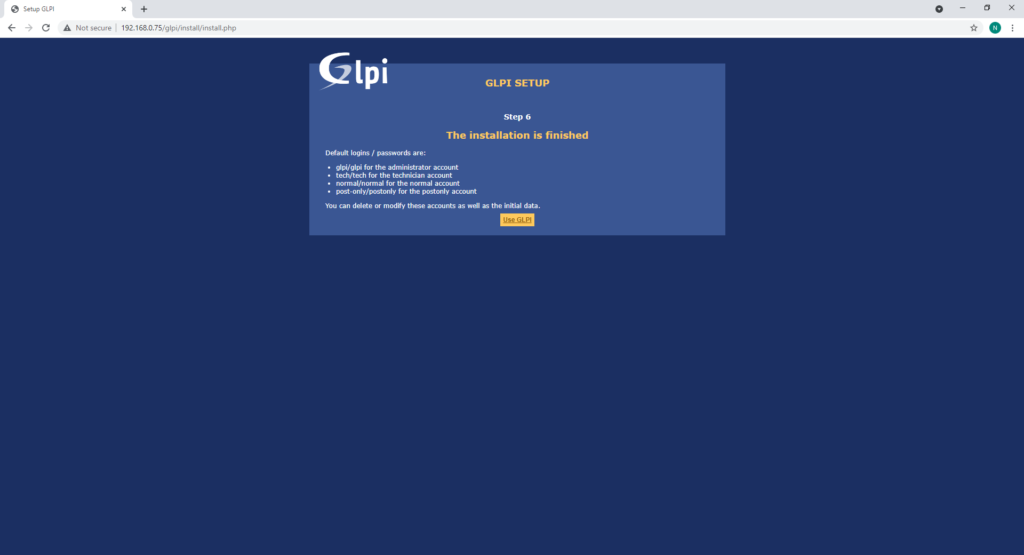
Finally, you will see the login credentials indicating that everything went well.
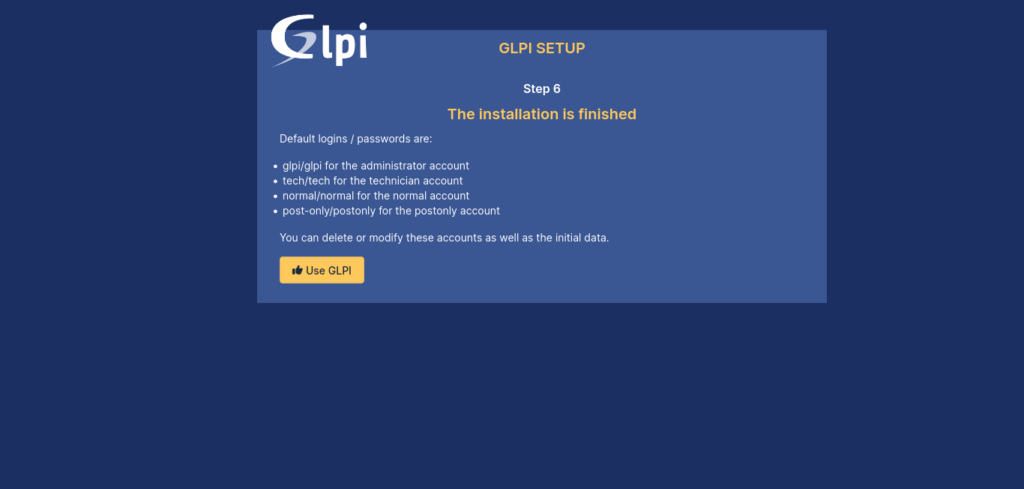 GLPI installed
You will see the login screen.
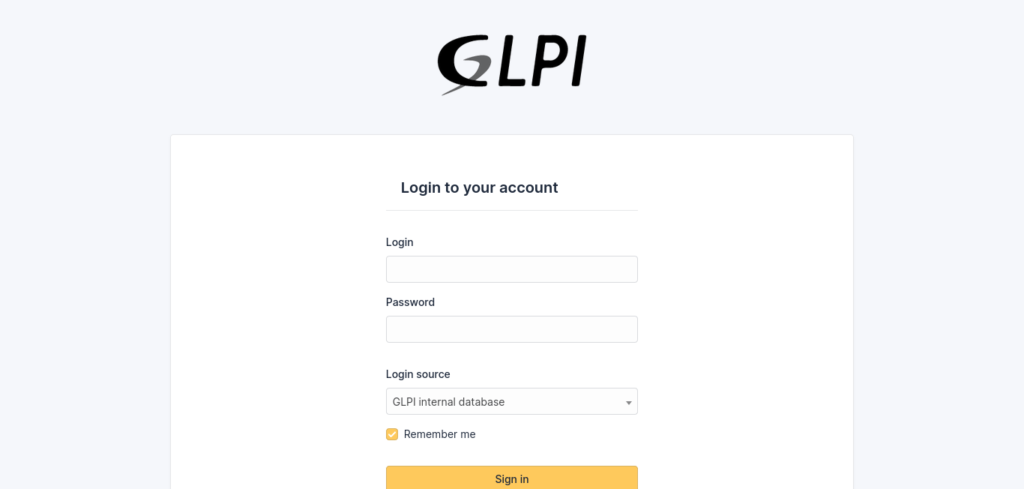 GLPI Login page
Log in with the administrator profile, and you will see the whole panel.
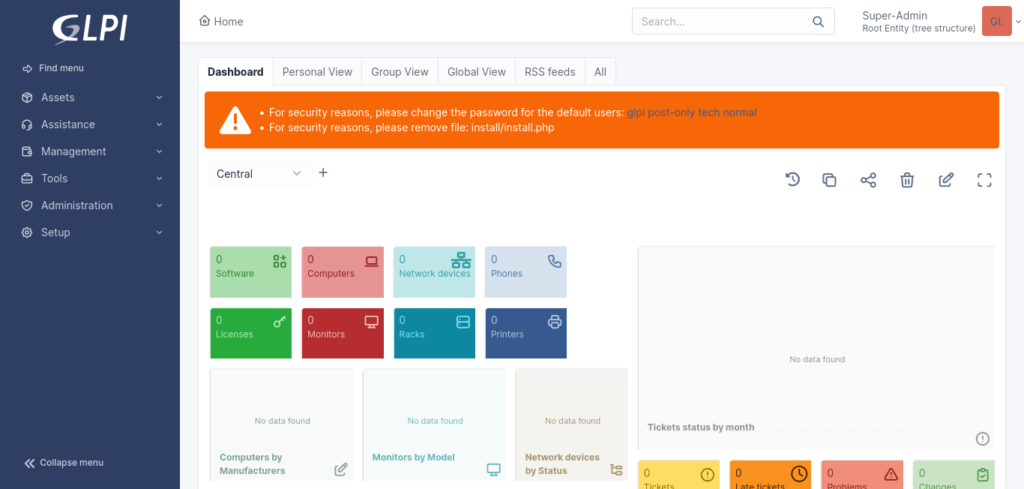 GLPI on Ubuntu 22.04
Enjoy it.