Prerequisites
- It is highly recommended to backup all virtual machines which are located on the CSV to make sure that you will have a restore point if Chkdsk operation result will be somewhat unexpected.
- Make sure that all the virtual machines, located on the CSV, are turned off before performing the next step.
- Turn on “Maintenance Mode” for the CSV. You can do it from Failover Cluster Manager or via PowerShell.
To turn on Maintenance Mode from Failover Cluster Manager:
Open Disks, right-click on Cluster Disk, choose “More actions” and click on the “Turn On Maintenance Mode” option.
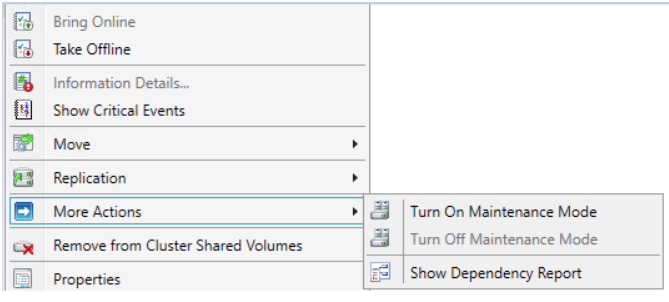
Turning on the Maintenance Mode from GUI
To turn on Maintenance Mode from PowerShell:
Run the code below to get the list of cluster volumes and note the name of CSV required:
Get-ClusterSharedVolume
| 1 | Get-ClusterSharedVolume |
Run the code to turn on Maintenance Mode:
Get-ClusterSharedVolume “Name of CSV” | Suspend-ClusterResource
| 1 | Get-ClusterSharedVolume“Name of CSV”|Suspend-ClusterResource |
VSAN from StarWind is software-defined storage (SDS) solution created with restricted budgets and maximum output in mind. It pulls close to 100% of IOPS from existing hardware, ensures high uptime and fault tolerance starting with just two nodes. StarWind VSAN is hypervisor and hardware agnostic, allowing you to forget about hardware restrictions and crazy expensive physical shared storage.
Build your infrastructure with off-the-shelf hardware, scale however you like, increase return on investment (ROI) and enjoy Enterprise-grade virtualization features and benefits at SMB price today!
Explore VSAN from StarWind
StarWind VSAN White Paper
Предварительные требования
- Лес доменных служб Active Directory (не обязательно под управлением Windows Server 2016).
- 4–128 серверов (два кластера из 2–64 серверов) под управлением Windows Server 2019 или Windows Server 2016, Datacenter Edition. Если вы используете Windows Server 2019, вместо этого можно использовать выпуск Standard, если вы реплицируете только один том размером до 2 ТБ.
- Два набора хранилищ, использующие SAS JBOD, сеть SAN стандарта Fibre Channel, общие VHDX-файлы, локальные дисковые пространства или цель iSCSI. Хранилище должно включать как жесткие диски, так и твердотельные накопители. Каждый набор хранилищ должен быть доступен только одному из этих кластеров без общего доступа между кластерами.
- Каждый набор хранилищ должен допускать создание по меньшей мере двух виртуальных дисков: один для реплицируемых данных и один для журналов. На всех дисках данных в физическом хранилище необходимо использовать одинаковый размер секторов. На всех дисках с журналами в физическом хранилище необходимо использовать одинаковый размер секторов.
- На каждом сервере должно быть создано по меньшей мере одно подключение Ethernet/TCP для синхронной репликации, но желательно использовать RDMA.
- Правила всех задействованных брандмауэров и маршрутизаторов должны разрешать двунаправленный трафик ICMP, SMB (порт 445, а также 5445 для SMB Direct) и WS-MAN (порт 5985) между всеми узлами.
- Сеть между серверами должна иметь достаточную пропускную способность для ваших рабочих нагрузок ввода-вывода, а средняя задержка приема-передачи должна составлять 5 мс для синхронной репликации. Для асинхронной репликации рекомендации по задержке приема и передачи отсутствуют.
- Реплицируемое хранилище не может находиться на диске с папкой операционной системы Windows.
- Существуют важные & ограничения для репликации Локальные дисковые пространства. Ознакомьтесь с подробными сведениями ниже.
Многие из этих требований можно определить с помощью командлета . Это средство будет доступно, если установить реплику хранилища или средства управления репликой хранилища хотя бы на один сервер. Настраивать реплику хранилища не нужно. Для использования инструмента достаточно только установить командлет. Дополнительная информация приведена ниже.
Настройка кластера Hyper-V
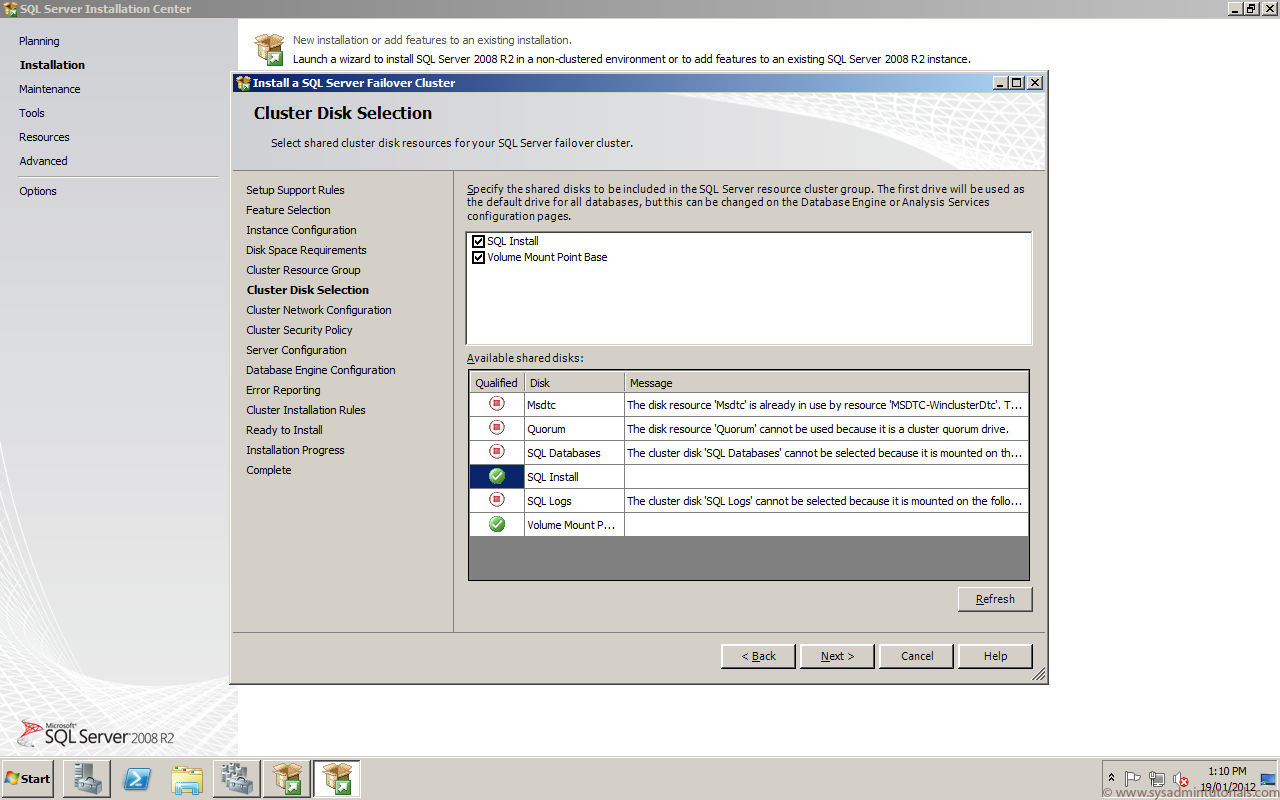
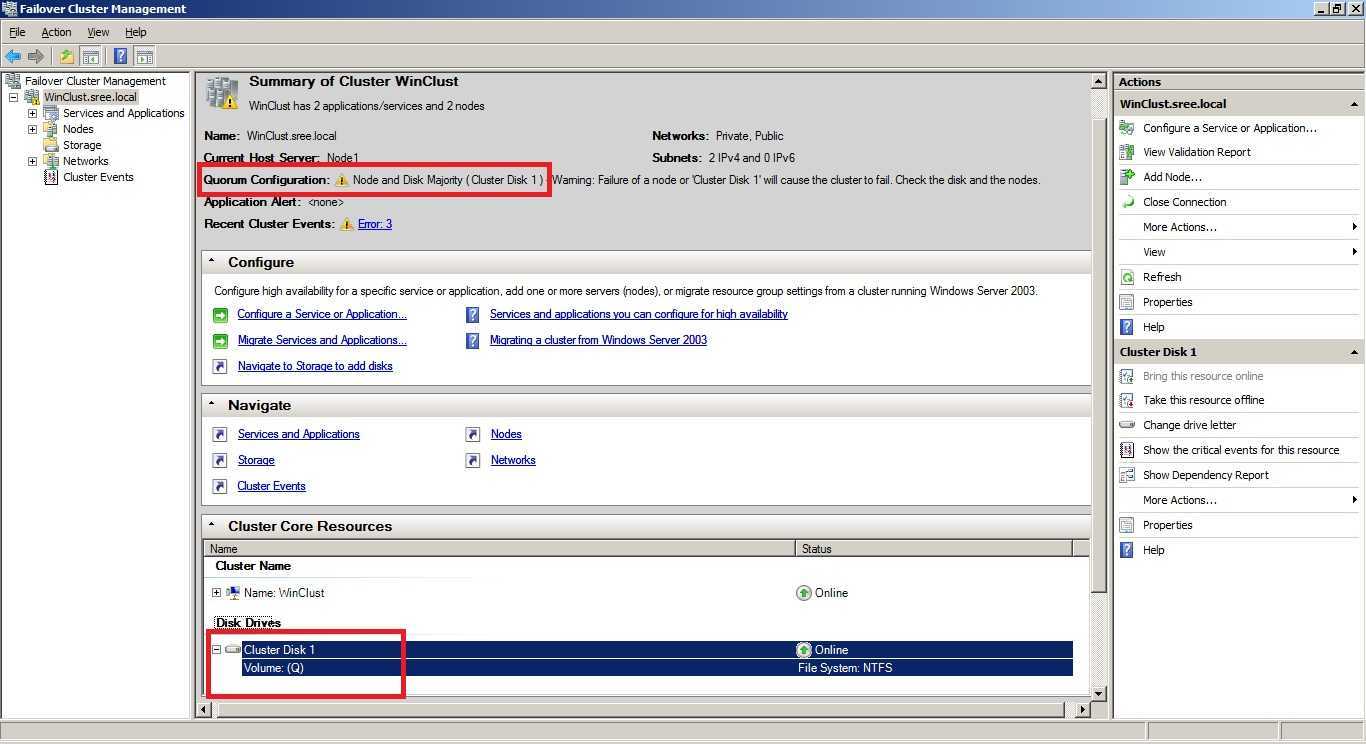
Теперь в кластер нужно добавить диски. Для этого откройте консоль Failover Cluster Management и в разделе Storage -> Disks добавьте общие в кластер общие диски (они должны быть инициализированы и отформатированы)
Задайте содержательные имена дискам. В нашем примере один кластерный диск будет использоваться как том Cluster Shared Volumes (CSV) для хранения файлов ВМ, а второй использоваться для кворума (диск небольшого размера).
Далее нужно настроить кластерный кворум. Для этого щелкните ПКМ по имени кластера и выберите пункт меню More Actions-> Configure Cluster Quorum Settings.Выберите вариант настройки кворума для кластера Select the quorum witness.В качестве типа кворума выберите Quorum Witness Select Disk Witness (кворум с использованием диска свидетеля).Выберите кластерный диск, который вы хотите использовать в качестве диска-свидетеля.
Теперь в настройках Hyper-V на каждой из нод нужно указать кластерный том CSV в качестве диска по-умолчанию для хранения виртуальных машин.
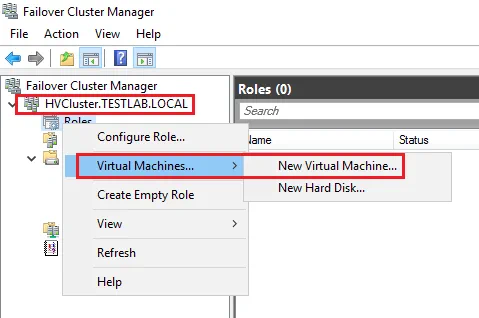
Теперь можно в консоли управления кластером создать новую виртуальную машину: Roles -> Virtual Machines -> New Virtual Machine.
Затем с помощью обычного мастера Hyper-V нужно создать новую виртуальную машину. С помощью Live Migration в дальнейшем можно убедится, что ВМ на легко перемещается между узлами кластера Hyper-V.
Conclusion
Check Disk is a common operation that any system administrator is dealing with from time to time. Unfortunately, the process requires the virtual machines to be shut down to be completed. But hey, it’s much better to go all the way through to make sure that system is healthy and works as expected than keeping you valuable VMs on and then suddenly losing them because of an unnoticed issue.
Also, in case you need some info on how to run ChkDsk and defrag on Cluster Shared Volumes in Windows Server 2012 R2, check out this article:
- Managing VSAN from StarWind infrastructure in a web browser. Part 2: StarWind VSA
- Combining Virtual SAN (vSAN) with Microsoft Storage Spaces for greater Performance and better Resiliency
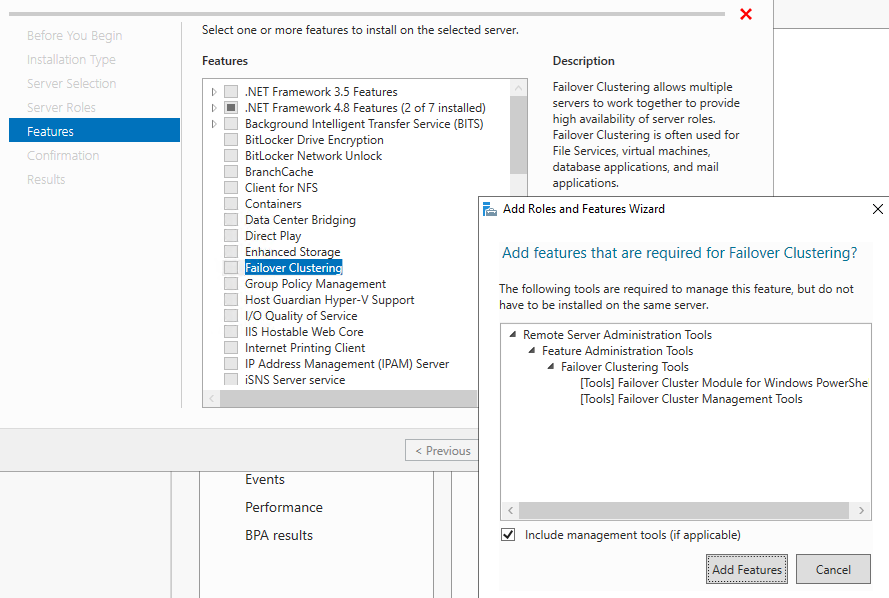
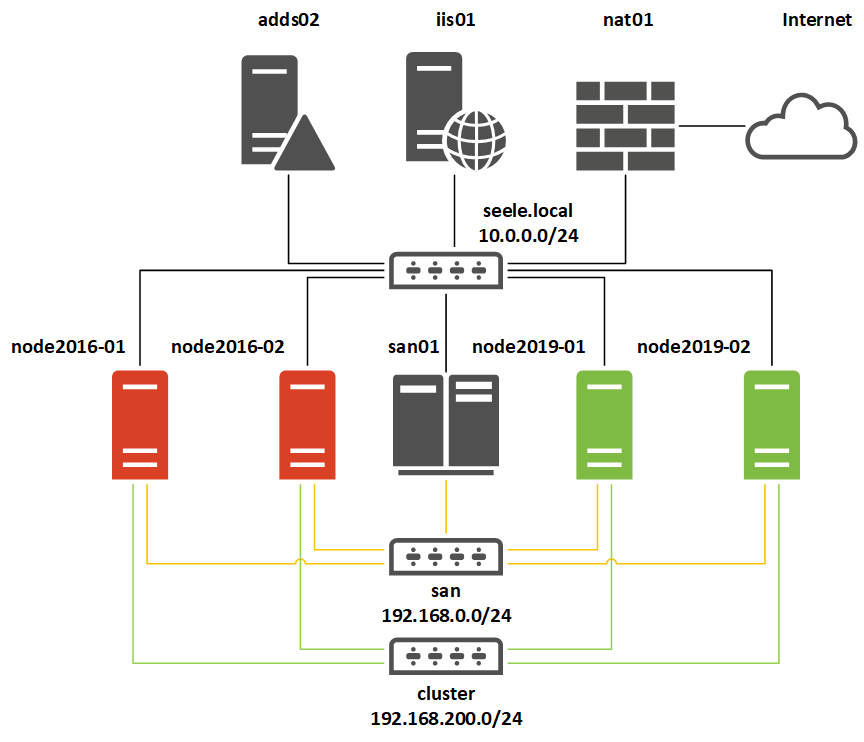
Предварительные требования к отказоустойчивому кластеру Hyper-V
- Два сервера с установленной ОС Windows Server 2016 (желательно чтобы количество памяти и CPU на обоих серверах было одинаково)
- Установленная роль Hyper-V с компонентами Failover Cluster и MPIO ( iSCSI по необходимости)
- Как минимум по 2 сетевых карты на каждом сервере (одна сетевая карта будет использоваться для управления и через нее будет идти трафик ВМ, вторая – для взаимодействия хостов между собой – трафик CSV и Heartbeat)
- Общее дисковое хранилище, подключенное к обоим серверам (в этом примере дисковый массив подключается к каждому серверу через 2 порта Fiber Channel, при этом компонент MPIO нужен для того, чтобы каждый сервер видел только одно подключение к диску, а не два)
- Как минимум один диск (LUN) с общего хранилища презентован обоим сервера, инициализирован и отформатирован.
Step 4: Deploy SMB Direct
If you’re using RDMA networking for your file server cluster, after creating virtual disks and shares, the next step is to deploy SMB Direct, which is the Windows Server implementation of RDMA. For help with this task, see Improve Performance of a File Server with SMB Direct.
It’s also important to note that if you’re using the RoCE flavor of RDMA, you must configure Priority Flow Control (PFC) and Datacenter Bridging (DCB). This includes configuring PFC on all servers on the RDMA network and the switches being used. This process is described Deploy SMB Direct with RoCE Network Adapters and Deploying Windows Server 2012 with SMB Direct (SMB over RDMA) and the Mellanox ConnectX-3 using 10GbE/40GbE RoCE – Step by Step.
If you’re using an iWARP network adapter, the process is somewhat simpler, as described in Deploy SMB Direct with Ethernet (iWARP) Network Adapters and Deploying Windows Server 2012 with SMB Direct (SMB over RDMA) and the Intel NetEffect NE020 card using iWARP – Step by Step.
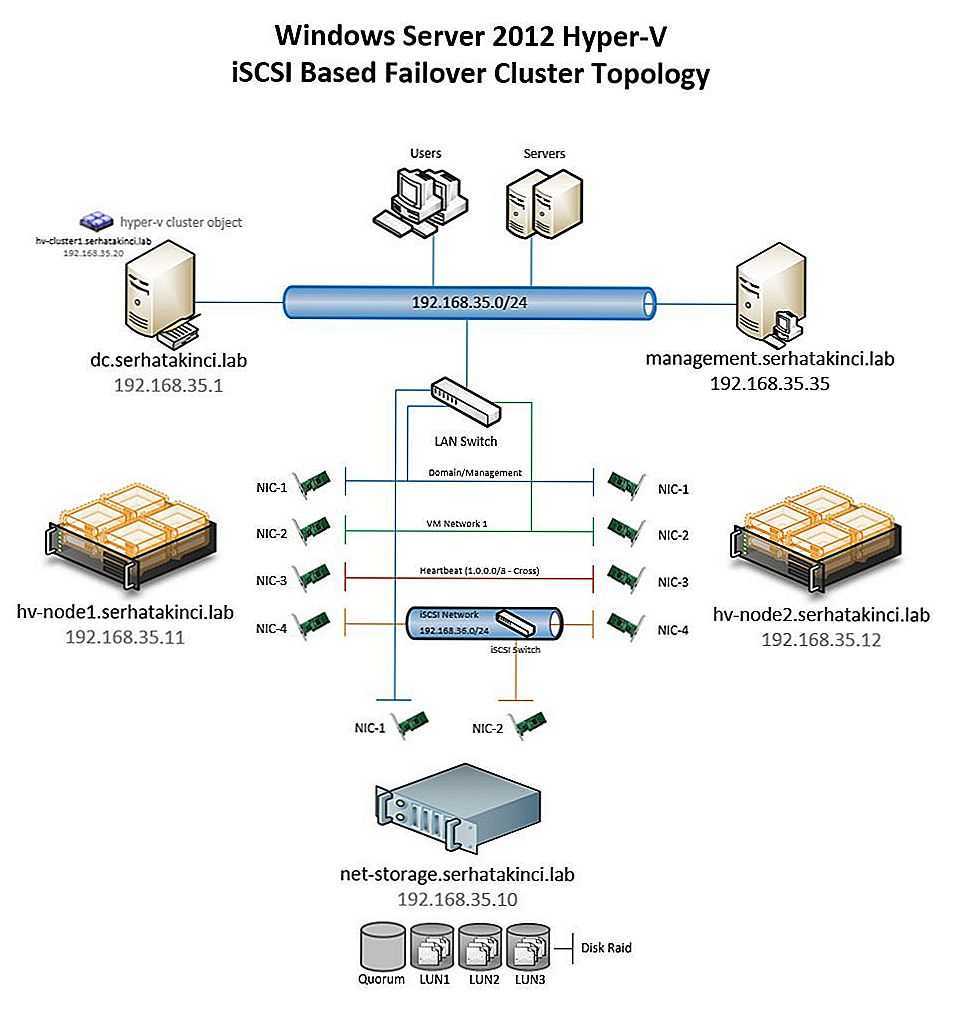
Network Planning
Proper environment planning mitigates many risks in the future. For the lab network in this scenario, four network adapters have been configured for each host. Both lab hosts are not doing any NIC teaming for simplicity sake. However, you would want to team your adapters in production to avoid having a single point of failure in any one network.
For our lab setup, we have:
- Management and VM traffic
- iSCSI
- Private Cluster Traffic
- Live Migration
With the above networks in mind, we assign IP Addresses to each server in our desired subnet ranges. VLANs are also a consideration here, as you will most likely want to align your subnets with VLANs provisioned. This would need to be thought through in advance.
Create an iSCSI session
- On the target host, in the Services snap-in, ensure that the Microsoft iSCSI Initiator Service is started and set to Automatic.
- In Fabric > Servers > All Hosts Hosts, select and hold the host that you want to configure > Properties.
- Under iSCSI Arrays, see if the storage array is already listed. If it’s not, on the toolbar, next to iSCSI Array, select Add.
- In the Create New iSCSI Session > Array , select the storage array you want to use.
- Select Create to create a new session. Select Use advanced settings if you want to modify customized settings, including target listener, name, or the host NIC that you want to use.
- The array that you added appears under iSCSI Arrays. Select the array to view more details.
Overview for a two-node file server cluster
Servers in a failover cluster can function in a variety of roles, including the roles of file server, Hyper-V server, or database server, and can provide high availability for a variety of other services and applications. This guide describes how to configure a two-node file server cluster.
A failover cluster usually includes a storage unit that is physically connected to all the servers in the cluster, although any given volume in the storage is only accessed by one server at a time. The following diagram shows a two-node failover cluster connected to a storage unit.
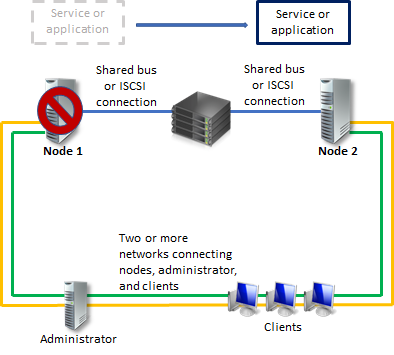
Storage volumes or logical unit numbers (LUNs) exposed to the nodes in a cluster must not be exposed to other servers, including servers in another cluster. The following diagram illustrates this.

Note that for the maximum availability of any server, it is important to follow best practices for server management—for example, carefully managing the physical environment of the servers, testing software changes before fully implementing them, and carefully keeping track of software updates and configuration changes on all clustered servers.
The following scenario describes how a file server failover cluster can be configured. The files being shared are on the cluster storage, and either clustered server can act as the file server that shares them.

Step 3: Set up Cluster to Cluster Replication using Windows PowerShell
Now you will set up cluster-to-cluster replication using Windows PowerShell. You can perform all of the steps below on the nodes directly or from a remote management computer that contains the Windows Server Remote Server Administration Tools
-
Grant the first cluster full access to the other cluster by running the Grant-SRAccess cmdlet on any node in the first cluster, or remotely. Windows Server Remote Server Administration Tools
-
Grant the second cluster full access to the other cluster by running the Grant-SRAccess cmdlet on any node in the second cluster, or remotely.
-
Configure the cluster-to-cluster replication, specifying the source and destination disks, the source and destination logs, the source and destination cluster names, and the log size. You can perform this command locally on the server or using a remote management computer.
Warning
The default log size is 8GB. Depending on the results of the Test-SRTopology cmdlet, you may decide to use -LogSizeInBytes with a higher or lower value.
-
To get replication source and destination state, use Get-SRGroup and Get-SRPartnership as follows:
-
Determine the replication progress as follows:
-
On the source server, run the following command and examine events 5015, 5002, 5004, 1237, 5001, and 2200:
-
On the destination server, run the following command to see the Storage Replica events that show creation of the partnership. This event states the number of copied bytes and the time taken. Example:
Here’s an example of the output:
-
Alternately, the destination server group for the replica states the number of byte remaining to copy at all times, and can be queried through PowerShell. For example:
As a progress sample (that will not terminate):
-
-
On the destination server in the destination cluster, run the following command and examine events 5009, 1237, 5001, 5015, 5005, and 2200 to understand the processing progress. There should be no warnings of errors in this sequence. There will be many 1237 events; these indicate progress.
Note
The destination cluster disk will always show as Online (No Access) when replicated.
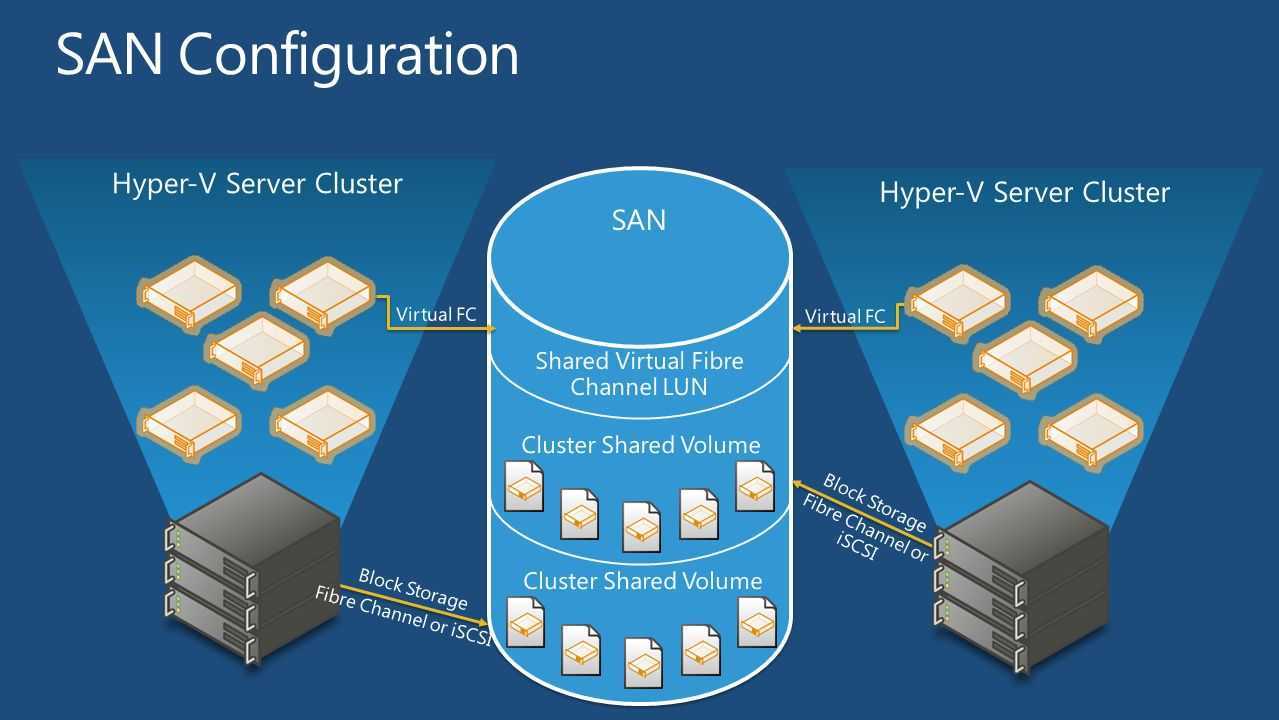
Deploying storage area networks with failover clusters
When deploying a storage area network (SAN) with a failover cluster, the following guidelines should be observed.
-
Confirm certification of the storage: Using the Windows Server Catalog site, confirm the vendor’s storage, including drivers, firmware and software, is certified for Windows Server 2016 or Windows Server 2019.
-
Isolate storage devices, one cluster per device: Servers from different clusters must not be able to access the same storage devices. In most cases, a LUN that is used for one set of cluster servers should be isolated from all other servers through LUN masking or zoning.
-
Consider using multipath I/O software: In a highly available storage fabric, you can deploy failover clusters with multiple host bus adapters by using multipath I/O software. This provides the highest level of redundancy and availability. The multipath solution must be based on Microsoft Multipath I/O (MPIO). The storage hardware vendor may supply an MPIO device-specific module (DSM) for your hardware, although Windows Server 2016 and Windows Server 2019 include one or more DSMs as part of the operating system.
Allocate file storage to a standalone host
You can assign file shares on any host on which you want to create VMs that will use the file share as storage.
-
Select Fabric > Servers > All Hosts, and select the host or cluster node you want to configure.
-
Select Host > Properties > Host Access. Specify a Run As account. By default, the Run As account that was used to add the host to VMM is listed. In the Run As account box, configure the account settings. You can’t use the account that you use for the VMM service.
Note
- If you used a domain account for the VMM service account, add the domain account to the local Administrators group on the file server.
- If you used the local system account for the VMM service account, add the computer account for the VMM management server to the local Administrators group on the file server. For example, for a VMM management server that is named VMMServer01, add the computer account VMMServer01$.
- Any host or host cluster that accesses the SMB 3.0 file share must have been added to VMM using a Run As account. VMM automatically uses this Run As account to access the SMB 3.0 file share.
- If you specified explicit user credentials when you added a host or host cluster, you can remove the host or cluster from VMM, and then add it again by using a Run As account.
-
Select Host Name Properties > Storage > Add File Share.
-
In File share path, select the required SMB 3.0 file share, and then select OK.
-
To confirm that the host has access, open the Jobs workspace to view the job status. Or, open the host properties again, and then select the Storage tab. Under File Shares, select the SMB 3.0 file share. Verify that a green check mark appears next to Access to file share.
-
Repeat this procedure for any standalone host that you want to access the SMB 3.0 file share or for all nodes in a cluster
Assign a logical unit to a standalone host
Either assign an existing unit, or create a new one and assign it.
-
In Fabric > Servers > All Hosts, right-click the host that you want to configure > Properties.
-
If you want to create a new logical unit:
- On the toolbar, next to Disk, select Add. Next to Logical unit, select Create Logical Unit.
- In Create Logical Unit > Storage pool, choose the pool from which you want to create the logical unit. Specify a name (alphanumeric only), a description, and the unit size. Select OK to finish.
-
To assign an existing logical unit to the host, on the toolbar, next to Disk, select Add, and select the logical unit you want to assign.
-
In the Logical unit list, verify that the logical unit that you just created is selected.
-
In Format new disk, if you want to format the disk, select Format this volume as NTFS volume with the following settings, and specify the settings.
Note
If you select Force format even if a file system is found, all the existing data on the volume will be overwritten. If the logical unit has existing data, and you do not use the Force Format option, the VMM job to assign the logical unit will complete with a warning. VMM assigns the logical unit to the host. You can format the disk later.
-
-
In Mount Point, select the mount options. Then select OK to assign the logical unit to the host.
-
VMM registers the storage logical unit to the host and mounts the storage disk.
- To view the associated job information, open the Jobs workspace.
- To verify that the logical unit was assigned, view the information on the Storage tab in the Host Name > Properties dialog. The newly assigned logical unit appears under Disk. Select the new disk to view the disk details.
- If the Array field is populated in the disk details, this indicates that the storage array is under VMM management.
-
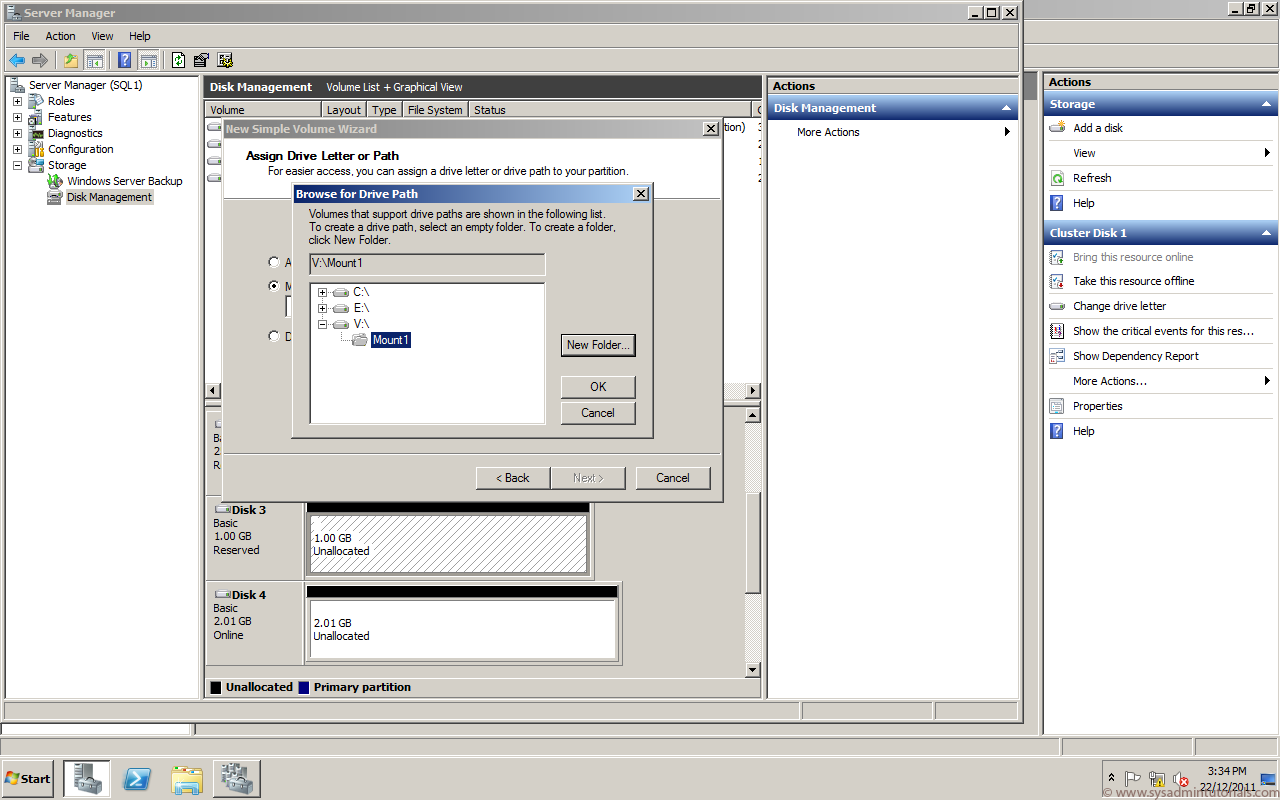
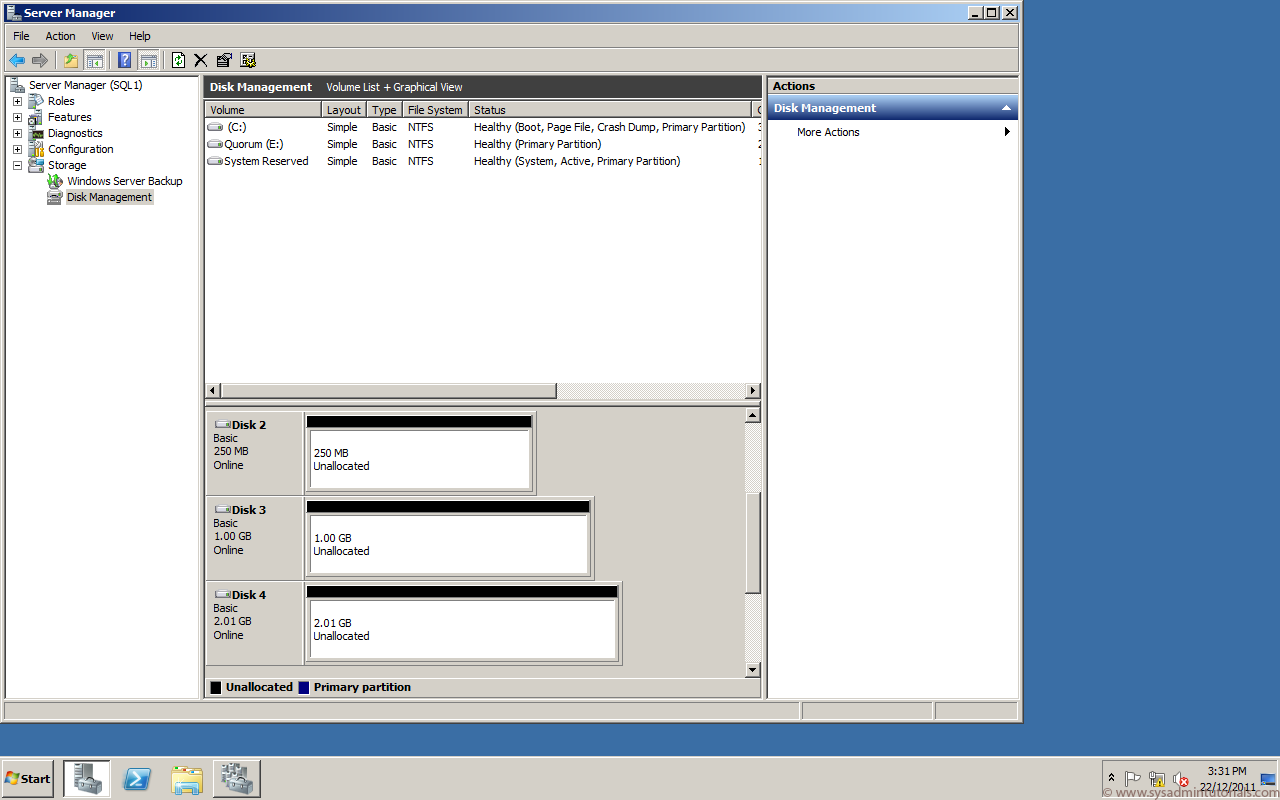
To configure additional disk settings, open Disk Management on the host. To open Disk Management, select Start, type diskmgmt.msc in the search box, and then press ENTER. The new disk appears in the list of disks as a basic disk. If you chose to format the disk, the disk is already formatted and online. You can select and hold the disk to see the available options, such as Format and Change Drive Letter and Paths.
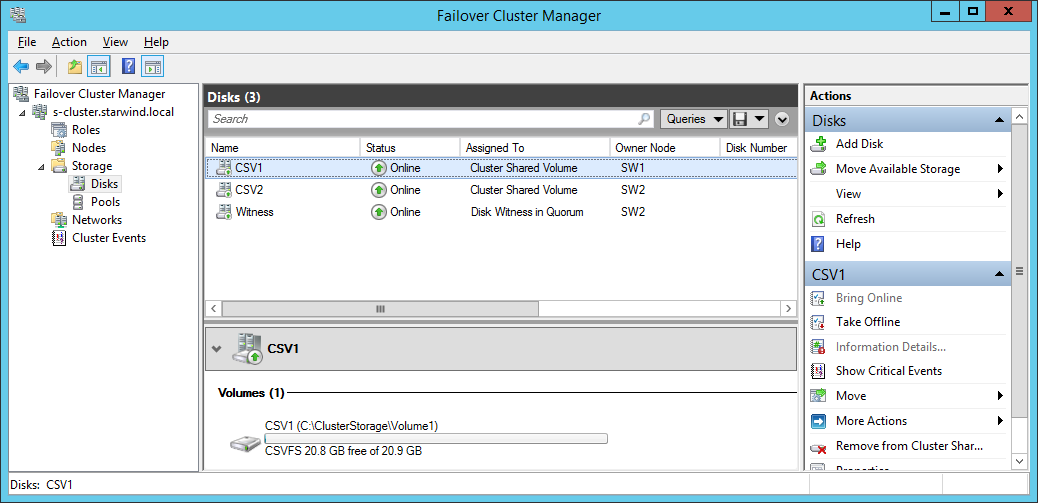
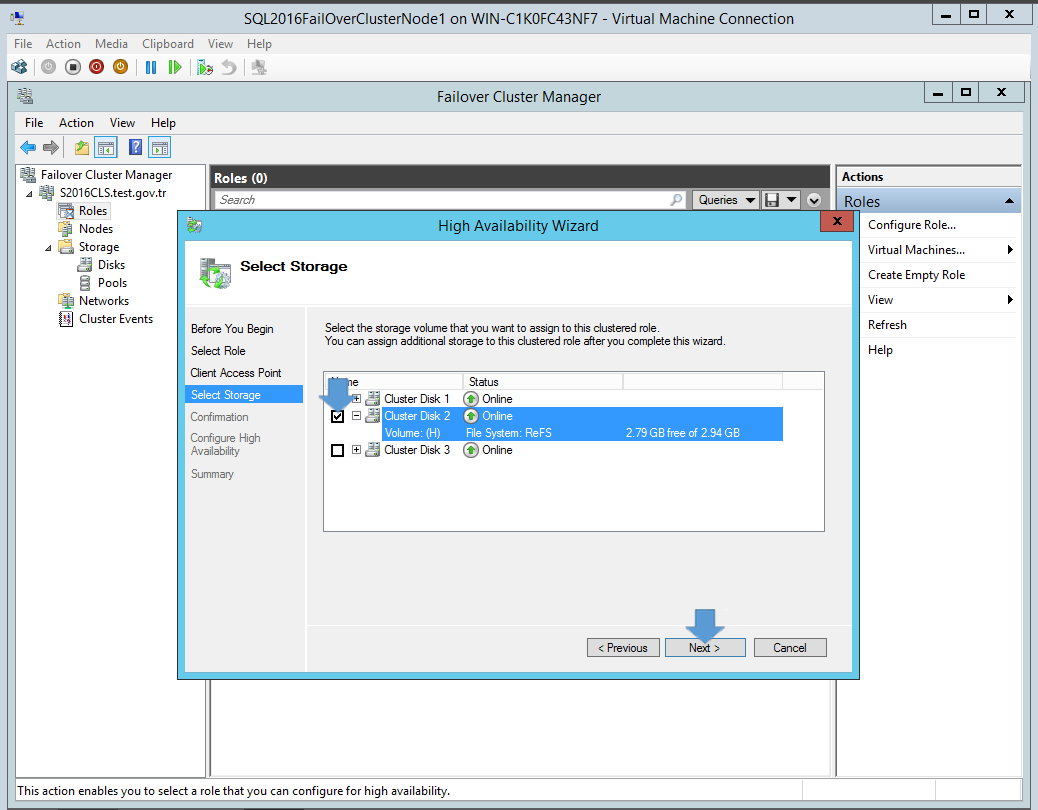


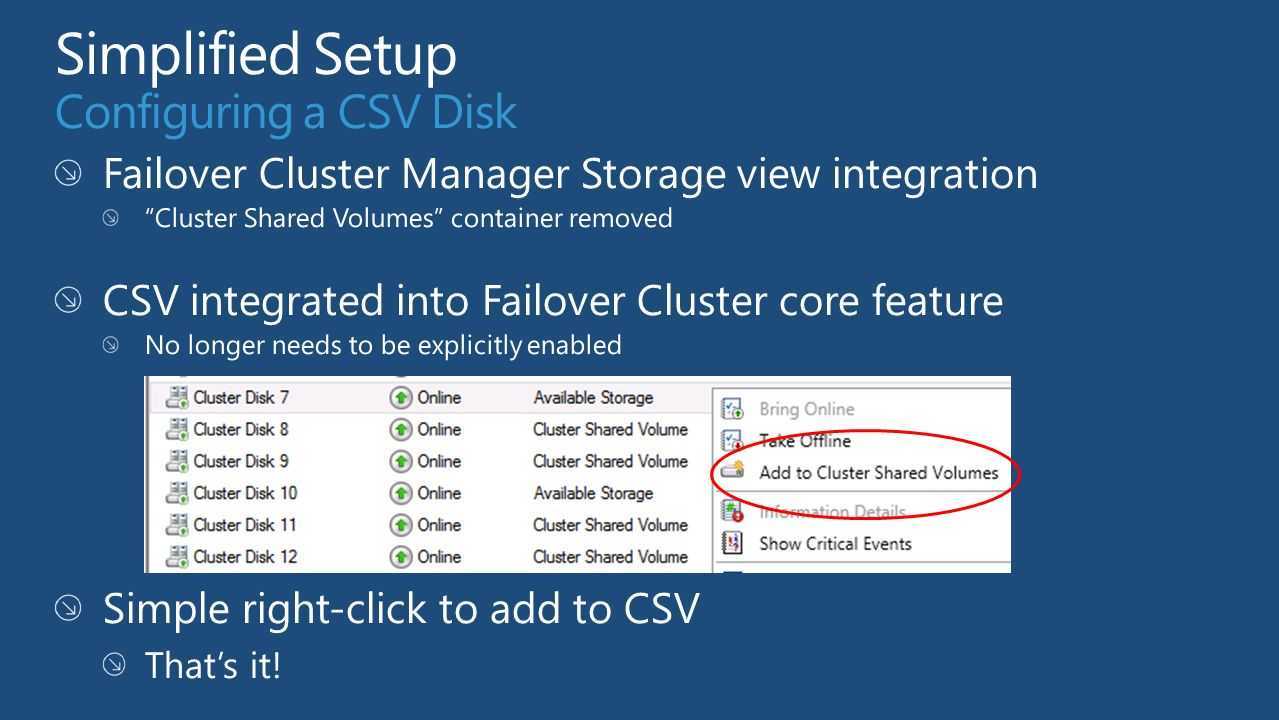
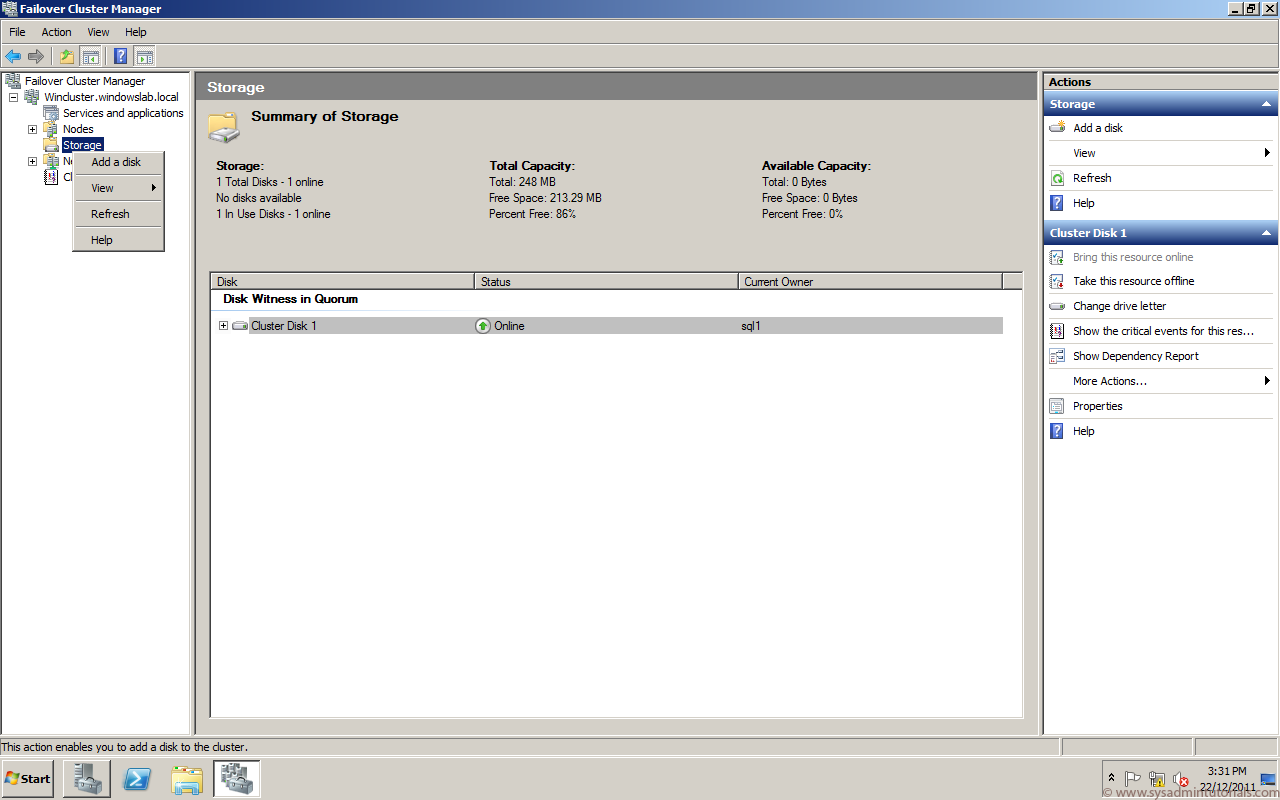
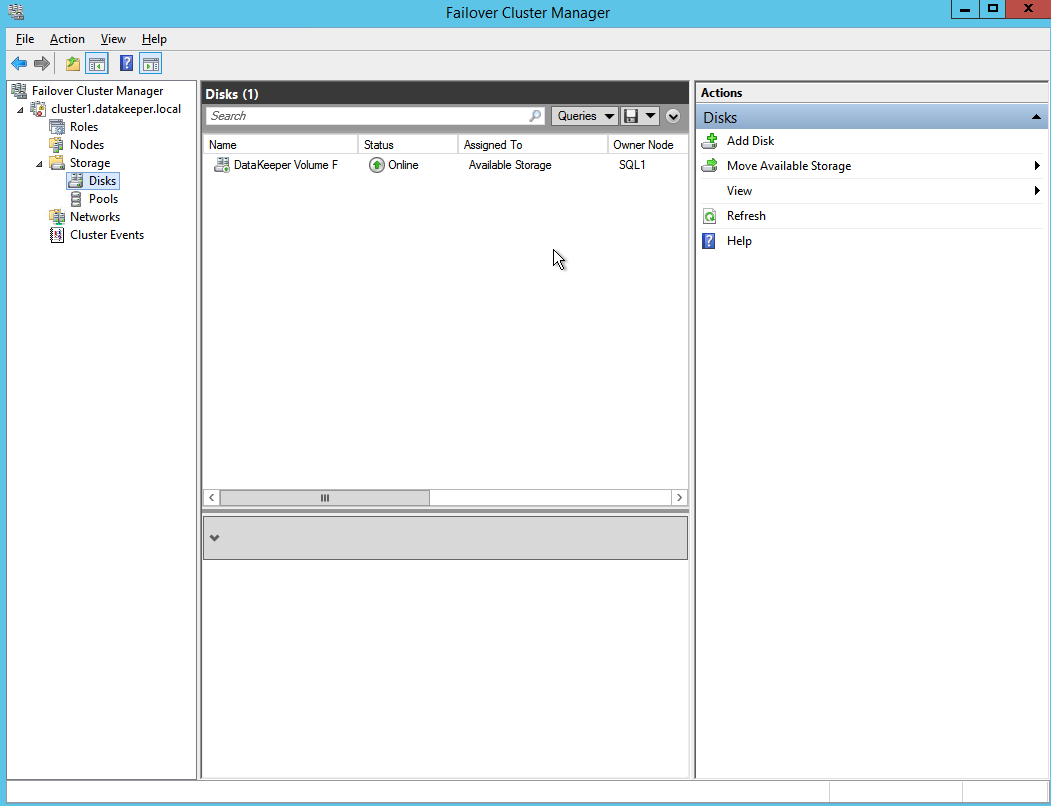
Add a disk to CSV on a failover cluster
The CSV feature is enabled by default in Failover Clustering. To add a disk to CSV, you must add a disk to the Available Storage group of the cluster (if it is not already added), and then add the disk to CSV on the cluster. You can use Failover Cluster Manager or the Failover Clusters Windows PowerShell cmdlets to perform these procedures.
To add a disk to Available Storage
-
In Failover Cluster Manager, in the console tree, expand the name of the cluster, and then expand Storage.
-
Right-click Disks, and then click Add Disk. A list appears showing the disks that can be added for use in a failover cluster.
-
Select the disk or disks you want to add, and then click OK.
The disks are now assigned to the Available Storage group.
Windows PowerShell equivalent commands
The following Windows PowerShell cmdlet or cmdlets perform the same function as the preceding procedure. Enter each cmdlet on a single line, even though they may appear word-wrapped across several lines here because of formatting constraints.
The following example identifies the disks that are ready to be added to the cluster, and then adds them to the Available Storage group.
To add a disk in Available Storage to CSV
-
In Failover Cluster Manager, in the console tree, expand the name of the cluster, expand Storage, and then click Disks.
-
Select one or more disks that are assigned to Available Storage, right-click the selection, and then click Add to Cluster Shared Volumes.
The disks are now assigned to the Cluster Shared Volume group in the cluster. The disks are exposed to each cluster node as numbered volumes (mount points) under the %SystemDisk%ClusterStorage folder. The volumes appear in the CSVFS file system.
Note
You can rename CSV volumes in the %SystemDisk%ClusterStorage folder.
Windows PowerShell equivalent commands
The following Windows PowerShell cmdlet or cmdlets perform the same function as the preceding procedure. Enter each cmdlet on a single line, even though they may appear word-wrapped across several lines here because of formatting constraints.
The following example adds Cluster Disk 1 in Available Storage to CSV on the local cluster.
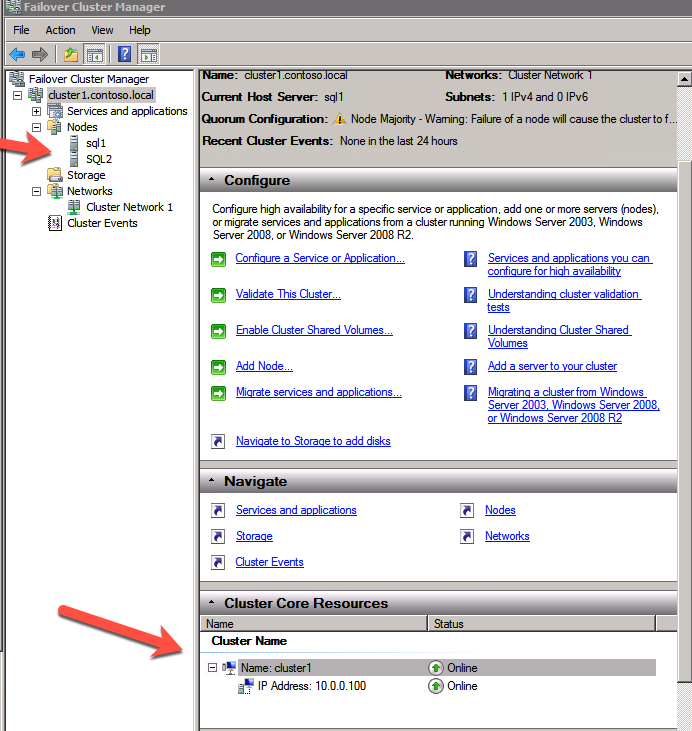
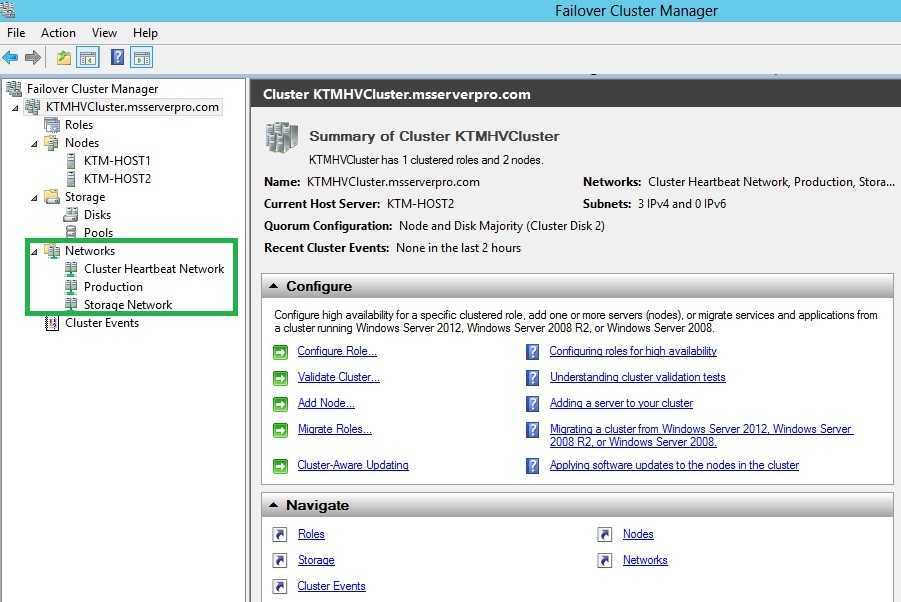
Установка кластера Hyper-V
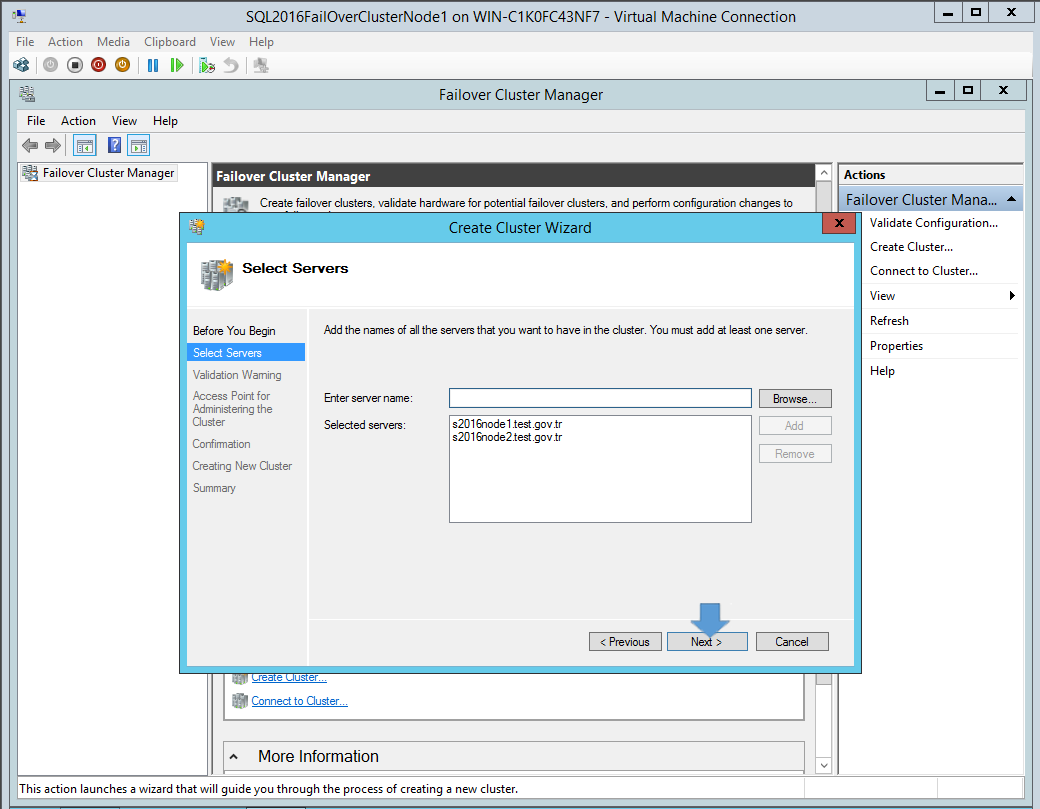
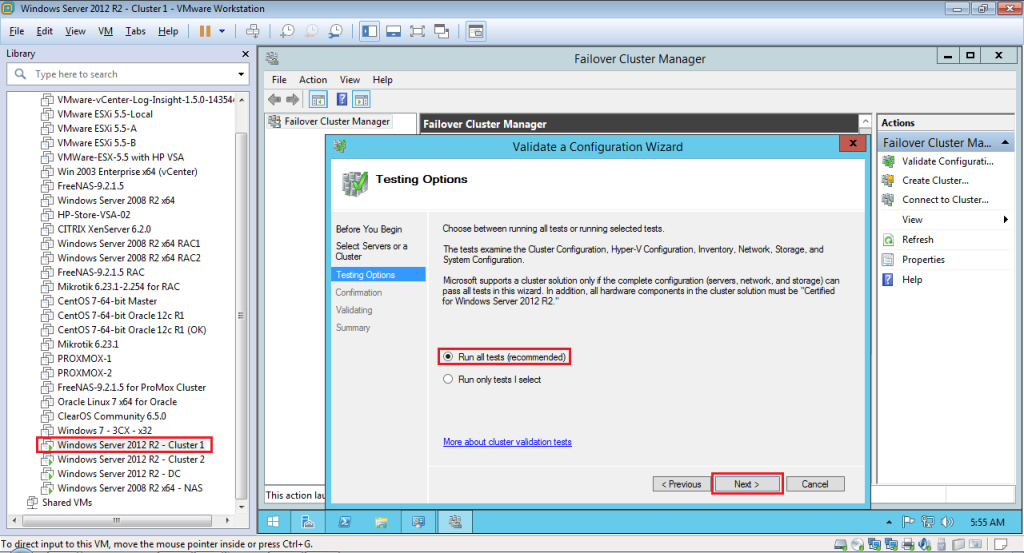
Итак, на любом из серверов запускаем оснастку Failover Cluster Manager и запускаем мастер создания кластера (Create Cluster).На странице выбора серверов кластера добавляем обе наших ноды.На странице Validation Warning соглашаемся с запуском встроенных тестов валидации кластерной конфигурации.Выберите, что нужно прогнать все тесты.
Нужно дождаться окончания валидации. Если будут найдены ошибки – их нужно исправить. После этого нажать на Finish.
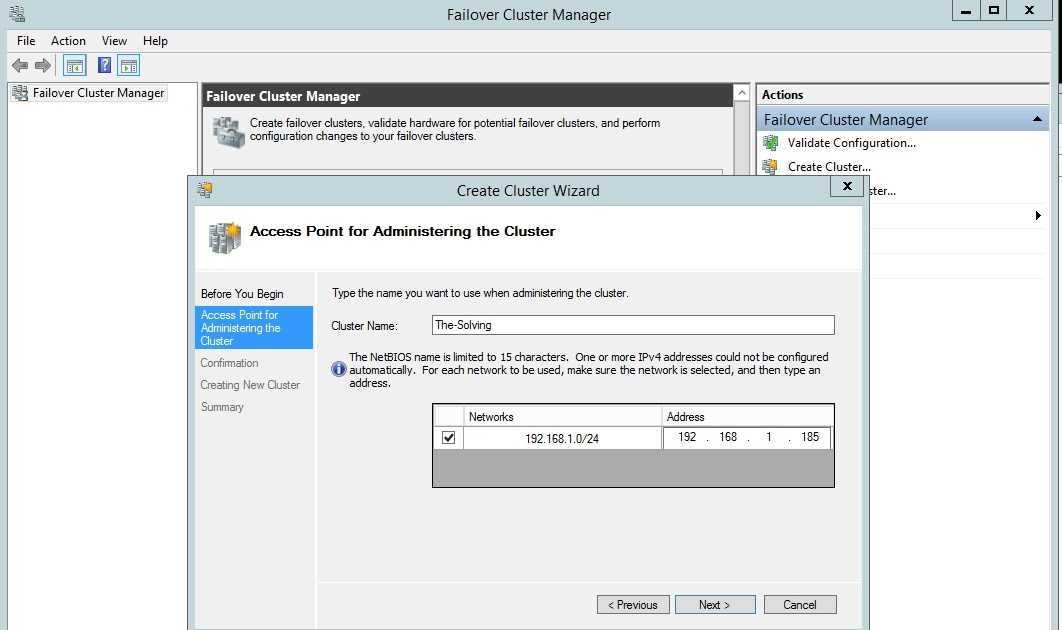
Далее на странице настройки Access Point for Administering the Cluster нужно указать имя кластера и его IP адрес и подсеть.Осталось нажать 2 раза кнопку Next и мастер создаст новый кластер.
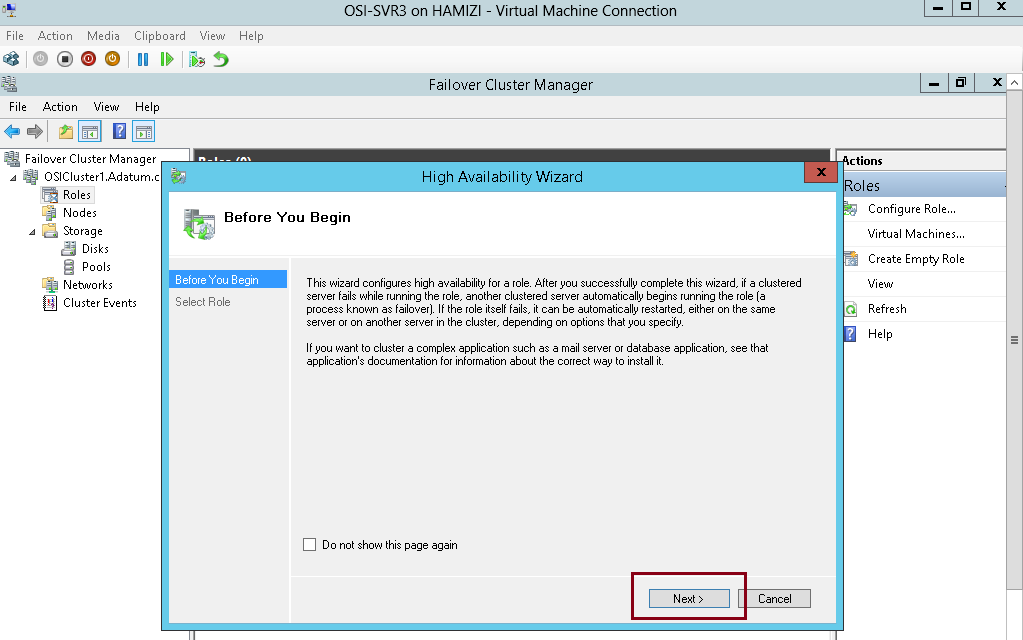
Creating a Highly Available VM
We can now launch Failover Cluster Manager and begin to create a highly available VM.
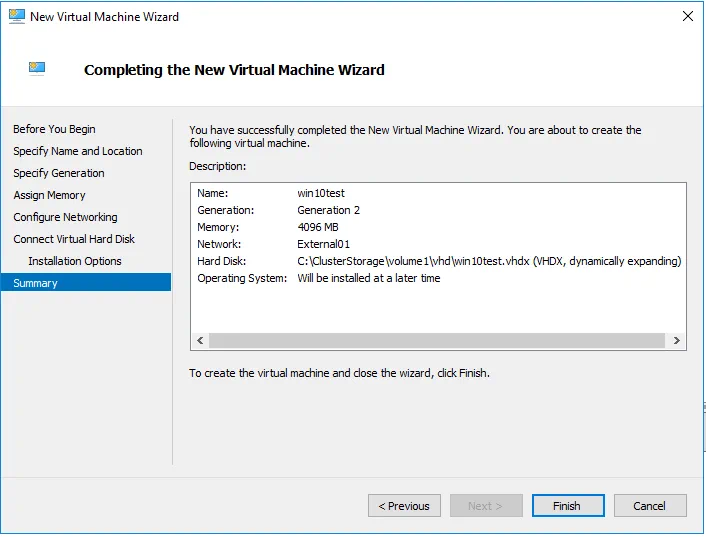
- Right-click the Roles and choose to create a New Virtual Machine.
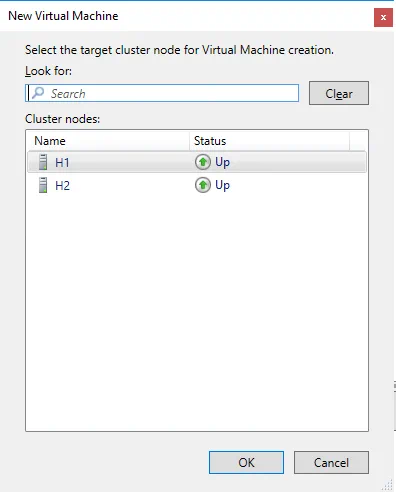
- Choose the Hyper-V host (one of the cluster nodes) for the virtual machine.
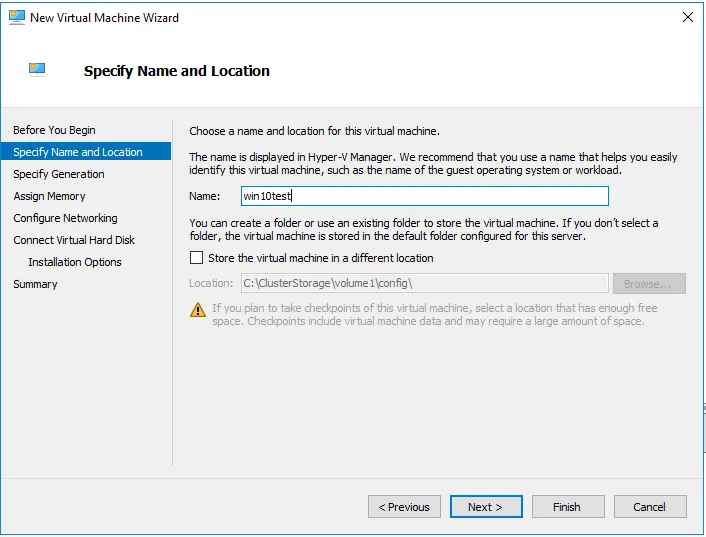
- Work through the New Virtual Machine Wizard prompts to provision a new virtual machine.
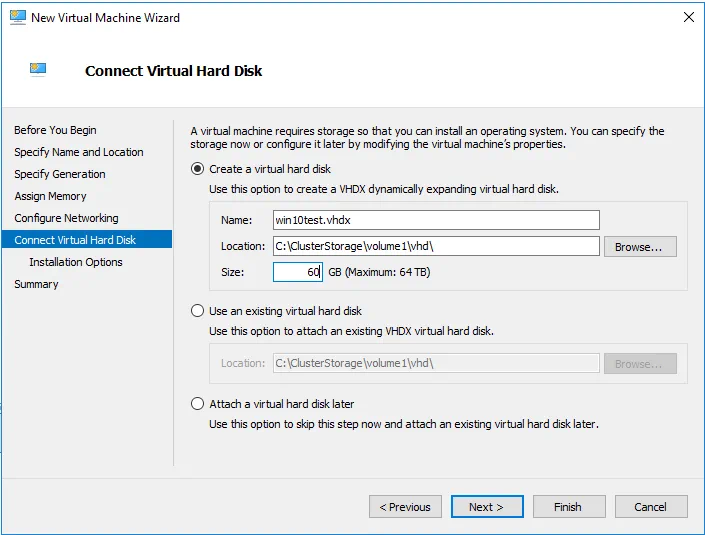
In the Connect Virtual Hard Disk step of the wizard, ensure that the virtual machine is created on our Hyper-V clustered shared volume.
The Summary step displays the options we selected.
- When you click finish, the High Availability Wizard displays the summary of enabling high availability on the role and the virtual machine. As you can see, it has been successfully enabled.
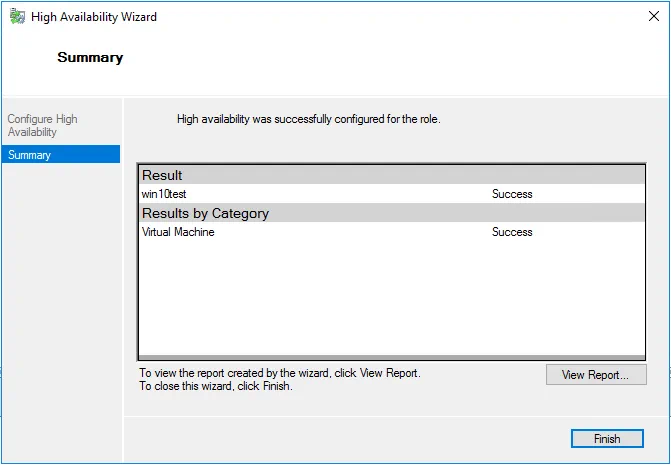
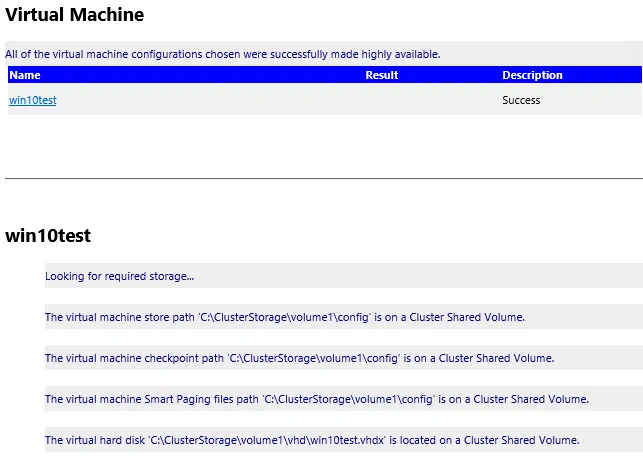
- If you want to take a look at the high availability report, you can click the View Report button, which displays a more detailed rendering of the high availability tests.
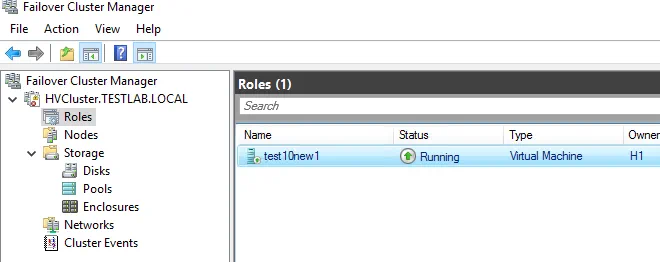
Hyper-V Failover cluster configuration is finished and we now have a highly available VM running in the cluster. You can create more VMs in your cluster to use Hyper-V High Availability.
Enable the CSV cache for read-intensive workloads (optional)
The CSV cache provides caching at the block level of read-only unbuffered I/O operations by allocating system memory (RAM) as a write-through cache. (Unbuffered I/O operations are not cached by the cache manager.) This can improve performance for applications such as Hyper-V, which conducts unbuffered I/O operations when accessing a VHD. The CSV cache can boost the performance of read requests without caching write requests. Enabling the CSV cache is also useful for Scale-Out File Server scenarios.
![What is cluster shared volume and its functions/technical skills? [minitool wiki]](https://robotrackkursk.ru/wp-content/uploads/e/4/c/e4ca8be2c22704dc828efb7e6c003e31.png)
Note
We recommend that you enable the CSV cache for all clustered Hyper-V and Scale-Out File Server deployments.
By default in Windows Server 2012, the CSV cache is disabled. In Windows Server 2012 R2, the CSV cache is enabled by default. However, you must still allocate the size of the block cache to reserve.
The following table describes the two configuration settings that control the CSV cache.
| Property Name in Windows Server 2012 R2 | Property Name in Windows Server 2012 | Description |
|---|---|---|
| BlockCacheSize | SharedVolumeBlockCacheSizeInMB | This is a cluster common property that allows you to define how much memory (in megabytes) to reserve for the CSV cache on each node in the cluster. For example, if a value of 512 is defined, then 512 MB of system memory is reserved on each node. (In many clusters, 512 MB is a recommended value.) The default setting is 0 (for disabled). |
| EnableBlockCache | CsvEnableBlockCache | This is a private property of the cluster Physical Disk resource. It allows you to enable CSV cache on an individual disk that is added to CSV. In Windows Server 2012, the default setting is 0 (for disabled). To enable CSV cache on a disk, configure a value of 1. By default, in Windows Server 2012 R2, this setting is enabled. |
You can monitor the CSV cache in Performance Monitor by adding the counters under Cluster CSV Volume Cache.
To configure the CSV cache
-
Start Windows PowerShell as an administrator.
-
To define a cache of 512 MB to be reserved on each node, type the following:
-
For Windows Server 2012 R2:
-
For Windows Server 2012:
-
-
In Windows Server 2012, to enable the CSV cache on a CSV named Cluster Disk 1, type the following:
Note
In Windows Server 2012, you can allocate only 20% of the total physical RAM to the CSV cache. In Windows Server 2012 R2, you can allocate up to 80%. Because Scale-Out File Servers are not typically memory constrained, you can accomplish large performance gains by using the extra memory for the CSV cache.
In Windows Server 2012, to avoid resource contention, you should restart each node in the cluster after you modify the memory that is allocated to the CSV cache. In Windows Server 2012 R2, a restart is no longer required.
After you enable or disable CSV cache on an individual disk, for the setting to take effect, you must take the Physical Disk resource offline and bring it back online. (By default, in Windows Server 2012 R2, the CSV cache is enabled.)
For more information about CSV cache that includes information about performance counters, see the blog post How to Enable CSV Cache.
Scenario description
With scale-out file shares, you can share the same folder from multiple nodes of a cluster. For instance, if you have a four-node file server cluster that is using Server Message Block (SMB) Scale-Out, a computer running Windows Server 2012 R2 or Windows Server 2012 can access file shares from any of the four nodes. This is achieved by applying new Windows Server Failover Clustering features and the capabilities of the Windows file server protocol, SMB 3.0. File server administrators can provide scale-out file shares and continuously available file services to server applications and respond to increased demands quickly by bringing more servers online. All of this can be done in a production environment, and it is completely transparent to the server application.
Key benefits provided by Scale-Out File Server in include:
- Active-Active file shares. All cluster nodes can accept and serve SMB client requests. By making the file share content accessible through all cluster nodes simultaneously, SMB 3.0 clusters and clients cooperate to provide transparent failover to alternative cluster nodes during planned maintenance and unplanned failures with service interruption.
- Increased bandwidth. The maximum share bandwidth is the total bandwidth of all file server cluster nodes. Unlike previous versions of Windows Server, the total bandwidth is no longer constrained to the bandwidth of a single cluster node; but rather, the capability of the backing storage system defines the constraints. You can increase the total bandwidth by adding nodes.
- CHKDSK with zero downtime. CHKDSK in Windows Server 2012 is enhanced to dramatically shorten the time a file system is offline for repair. Clustered shared volumes (CSVs) take this one step further by eliminating the offline phase. A CSV File System (CSVFS) can use CHKDSK without impacting applications with open handles on the file system.
- Clustered Shared Volume cache. CSVs in Windows Server 2012 introduces support for a Read cache, which can significantly improve performance in certain scenarios, such as in Virtual Desktop Infrastructure (VDI).
- Simpler management. With Scale-Out File Server, you create the scale-out file servers, and then add the necessary CSVs and file shares. It is no longer necessary to create multiple clustered file servers, each with separate cluster disks, and then develop placement policies to ensure activity on each cluster node.
- Automatic rebalancing of Scale-Out File Server clients. In Windows Server 2012 R2, automatic rebalancing improves scalability and manageability for scale-out file servers. SMB client connections are tracked per file share (instead of per server), and clients are then redirected to the cluster node with the best access to the volume used by the file share. This improves efficiency by reducing redirection traffic between file server nodes. Clients are redirected following an initial connection and when cluster storage is reconfigured.
Расширения CSV в Windows Server 2012
Функционирование файлового кластера в режиме Active-Active подразумевает возможность одновременного доступа на «чтение-запись» к общему кластерному тому со всех узлов кластера. Последнее возможно благодаря технологии Cluster Shared Volumes (CSV), впервые появившейся в Windows Server 2008 R2. Напомню, что при использовании CSV для каждого CSV-тома, по-прежнему, один из узлов кластера назначается в качестве «владельца», отвечающего за все операции с метаданными, как то: создание, удаление, переименование файла и пр. Если, например, запрос на создание файла поступил на узел кластера, не являющийся «владельцем» тома, то данный узел перенаправляет запрос по сети «владельцу», который и выполняет операцию.
Если же речь идет об операции «чтения-записи» файла, то такой запрос реализует тот узел кластера, который данный запрос получил, вне зависимости от того, является ли он «владельцем» тома, или нет.
В случае отказа/сбоя текущего «владельца», назначается новый «владелец» из числа работоспособных узлов. При необходимости администратор может в любой момент передать владение нужному узлу с помощью консоли Failover Cluster Manager или командлета PowerShell.
Описанная функциональность в Windows Server 2008 R2 была доступна только для роли Hyper-V, который мог располагать на CSV-томах VHD-файлы. Иными словами, создать на CSV-томе шару и подключиться к ней через кластер было невозможно. Этого ограничения более нет в Windows Server 2012. Как следствие, в кластере можно сконфигурировать один или несколько томов CSV, затем поднять роль Scale-Out File Server и в рамках этой роли создать на CSV-томах нужное количество файловых шар с признаком continuous availability. В результате получим файловый кластер с набором шар, доступ к которым возможен с любого узла кластера (Active-Active) и для которых поддерживается прозрачная отработка отказа (Transparent Failover).