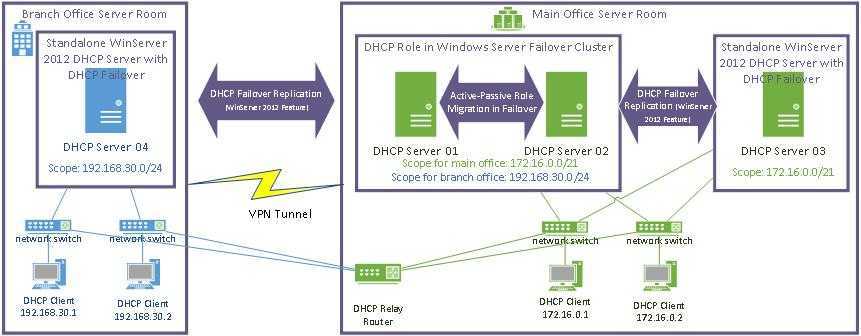
Windows Server 2012 DHCP Failover With or Without Custom DHCP Attributes
Windows Server 2012 DHCP Failover feature is really something we should have a long time ago. Before this feature, when we wanted to achieve DHCP service redundancy, we had to have at least two DHCP servers and we had to split each of our scopes into two. For example, if we had a 192.168.0.0/24 scope, we set up one DHCP server to hand out addresses from 192.168.0.1 to 192.168.0.129 and another DHCP server handing out addresses from 192.168.0.129 to 192.168.0.254. This is just an example. And it is an easy one. If had network such as /27 or /21, a math could be a little bit more complicated.
Thankfully, this is over. Now we can have one DHCP server setup correctly for a particular scope, let’s say 192.168.0.0/24, handing out all addresses from 192.168.0.1 to 192.168.0.254, and add another DHCP server that can hand out addresses if primary server fails, or handing out addresses along with the primary server. We can achieve this with only few mouse clicks!
So, here is our scenario…
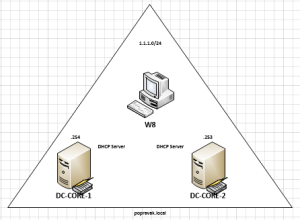
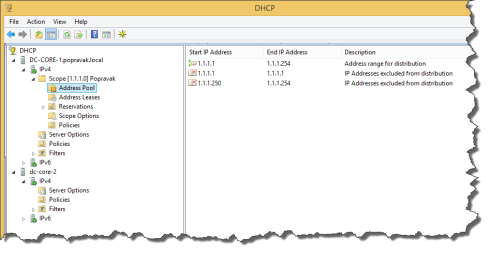
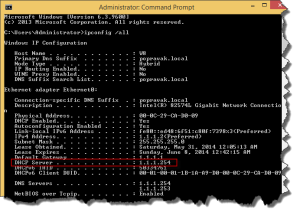
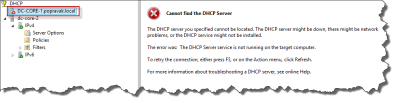
We have two domain controllers running Windows 2012R2 Server Core with DHCP server role installed. Both DHCP servers are authorized to the domain. Only the DC-CORE-1 is setup with a test scope:
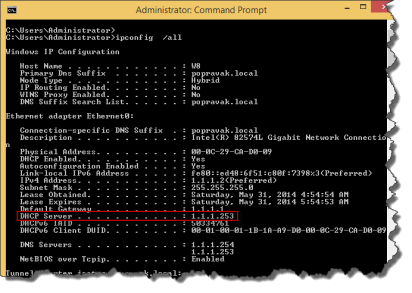
And we can verify that our client received the IP parameters from DC-CORE-1:
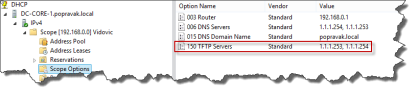
Before we create our failover, let’s add some custom DHCP options to our first server. These options are common in many enterprises and will help us later to see how they can cause us problems.
These custom options we will create:
- 150 TFTP Servers
- 161 Wyse FTPServers
- 162 Wyse FTP Starting Path
First option lists TFTP servers for IP phones, for example, and last two are used for VDI environment, or Virtual Desktop Infrastructure. These are just examples. We can have other options as well, such as option that LWAP access points use for finding a wireless LAN controller. Bottom line is we have these options and they can cause problems, as we shall see.
Let’s create option 150…
In the DHCP Manager, expand DC-CORE-1.popravak.local, right click IPv4 and click “Set Predefined Options…“:
Then we click Add and create our TFTP custom option:
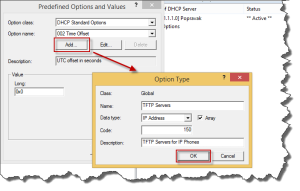
Then we add our TFTP servers:
This is just example of creating a custom option. Other options are created in a similar fashion…
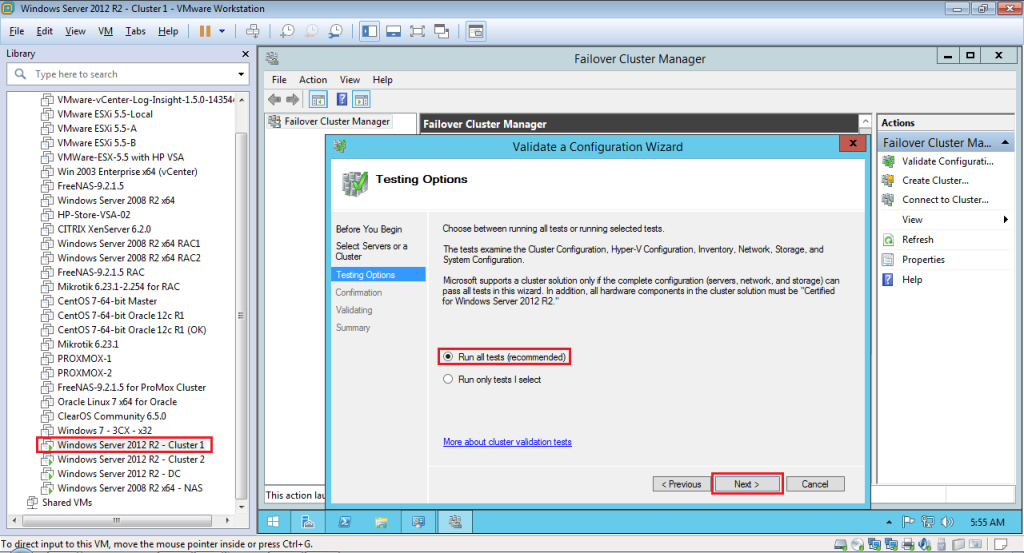
Now let’s try setting up our DHCP Failover Cluster.
Right click the scope and click “Configure Failover…“:
Then complete the wizard…
We select scope or scopeS.
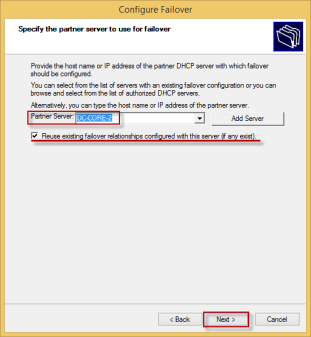
Then chose our partner server.
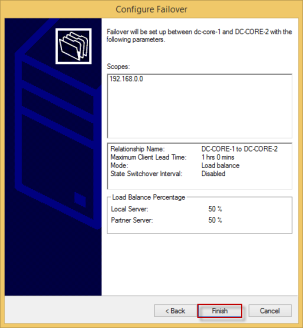
Give a name to this relationship, select if we want active/passive or active/active mode and percentage of IP address distribution. We also give a shared secret to be used for authentication purposes.
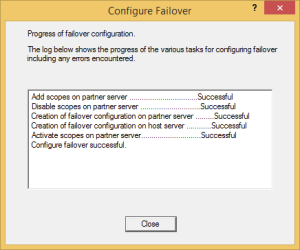
Finally, we complete the wizard.
We can see that the failover setup was successful.
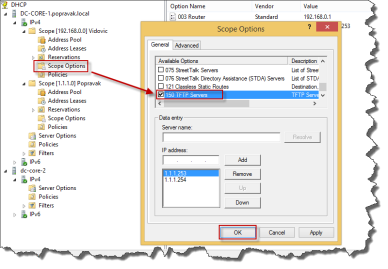
Fine. But before we test the failover, let’s add custom attributes into play. For this we will create another scope for IP phones. This scope will use 192.168.0.0/24 address space and each IP phone requires one ore more TFTP server’s IP addresses. So we add previously created option 150.
Now let’s replicate this pool with our partner server.

Whoops!
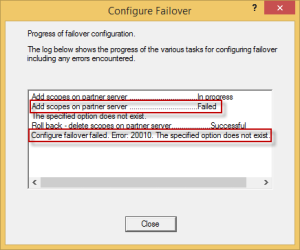
We can see that now the failover of our pool that uses custom options failed with the error message:
Configure failover failed. Error: 20010. The specified option does not exist.
This will happen with any scope that has one or more custom DHCP attributes. This is what causes our replication to fail:
Because we have to have these attributes, what are we going to do? Well, we have to create the same custom attributes on our partner server and then try to replicate our scope. We don’t need to create scopes on partner server, because they will replicate, but just create the attributes that will be used in particular scope we are trying to replicate. The 150 attribute in this case. So we go through the “Set Predefined Options…” on the partner server. Once we do that, we can try to replicate our IP phones scope.
Now we have a success!
We don’t have the same parameters within the custom attributes we create in our partner scope. For example, IP addresses of TFTP servers don’t have to match those on the primary server. Perhaps types don’t have to match either. Only Code has to match. A setup such as this may or may not make sense, but that’s another story.
Now, let’s shutdown the DHCP service on primary server.
This will simulate the DC-CORE-1 server failure. From the DHCP standpoint of course. Now we renew our IP address. And we can see that we received our IP address from the partner server.

Very nice feature
Advertisement
DHCP failover overview
In Windows Server 2008 R2, there are two high availability options available for DHCP Server deployment. Each of these options is associated with some challenges.
-
DHCP in a Windows failover cluster. This option places the DHCP server in a cluster with an additional server configured with the DHCP service that assumes the load if the primary DHCP server fails. The clustering deployment option uses a single shared storage. This makes the storage a single point of failure, and requires additional investment in redundancy for storage. In addition, clustering involves relatively complex setup and maintenance.
-
Split scope DHCP. Split scope DHCP uses two independent DHCP servers that share responsibility for a scope. Typically 70% of the addresses in the scope are assigned to the primary server and the remaining 30% are assigned to the backup server. If clients cannot reach the primary server then they can get an IP configuration from the secondary server. Split scope deployment does not provide IP address continuity and is unusable in scenarios where the scope is already running at high utilization of address space, which is very common with Internet Protocol version 4 (IPv4).
DHCP failover in Windows Server 2012 enables administrators to deploy a highly resilient DHCP service to support a large enterprise without the challenges of the options discussed earlier. The main goals of the feature are the following:
-
Provide DHCP service availability at all times on the enterprise network.
-
If a DHCP server is no longer reachable, the DHCP client is able to extend the lease on its current IP address by contacting another DHCP server on the enterprise network.
The DHCP server failover feature provides the ability to have two DHCP servers provide IP addresses and option configuration to the same subnet or scope, providing for continuous availability of DHCP service to clients. The two DHCP servers replicate lease information between them, allowing one server to assume responsibility for servicing of clients for the entire subnet when the other server is unavailable. It is also possible to configure failover in a load-balancing configuration with client requests distributed between the two servers in a failover relationship.
DHCP failover in Windows Server 2012 provides support for a maximum of two DHCP servers, and the failover relationship is limited to IPv4 scopes and subnets. Network nodes using Internet Protocol version 6 (IPv6) typically determine their own IPv6 address using stateless IP auto configuration. In this mode, the DHCP server delivers only the DHCP option configuration, and the server does not maintain any lease state information. A high availability deployment for stateless DHCPv6 is possible by simply setting up two servers with identical option configuration. Even in a stateful DHCPv6 deployment, the scopes do not run under high address utilization, which makes split scope a viable solution for high availability.
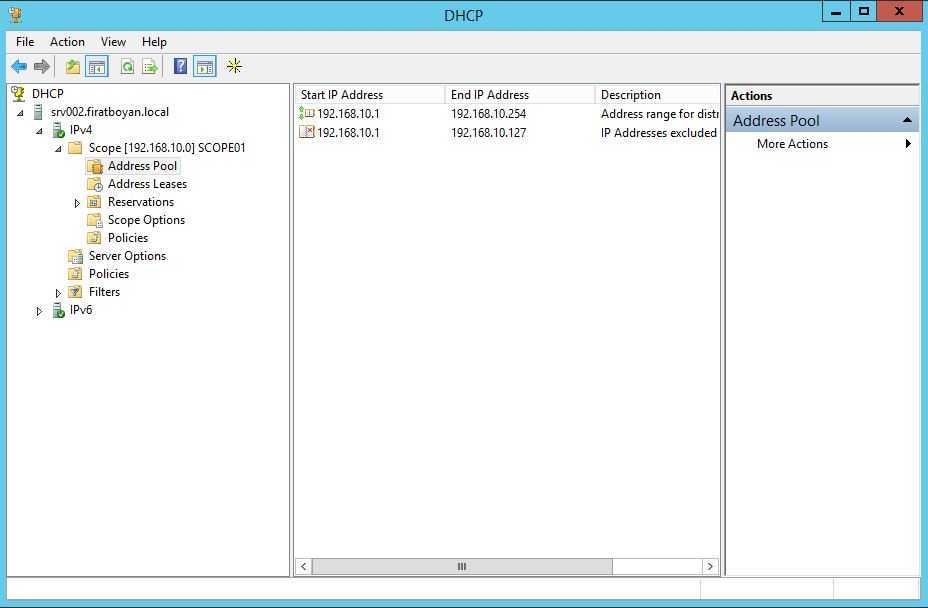
2 – Scope Setup
Before we can setup DHCP failover we need at least one DHCP scope configured. This scope should ONLY be configured on the primary DHCP server and MUST NOT be added to the secondary DHCP server.
- On your primary server only – Right click on the IPv4 object. Click “New Scope…”. This will add a new IPv4 scope.
- Enter the Name and Description of your DHCP scope. Click Next.
- Enter the IP range of the scope as well as the subnet length and mask. The mask should be generated for you based on the length you enter. A /24 would include 254 usable IP’s which is more than sufficient for this test.
- You will be promoted for any exclusions or delays. Add if required. Otherwise click next.
- Enter the lease duration for the scope. I will leave this at the default of 8 days. Click Next.
- Select “Yes, I want to configure these options now“. This will allow us to configure the gateway, DNS servers appropriately so that clients who get an IP address can communicate properly on our network.
- On the Router / default gateway page enter the IP address of your router or aggregate switch here. Click Add, then Next.
- On the DNS Name and DNS servers page enter the domain of your environment and the DNS servers that you want clients to use. Click Next.
- Add a WINS server if you have or need one. (Probably not.) Click Next.
- Finally you will be asked to activate the scope now. Select “No, I will activate the scope later“, or you can enable it if you wish. Click Next, then click Finish.
Overview
With Windows Server 2012, Microsoft has finally introduced the ability to properly cluster the DHCP server role. There are two different methods of clustering available: failover and load balance.
Failover clusters use the same 80/20 methodology as has always been used – where one server owns at least 80% of a scope’s available addresses and a second server own the 20%. This allowed the second server to continue registering new leases to clients if the primary DHCP server went offline.
We still follow the 80/20 rule, as there is still a need to reserve a recommended 20% of a scope’s addresses for the hot standby. The main difference now is scope settings and options replication between DHCP partner servers. We no longer need to re-create the scope and manually adjust options on the second server.
Another benefit is that the partner server can automatically take full ownership of the scope, if the primary servers is lost.
The failover DHCP cluster is defined and configured at the scope level. And unlike most other high-availability failover configurations available on Windows Servers, it does not use the Failover Clustering feature.
This step-by-step tutorial will guide you through configuring a DHCP failover cluster on Windows Server 2012 R2.
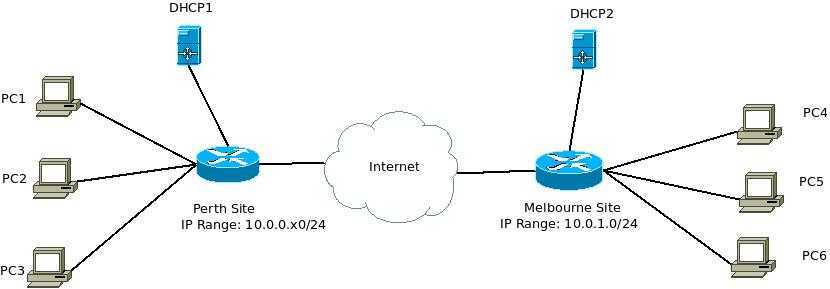
Install and configure DHCP on DHCP2
DHCP2 is a domain member server running the DHCP Server role service.
To install DHCP on DHCP2
-
In the Server Manager navigation pane, click Local Server and then click the name next to Computer name. The System Properties control panel will open.
-
On the Computer Name tab, click Change and then type DHCP2 under Computer name.
-
Under Member of, select Domain, type contoso.com, and then click OK.
-
When you are prompted to provide credentials to join the domain, enter the credentials for the user1 account that was created previously and then click OK.
-
Confirm that computer name and domain changes were successful, click OK twice, and then click Close.
-
When you are prompted to restart the computer, click Restart Now.
-
After restarting the computer, sign-in using the CONTOSO\user1 account.
-
In Server Manager, under Configure this local server, click Add Roles and Features.
-
In the Add Roles and Features Wizard, click Next three times, and then on the Select server roles page select the DHCP Server checkbox.
-
When you are prompted to add required features, click Add Features.
-
Click Next three times, and then click Install.
-
Wait for the installation process to complete, verify on the Installation progress page that Configuration required. Installation succeeded on DHCP2.contoso.com is displayed, and then click Close.
To configure DHCP on DHCP2
-
On the Server Manager menu bar, click Tools and then click DHCP. THE DHCP console opens.
-
In the DHCP console tree, navigate to IPv4. Right-click IPv4 and then click New Scope. The New Scope Wizard opens.
-
Click Next and then type a name for the new scope next to Name (ex: Contoso-scope1).
-
Click Next and then in IP Address Range, type 10.0.0.1 next to Start IP address, type 10.0.0.254 next to End IP address, and type 24 next to Length. The value of Subnet mask will change automatically to 255.255.255.0.
-
Click Next, and then in Add Exclusions and Delay type 10.0.0.1 under Start IP address, type 10.0.0.10 under End IP address, and then click Add. This allows the first ten IP addresses in the 10.0.0.0/24 subnet to be used for static addressing of servers on the network.
-
Click Next and then in Lease Duration under Limited to enter 0 Days, 0 Hours, and 2 Minutes. This very short lease duration will simplify the DHCP failover demonstration.
-
Click Next three times, and then in Domain Name and DNS Servers, verify that the Parent domain is contoso.com and 10.0.0.1 is listed as the only DNS server.
-
Click Next twice, and then in Activate Scope select Yes, I want to activate this scope now.
-
Click Next, and then click Finish.
-
In the DHCP console tree, right-click dhcp2.contoso.com, and then click Authorize.
-
Refresh the view in the DHCP console and verify that DHCP2 is authorized and that the Contoso-scope1 is active.
Note: To review scopes on the current server using Windows PowerShell, right-click Windows PowerShell, click Run as Administrator, click Yes in the User Account Control alert that appears, and then type the following command at the Windows PowerShell prompt, and then press ENTER.
Configure a failover relationship
First, configure a failover relationship using DHCP1 and DHCP2.
To configure a failover relationship
-
On DHCP2, open the DHCP console, right-click the Contoso-scope1 DHCP scope and then click Configure failover.
-
In the Configure Failover wizard, click Next.
-
In Specify the partner server to use for failover, next to Partner Server, type dhcp1.contoso.com and then click Next.
-
In Create a new failover relationship, type a name next to Relationship Name, or accept the default name that is displayed (dhcp2.contoso.com-dhcp1.contoso.com).
-
Type a shared secret for this failover relationship next to Shared Secret (ex: secret).
-
Change the value next to Maximum Client Lead Time to hours and 1 minute.
Important
The Maximum Client Lead Time (MCLT) is additional time provided to a DHCP client after expiration of a DHCP lease. The MCLT is transmitted from the primary to the secondary server in the CONNECT message, and is the maximum amount of time that one server can extend a lease for a client beyond the time known by the partner server.
The 1 minute MCLT value used here is for test lab purposes only, to prompt lease renewal by the client. In a production environment, you should use a longer MCLT, such as 1 hour. -
-
Review the options available in the drop-down menu next to Mode. You can choose Load balance or Hot standby. By default, Load balance mode is chosen.
-
Click Next and then click Finish.
-
Verify that failover configuration was successful, and then click Close.
-
On DHCP1, refresh the DHCP console and verify that the same DHCP scope configuration that is present on DHCP2 is now present on DHCP1.

Address assignment
The DHCP server determines the scope to which a DHCP client belongs based on the gateway IP address of the relay agent or the interface of the DHCP server on which it receives the DHCP client packet. Once the server determines the client scope, the server evaluates the DHCP packet against the policies applicable for the scope in the processing order specified. The policies applicable at a scope are those configured at the scope and those inherited from the server. A single client request can match multiple policies.
If a client request matches the conditions of a policy for which a specific IP address range is associated, the server will assign the first free IP address from the range as determined by the rule. If a policy is associated with multiple address ranges, the server will assign IP addresses by first attempting to assign an IP from the lowest address range. If no IP addresses are available to use from the lower address range, the server will then look for a free IP address from the higher address ranges. If no IP addresses are free from any of the address ranges associated with the policy, the server will process the next matched policy as defined by the processing order.
If none of the matched policies has a free IP address, the server will drop the client packet and log an event. If a DHCP client packet does not match any of the policies applicable for the scope, or none of the matched policies for a client packet is associated with an IP address range, the server will lease the client an IP address from the IP address range configured for the scope exclusive of any policy-specific IP address ranges.
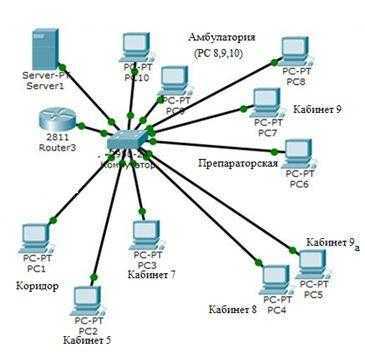
Переключить конфигурацию реле DHCP
Если вы выполняете DHCP в сетевых сегментах, вам необходимо настроить ретрансляцию DHCP на интерфейсе сетевого сегмента на коммутаторе уровня 3.
В качестве примера возьмем указанный выше сегмент сети:
- Сегмент сети DHCP 172.29.56.x / 24
- Выделить ip сегмент сети 172.29.62.x / 24
Поскольку коммутатор уровня 3 не предоставляет напрямую функцию DHCP, вам необходимо предоставитьНастройте ретранслятор DHCP. Следующие операции основаны на Huawei S6720
Сначала настройте группу DHCP-сервера и добавьте два IP-адреса: активный и резервный. Здесь 0 и 1 за ip — порядковые номера
Затем используйте эту группу в качестве реле на интерфейсе.
DHCPv6 Scopes
On Windows Server 2012, DHCPv6 scopes are created and configured separately from IPv4 scopes. Let’s review the step-by-step configuration of a DHCPv6 scope.
- On the DHCP Server console, right click IPv6 and select New Scope.
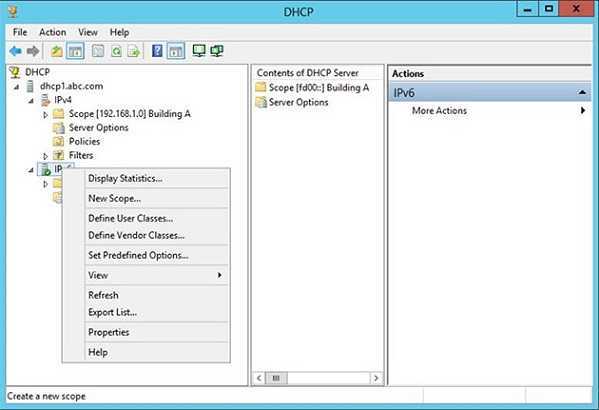 Figure 11
- On the Welcome to the New Scope Wizard, click Next
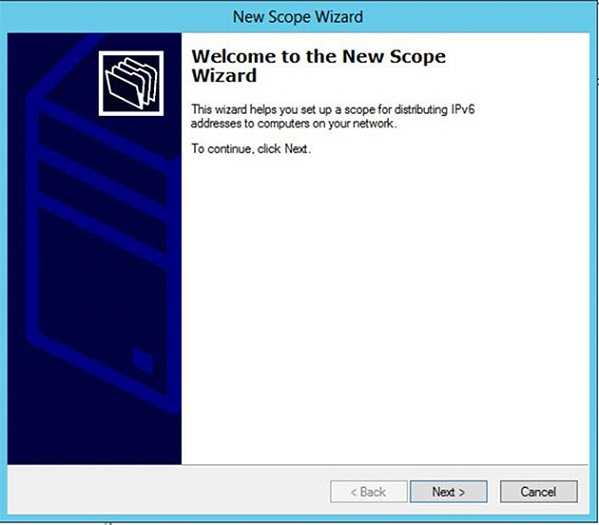 Figure 12
- On the Scope Name, enter Name and Description information.
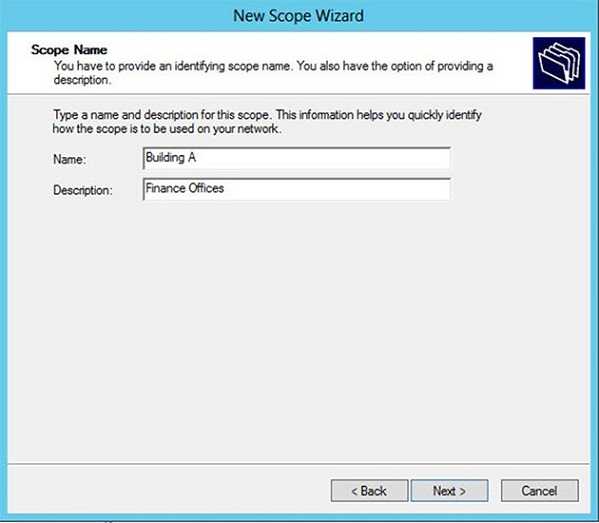 Figure 13
- On the Scope Prefix, enter the corresponding prefix for your IPv6 network. If you have multiple DHCPv6 servers, the preference value can be modified to indicate your priority among the servers. The lower this value, the higher the priority.
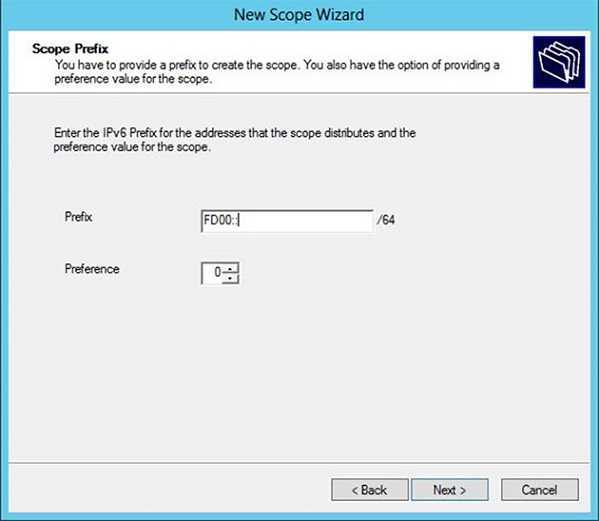 Figure 14
- On the Add Exclusions, enter any IPv6 address that belongs to that scope but has been manually assigned to other devices in the network. This includes the IPv6 address that is manually configured on the DHCPv6 server itself. Additional exclusion can be added after the initial DHCPv6 scope has been configured.
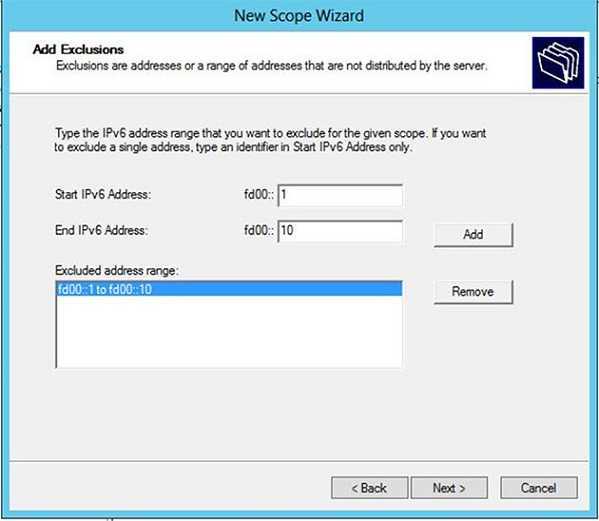 Figure 15
- On the Scope Lease, configure two settings:
- Preferred Life Time is the length of time that a valid IPv6 address is preferred. When this time expires, the address becomes deprecated but it is still valid.
- Valid Life Time is the length of time that an IPv6 is in the valid state. The address becomes invalid after the valid life time expires. The valid life rime must be equal or greater than the preferred life time.
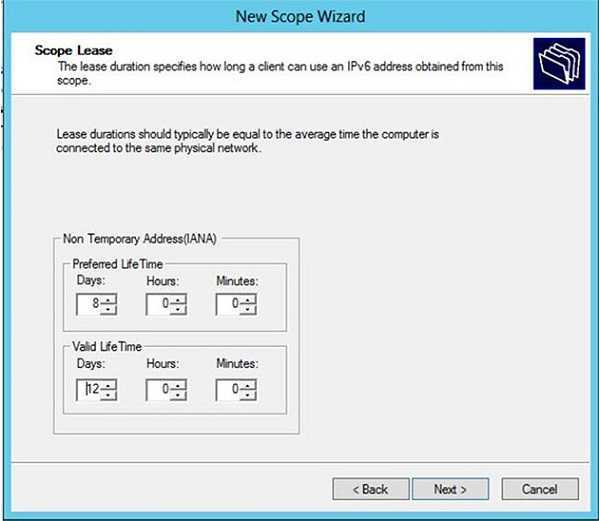 Figure 16
- On the Completing the New Scope Wizard, click Finish to activate the scope.
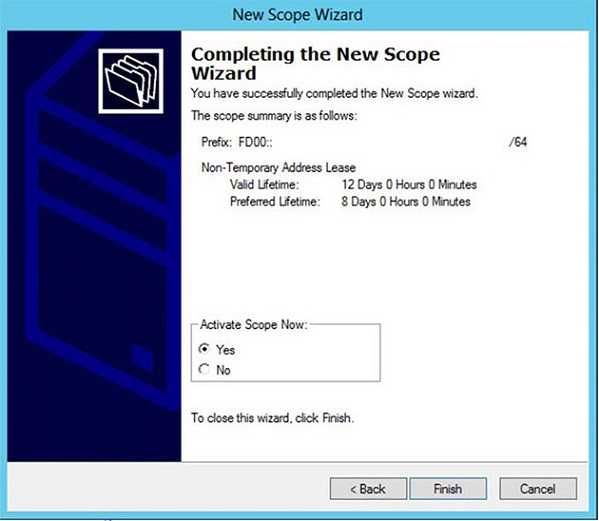 Figure 17
As on IPv4 scopes, you can configure exclusions, reservations, and DHCP options on IPv6 scopes. However, DHCPv6 clients do not use their MAC addresses when contacting a DHCP server. Instead a device unique identifier (DUID) is used by clients to get an IP address from a DHCPv6 server.
Edit properties of the failover relationship and demonstrate hot standby mode
To demonstrate hot standby mode, the DHCP Server service on one of the failover partners will be stopped.
To edit properties of the failover relationship and demonstrate hot standby mode
-
On DHCP1 or DHCP2, in the DHCP console, right-click the Contoso-scope1 DHCP scope and then click Properties.
-
Click the Failover tab.
-
Click Edit and then choose Hot Standby Mode.
-
Depending on which DHCP server you are configuring, the local server will be assigned either Active or Standby status. The status is displayed next to Role of this server.
Tip
The server that is designated to be Active in hot standby mode is the server that you used to create the failover relationship.
-
Click OK twice and then wait 2 minutes for the DHCP lease on Client1 to renew.
-
On Client1, type ipconfig /all at the Windows PowerShell prompt and verify that the server that is assigned as Active is supplying an IP addresses configuration to Client1.
-
In the DHCP console on the DHCP server that is marked as Active for the hot standby failover relationship and is currently supplying an IP address to Client1, right-click the server name, point to All Tasks, and then click Stop.
-
Verify that the DHCP service is stopped on the active DHCP server.
-
Wait for the DHCP lease to renew on Client1, type ipconfig /all at the Windows PowerShell prompt, and verify that the standby DHCP server is supplying an IP address to Client1.
Install AD DS, DNS Server, and DHCP Server
DHCP1 will serve as a domain controller, DNS server, and DHCP server for the contoso.com Active Directory domain.
To configure DHCP1 as a domain controller, DNS server, and DHCP server
-
The Server Manager Dashboard is displayed by default. In the navigation pane, click Configure this local server.
-
Under PROPERTIES, click the name next to Computer name. The System Properties dialog box will open.
-
On the Computer Name tab, click Change and then type DHCP1 under Computer name.
-
Click OK twice, and then click Close.
-
When you are prompted to restart the computer, click Restart Now.
-
After restarting the computer, sign-in using the local Administrator account.
-
In Server Manager, under Configure this local server, click Add Roles and Features.
-
In the Add Roles and Features Wizard, click Next three times, and then on the Select server roles page select the Active Directory Domain Services checkbox.
-
When you are prompted to add required features, click Add Features.
-
Select the DHCP Server checkbox.
-
When you are prompted to add required features, click Add Features.
-
Select the DNS Server checkbox.
-
When you are prompted to add required features, click Add Features.
-
Click Next five times, and then click Install.
-
Wait for the installation process to complete, verify on the Installation progress page that Configuration required. Installation succeeded on DHCP1 is displayed, and then click Close.
-
Click the Notification flag and then click Promote this server to a domain controller. See the following example.
-
-
In the Active Directory Domain Services Configuration Wizard, on the Deployment Configuration page, choose Add a new forest and then next to Root domain name, type contoso.com.
-
Click Next, and then on the Domain Controller Options page, under Type the Directory Services Restore Mode (DSRM) password, type a password next to Password and Confirm password. Confirm that Domain Name System (DNS) server and Global Catalog (GC) are selected, and then click Next.
-
Click Next four times, verify that All prerequisite checks passed successfully is displayed, and then click Install.
-
The computer will restart automatically to complete the installation process.
-
Sign in using the local Administrator account.
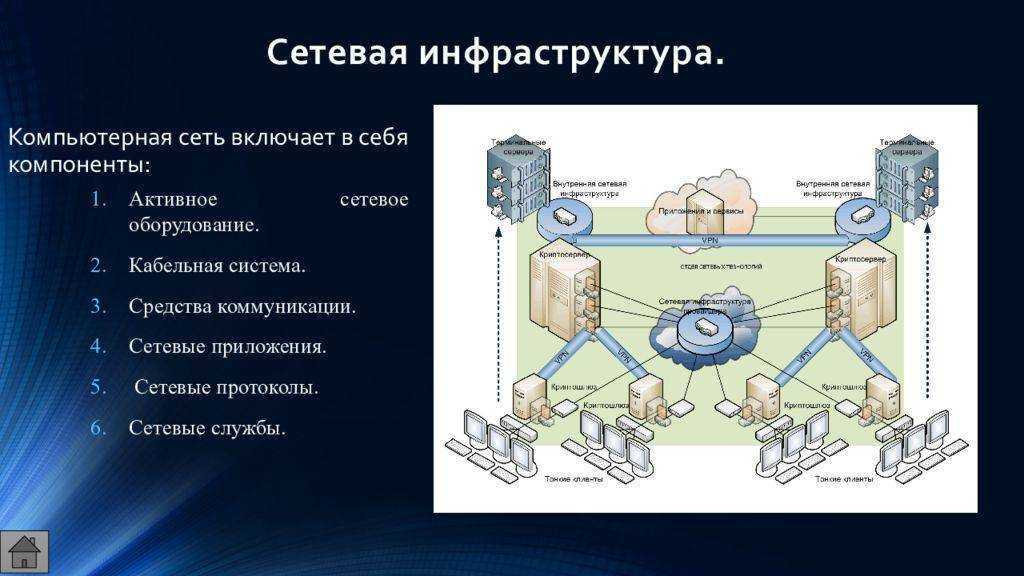
Что такое DHCP сервер и его плюсы
Прежде чем говорить о сервере DHCP, давайте узнаем, что такое DHCP.
DHCP (Dynamic Host Configuration Protocol) – это протокол позволяющий компьютерам динамически получать ip адреса и другие сетевые параметры.
Для работы протокола DHCP требуется сервер и клиент.
DHCP сервер – это сервер который раздает ip адреса и параметры компьютерам в сети, соответственно на нем и задаются настройки раздачи ip адресов и сетевых параметров.
DHCP клиент – это приложение установленное на клиентских компьютерах, которое обращается к DHCP серверу для получения ip адреса и соответствующих параметров. Во всех операционных системах по умолчанию установлен клиент DHCP, например в Windows он выглядит в виде службы с логичным названием DHCP-клиент.
Как Вы, наверное, знаете если не пользоваться DHCP, то у всех компьютеров в сети придется прописывать статические ip адреса вручную. Это первый плюс использования DHCP. Потому что если прописывать статические ip адреса, то обязательно будут возникать проблемы, самой распространенной проблемой является конфликт ip адресов, т.е. один и тот же адрес задан одновременно на нескольких компьютерах.
Также к самым наглядным плюсам можно отнести то, что DHCP сервер может раздавать параметры, например, шлюз, dns сервера и еще много других. Соответственно без DHCP сервера это тоже придется делать вручную.
Перечислять все положительные стороны использования DHCP у себя в организации я думаю, не стоит, так как уже на данном моменте ясно, что использовать DHCP лучше, чем не использовать. Некоторые могут сказать «Зачем использовать DHCP, если в организации всего 15 машин?» поверьте, даже с таким количеством компьютеров в сети Вы значительно упрощаете администрирование ими. Даже если Вы наизусть помните, какой ip задан у каждого компьютера или устройства, рано или поздно Вам придется их менять (компьютеры устарели или сломались), и настраивать все эти параметры заново, или при добавление новой единицы оргтехники, которой необходим ip адрес, Вы можете забыть, или просто ошибиться в назначение ip адреса, соответственно потом все это нужно будет исправлять. Конечно если у Вас в сети до 5 компьютеров, может смысла, особого нет, я думаю и администратор в таком случае не нужен, но если в Вашем парке скажем 50-100 или больше компьютеров, то DHCP обязателен, также как и объедение всех компьютеров в домен.
Install the operating system and configure TCP/IP on DHCP2
Tip
The procedure below is identical to the steps used to install the operating system and configure TCP/IP on DHCP1, with the exception that DHCP2 is configured with an IP address of 10.0.0.2.
To install the operating system and configure TCP/IP on DHCP2
-
Start your computer using the Windows Server 2012 product disc or other digital media.
-
When prompted, enter a product key, accept license terms, configure clock, language, and regional settings, and provide a password for the local Administrator account.
-
Press Ctrl+Alt+Delete and sign-in using the local Administrator account.
-
If you are prompted to enable Windows Error Reporting, click Accept.
-
In the Server Manager navigation pane, click Local Server and then click the IP address next to Wired Ethernet Connection. The Network Connections control panel will open.
-
In Network Connections, right-click Wired Ethernet Connection and then click Properties.
-
Double-click Internet Protocol Version 4 (TCP/IPv4).
-
On the General tab, choose Use the following IP address.
-
Next to IP address type 10.0.0.2 and next to Subnet mask type 255.255.255.0. It is not necessary to provide an entry next to Default gateway.
-
Next to Preferred DNS server, type 10.0.0.1.
-
Click OK twice, and then close the Network Connections control panel.
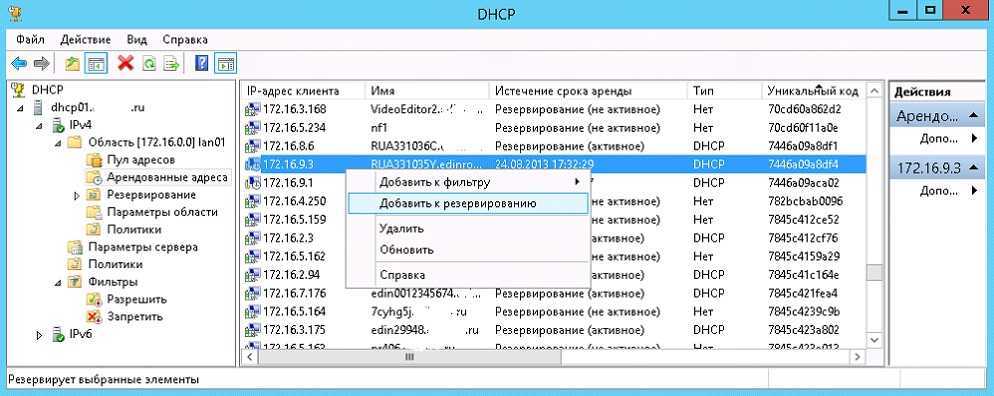
Настройка службы DHCP
После установки службы DHCP и ее запуска необходимо создать область. Область — это диапазон допустимых IP-адресов, доступных для аренды клиентским компьютерам DHCP в сети. Корпорация Майкрософт рекомендует, чтобы каждый DHCP-сервер в вашей среде имел как минимум одну область, которая не пересекается с любой другой областью DHCP-сервера в вашей среде. В Windows Server 2003 DHCP-серверы в домене на основе Active Directory должны быть авторизованы, чтобы предотвратить подключение к мошенническим DHCP-серверам. Любой DHCP-сервер в Windows Server 2003, который определяет себя как неавторизованный, не будет управлять клиентами.
Создание новой области
- Нажмите кнопку «Пуск», выберите пункт «Администрирование», а затем — «Протокол DHCP».
- В дереве консоли щелкните правой кнопкой мыши DHCP-сервер, на котором нужно создать новую область DHCP, затем выберите команду «Создать область».
- В мастере создания области нажмите кнопку «Далее», а затем введите имя и описание области. Имя может быть любым, но при этом должно быть достаточно описательным, чтобы вы могли определить назначение области в вашей сети (например, можно использовать такое имя, как «Адреса клиентов административного здания»). Нажмите кнопку «Далее».
- Введите диапазон адресов, которые могут быть предоставлены в аренду в рамках этой области. Например, используйте диапазон IP-адресов от начального IP-адреса 192.168.100.1 до конечного адреса 192.168.100.100. Поскольку эти адреса предоставляются клиентам, все они должны быть допустимыми адресами для вашей сети и не использоваться в настоящее время. Если вы хотите использовать другую маску подсети, введите новую маску подсети. Нажмите кнопку «Далее».
- Введите любые IP-адреса, которые нужно исключить из введенного диапазона. Эти адреса включают любой адрес в диапазоне, описанном на шаге 4, который уже может быть статически назначен различным компьютерам в организации. Обычно контроллеры домена, веб-серверы, DHCP-серверы, DNS-серверы и другие серверы имеют статически назначенные IP-адреса. Нажмите кнопку «Далее».
- Введите количество дней, часов и минут до истечения срока аренды IP-адреса из этой области. Определяет, как долго клиент может хранить арендованный адрес без его продления. Нажмите кнопку «Далее», а затем нажмите кнопку Да, настроить эти параметры сейчас, чтобы расширить мастер для включения наиболее распространенных параметров DHCP. Нажмите кнопку «Далее».
- Введите IP-адрес основного шлюза, который должен использоваться клиентами, которые получают IP-адрес из этой области. Нажмите кнопку «Добавить», чтобы добавить в список адрес основного шлюза, а затем нажмите кнопку «Далее».
- Если вы используете DNS-серверы в сети, введите доменное имя организации в поле Родительский домен. Введите имя DNS-сервера и нажмите кнопку «Разрешить», чтобы убедиться, что DHCP-сервер может связаться с DNS-сервером и определить его адрес. Нажмите кнопку «Добавить», чтобы включить этот сервер в список DNS-серверов, назначенных DHCP-клиентам. Нажмите кнопку «Далее» и выполните те же действия. Если вы используете WINS-сервер, добавьте его имя и IP-адрес, затем нажмите кнопку «Далее».
- Нажмите кнопку Да, я хочу активировать эту область сейчас, чтобы активировать область и разрешить клиентам получать из нее аренды, затем нажмите кнопку «Далее».
- Нажмите кнопку «Готово».
- В дереве консоли щелкните имя сервера, затем нажмите «Авторизовать» в меню «Действие».
History of the DHCP Server Role in Server Core ^
The DHCP Server Server Role has been included in Server Core since Windows Server 2008. Server Core installations of Windows Server 2012 support failover DHCP scopes. This new feature, which is found in both Server Core and Server with a GUI installations of Windows Server 2012, adds redundancy to DHCP Servers without failover clustering, shared storage, and multiple network interconnects between two (or more) DHCP Servers. This also replaces the practice where admins needed to place 80% of their leases on one DHCP Server and 20% on another DHCP Server (and maintain reservations and DHCP options on both servers) to achieve DHCP Server redundancy.