Concluding ^
The Remote Access Services Server Role in Server Core installations of Windows Server 2012 is a powerful Server Role. Its PowerShell commands allow you to quickly deploy DirectAccess and VPN tunnels. If you’re looking to deploy a lightweight Windows-based IP router, look somewhere else, because the IIS requirement is a definite no-go area.
Articles in series
Server Roles in Sever Core
- Server Roles in Server Core
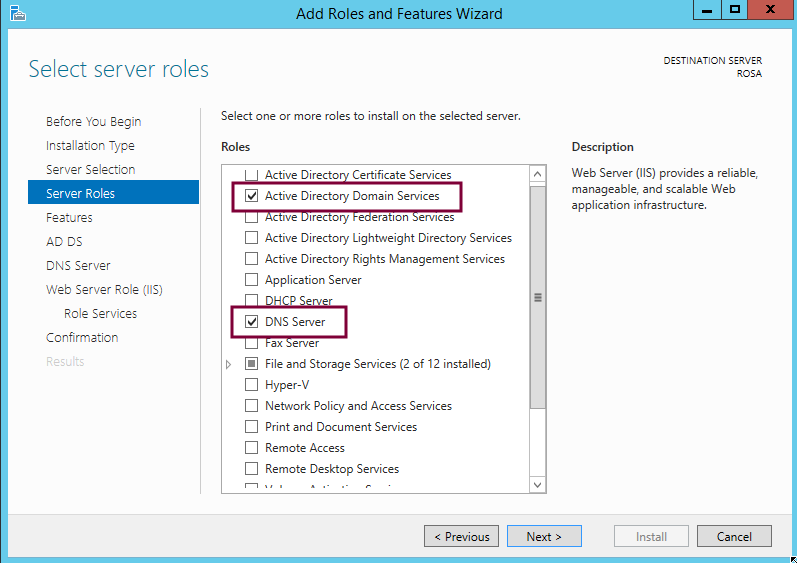
- How to configure Server Core as Domain Controller
- How to install a DNS Server on Server Core
- How to install a DHCP Server on Server Core
- How to install File Services on Server Core
- Certificate Server in Server Core
- Install and manage a Print Server in Server Core
- Server Core Remote Access Services -DirectAccess and Routing
- How to install Hyper-V on Server Core
- Internet Information Services (IIS) on Server Core
- How to install the FTP Server Role on Server Core
- WSUS on Server Core
IPMI driver and provider installation notes
The driver might not detect the existence of IPMI drivers that are not from Microsoft. If the driver fails to start, then you might need to disable it.
If the resources appear in the system BIOS, then ACPI (Plug and Play) detects the BMC hardware, and automatically installs the IPMI driver. Plug and Play support might not be present in all BMCs. If the BMC is detected by Plug and Play, then an Unknown Device appears in Device Manager before the Hardware Management component is installed. When the driver is installed, a new component, the Microsoft ACPI Generic IPMI Compliant Device, appears in Device Manager.
If your system doesn’t automatically detect the BMC and install the driver, but a BMC was detected during the setup process, then you must create the BMC device. To do this, type the following command at a command prompt: . After this command is executed, the IPMI device is created, and it appears in Device Manager. If you uninstall the Hardware Management component, then the device is removed.
For more information, see Hardware Management Introduction.
The IPMI provider places the hardware classes in the root\hardware namespace of WMI. For more information about the hardware classes, see IPMI Provider. For more information about WMI namespaces, see WMI Architecture.
Introduction
Remote management of IIS 7.0 and above through Internet Information Services (IIS) Manager must be explicitly enabled. This has changed from IIS 6.0 where IIS Manager remoting was through MMC and was always enabled. This document describes how to enable remote management of IIS on Windows Server 2008 through IIS Manager.
First, you must be on Windows Server 2008. IIS on Windows Vista will not be remotely manageable when it released. You must also be logged in as the built-in Administrator account, or be a member of the Administrators group using elevated privileges.
These are the steps for enabling remote administration of your IIS server.
-
Install the Web Management Service (WMSVC).
-
Enable remote connections.
-
Optionally set other configuration, e.g.:
a. HTTPS binding (port, IP address, and/or SSL certificate)
b. IP and domain restrictions. -
Start WMSVC, and optionally change the service Startup Type from Manual to Automatic.
Starting WMSVC is the last step because WMSVC cannot be configured while running.
Note
This document only describes how to enable remoting. For an overview of how IIS Manager remoting works, please see the Getting Started with IIS Manager.
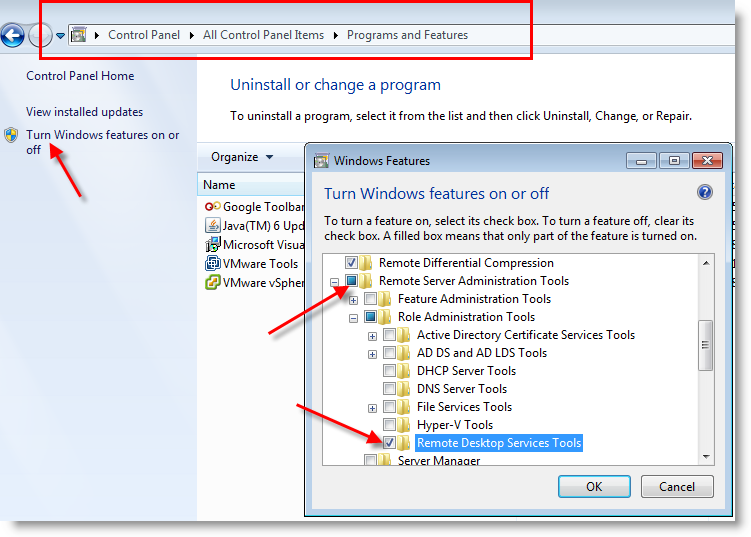
Install Web Management Service (WMSVC)
Click Server Manager in the Start menu, select the Roles node in the left-hand tree view, and scan down to find the Web Server (IIS) role. Click Add Role Services and select the Management Service component.
Remove roles, role services, and features by using the remove Roles and Features Wizard
You must be logged on to a server as an administrator to uninstall roles, role services, and features. If you are logged on to the local computer with an account that does not have administrator rights on your uninstallation target server, right-click the target server in the Servers tile, and then click Manage As to provide an account that has administrator rights. The server on which you want to mount an offline VHD must be added to Server Manager, and you must have Administrator rights on that server.
To remove roles and features by using the remove Roles and Features Wizard
-
If Server Manager is already open, go on to the next step. If Server Manager is not already open, open it by doing one of the following.
-
On the Windows desktop, start Server Manager by clicking Server Manager in the Windows taskbar.
-
On the Windows Start screen, click the Server Manager tile.
-
-
On the Manage menu, click Remove Roles and Features.
-
On the Before you begin page, verify that you have prepared for removing roles or features from a server. Click Next.
-
On the Select Destination Server page, select a server from the server pool, or select an offline VHD. To select an offline VHD, first select the server on which to mount the VHD, and then select the VHD file.
Note
The network shared folder in which the VHD file is stored must grant the following access rights to the computer (or local system) account of server that you have selected to mount the VHD. User-only account access is not sufficient. The share can grant Read and Write permissions to the Everyone group to allow access to the VHD, but for security reasons, this is not recommended.
- Read/Write access on the File Sharing dialog box.
- Full Control access on the Security tab , file or folder Properties dialog box.
For information about how to add servers to your server pool, see add Servers to Server Manager. After you have selected the destination server, click Next.
Note
You can use the remove Roles and Features Wizard to remove roles and features from servers that are running the same release of Windows Server that supports the version of Server Manager that you are using. You cannot remove roles, role services, or features from servers that are running Windows Server 2016, if you are running Server Manager on Windows Server 2012 R2, Windows Server 2012, or Windows 8. You cannot use the remove Roles and Features Wizard to remove roles and features from servers that are running Windows Server 2008 or Windows Server 2008 R2.
-
Select roles, select role services for the role if applicable, and then click Next to select features.
As you proceed, the remove Roles and Features Wizard automatically prompts you to remove any roles, role services, or features that cannot run without the roles or features that you are removing.
additionally, you can opt to remove management tools and snap-ins for roles on the destination server. By default, in the remove Roles and Features Wizard, management tools are selected for removal. You can leave management tools and snap-ins if you plan to use the selected server to manage the role on other remote servers.
-
On the Confirm removal selections page, review your role, feature, and server selections. If you are ready to remove the roles or features, click remove.
-
After you click remove, the removal progress page displays removal progress, results, and messages such as warnings, failures, or post-removal configuration steps that are required, such as restarting the destination server. In Windows Server 2012 and later releases of Windows Server, you can close the remove Roles and Features Wizard while removal is still in progress, and view removal results or other messages in the Notifications area at the top of the Server Manager console. Click the Notifications flag to see more details about removals or other tasks that you are performing in Server Manager.
Создание нового образа с помощью WDSCapture
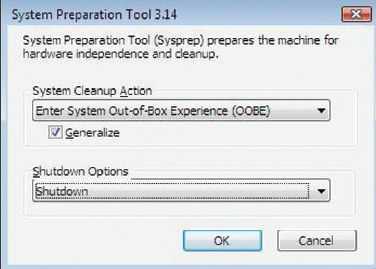
Для создания образа операционной системы необходим компьютер без программного обеспечения. Установите на него операционную систему (подходят Vista, Server 2008, XP или Windows Server 2003, но данная статья ориентирована на Vista и Server 2008) и настройте по своему вкусу. Теперь все готово к тому, чтобы использовать утилиту Sysprep для подготовки компьютера; при этом будут удалены все уникальные идентификаторы, такие как имя компьютера и информация об IP-адресе. Для запуска Sysprep нажмите Start и выберите Run. В поле Run введите sysprep. Дважды щелкните на sysprep.exe, когда файл появится в области результатов. В диалоговом окне Sysprep установите флажок Generalize и выберите пункт Shutdown в раскрывающемся меню Shutdown Options,как показано на экране1. Нажмите кнопку OK. После выполнения Sysprep компьютер будет отключен.
Затем требуется выполнить загрузку через сеть (PXE-загрузка) на компьютере, подготовленном с помощью утилиты Sysprep. Перезапустите компьютер и приготовьтесь выполнить сетевую загрузку — это очень быстро. В одних компьютерах нужно нажать клавишу F12, в некоторых F2, а в других — специальную клавишу. Если режим сетевой загрузки отсутствует, то, возможно, потребуется заменить BIOS на версию с функцией сетевой загрузки. Редактирование BIOS для каждого компьютера имеет свои особенности, поэтому придется провести небольшое исследование конкретного типа компьютера. Экран будет черным, пока компьютер получает IP-адрес от сервера DHCP. Затем появится приглашение нажать клавишу F12 для загрузки.
Выберите пункт Create Image из списка образов загрузки, добавленных к серверу WDS. После загрузки Create Image появится картина, аналогичная показанной на экране 2. В ответ на приглашение X:\windows\system32> введите: Wdscapture
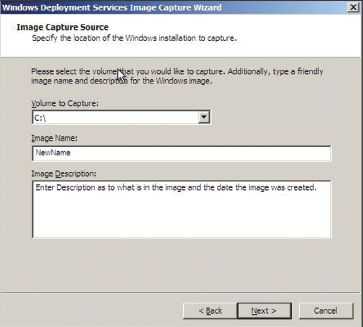
Появится экран приветствия мастера Windows Deployment Services Image Capture. Нажмите кнопку Next. На странице Image Capture Source выберите том из раскрывающего списка доступных томов. Если том C: отсутствует, значит, утилита Sysprep была выполнена неверно. Это распространенная ошибка; легко забыть о необходимости установить флажок в поле Generalize утилиты Sysprep. Если в раскрывающемся поле не видно символа дисков, нужно заново загрузить компьютер, ответить на вопросы мини-мастера установки Sysprep и вновь запустить Sysprep.После выбора обрабатываемого тома дайте образу новое имя и описание,как показано на экране 3. Нажмите Next.
На странице Image Capture Destination (см. экран 4) следует перейти к папке, в которой хранится образ (должна находиться на локальном диске). Введите имя создаваемого образа и нажмите Save.
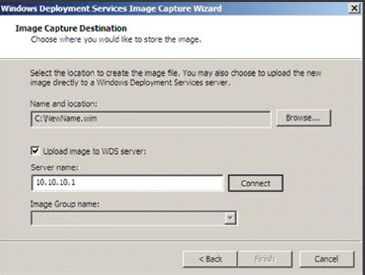
Единственный вариант — сохранить образ локально. Выберите команду Upload image to WDS server. Введите IP-адрес сервера WDS. Можно использовать имя сервера WDS, но соединение с сервером может отказать из-за проблем с разрешением имен. IP-адрес надежнее.
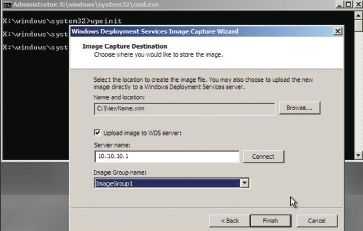
Далее система предложит ввести учетные данные для проверки подлинности на сервере WDS. Введите имя пользователя и пароль и нажмите кнопку OK. После проверки подлинности отображается список групп образов в раскрывающемся меню Image Group name. Выберите группу образов, в которой нужно сохранить новый образ, как показано на экране 5, и нажмите Finish. Образ появится в области результатов в оснастке WDS под Install Images и выбранной группой образов.
Благодаря группам образов сокращается пространство, необходимое для хранения образов. Предположим, первый образ операционной системы Server 2008 Enterprise добавлен в группу образов с именем Ent08. Если в группу образов Ent08 добавляется второй образ операционной системы Server 2008 Enterprise (с приложениями, отличными от первого), активируется функция проверки экземпляров, которая проверяет каждый файл перед сохранением. Файл, уже существующий в группе образов, не сохраняется повторно, вместо него создается указатель на этот файл.
Параметры конфигурации клиента WinRM по умолчанию
Клиентская версия WinRM имеет следующие параметры конфигурации по умолчанию.
NetworkDelayms
Задает дополнительное время ожидания клиента в миллисекундах для поправки на сетевую задержку. Значение по умолчанию — 5000 миллисекунда.
URLPrefix
Указывает префикс URL-адреса, для которого следует принимать HTTP-запросы или HTTPS. Префикс URL-адреса по умолчанию — wsman.
AllowUnencrypted
Позволяет клиентскому компьютеру запрашивать передачу данных в незашифрованном виде. По умолчанию клиентский компьютер требует зашифрованного сетевого трафика, а этот параметр имеет значение False.
Basic
Позволяет клиентскому компьютеру использовать обычную проверку подлинности. При использовании обычной проверки подлинности имя пользователя и пароль передаются серверу или прокси-серверу открытым текстом. Эта схема является наименее безопасным методом проверки подлинности. Значение по умолчанию равно True.
Дайджест
Позволяет клиентскому компьютеру использовать дайджест-проверку подлинности. Дайджест-проверка подлинности проводится по принципу «запрос-ответ». В качестве запроса поступает строка данных, указанная сервером. Инициировать запрос дайджест-проверки подлинности может только клиентский компьютер. Клиентский компьютер отправляет серверу запрос на проверку подлинности и получает строку маркера с сервера. Затем клиентский компьютер отправляет запрос ресурса, включая имя пользователя и криптографический хэш пароля в сочетании со строкой токена. Дайджест-проверка подлинности поддерживается для HTTP и для HTTPS. Клиентские скрипты и приложения Оболочки WinRM могут указывать дайджест-проверку подлинности, но служба WinRM не принимает дайджест-проверку подлинности. Значение по умолчанию равно True.
Примечание
Дайджест-проверка подлинности по протоколу HTTP не считается безопасной.
Сертификат
Позволяет клиенту использовать проверку подлинности на основе сертификатов клиента. Проверка подлинности на основе сертификатов — это схема, в которой сервер проверяет подлинность клиента, определяемого сертификатом X509. Значение по умолчанию равно True.
Kerberos
Позволяет клиентскому компьютеру использовать проверку подлинности Kerberos. Проверка подлинности Kerberos подразумевает взаимную проверку подлинности клиента и сервера с использованием сертификатов Kerberos. Значение по умолчанию равно True.
Согласование
Позволяет клиенту использовать проверку подлинности согласованием. При проверке подлинности с согласованием клиент отправляет серверу запрос на проверку подлинности. Сервер определяет, какой протокол использовать — Kerberos или NTLM. Протокол Kerberos выбирается для проверки подлинности учетной записи домена, а NTLM — для учетных записей локального компьютера. Имя пользователя должно быть указано в формате domain\user_name для пользователя домена. Имя пользователя должно быть указано в формате «server_name\user_name» для локального пользователя на серверном компьютере. Значение по умолчанию равно True.
CredSSP
Позволяет клиенту использовать проверку подлинности поставщика поддержки безопасности учетных данных (CredSSP). CredSSP позволяет приложению делегировать учетные данные пользователя с клиентского компьютера на целевой сервер. По умолчанию False.
DefaultPorts
Указывает порты, которые клиент будет использовать для HTTP или HTTPS.
WinRM 2.0: Http-порт по умолчанию — 5985, а порт HTTPS по умолчанию — 5986.
TrustedHosts
Указывает список доверенных удаленных компьютеров. Другие компьютеры в рабочей группе или компьютерах в другом домене следует добавить в этот список.
Примечание
Компьютеры в списке TrustedHosts не проходят проверку подлинности. Клиент может отправлять учетные данные на эти компьютеры.
Если для TrustedHost указан IPv6-адрес, адрес должен быть заключен в квадратные скобки, как показано в следующей команде программы winrm:
Дополнительные сведения о добавлении компьютеров в список TrustedHosts введите .
Configure WMSVC Settings
There are a few other WMSVC settings you might want to configure:
- Binding – By default, WMSVC is bound to all unassigned IP addresses on port 8172 using a self-signed certificate (WMSVC only communicates over HTTPS).
- IPv4 Restrictions – After remote connections are enabled, WMSVC accepts connects from any IP address. You may want to refuse connections from a set of known clients, or lock down connections to only a set of known clients.
- Acceptable for unspecified clients – By default, WMSVC accepts both Windows credentials and IIS Manager credentials (i.e. non-Windows credentials stored in administration.config). You can choose to restrict this to just Windows credentials.
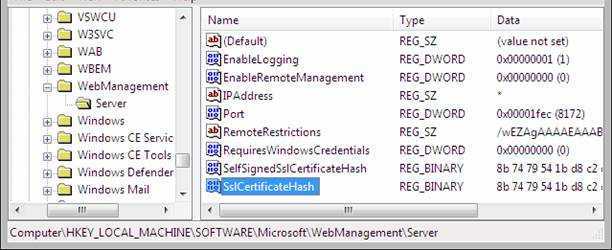
To configure these settings using IIS Manager, click the server node in the tree view and open the Management Service feature. This configuration is stored in the registry and can be manipulated many different ways (e.g. regedit, .reg files, WMI, etc.):
WMI plug-in configuration notes
Beginning with Windows 8 and Windows Server 2012, have their own security configurations. For a normal or power (non-administrator) user to be able to use the WMI plug-in, you need to enable access for that user after the has been configured. First, you must set up the user for remote access to through one of these steps.
- Run to add the user to the WinRMRemoteWMIUsers__ group in the Local Users and Groups window, or
- use the winrm command-line tool to configure the security descriptor for the of the , as follows: .
When the user interface appears, add the user.
After setting up the user for remote access to , you must set up WMI to allow the user to access the plug-in. To do this, run to modify the WMI security for the to be accessed in the WMI Control window.
WinRM service default configuration settings
The service version of WinRM has the following default configuration settings.
RootSDDL
Specifies the security descriptor that controls remote access to the listener. The default is «O:NSG:BAD:P(A;;GA;;;BA)(A;;GR;;;ER)S:P(AU;FA;GA;;;WD)(AU;SA;GWGX;;;WD)».
MaxConcurrentOperations
The maximum number of concurrent operations. The default is 100.
WinRM 2.0: The MaxConcurrentOperations setting is deprecated, and is set to read-only. This setting has been replaced by MaxConcurrentOperationsPerUser.
MaxConcurrentOperationsPerUser
Specifies the maximum number of concurrent operations that any user can remotely open on the same system. The default is 1500.
MaxConnections
Specifies the maximum number of active requests that the service can process simultaneously. The default is 300.
WinRM 2.0: The default is 25.
MaxPacketRetrievalTimeSeconds
Specifies the maximum length of time, in seconds, the WinRM service takes to retrieve a packet. The default is 120 seconds.
CredSSP
Allows the WinRM service to use Credential Security Support Provider (CredSSP) authentication. The default is False.
DefaultPorts
Specifies the ports that the WinRM service will use for either HTTP or HTTPS.
WinRM 2.0: The default HTTP port is 5985, and the default HTTPS port is 5986.
IPv4Filter and IPv6Filter
Specifies the IPv4 or IPv6 addresses that listeners can use. The defaults are IPv4Filter = * and IPv6Filter = *.
IPv4: An IPv4 literal string consists of four dotted decimal numbers, each in the range 0 through 255. For example: 192.168.0.0.
IPv6: An IPv6 literal string is enclosed in brackets and contains hexadecimal numbers that are separated by colons. For example: or .
EnableCompatibilityHttpListener
Specifies whether the compatibility HTTP listener is enabled. If this setting is True, then the listener will listen on port 80 in addition to port 5985. The default is False.
EnableCompatibilityHttpsListener
Specifies whether the compatibility HTTPS listener is enabled. If this setting is True, then the listener will listen on port 443 in addition to port 5986. The default is False.
Install the client agent service using EXE installers
You can install the remote hosts directly by extracting the installer (EXE) file. The installer contains both the Remote Host installation (MSI) and Remote Host configuration (MST). The EXE installer is located in the Dameware Proxy machine, and is unique for each proxy and configuration.
The EXE installer is saved to c:\Program File (x86)\SolarWinds\Dameware Central Server\WebServerStaticContent\binary\
By default, remote host installation does not overwrite the Remote Host configuration. To apply a clear configuration, run the installation with .
After you add the custom installation arguments, specify the default arguments. Otherwise, the remote host is installed without configuration and runs in Direct mode. SolarWinds recommends that you use the following command line arguments:
DWRCS_Vista_64.exe -ap "TRANSFORMS=transform_DWRCS_Vista_64.mst OVERWRITEREMOTECFG=1"
Headwind Remote installation
The system consists of the server part and the agent application.
The agent is a regular Android application and is available for download on Google Play.
The server part is delivered as the Docker-Compose container and works on any Linux. The installer is optimized for Ubuntu Linux (16.04 or above, 20.04 recommended), also CentOS 8 is supported. To support other Linux distros, some adjustments to the installer configuration must be done (please contact us for details).
Prerequisites
To install Headwind Remote server, setup a domain (a subdomain would be enough).
The server needs root access and it is recommended to use Ubuntu Linux 20.04 LTS.

The following TCP/IP ports must be enabled on a firewall (or forwarded if you’re using NAT):
- 80/TCP – used only by certbot to renew certificates;
- 443/TCP – used by nginx to display the web UI;
- 8989/TCP – WSS protocol used by WebRTC to play the video;
- 8089/TCP – used by the web application to communicate with Janus server (REST API);
- 10000-10500/UDP – UDP is used for the RTP screencast (the port is chosen dynamically by Janus).
Notice: Headwind Remote requires enabling all incoming and outgoing UDP traffic, especially if you’re behind a NAT.
Installation
1. Clone the source code repository from GitHub.
git clone https://github.com/h-mdm/remote-control.git
Notice: the information written below can be also found in the file README.md in more details.
2. Configure the installer.
cd remote-control
3. Run the installer.
sudo ./install.sh
That’s all! After the successful run of this command, Headwind Remote will be configured, installed and started. Open the Headwind Remote domain name in a web browser to make sure it is up and running.
Notice the secret printed by the installation script. This secret must be configured in the Android application to avoid unauthorized remote access through your Headwind Remote server. If you forget the secret, you can find it in the file ./dist/credentials/janus_api_secret at any time.
4. Test the remote access.
Install the Headwind Remote mobile agent from Google Play (search for Headwind Remote or use this direct link on a device: https://play.google.com/store/apps/details?id=com.hmdm.control.
At first start, the Android app will request you to grant permissions, and asks for the server URL and secret. Enter the URL in the form
and the secret generated by the installer script.
After setting up the Android app, you must see a green dot and the status must be “Connected”. Enter the session ID and PIN code in the Headwind Remote webpage and make sure the mobile device can be remotely controlled.
Operation
The system is based on docker-compose, therefore you need to use docker-compose commands to start, restart, stop, and other Headwind Remote management actions.
Before executing the management commands, change the current directory to the Headwind Remote directory:
cd ~/remote-control
Start services:
docker-compose up --detach
Restart services:
docker-compose restart
Stop services:
docker-compose stop
View logs:
docker-compose logs
More information is available in the README.md file.
Installing Headwind Remote behind a NAT
Headwind Remote can be installed behind a 1-to-1 NAT (for example, on AWS and Oracle clouds). To work behind a NAT, you need to add the following parameters to config.yaml:
Parameter public_ip is optional and needs to be set only if the Headwind Remote domain name is not resolved as a public IP address on the local host.
Installing Headwind Remote in LAN
Headwind Remote server is a self hosted remote access software and can be installed in a private network without Internet connection (LAN, VPN, private APN).
The system must be installed in the same way as for an Internet domain but there is a HTTPS-related trick. Headwind Remote Community uses LetsEncrypt as an SSL certificate provider, and it requires Internet connection to the host at least each 3 months (you cannot renew the certificate for a domain which is unavailable in Internet).
To avoid possible service interruptions due to frequent certificate renewals, use Headwind Remote Premium for LAN-based remote access service, and additionally purchase a commercial SSL certificate valid within maximal possible time (for example, 5 years).
Фон
Во время загрузки рабочая станция, настроенная на загрузку с PXE, выдаст сообщение BOOTP запрос через сеть. Как только запрос будет получен, DHCP-сервер предоставит айпи адрес к машине, и DNS-сервер направит клиентский компьютер на RIS-сервер, который, в свою очередь, выдаст загрузочный образ диска (часто называемый «OS Chooser»). После загрузки среды OS Chooser пользователь должен пройти аутентификацию по Контроллер домена, а затем можно выбрать образ Windows для установки. Исходные файлы для каждого изображения можно настроить с помощью сторонних утилит, таких как nLite распространять обновления и пакеты обновлений, применять настройки, выполнять автоматическую установку и включать программное обеспечение в операционную систему.
Install the client agent service from the Dameware Mini Remote Control application
You can push the client agent to a computer using an option in the Dameware Mini Remote Control application console. The push method is useful when you want to update the client agent without requiring the remote user’s permission.
- The FIPS modules are required to connect in FIPS Encryption Mode.
- The remote agent can run in the following modes:
- Direct and remote connections: This enables you to connect computers using on-premise access and off-premise access through the Dameware Internet Proxy.
- Direct connection only: This enables you to connect to computers using on-premise access only.
Before you begin, on the remote computer, open the File & Printer Sharing protocols and the File & Printer Sharing ports.
- Launch Dameware Mini Remote Control, and click File > Install Service.
- Enter the host name or IP address of the computer on which you want to install the service.
- To manually start the service each time a connection is opened, select Set Service Startup type to .
- To configure the settings of the Dameware Mini Remote Control client agent service to copy to the remote system, click Configure.
- Copy the DWRCS.reg file from the local system to the remote system with pre-configured Dameware Mini Remote Control client agent service settings, select Include Configuration File (DWRCS.reg). This option is available after you have created configuration settings.
- To connect in FIPS Encryption Mode, select Copy FIPS Modules (approximately 9 MB).
- Select Overwrite any existing configuration on remote host to recreate the configuration file in the remote machine.
- Approve the agent on remote machine.
- Click OK.
The Dameware Mini Remote Control application deploys the service to the remote computer.
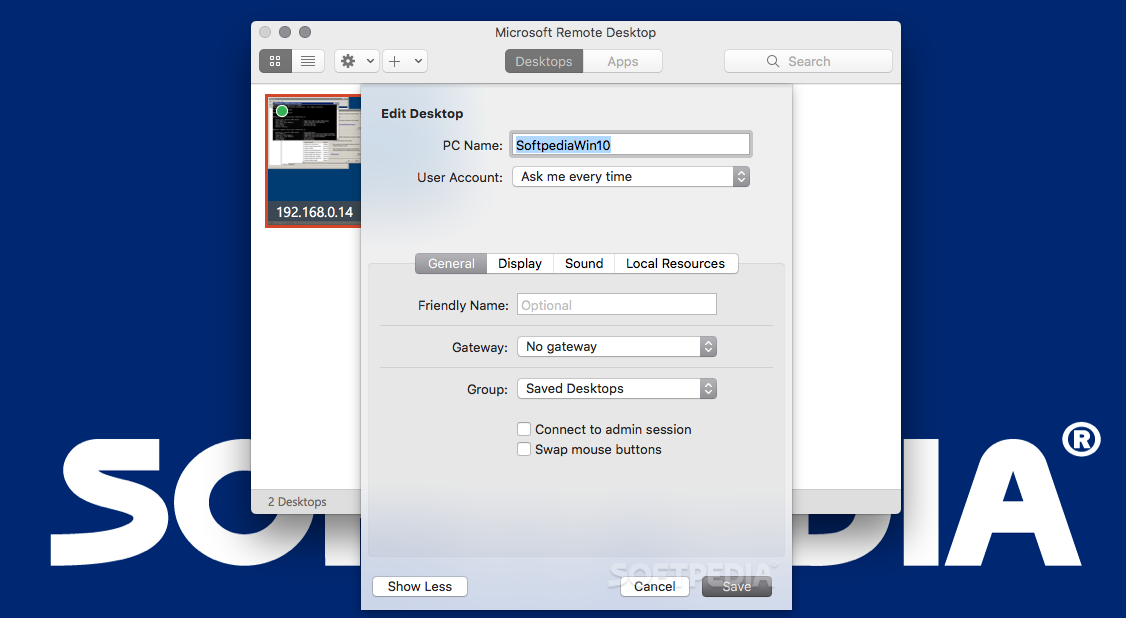
Стандартное развертывание службы удаленных рабочих столов
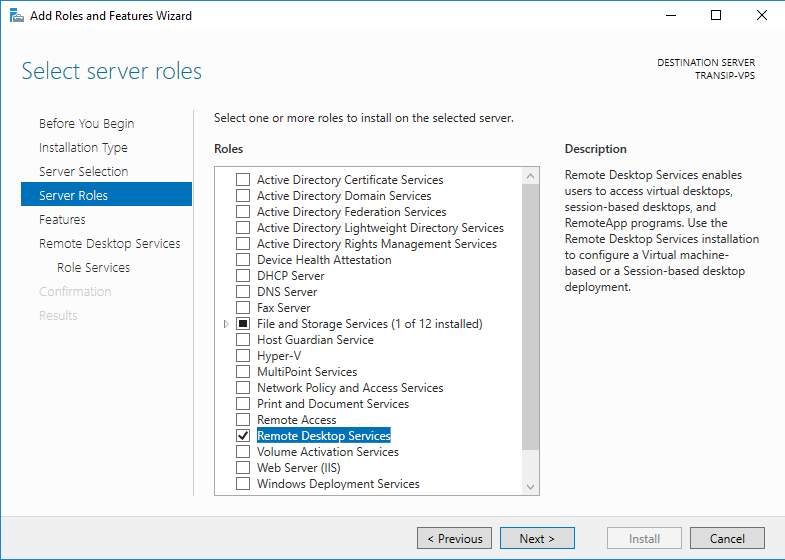
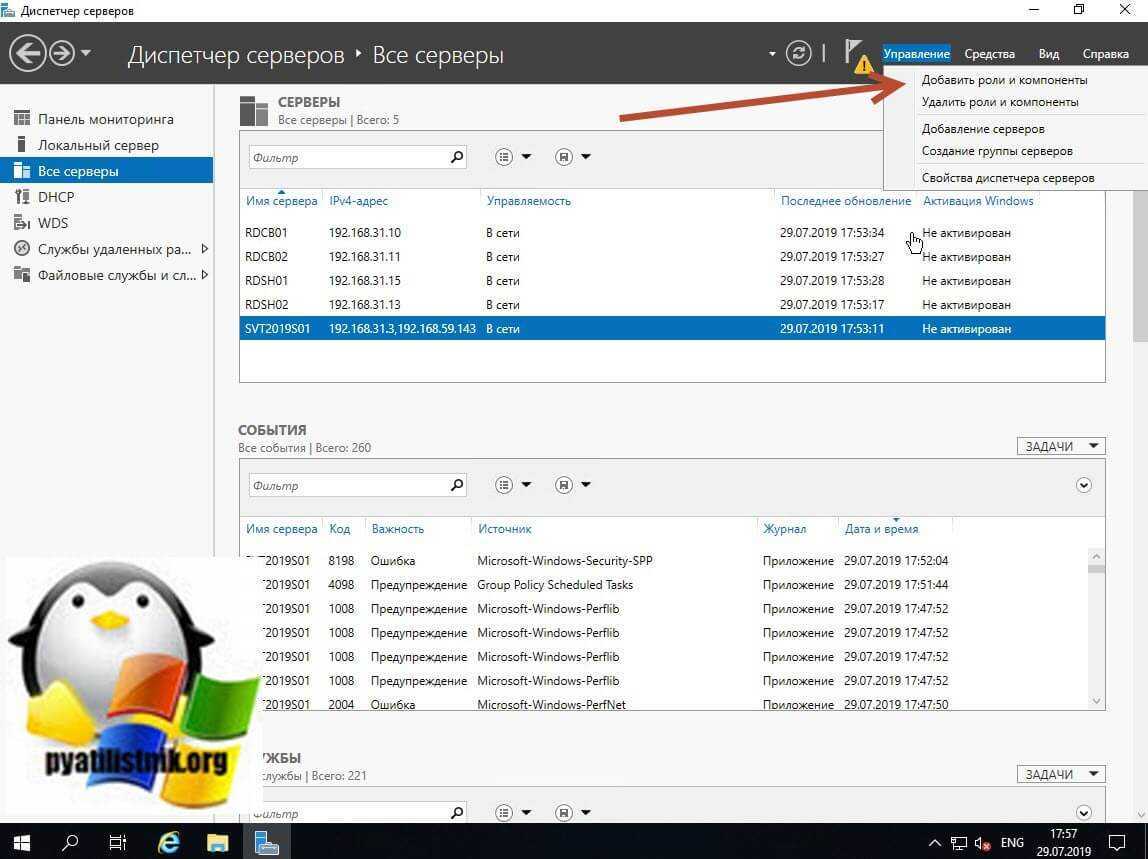
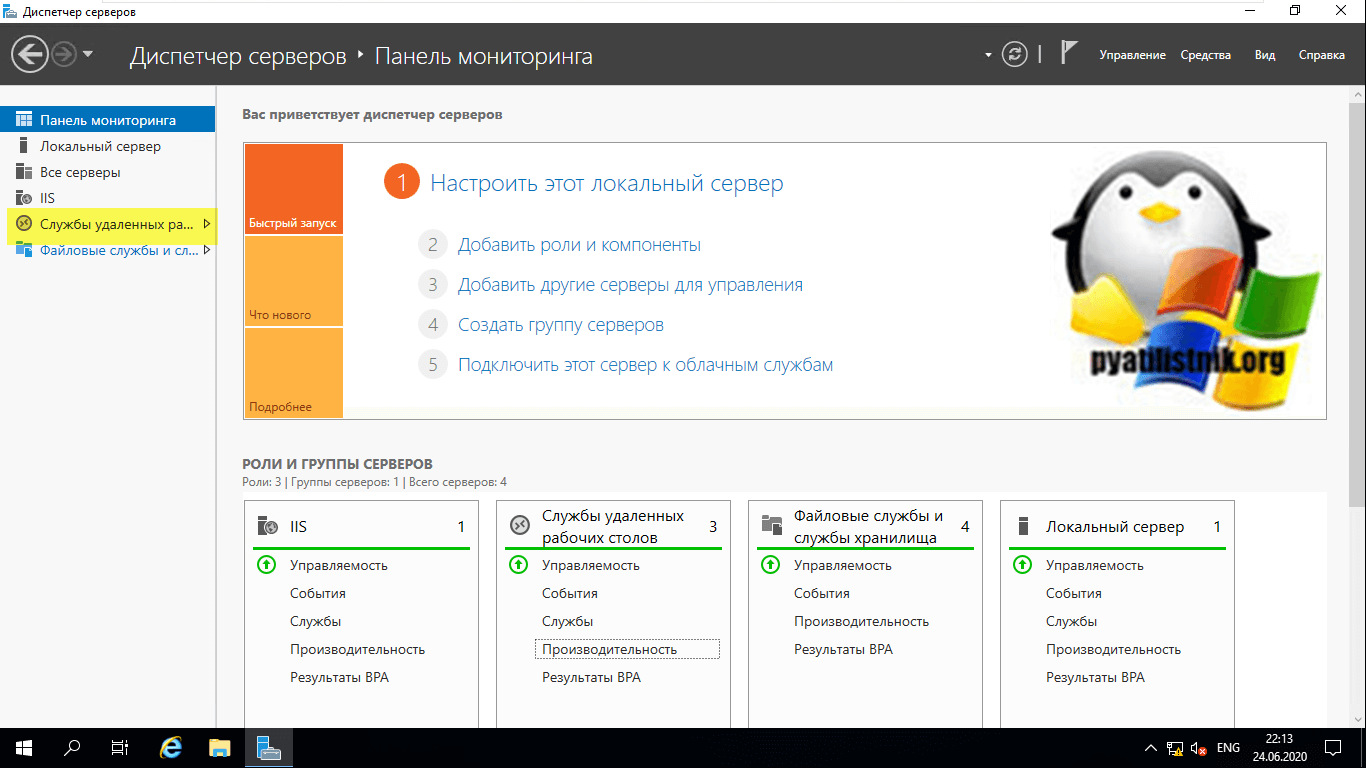
Перед тем как создавать высоко доступную ферму RDS, вы должны произвести базовую инсталляцию, а именно нам необходимо установить три роли на текущие сервера, для этого в правом верхнем углу выберите пункт «Управление — Добавить роли и компоненты».
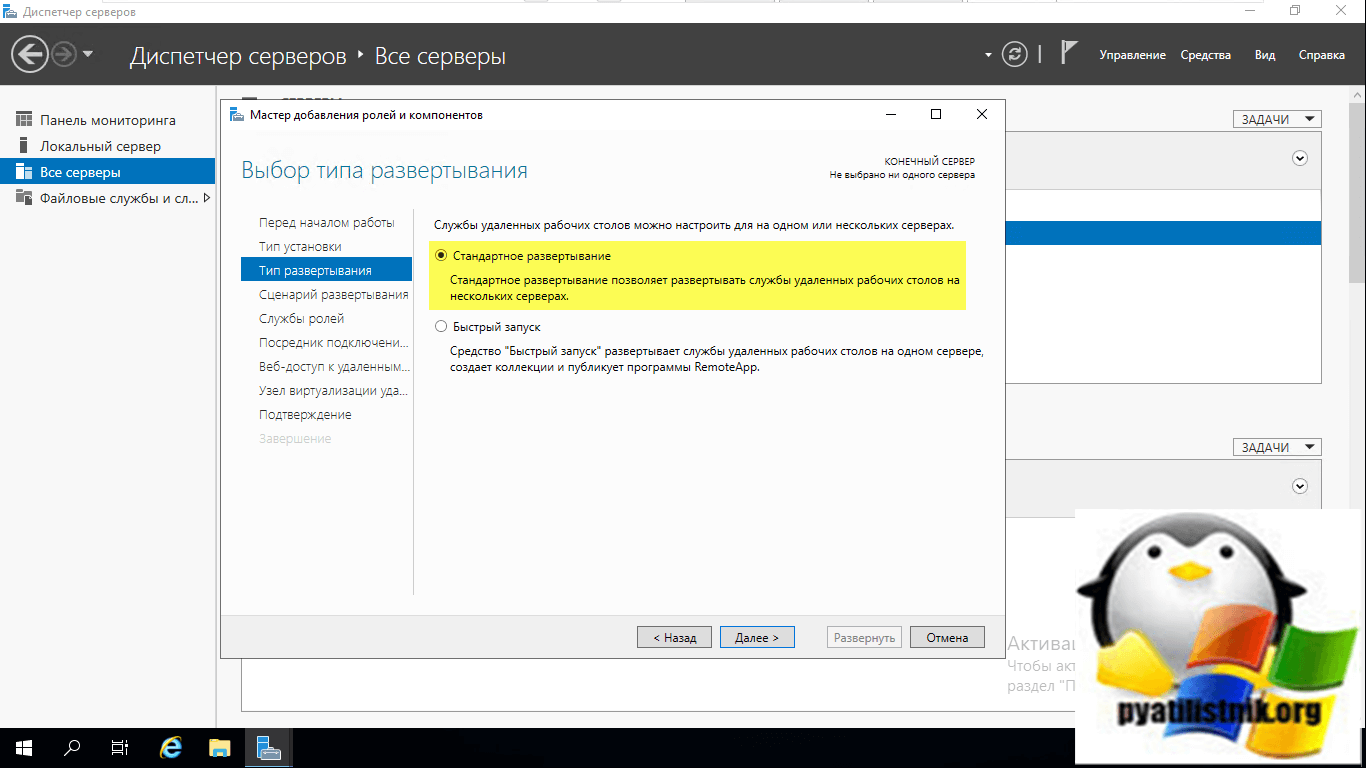
Стандартный тип развертывания — это лучший метод развертывания, и вы должны выбрать этот тип развертывания в производственной среде
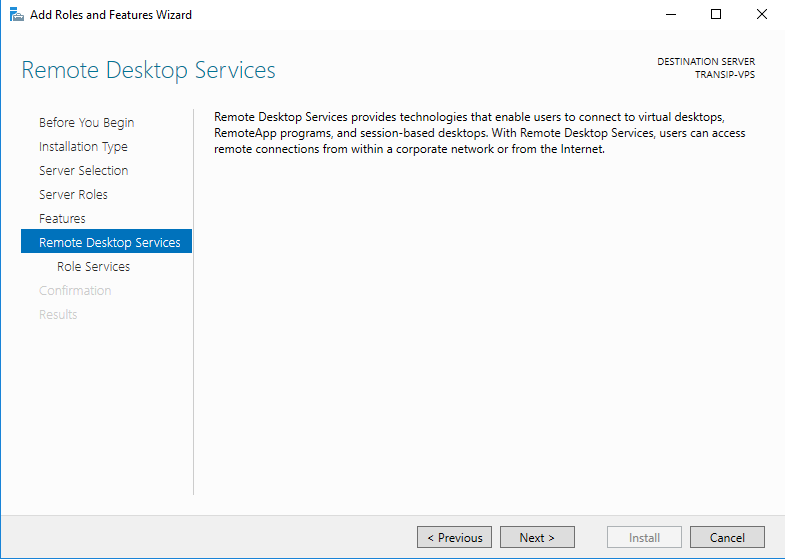
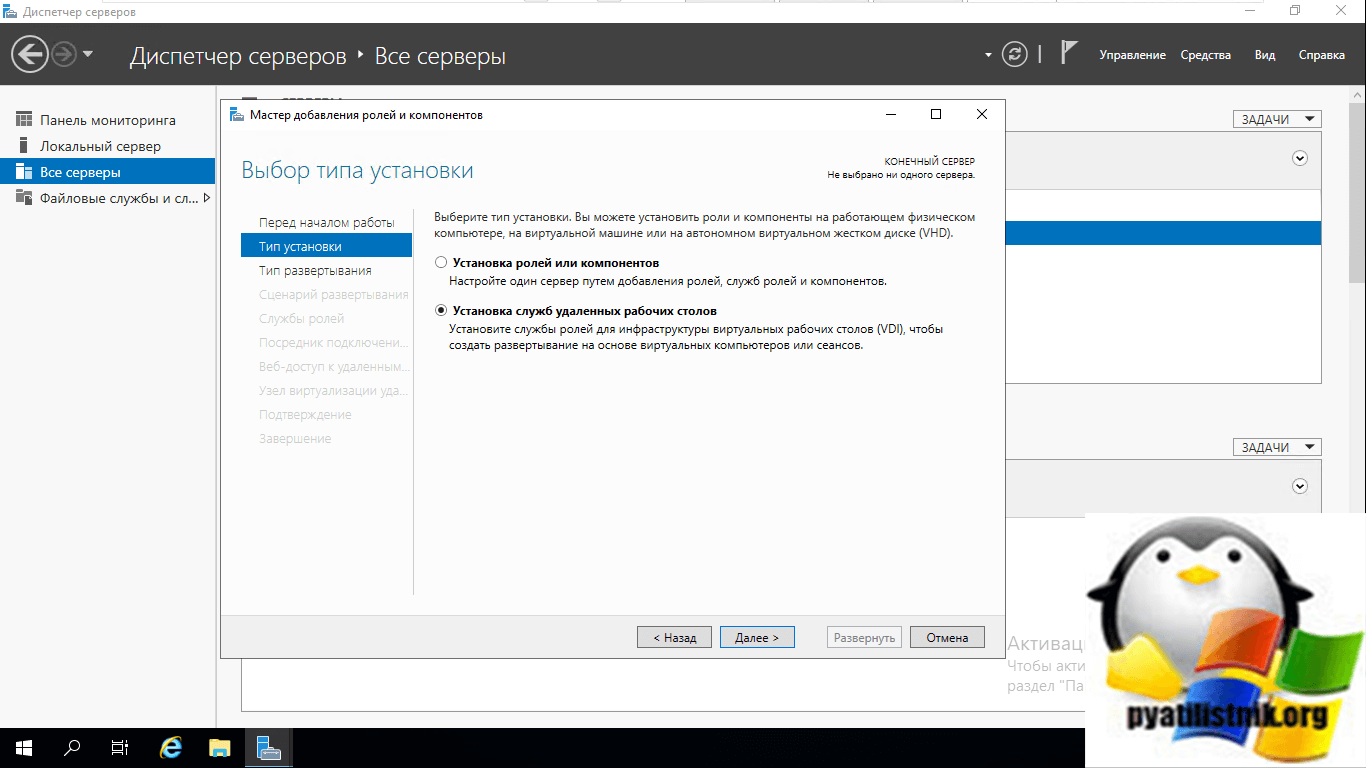
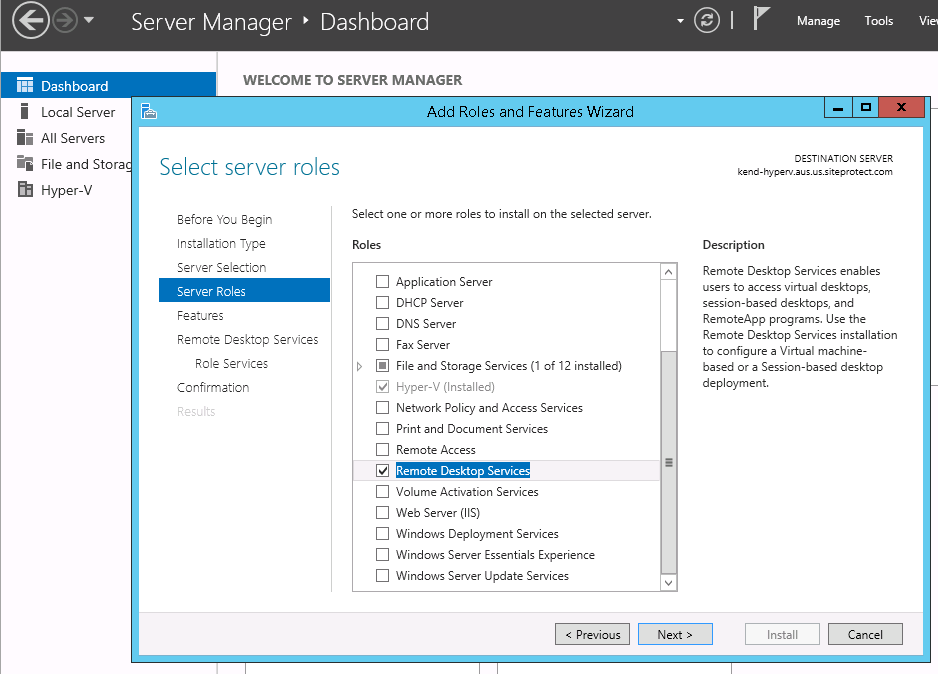
В мастере добавления ролей выберите пункт «Установка служб удаленных рабочих столов (Remote Desktop Services Installation)» и нажимаем далее.
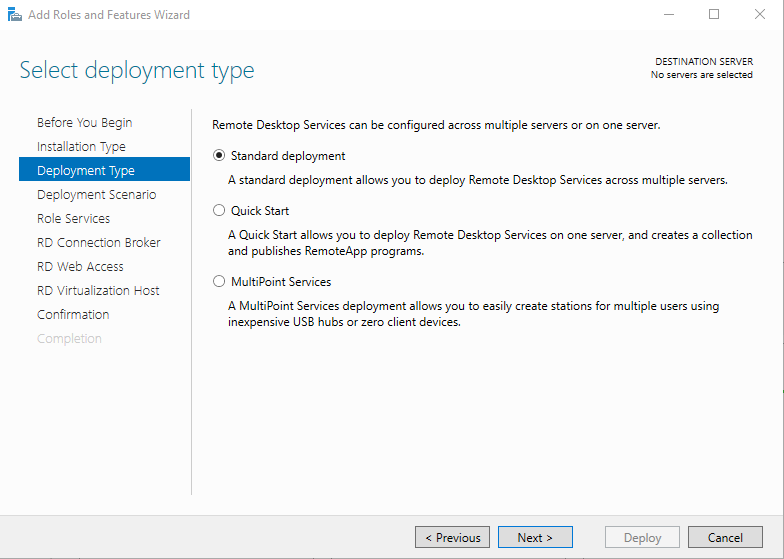
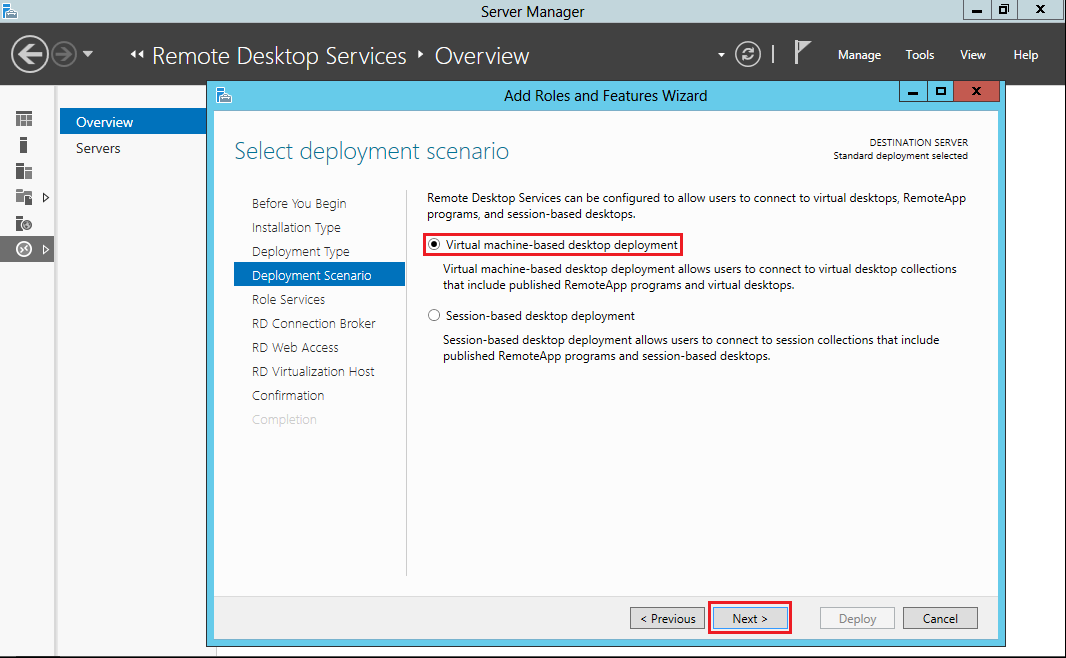
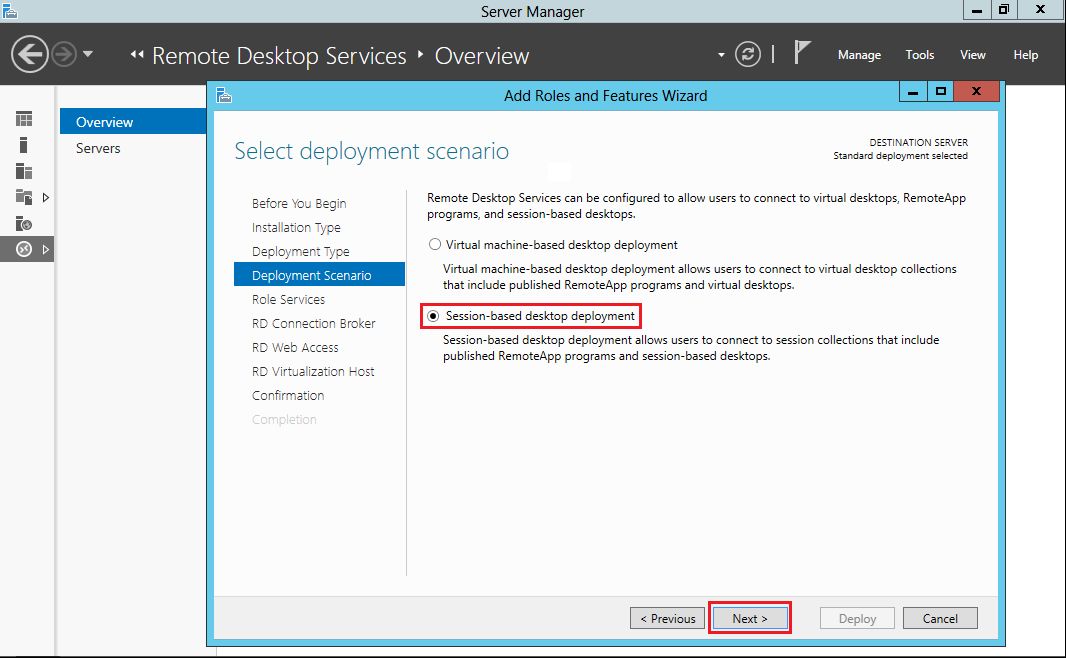
Выбираем первый пункт «Стандартное развертывание (Standard Deployment)» — данный тип развертывания позволяет устанавливать роли Remote Desktop Services на нескольких серверах одновременно.
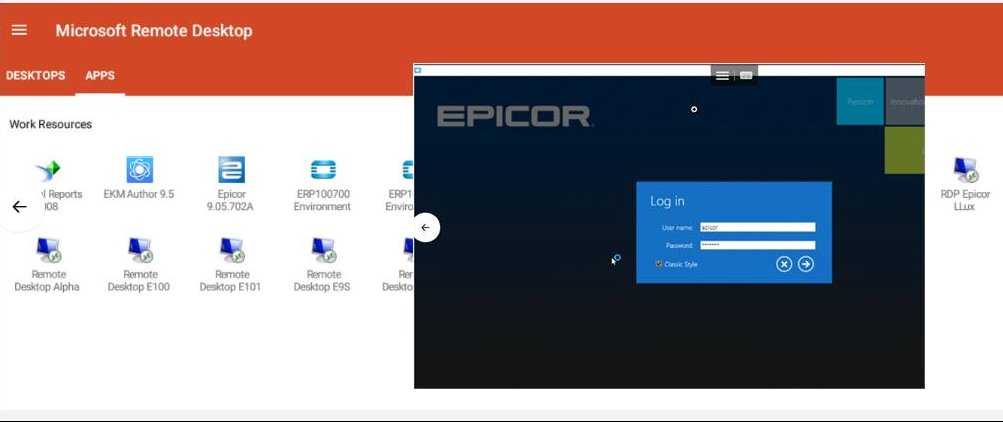
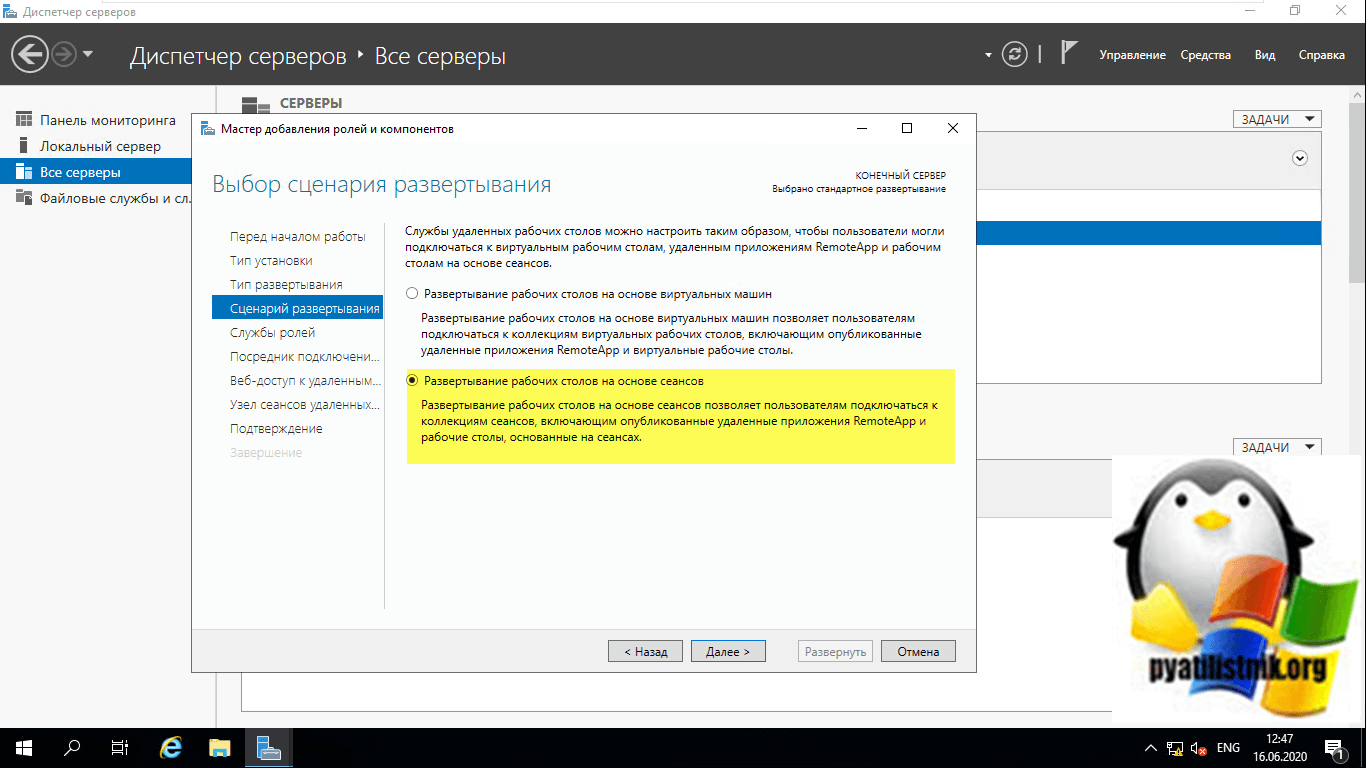
Выбираем второй пункт «Развертывание рабочих столов на основе сеансов (Session-based desktop deployment)»
Это развертывание рабочих столов на основе сеансов позволяет пользователям подключаться к коллекциям сеансов, включающим опубликованные удаленные приложения RemoteApp и рабочие столы, основанные на сеансах
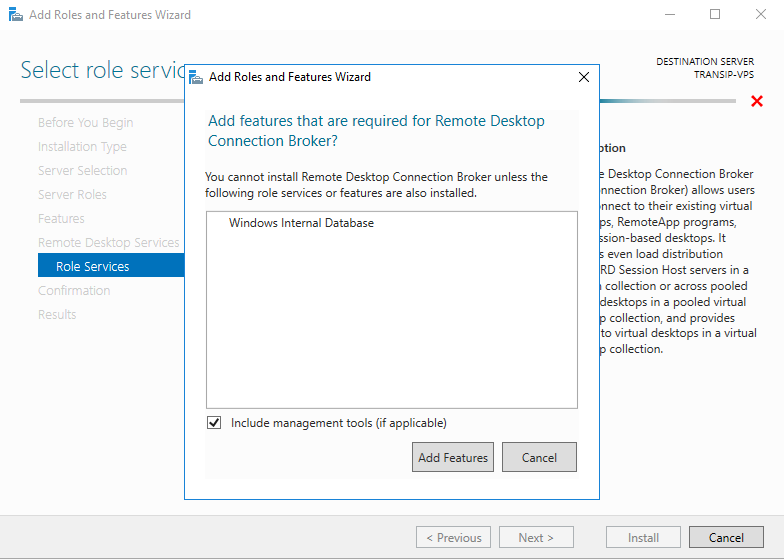
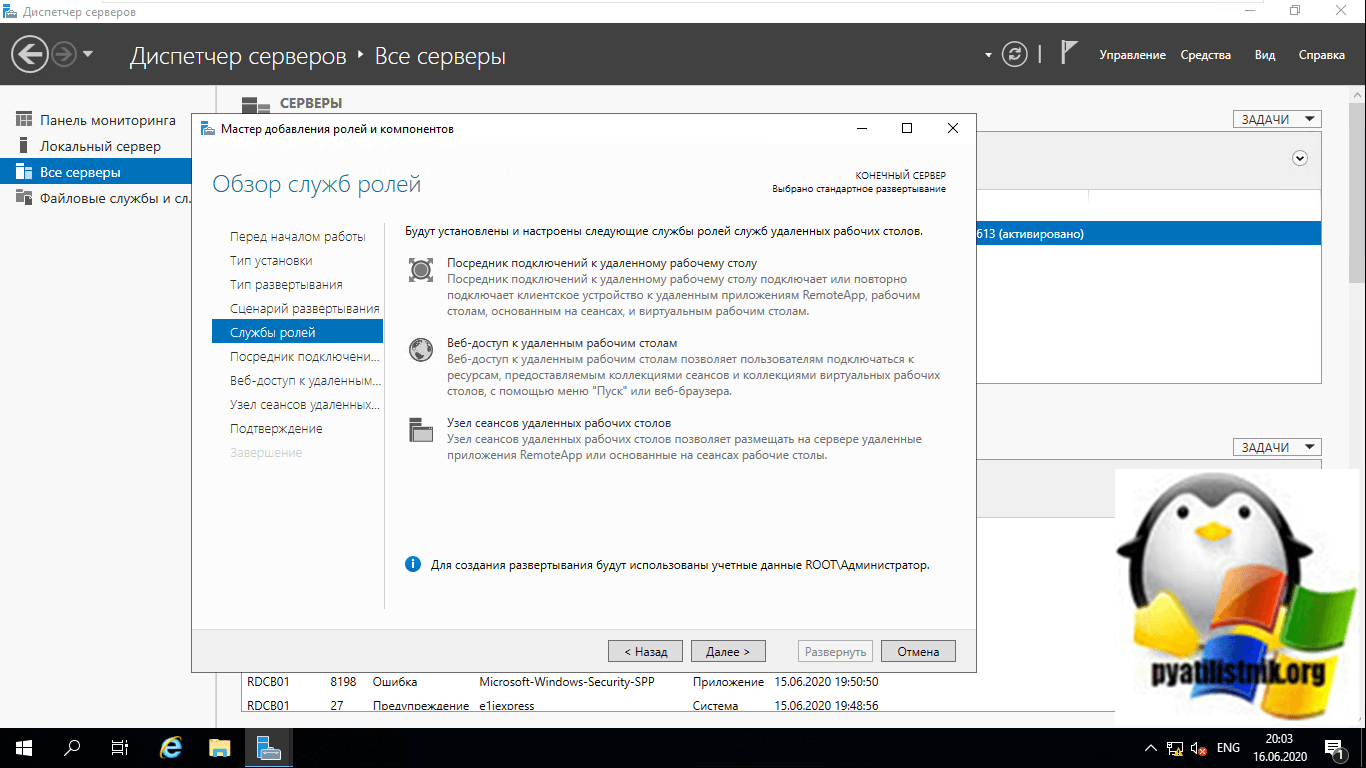
Список компонентов устанавливаемых при стандартной конфигурации RDS фермы. Тут будет установлен:
- Посредник подключений к удаленным рабочим столам (Connection Broker)
- Веб-доступ к удаленным рабочим столам
- Узел сеансов удаленных рабочих столов
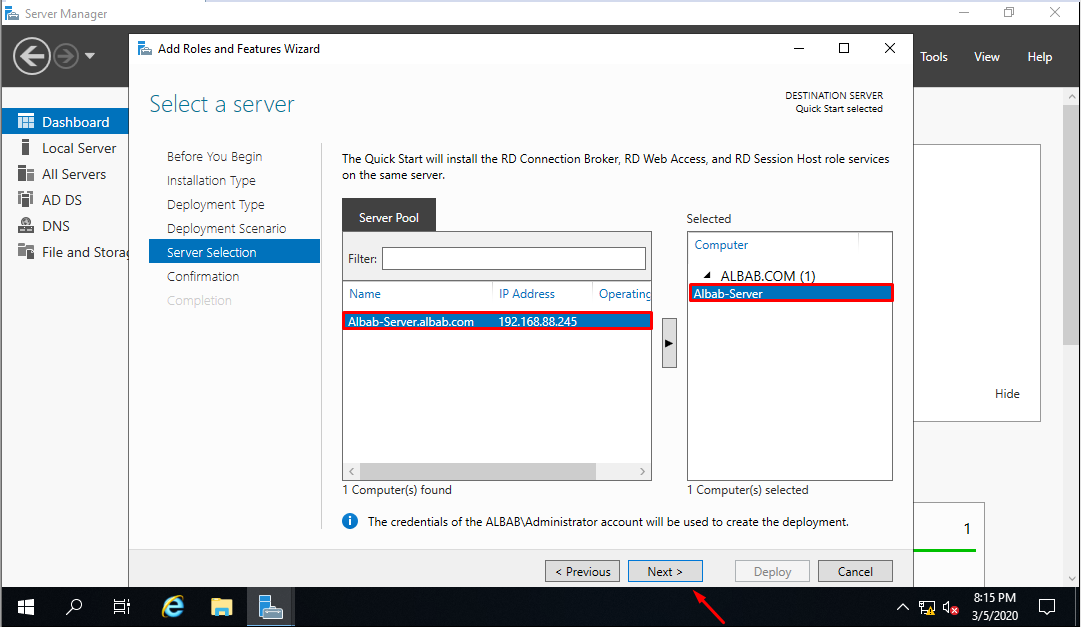
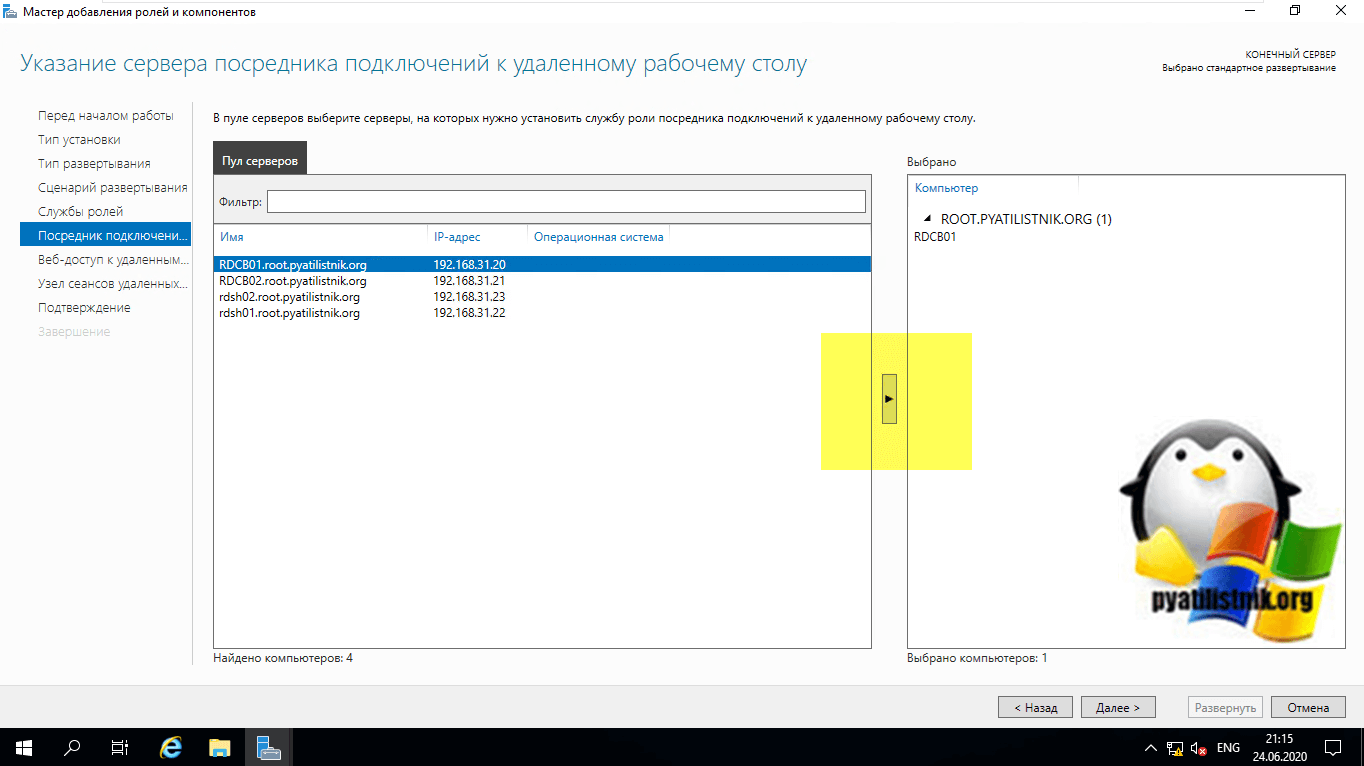
На следующем шаге вам нужно выбрать и перенести в правую область сервер, который будет нести на себе роль «Посредник подключений к удаленным рабочим столам (RD Connection Broker)». В моем примете, это первый сервер RDCB01.root.pyatilistnik.org.
Второй сервер на данном этапе добавлять не нужно
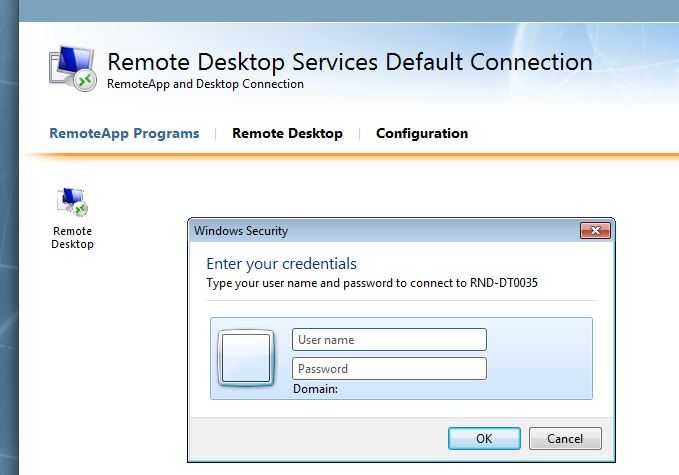
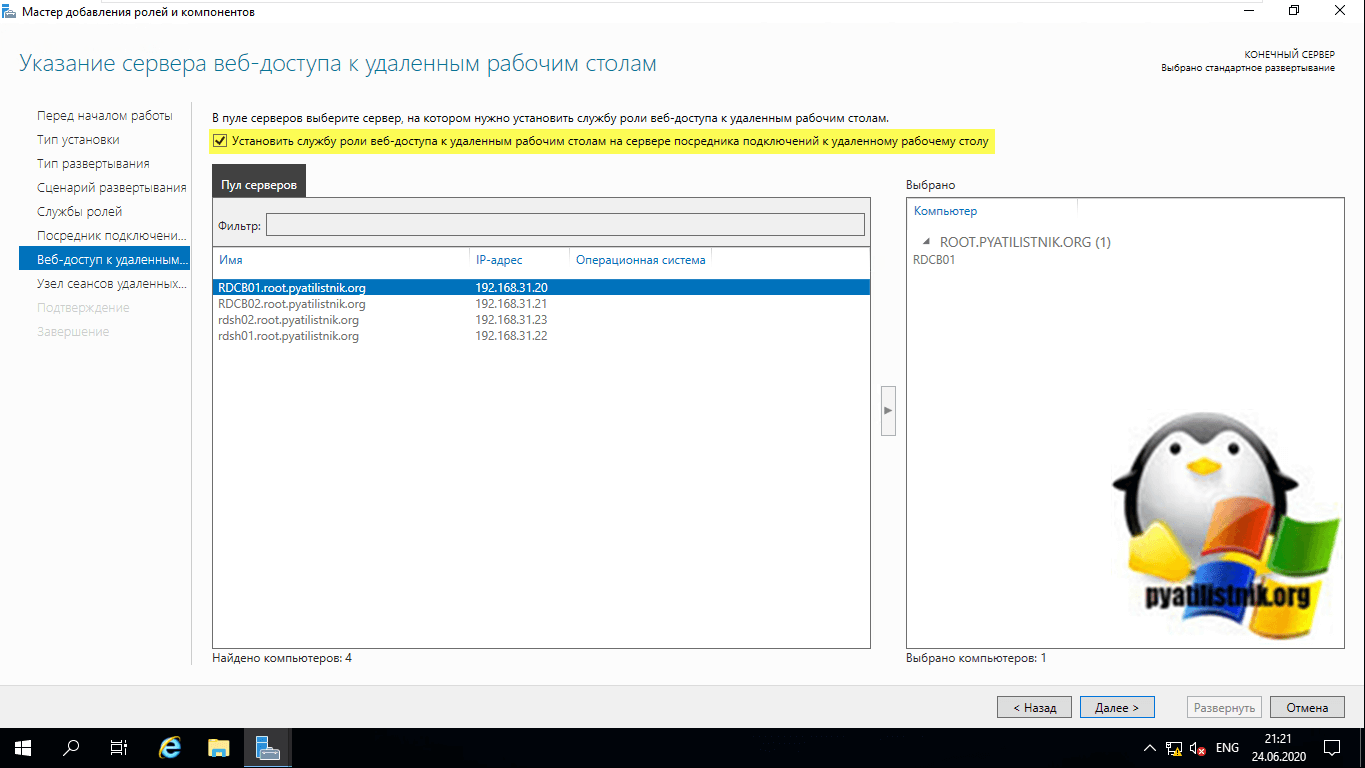
Далее у нас идет выбор сервера для установки роли «Веб-доступ к удаленным рабочим столам (RD Web Access)», так как я пока не планирую использовать веб доступ RemoteApp, а настрою это потом, то я воспользуюсь галкой «Установить службу веб-доступа к удаленным рабочим столам на сервере посреднике подключений к удаленному рабочему столу (Install the RD Web Access role service on the RD Connection Broker server)»
Данную роль нельзя пропустить в мастере стандартной установки служб Remote Desktop Services, но она нам пригодится еще очень сильно
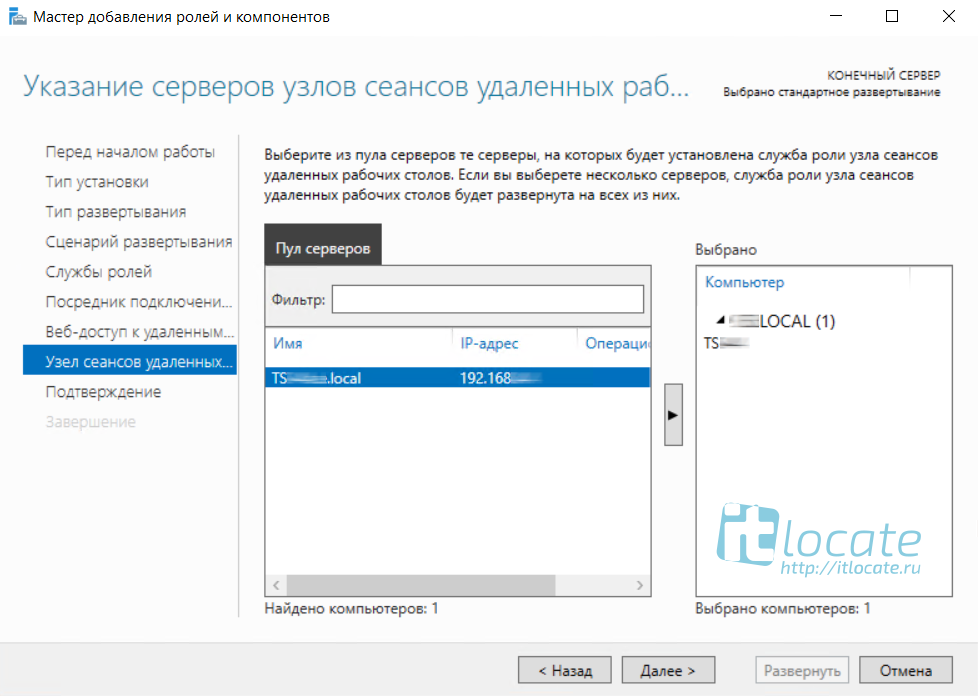
Последним идет пункт по установке роли на сервера к которым вы будите непосредственно подключаться, выбираем нужные сервера и инсталлируем на них роль «Узел сеансов удаленных рабочих столов (RS Session Host)». В моем примере, это два сервера rdsh01 и rdsh02.
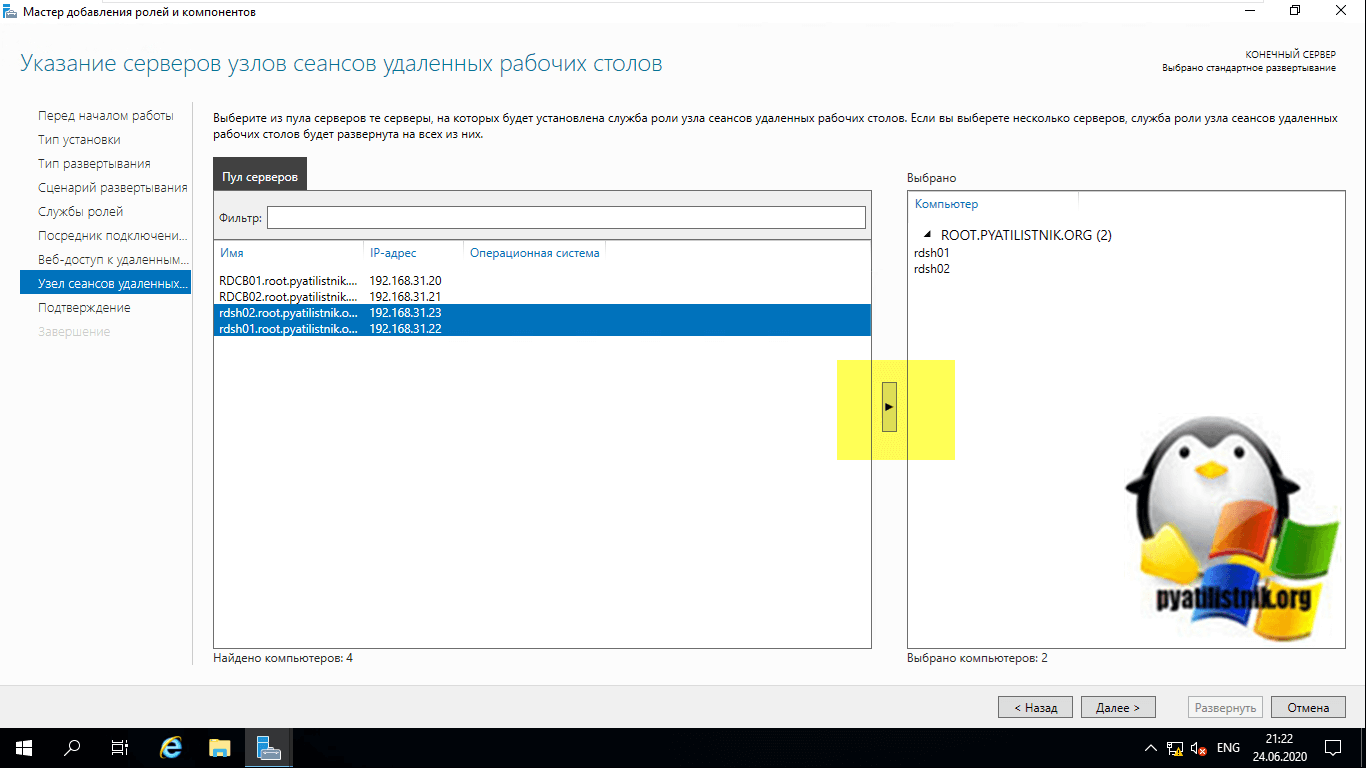
Процесс установки ролей подразумевает, что потребуется перезагрузка сервера, для этого вам необходимо выставить галку «Автоматически перезапускать конечный сервер, если это потребуется (Restart the destination server automatically if required )» и нажать кнопку «Развернуть»
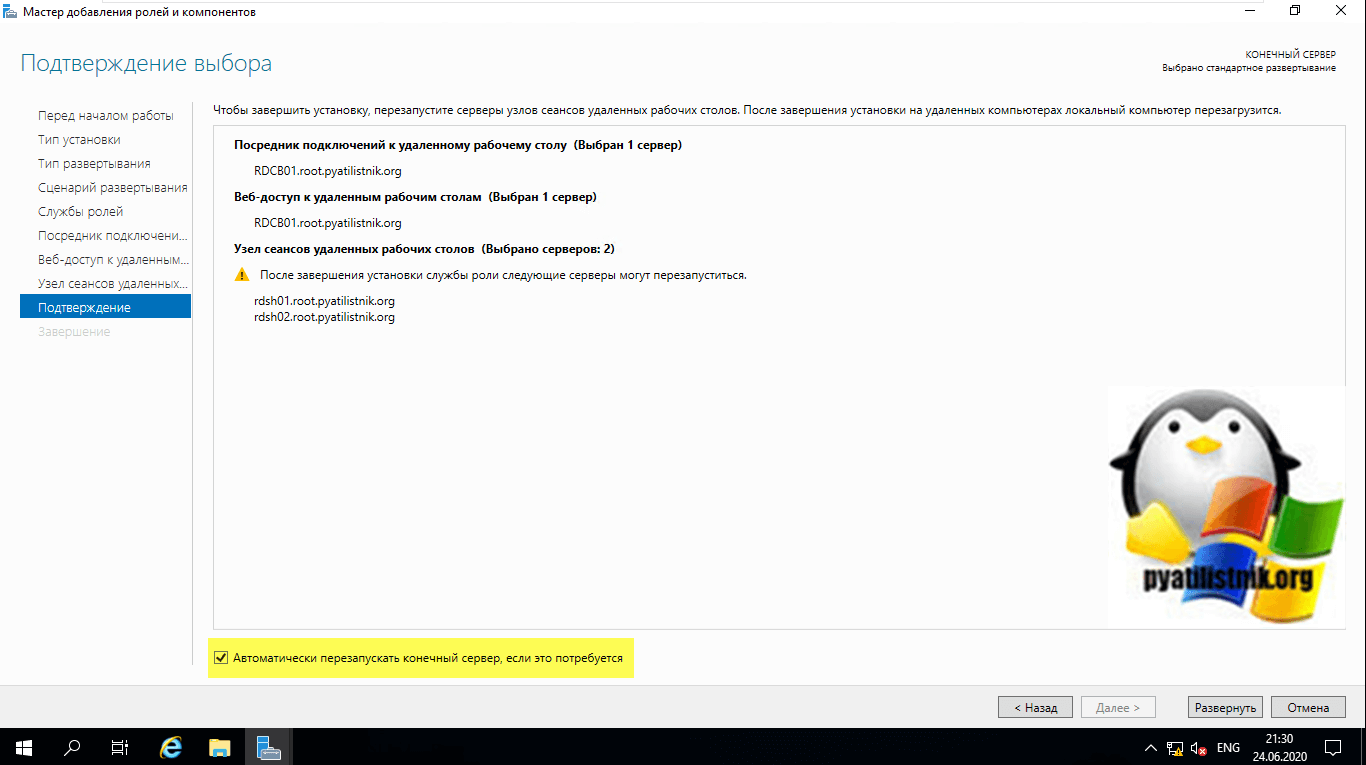
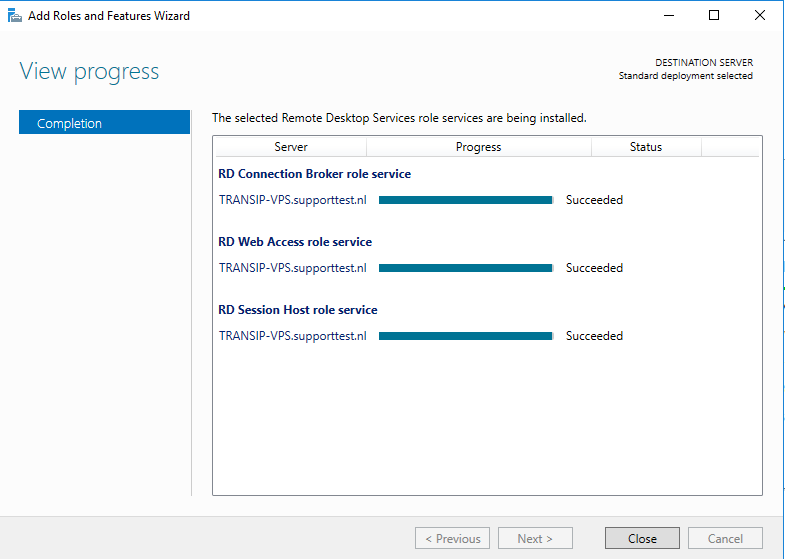
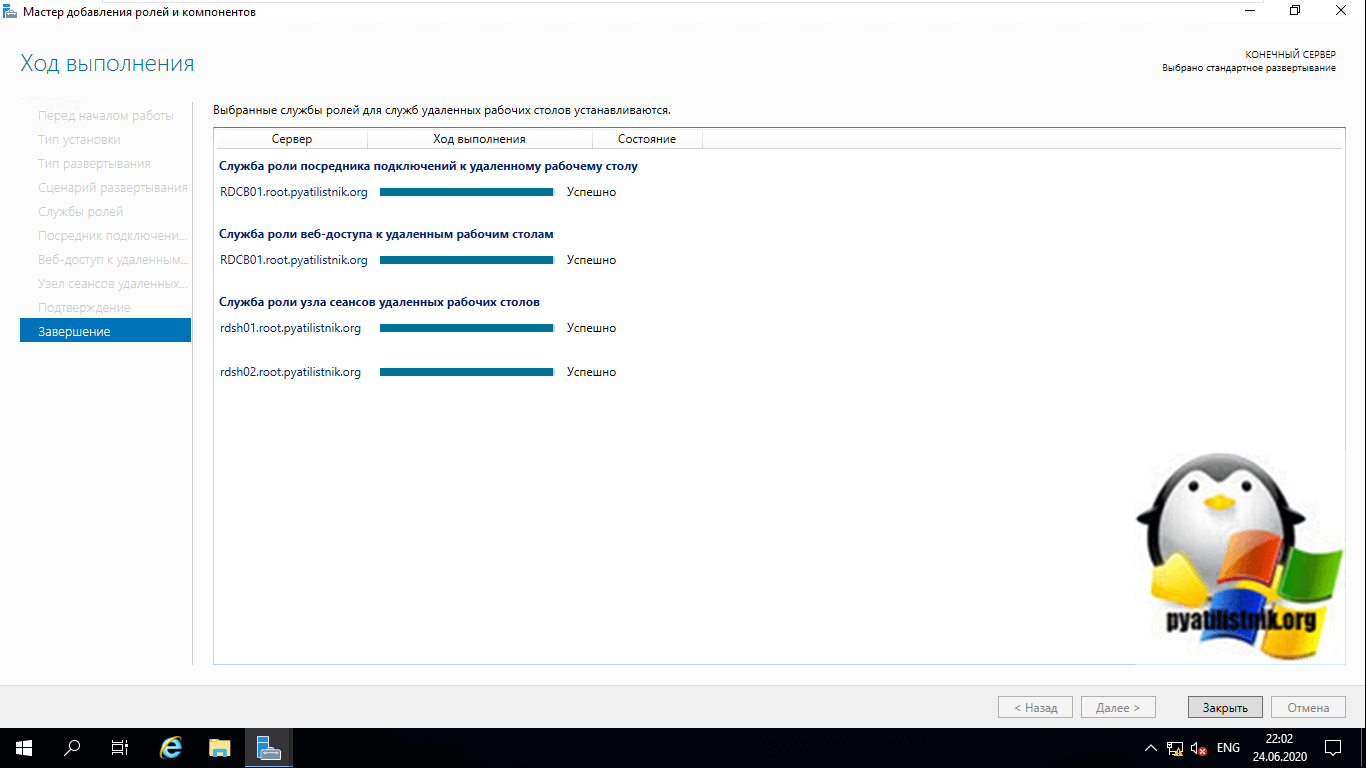
Начинается процесс установки службы удаленных рабочих столов, может занимать несколько минут.

У вас должна произойти успешная установка службы «службы удаленных рабочих столов». Все необходимые сервера будут перезагружены.
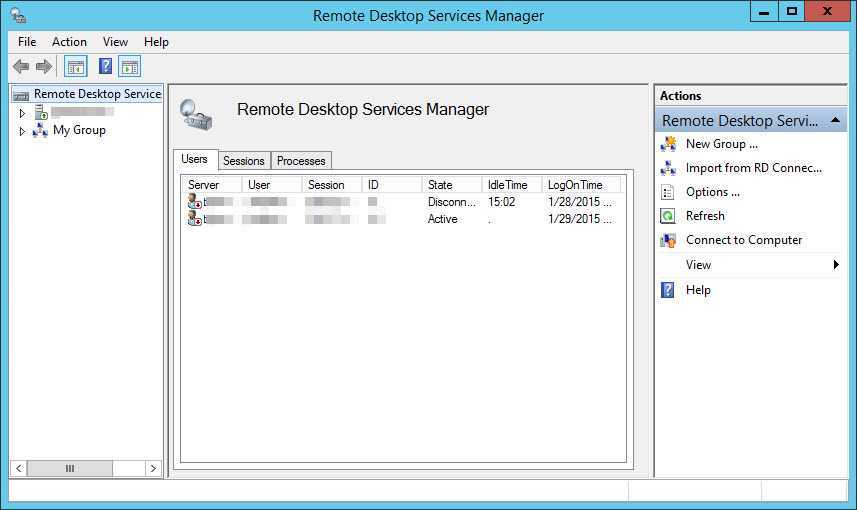
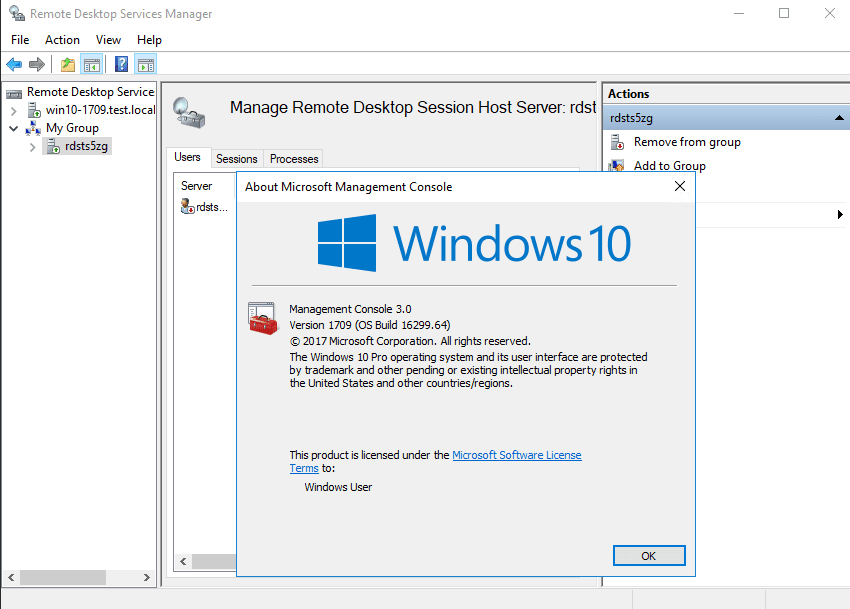
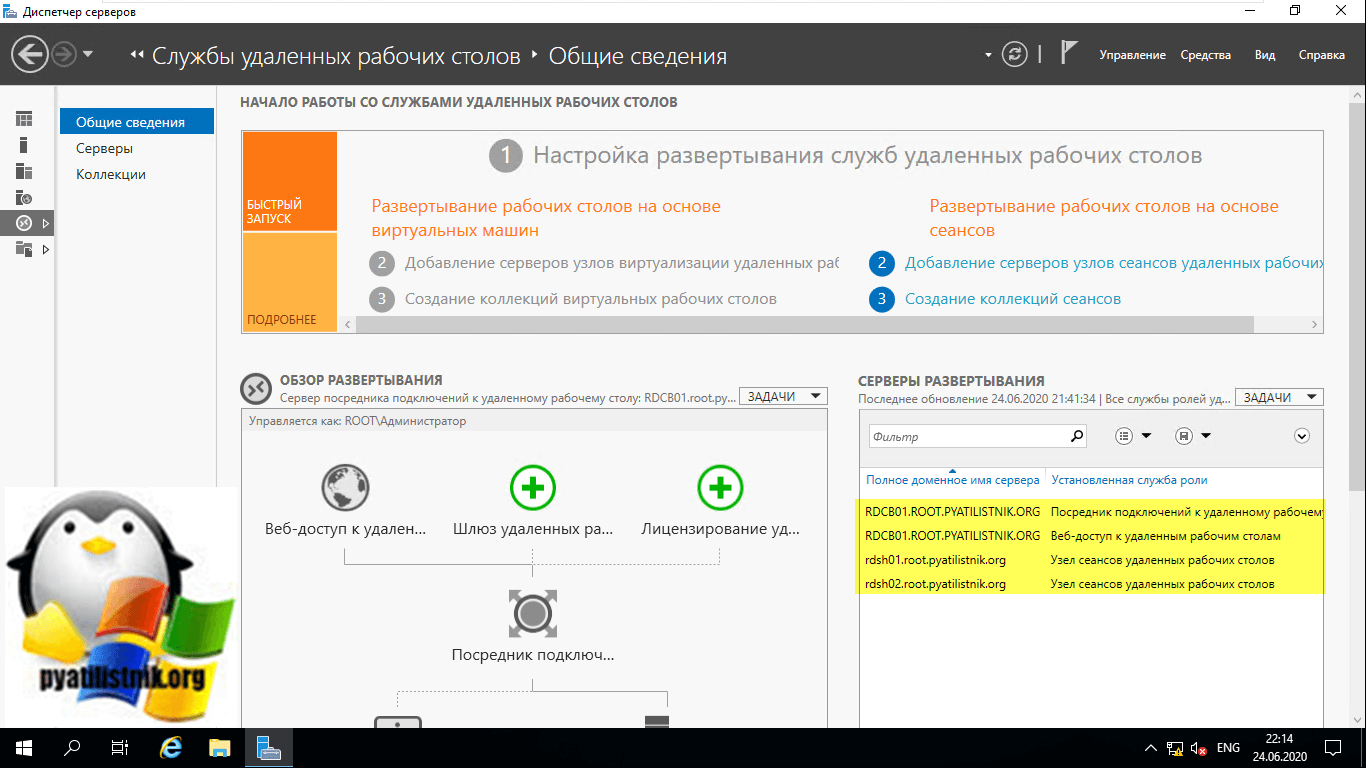
Давайте убедимся, что все серверы получили свои роли. Для этого на сервере, где вы добавляли сервера в оснастку «Диспетчер серверов (Производили установку)», откройте оснастку и перейдите в раздел «Службы удаленных рабочих столов».
Кстати никто вам не мешает собрать оснастку управления службами Remote Desktop Services на другом компьютере, посмотрите как это делать
На вкладке «Общие сведения» посмотрите в разделе «Серверы развертывания», кто и какие роли себе установил.
Перейдите в раздел «Коллекции» и убедитесь, что список пуст, но зато присутствуют два ваших хоста узла сеансов удаленных рабочих столов, к котором будут подключаться конечные пользователи. Они будут иметь статус «Истина (True)», что говорит о разрешении подключаться (Режим стока выключен)
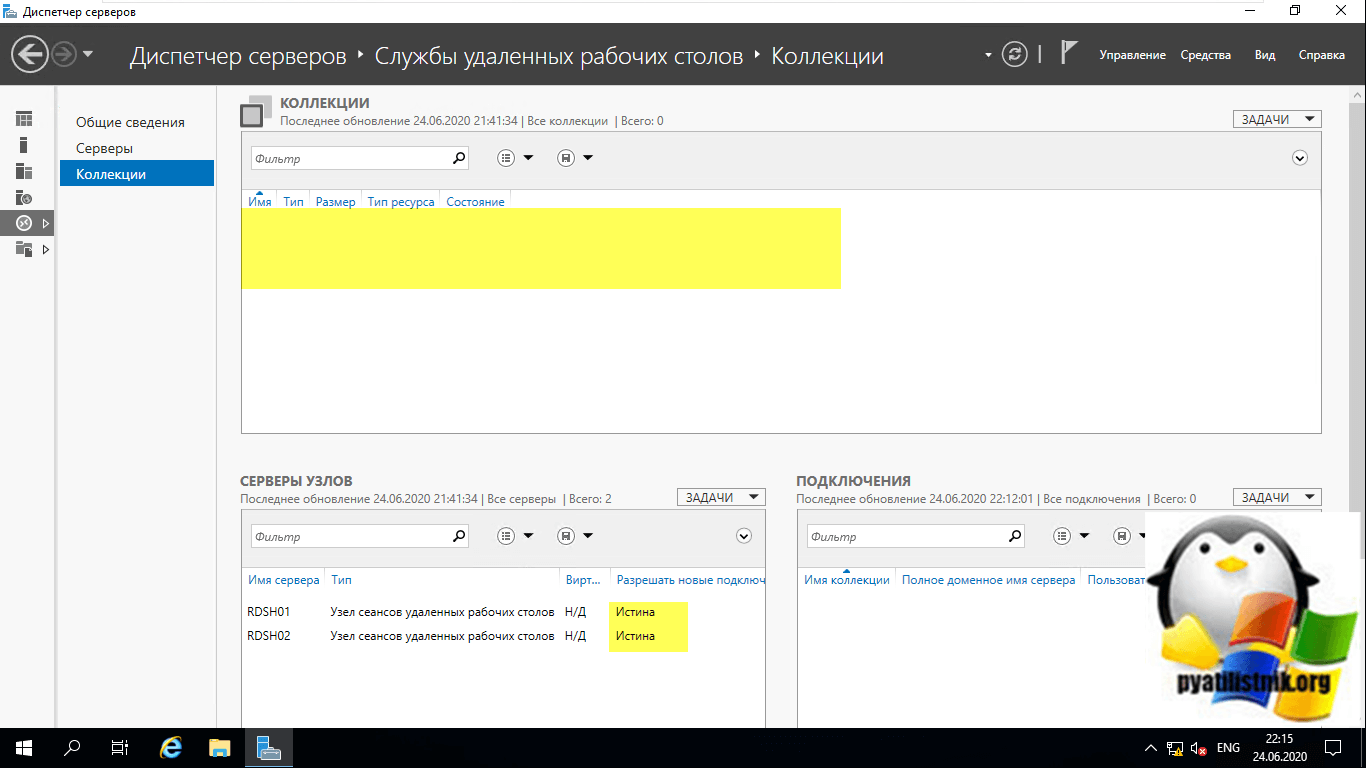
Следующим шагом мы создадим новую коллекцию для подключения к службам Remote Desktop Services High Availability на Windows Server 2019.
Configuration of WinRM and IPMI
These WinRM and WMI provider components are installed with the operating system.
- The WinRM service starts automatically on Windows Server 2008 and onwards (on Windows Vista, you need to start the service manually).
- By default, no WinRM is configured. Even if the WinRM service is running, WS-Management protocol that request data can’t be received or sent.
- Internet Connection Firewall (ICF) blocks access to ports.
Use the command to locate listeners and the addresses by typing the following command at a command prompt.
To check the state of configuration settings, type the following command.
Быстрая конфигурация по умолчанию
Вы можете включить протокол WS-Management на локальном компьютере и настроить конфигурацию по умолчанию для удаленного управления с помощью команды .
Команда (или сокращенная версия ) выполняет эти операции.
- Запускает службу WinRM и задает тип запуска службы для автоматического запуска.
- Настраивает прослушиватель для портов, которые отправляют и получают протокола WS-Management с помощью ПРОТОКОЛА HTTP или HTTPS на любом IP-адресе.
- Определяет исключения ICF для службы WinRM и открывает порты для HTTP и HTTPS.
Примечание
Эта команда создает исключение брандмауэра только для текущего профиля пользователя. Если профиль брандмауэра изменен по какой-либо причине, необходимо запустить , чтобы включить исключение брандмауэра для нового профиля. В противном случае исключение может быть не включено.
Чтобы получить сведения о настройке конфигурации, введите в командной строке.
Настройка WinRM с параметрами по умолчанию
-
Введите в командной строке.
Если вы не работаете под учетной записью администратора локального компьютера, необходимо выбрать пункт «Запуск от имени администратора » в меню «Пуск » или использовать команду Runas в командной строке.
-
Когда средство отображает эти изменения [y/n]?, введите y.
Если конфигурация выполнена успешно, отображаются следующие выходные данные.
-
Оставьте параметры по умолчанию для клиентских и серверных компонентов WinRM или настройте их. Например, может потребоваться добавить определенные удаленные компьютеры в список TrustedHosts конфигурации клиента.
Если взаимная проверка подлинности не удается установить, необходимо настроить список доверенных узлов. Kerberos разрешает взаимную проверку подлинности, но ее нельзя использовать в рабочих группах — только в доменах. При настройке надежных узлов для рабочей группы рекомендуется сделать список максимально ограниченным.
-
Создайте прослушиватель HTTPS, введя команду . Имейте в виду, что для работы транспорта HTTPS необходимо открыть порт 5986.