Step 3 — Building a batch migration table
-
Select the users to be migrated in the batch from the People & Groups tab in Domino Administrator and run the
Create\Batch Migration Table agent. You can either select users individually or select a group containing users in the
batch. A useful technique is to create group documents that correspond with each batch (Batch 1, Batch 2, Batch 3, etc.)
and add the users for each batch to the appropriate group. Then select the group and run the Create\Batch Migration Doc
agent. -
Review the batch migration CSV file in C:\ProgramData\Transend\Batches. The file should contain the following fields for
each user in the migration batch:
- Legacy email address
- Full path to the user’s mail file, including the mail server
- Notes canonical name
If there are any problems, review MigrationUtils.log, which is located in the directory you specified when running the
Update Configuration agent in Step 1.
Usage
-
Add dependency:
-- <project-name>-scm-1.rockspec dependencies = { ... 'migrations == <the-latest-tag>-1', ... } -
Add to the list of cartridge roles in :
-- init.lua .... cartridge.cfg({ roles = { 'migrator', .... } }) -
Put migrations code to folder in your app. By default, migrator loads all files from it using lexicographical order.
Every migration (e. g. ) should expose a single parameter-less function :return { up = function() local utils = require('migrator.utils') local f = box.schema.create_space('my_sharded_space', { format = { { name = 'key', type = 'string' }, { name = 'bucket_id', type = 'unsigned' }, { name = 'value', type = 'any', is_nullable = true } }, if_not_exists = true, }) f:create_index('primary', { parts = { 'key' }, if_not_exists = true, }) f:create_index('bucket_id', { parts = { 'bucket_id' }, if_not_exists = true, unique = false }) utils.register_sharding_key('my_sharded_space', {'key'}) return true end } -
Call once you are ready to migrate or connect to any instance of cluster and call .
-
What will happen then:
- coordinator node (the one you curled upon) will trigger migrations execution on all replicaset leaders;
- each replicaset leader will apply all available migrations and reply to coordinator;
- if all replies are successful, coordinator will apply changes to cluster-wide config — a list of applied migrations and (optionally) resulting ddl-schema.
-
That’s it!
Step 2c — Registering Users from Zimbra
Only perform this step if legacy user accounts are stored in Zimbra and you want to use MigrationUtils to register
those users in Domino. Skip this step if user accounts are stored in a different directory or you will register users in
Domino outside of MigrationUtils.
-
Open PowerShell and cd to C:\ProgramData\Transend\Bin.
-
Run .\getZimbraUsers to see the options required for the getZimbraUsers script.
-
Run .\getZimbraUsers with the options for your environment and direct the output to a file named registration.ldif. For
example:.\getZimbraUsers "C:\IBM\Notes" "ldap.ibm.com" "uid=admin,ou=people,dc=ibm,dc=com" "password" "ou=people,dc=ibm,dc=com" "(&(uid=*)(objectClass=inetOrgPerson))" > c:\ProgramData\Transend\Extras\registration.ldif
The following are true in the example above:
- The Notes client is installed in C:\IBM\Notes
- The Zimbra server is ldap.ibm.com
- The Zimbra administrator is uid=admin,ou=people,dc=ibm,dc=com
- The Zimbra administrator password is password
- The search for users will begin at ou=people,dc=ibm,dc=com
- The search will be for all users in ou=people,dc=ibm,dc=com
-
From migration.nsf, run the Register\Zimbra Users agent and select the registration.ldif file when prompted.
Overview
- User registration in an on-prem Domino server
- Generation of batch migration tables
- Generation of address translation tables
- Generation of custom Transend Migrator configuration files (TMDs)
In general, a migration project using MigrationUtils is comprised of these steps:
-
Creating batch migration tables. When using Transend Migrator, the most efficient migration strategy is to run a batch
migration, which migrates multiple users at one time using the same configuration. To do this, Transend Migrator uses
batch substitution variables in its configuration that are replaced at runtime by actual values corresponding to the
users being migrated. MigrationUtils uses information stored in the Person document to generate a batch migration table
to prevent the migration administrator from needing to generate these manually. -
Creating address translation tables. During the migration of data, Transend Migrator needs to update names stored in one
format in the legacy mail system to the format required in Notes and Domino. MigrationUtils uses information in the
Person document to generate these tables automatically, preventing the migration administrator from needing to generate
them manually. -
Performing the data migration using the Transend Migrator client. The Transend Migrator client uses configuration
information about the source and target environments, batch migration tables, address translation tables, and various
runtime options to move data from the legacy system to Domino, storing the data in the user’s mail file (NSF) on the
on-prem Domino server. In addition to the batch migration and address translation tables discussed previously,
MigrationUtils builds a custom Transend Migrator configuration file (TMD) with all of the information needed to connect
to the source and target environments plus a set of best-practice options.
The sections that follow will describe in detail how to perform Steps 1-4 above.
Step 6 — Performing the migration
-
Launch Transend Migrator and click File -> Open Configuration.
-
Select the TMD file created in Step 5, which will be located in C:\ProgramData\Transend\Configurations.
-
Click Batch Migration -> Batch Migration Setup.
-
On the Batch Mode Data tab, click the Load From File button and select the
C:\ProgramData\Transend\Batches\batch_migration_.csv file. Click Open. You should see the users load in the
Batch Mode Data tab.IMAP note: If you are migrating from IMAP with the LOGIN authentication mechanism, you will need to manually enter user
passwords in the $Var4 column before proceeding to the next step. -
Click the Address Translation tab and click the Load From File button. Select the
C:\ProgramData\Transend\Batches\address_translation_.csv file and click Open. You should see the users load in
the Address Translation tab. -
Click OK to return to the Transend Migrator main UI.
-
Click the Start Batch Migration button.
-
Click the Yes button to continue the migration.
-
If there are any errors during the migration, review the Transend Migrator logs, which are located in
C:\ProgramData\Transend\Logs.
Prerequisites
Perform the following on the system on which you will be performing the migration (i.e. the migration workstation):
-
Install a Notes client (with Domino Administrator and Domino Designer) at version level 9.0.1 FP8. Note that this exact
level is required. -
Copy the on-prem Domino certifier ID to the migration workstation. For example, copy it to C:\IBM\IDs.
-
Update PowerShell to version 5 or later. You can get the current version of PowerShell by running the following command:
$PSVersionTable.PSVersion.Major
Note: Review the output of Get-ExecutionPolicy -List to ensure that the assigned policies permit running unsigned
scripts. -
Ensure your assigned policies permit running unsigned scripts. To check, run the following command:
Get-ExecutionPolicy -List
- MachinePolicy: Undefined
- UserPolicy: Undefined
- Process: Undefined
- CurrentUser: Undefined
- LocalMachine: Unrestricted
Step 3 — Building a batch migration table
-
Select the users to be migrated in the batch from the People & Groups tab in Domino Administrator and run the
Create\Batch Migration Table agent. You can either select users individually or select a group containing users in the
batch. A useful technique is to create group documents that correspond with each batch (Batch 1, Batch 2, Batch 3, etc.)
and add the users for each batch to the appropriate group. Then select the group and run the Create\Batch Migration Doc
agent. -
Review the batch migration CSV file in C:\ProgramData\Transend\Batches. The file should contain the following fields for
each user in the migration batch:
- Legacy email address
- Full path to the user’s mail file, including the mail server
- Notes canonical name
If there are any problems, review MigrationUtils.log, which is located in the directory you specified when running the
Update Configuration agent in Step 1.
ThinkingHome.Migrator
В прошлом году я начал работать над проектом на .NET Core. Там нужно было сделать возможность подключения плагинов, а у плагинов должна быть возможность создать себе нужную структуру БД, чтобы хранить там свои данные. Это как раз такая задача, для которой хорошо подходит мигратор.

EF Migrations
Для работы с базой данных я использовал Entity Framework Core, поэтому первое, что я попробовал — это EF Migrations. К сожалению, почти сразу пришлось отказаться от идеи использовать их.
Миграции Entity Framework тащат в проект кучу зависимостей, а при запуске — делают какую-то особую магию. Шаг влево/шаг вправо — упираешься в ограничения. Например, миграции Entity Framework почему-то обязательно должны быть в одной сборке с . Это значит, что не получится хранить миграции внутри плагинов.
FluentMigrator
Когда стало ясно, что EF Migrations не подходят, я поискал решение в гугле и нашел несколько open source миграторов. Самый продвинутый из них, судя по количеству загрузок в NuGet и звездочек на GitHub, оказался FluentMigrator. FM — очень хорош! Он умеет очень многое и у него очень удобный API. Сначала я решил, что это то, то мне нужно, но позже обнаружилось несколько проблем.
Главная проблема — FluentMigrator не умеет параллельно учитывать несколько последовательностей версий внутри одной БД. Как я писал выше, мне нужно было использовать мигратор в модульном приложении. Нужно, чтобы модули (плагины) можно было устанавливать и обновлять независимо друг от друга. У FluentMigrator сквозная нумерация версий. Из-за этого нельзя выполнить/откатить из БД миграции одного плагина, не затронув структуру БД остальных плагинов.
Я пробовал организовать нужное поведение при помощи тэгов, но это тоже не совсем то, что нужно. FluentMigrator не хранит информацию о тэгах выполненных миграций. Кроме того, тэги привязаны к миграциям, а не к сборкам. Это очень странно, учитывая, что точка входа для поиска миграций — именно сборка. В принципе, наверно было можно таким образом сделать параллельный учет версий, но нужно написать над мигратором довольно сложную обертку.
Портировать ECM7.Migrator на .NET Core
В начале этот вариант даже не рассматривал. В то время текущая версия .NET Core была — 1.1 и её API был плохо совместим с .NET Framework, в котором работал ECM7.Migrator. Я был уверен, что портировать его на .NET Core будет сложно и долго. Когда вариантов «взять готовое» не осталось, решил попробовать. Задача оказалась легче, чем я ожидал. На удивление, всё заработало почти сразу. Потребовались лишь небольшие правки. Так как логика мигратора была покрыта тестами, сразу были видны все места, которые сломались и я быстро починил их.
Сейчас я портировал адаптеры только для четырех СУБД: MS SQL Server, PostgreSQL, MySQL, SQLite. Не портировал адаптеры для Oracle (т. к. всё еще нет стабильного клиента под .NET Core), MS SQL Server CE (т.к. он работает только под Windows и мне тупо негде его запускать) и Firebird (т.к. он не очень популярный, портирую позже). В принципе, если нужно будет сделать провайдеры для этих или других СУБД — это довольно просто.
Исходный код нового мигратора лежит на GitHub. Настроен запуск тестов для каждой СУБД в Travis CI. Написана утилита командной строки (.NET Core Global Tool), которую можно легко установить из NuGet. Написана документация — я очень старался написать подробно и понятно и, кажется, так и получилось. Можно брать и пользоваться!
Немного про название…
У нового мигратора нет обратной совместимости со старым. Они работают на разных платформах и у них отличается API. Поэтому проект опубликован под другим названием.
Название выбрано по проекту ThinkingHome, для которого я портировал мигратор. Собственно, ECM7.Migrator тоже назван по проекту, над которым я работал в тот момент.
Номер версии указал 3.0.0, т.к. новый мигратор — логическое продолжение старого.
Overview
- User registration in an on-prem Domino server
- Generation of batch migration tables
- Generation of address translation tables
- Generation of custom Transend Migrator configuration files (TMDs)
In general, a migration project using MigrationUtils is comprised of these steps:
-
Creating batch migration tables. When using Transend Migrator, the most efficient migration strategy is to run a batch
migration, which migrates multiple users at one time using the same configuration. To do this, Transend Migrator uses
batch substitution variables in its configuration that are replaced at runtime by actual values corresponding to the
users being migrated. MigrationUtils uses information stored in the Person document to generate a batch migration table
to prevent the migration administrator from needing to generate these manually. -
Creating address translation tables. During the migration of data, Transend Migrator needs to update names stored in one
format in the legacy mail system to the format required in Notes and Domino. MigrationUtils uses information in the
Person document to generate these tables automatically, preventing the migration administrator from needing to generate
them manually. -
Performing the data migration using the Transend Migrator client. The Transend Migrator client uses configuration
information about the source and target environments, batch migration tables, address translation tables, and various
runtime options to move data from the legacy system to Domino, storing the data in the user’s mail file (NSF) on the
on-prem Domino server. In addition to the batch migration and address translation tables discussed previously,
MigrationUtils builds a custom Transend Migrator configuration file (TMD) with all of the information needed to connect
to the source and target environments plus a set of best-practice options.
The sections that follow will describe in detail how to perform Steps 1-4 above.
Step 4 — Building an address translation table
-
Select all users that will be migrating from the People & Groups tab in Domino Administrator and run the Create\Address
Translation Table agent. As with the Create\Batch Migration Table agent, you can select users individually or a group
containing the migrating users. You can also select multiple groups; for example, select the Batch 1, Batch 2 and Batch
3 groups to build an address translation table for all users in the three groups. -
Review the address translation CSV in C:\ProgramData\Transend\Batches. The file should contain the following mappings
for each user being migrated as part of the migration project:
- Legacy email address to Notes canonical name
- Legacy DN to the Notes canonical name
If there are any problems, review MigrationUtils.log, which is located in the directory you specified when running the
Update Configuration agent in Step 1.
Step 6 — Performing the migration
-
Launch Transend Migrator and click File -> Open Configuration.
-
Select the TMD file created in Step 5, which will be located in C:\ProgramData\Transend\Configurations.
-
Click Batch Migration -> Batch Migration Setup.
-
On the Batch Mode Data tab, click the Load From File button and select the
C:\ProgramData\Transend\Batches\batch_migration_.csv file. Click Open. You should see the users load in the
Batch Mode Data tab.IMAP note: If you are migrating from IMAP with the LOGIN authentication mechanism, you will need to manually enter user
passwords in the $Var4 column before proceeding to the next step. -
Click the Address Translation tab and click the Load From File button. Select the
C:\ProgramData\Transend\Batches\address_translation_.csv file and click Open. You should see the users load in
the Address Translation tab. -
Click OK to return to the Transend Migrator main UI.
-
Click the Start Batch Migration button.
-
Click the Yes button to continue the migration.
-
If there are any errors during the migration, review the Transend Migrator logs, which are located in
C:\ProgramData\Transend\Logs.
Step 1 — Setup
-
Copy MigrationUtils_.zip to the migration workstation’s C:\Temp directory.
-
Unzip the contents of MigrationUtils_.zip to C:\Temp\TM.
-
Run setupTM.bat, which will create the necessary directories and files in C:\ProgramData\Transend. Note that you will
need to have Windows Explorer configured to display hidden folders. Click Organize -> Folder and search options -> View
tab and enable Show hidden files, folders, and drives. -
Copy C:\ProgramData\Transend\Templates\migration.ntf to the Domino mail server data directory. For example, copy it to
C:\IBM\Domino\Data. -
Open the new migration.nsf application and the server names.nsf application in Domino Designer.
-
Navigate to migration.nsf -> Code -> Script Libraries.
-
Open the MigrationUtils script library and click on Declarations.
-
Update the DOMINO_MAIL_SERVER variable to point to your Domino server. For example, «CN=Mail1/O=IBM.»
-
Copy the MigrationUtils script library to names.nsf -> Code -> Script Libraries.
-
Navigate to migration.nsf -> Code -> Agents.
-
Select the Create\Address Translation Table and Create\Batch Migration Table agents and copy them to
names.nsf -> Code -> Agents. -
-
Close Domino Designer and open migration.nsf in Domino Administrator.
-
Click Actions -> Update Configuration and fill out the fields in the form to match your environment. Click Save & Close
after filling out all fields.
You have now completed setup.
Advanced usage
IMPORTANT: code snippets below should be embedded to , so they would take effect on all nodes of the cluster.
-
Change directory where migrations are located: embed the following to init.lua
local migrator = require('migrator') local my_directory_loader = require('migrator.directory-loader').new('test/integration/migrations') migrator.set_loader(my_directory_loader) -
… or use to load migrations from Tarantool Cartridge clusterwide config.
Configure to use :
local migrator = require('migrator')
local config_loader = require('migrator.config-loader').new()
migrator.set_loader(config_loader)
Navigate to Cartridge webui «Code» to write your migrations.
Migrations must be stored in *.lua files under «migrations/source» key: -
… or use your own loader — it should expose a single function which returns a similar-looking array:
local my_loader = { list = function(_) return { { name = '01_first', up = function() ... end }, } end } migrator.set_loader(my_loader) -
Disable usage:
migrator.set_use_cartridge_ddl(false)
In this case, resulting schema will not be registered via
Prerequisites
Perform the following on the system on which you will be performing the migration (i.e. the migration workstation):
-
Install a Notes client (with Domino Administrator and Domino Designer) at version level 9.0.1 FP8. Note that this exact
level is required. -
Copy the on-prem Domino certifier ID to the migration workstation. For example, copy it to C:\IBM\IDs.
-
Update PowerShell to version 5 or later. You can get the current version of PowerShell by running the following command:
$PSVersionTable.PSVersion.Major
Note: Review the output of Get-ExecutionPolicy -List to ensure that the assigned policies permit running unsigned
scripts. -
Ensure your assigned policies permit running unsigned scripts. To check, run the following command:
Get-ExecutionPolicy -List
- MachinePolicy: Undefined
- UserPolicy: Undefined
- Process: Undefined
- CurrentUser: Undefined
- LocalMachine: Unrestricted
Step 4 — Building an address translation table
-
Select all users that will be migrating from the People & Groups tab in Domino Administrator and run the Create\Address
Translation Table agent. As with the Create\Batch Migration Table agent, you can select users individually or a group
containing the migrating users. You can also select multiple groups; for example, select the Batch 1, Batch 2 and Batch
3 groups to build an address translation table for all users in the three groups. -
Review the address translation CSV in C:\ProgramData\Transend\Batches. The file should contain the following mappings
for each user being migrated as part of the migration project:
- Legacy email address to Notes canonical name
- Legacy DN to the Notes canonical name
If there are any problems, review MigrationUtils.log, which is located in the directory you specified when running the
Update Configuration agent in Step 1.
Сравнение и выбор систем миграции данных
Задача
- Поддержка различных СУБД. Обязательно MS SQL Server, PostgreSQL, Oracle, но потенциально возможно использование и других
- Работа с ORM. Изначально предполагалось использование EF Core, однако на этапе проектирования были готовы рассмотреть и другие ORM
- Автогенерация миграций. С учетом разработки Code First необходимости «расписывать ручками» миграции хотелось бы избежать
- Конфликты версий. В условиях распределенной разработки при мерджинге EF Core может валиться на конфликтах. Это становится существенной проблемой, поскольку различные части приложения создаются разными разработчиками, поэтому приходится тратить большое количество времени на каждый
- Развитая документация и поддержка. Здесь, нам кажется, пояснения не нужны
- Бесплатность. Критерий условный, поскольку не очень дорогие системы или дорогие, но идеальные в удобстве, мы тоже готовы были рассмотреть
- EF Core Migrations
- DBup
- RoundhousE
- ThinkingHome.Migrator
- Fluent Migrator
А теперь чуть подробнее
EntityFramework Core Migrations
- Поддержка Microsoft, документация, в том числе на русском, огромное комьюнити
- Автогенерация миграций на основе CodeFirst
- По сравнению с EF 6 в EF Core теперь не хранится снимок БД. При работе с EF Core в Code First теперь не обязательно разворачивать базу данных
- Поскольку пляшем от Code First – есть возможность вести одну миграцию на все требуемые провайдеры доступа к данным
- По поводу провайдеров — поддерживается и PostgreSQL, и Oracle, и т.д., и т.п., и даже – MS SQL Server
- Разрешение конфликтов осталось на том же уровне. Необходимо выстраивать последовательность миграций и обновлять снимки БД
- Зависимость от моделей, на основе которых сгенерированы миграции
DbUpdbup.github.io
- Поддержка большого количества СУБД (MS SQL Server, PstgreSQL, MySQL)
- Поскольку скрипты пишутся на T-SQL, выглядят они довольно просто
- Конфликты также решаются с помощью SQL
- При всем многообразии поддерживаемых СУБД, Oracle в их число не входит
- Не взаимодействует с ORM
- Написание скриптов на T-SQL «ручками» – не то, к чему мы стремились
- Документация и комьюнити так себе, хотя в условиях написания SQL-скриптов они, может быть, и не нужны.
RoundhousEgithub.com/chucknorris/roundhouse
- Oracle (а так же неактуальный для нас Access) не поддерживается на .NET Core, только на .NET Full Framework
- Не работает с ORM
- Документации еще меньше, чем у предыдущего инструмента
- Опять же – миграции пишутся скриптами
ThinkingHome.MigratorСам разработчик писал про последнюю его версию почти год назад
- Заточен под .NET Core
- Реализована ветвистая последовательность миграций
- Реализовано логирование миграций
- Последнее обновление – год назад. Судя по всему, проект не поддерживается
- Не поддерживается Oracle (в статье указано, что это из-за отсутствия стабильной реализации под .NET Core – но это год назад)
- Отсутствует автогенерация миграций
Fluent Migratorgithub.com/fluentmigrator/fluentmigrator
- Поддержка необходимых СУБД
- Поддержка .NET Core
- Большое развитое комьюнити
- Конфликты миграций решаются последовательно – у миграций указывается порядок выполнения. Кроме того, если возникает конфликт вокруг одной сущности, при мерджинге кода его решение производится так же, как и в остальном коде
- Есть профили, которые выполняются после успешного выполнения миграции. И могут нести в себе сервисные функцииПоследнее обновление было месяц назад, то есть проект живет
- Отсутствует автогенерация миграций
- Отсутствует связь с моделями EF
- Нет снимков БД
Step 1 — Setup
-
Copy MigrationUtils_.zip to the migration workstation’s C:\Temp directory.
-
Unzip the contents of MigrationUtils_.zip to C:\Temp\TM.
-
Run setupTM.bat, which will create the necessary directories and files in C:\ProgramData\Transend. Note that you will
need to have Windows Explorer configured to display hidden folders. Click Organize -> Folder and search options -> View
tab and enable Show hidden files, folders, and drives. -
Copy C:\ProgramData\Transend\Templates\migration.ntf to the Domino mail server data directory. For example, copy it to
C:\IBM\Domino\Data. -
Open the new migration.nsf application and the server names.nsf application in Domino Designer.
-
Navigate to migration.nsf -> Code -> Script Libraries.
-
Open the MigrationUtils script library and click on Declarations.
-
Update the DOMINO_MAIL_SERVER variable to point to your Domino server. For example, «CN=Mail1/O=IBM.»
-
Copy the MigrationUtils script library to names.nsf -> Code -> Script Libraries.
-
Navigate to migration.nsf -> Code -> Agents.
-
Select the Create\Address Translation Table and Create\Batch Migration Table agents and copy them to
names.nsf -> Code -> Agents. -
Close Domino Designer and open migration.nsf in Domino Administrator.
-
Click Actions -> Update Configuration and fill out the fields in the form to match your environment. Click Save & Close
after filling out all fields.
You have now completed setup.
Как всё начиналось
9 лет назад, в 2009 году я работал ASP.NET разработчиком. Когда мы релизили наш проект, специальный человек оставался на работе допоздна и, одновременно с обновлением файлов на сервере, руками выполнял SQL скрипты, обновляющие БД в проде. Мы искали инструмент, который делал бы это автоматически, и нашли проект Migrator.NET.

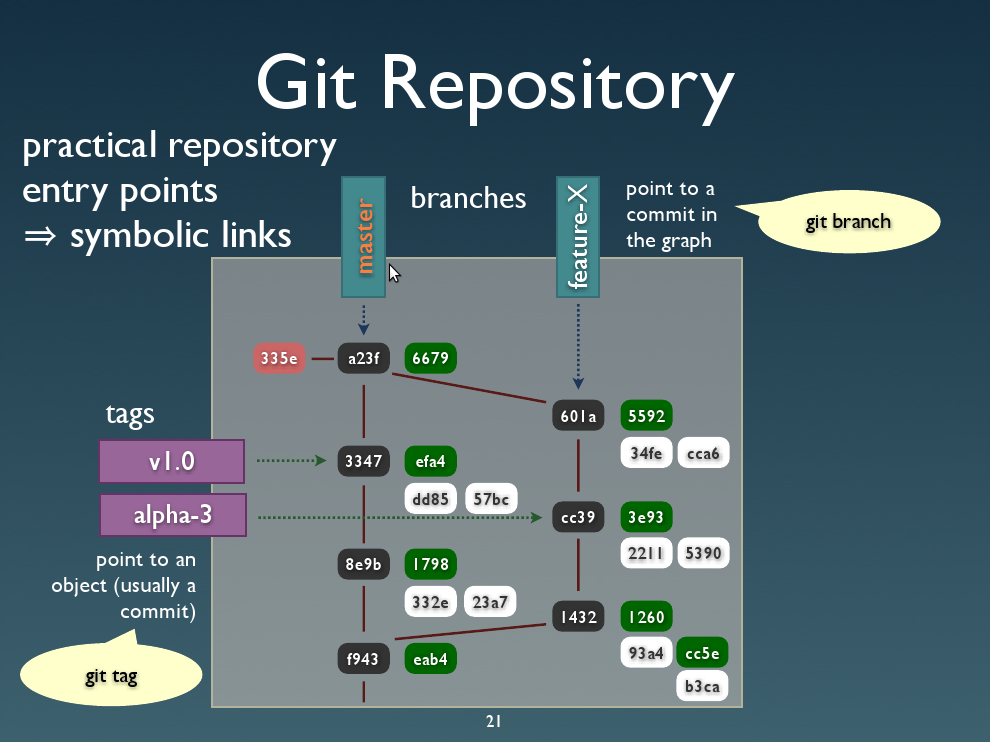
Мигратор предлагал новую для того времени идею — задавать изменения БД в виде миграций. Каждая миграция содержит маленькую порцию изменений и имеет номер версии, в которую перейдет БД после её выполнения. Мигратор сам вел учет версий и выполнял нужные миграции в нужном порядке. Особенно круто было то, что мигратор позволял для каждой миграции задать обратные изменения. Можно было при запуске мигратора задать версию, ниже текущей, и он автоматически откатил бы БД до этой версии, выполняя нужные миграции в обратном порядке.
В том миграторе было много ошибок. Он не умел работать со схемами БД, отличными от схемы по умолчанию. В некоторых случаях генерировал некорректные SQL запросы, а если указать ему несуществующий номер версии — впадал в бесконечный цикл. В результате мы с коллегами форкнули проект и чинили там баги.
GitHub.com с его форками и пулл реквестами тогда еще не было (код мигратора лежал на code.google.com). Поэтому мы особенно не заморачивались с тем, чтобы наши изменения попали обратно в оригинальный проект — просто пилили свою копию и сами этим пользовались. Со временем мы переписали бо́льшую часть проекта, а я стал его основным мэйнтейнером. Потом я выложил код нашего мигратора на google code и написал статью на хабр. Так появился ECM7.Migrator.
За время работы над мигратором мы почти полностью его переписали. Заодно немного упростили API и покрыли всё автотестами. Лично мне очень нравилось пользоваться тем, что получилось. В отличие от оригинального мигратора, было ощущение надежности и не было ощущения, что происходит непонятная магия.
Как оказалось, наш мигратор нравился не только мне. Насколько я знаю, он использовался в довольно крупных компаниях. Мне известно про ABBYY, БАРС Груп и concert.ru. Если наберете в поиске запрос «ecm7 migrator», то можете встретить в результатах статьи о нем, упоминания в резюме, описания использования в студенческих работах. Иногда мне приходили письма от незнакомых людей с вопросами или словами благодарности.
После 2012 года проект почти не развивался. Его текущие возможности покрывали все задачи, которые у меня возникали и я не видел необходимости что-то доделывать.
Step 2a — Registering Users from Active Directory
Only perform this step if legacy user accounts are stored in Active Directory and you want to use MigrationUtils to
register those users in Domino. Skip this step if user accounts are stored in a different directory or you will register
users in Domino outside of MigrationUtils.
-
Open PowerShell and cd to C:\ProgramData\Transend\Bin.
-
Run .\getADUsers to see the options required for the getADUsers script.
-
Run .\getADUsers with the options for your environment and direct the output to a file named registration.ldif. For
example:.\getADUsers "C:\IBM\Notes" "ldap.ibm.com" "cn=Administrator,cn=Users,dc=ibm,dc=com" "password" "ou=Sales,dc=ibm,dc=com" "(&(cn=*)(objectClass=organizationalPerson))" > c:\ProgramData\Transend\Extras\registration.ldif
The following are true in the example above:
- The Notes client is installed in C:\IBM\Notes
- The Active Directory server is ldap.ibm.com
- The Active Directory administrator is cn=Administrator,cn=Users,dc=ibm,dc=com
- The Active Directory administrator password is password
- The search for users will begin at ou=Sales,dc=ibm,dc=com
- The search will be for all users in ou=Sales,dc=ibm,dc=com
-
From migration.nsf, run the Register\Active Directory Users agent and select the registration.ldif file when prompted.
Utils, helpers, tips and tricks
    up = function()
        local utils = require('migrator.utils')
        local f = box.schema.create_space('my_sharded_space', {
            format = {
                { name = 'key', type = 'string' },
                { name = 'bucket_id', type = 'unsigned' },
                { name = 'value', type = 'any', is_nullable = true }
            },
            if_not_exists = true,
        })
        f:create_index('primary', {
            parts = { 'key' },
            if_not_exists = true,
        })
        f:create_index('bucket_id', {
            parts = { 'bucket_id' },
            if_not_exists = true,
            unique = false
        })
        utils.register_sharding_key('my_sharded_space', {'key'})
        return true
    end
Warning! It’s not correct to specify ‘bucket_id’ as a ‘key’ parameter for register_sharding_key().
The ‘bucket_id’ field is a place where the output of sharding function is saved to.
Step 2c — Registering Users from Zimbra
Only perform this step if legacy user accounts are stored in Zimbra and you want to use MigrationUtils to register
those users in Domino. Skip this step if user accounts are stored in a different directory or you will register users in
Domino outside of MigrationUtils.
-
Open PowerShell and cd to C:\ProgramData\Transend\Bin.
-
Run .\getZimbraUsers to see the options required for the getZimbraUsers script.
-
Run .\getZimbraUsers with the options for your environment and direct the output to a file named registration.ldif. For
example:.\getZimbraUsers "C:\IBM\Notes" "ldap.ibm.com" "uid=admin,ou=people,dc=ibm,dc=com" "password" "ou=people,dc=ibm,dc=com" "(&(uid=*)(objectClass=inetOrgPerson))" > c:\ProgramData\Transend\Extras\registration.ldif
The following are true in the example above:
- The Notes client is installed in C:\IBM\Notes
- The Zimbra server is ldap.ibm.com
- The Zimbra administrator is uid=admin,ou=people,dc=ibm,dc=com
- The Zimbra administrator password is password
- The search for users will begin at ou=people,dc=ibm,dc=com
- The search will be for all users in ou=people,dc=ibm,dc=com
-
From migration.nsf, run the Register\Zimbra Users agent and select the registration.ldif file when prompted.
Step 2a — Registering Users from Active Directory
Only perform this step if legacy user accounts are stored in Active Directory and you want to use MigrationUtils to
register those users in Domino. Skip this step if user accounts are stored in a different directory or you will register
users in Domino outside of MigrationUtils.
-
Open PowerShell and cd to C:\ProgramData\Transend\Bin.
-
Run .\getADUsers to see the options required for the getADUsers script.
-
Run .\getADUsers with the options for your environment and direct the output to a file named registration.ldif. For
example:.\getADUsers "C:\IBM\Notes" "ldap.ibm.com" "cn=Administrator,cn=Users,dc=ibm,dc=com" "password" "ou=Sales,dc=ibm,dc=com" "(&(cn=*)(objectClass=organizationalPerson))" > c:\ProgramData\Transend\Extras\registration.ldif
The following are true in the example above:
- The Notes client is installed in C:\IBM\Notes
- The Active Directory server is ldap.ibm.com
- The Active Directory administrator is cn=Administrator,cn=Users,dc=ibm,dc=com
- The Active Directory administrator password is password
- The search for users will begin at ou=Sales,dc=ibm,dc=com
- The search will be for all users in ou=Sales,dc=ibm,dc=com
-
From migration.nsf, run the Register\Active Directory Users agent and select the registration.ldif file when prompted.