Final Tips
We are now set to run ExMerge against Exchange 2007. This procedure can be applied to installations where no earlier Exchange version was ever installed. However the Exchange 2000/2003 System Management Tools are still necessary to satisfy the ExMerge dependencies.
Exchange 2007 SP1 will bring the Import-Mailbox and Export-Mailbox cmdlets. These should provide a native ExMerge replacement. Although I can imagine that some will still keep on using ExMerge for its UI. Details on these cmdlets were posted on the MS Exchange Team blog in How to Export and Import mailboxes to PST files in Exchange 2007 SP1.
Configuring Permissions
So here are the steps taken from Meeting the ExMerge Requirements but updated for Exchange 2007:
-
On the XP/2000 Pro machine the user account only requires to be a Standard User (Power User Group).
-
To set the rights, at the server we first create a security group to hold all user accounts running ExMerge. We will call this group ExMerge to be consistent with the MS support articles. Once created, add the user account(s) to its membership list.
Note: At this stage it is easier to work with accounts that have no Administrative role in Exchange. This helps us avoid hitting into issues related to permission inheritance that too often cause confusion.
-
At the Exchange Server, delegate ‘Exchange View Only Administrator’ control to the newly created security group.
Unless we do this, ExMerge would fail on enumerating the private information stores and would return an error saying: «Error getting list of private information store databases on server…»
-
Open the Exchange 2007 Management Console and select ‘Organization Configuration’
-
At the right-hand Action pane, click on ‘Add Exchange Administrator’
-
Click on Browse to select the ExMerge security group.
-
Select ‘Exchange View-Only Administrator role’ as the role to be assigned.
-
Complete the wizard and ExMerge will now be added to the list of administrators.
Alternatively we could have done all this in a single command-shell step using Add-ExchangeAdministrator as follows:Add-ExchangeAdministrator -Identity ‘vert.local/Users/ExMerge’ -Role ‘ViewOnlyAdmin’
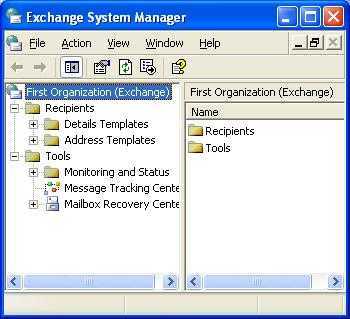
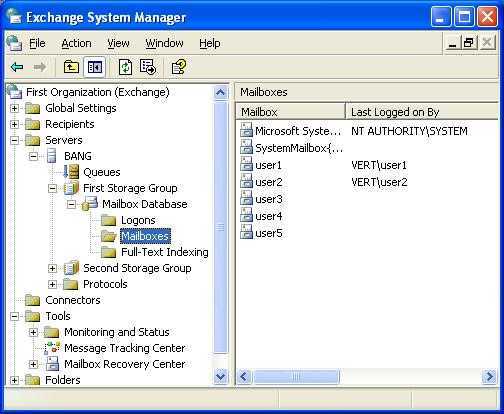
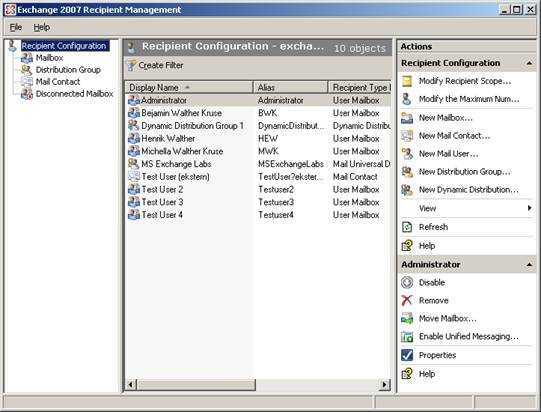
At this point we should be able to logon to the Windows XP machine with the user account intended for running ExMerge. We should be able to open the Exchange System Manager and browse the Exchange organization. In my case I was unable to do this until the Exchange 2007 machine was restarted. However it is worth trying this immediately in order to avoid any downtime. The following screen shots show how the Windows XP ESM looked like before and after the Exchange View-Only Administrator role took effect.
-
-
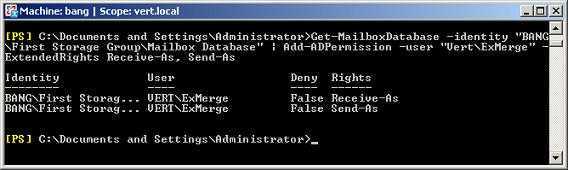
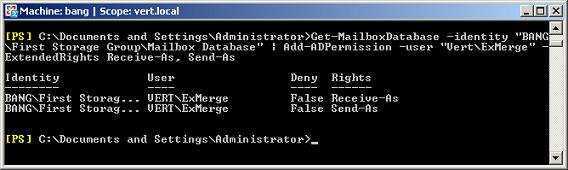
Here we are piping the results of Get-MailboxDatabase to Add-ADPermission. The database identity was in this case:
«BANG\First Storage Group\Mailbox Database»BANG is the Exchange 2007 server name.
Add-ADPermission is fed with the account (Vert\ExMerge) for which the extended rights Receive-As and Send-As are to be set.
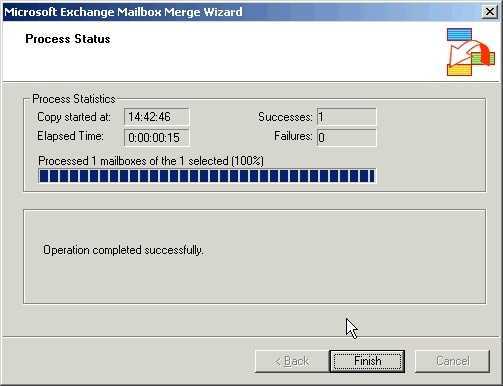
Running successfully this command should return:
Troubleshooting Tips
To conclude this discussion I researched some of the errors that may be returned when running these cmdlets.
Server Administrator Role Not Assigned
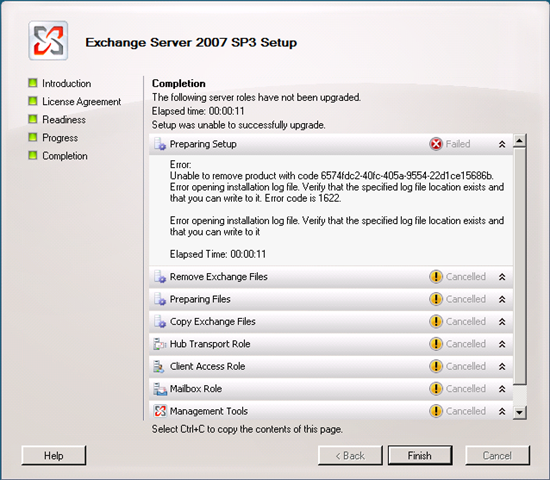
Without the Server Administrator Role, a user won’t even be able to export his own mailbox. Here is what export-mailbox returns in that case:
«The specified mailbox database «PCBOX\First Storage Group\Mailbox Database» does not exist.»
Missing Mailbox Access Rights
Once the Server Administrator Role is assigned the user will be able to export and import against his own mailbox. But on trying any other mailbox the command will fail unless the necessary access rights are assigned. The following error is returned in that case:
«Error occurred in the step: Moving messages.
Failed to copy messages to the destination mailbox store with error:
MAPI or an unspecified service provider.
ID no: 00000000-0000-00000000»
Ручные методы открытия файла EDB вне обмена
В этом блоге обсуждаются два метода. Это поможет пользователям открывать файлы электронной почты EDB без установки Exchange:
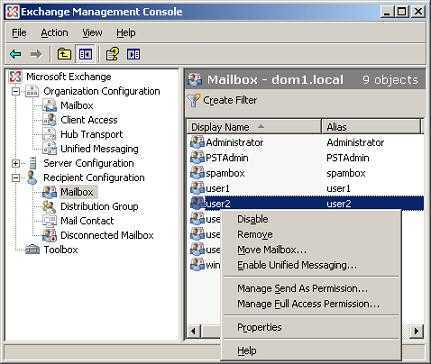
- Перейдите в панель поиска Google и ExMerge.exe и скачать программу
- Запустите утилиту и перейдите на вкладку «Далее».
- Выбрать Экспорт Импорт вариант и выберите Следующий.
- Нажмите кнопку «Процедура импорта». галочка Архивные данные в целевой магазин, нажмите Ok
- Выберите Вкладка Почтовый ящик для экспорта, затем укажите местоположение, и на этом процесс экспорта будет завершен.
- Нажать на финишная вкладка.
После выполнения задачи файлы EDB преобразуются в формат PST и доступны в Outlook.
Ограничения ручного процесса
- Не удаляет почтовые ящики с размером файлов более 2 ГБ.
- Невозможно просмотреть файлы EDB вне Exchange
- Невозможно экспортировать почтовый ящик из автономного EDB
- ExMerge.exe не работает с Exchange Server 2007, 2010, 2013, 2016 и 2019.
Быстрое решение для открытия файла EDB без обмена
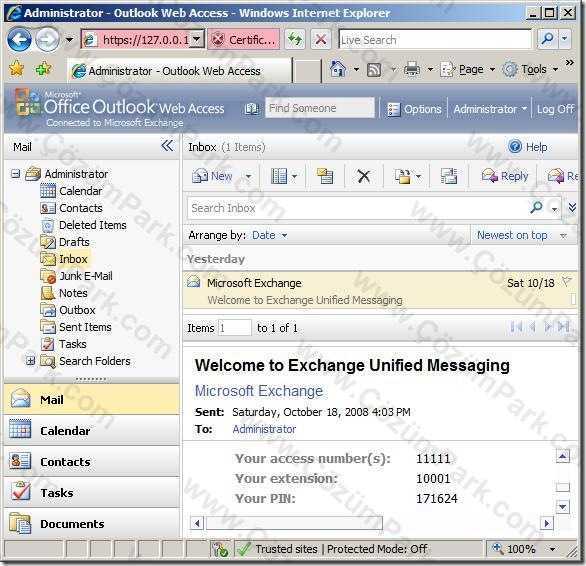
Datahelp EDB Viewer это полностью надежная утилита, которая обеспечивает быстрое открытие ЕАБР файлы данных без сервера Exchange. Инструмент имеет несколько заметных преимуществ и функций, которые могут быть реализованы при необходимости доступа к базе данных Exchange. Лучший способ получить доступ к файлу Exchange Server без файла Exchange Server — использовать этот инструмент. Пользователи могут легко просматривать все данные почтового ящика, содержащиеся в нем.
Это приложение может загружать любой почтовый ящик в файл EDB, содержащий все элементы. Вы также можете создать прямой предварительный просмотр списка элементов, например электронной почты, контактов, календаря, задач, заметок, журнала и т. Д. Этот инструмент позволяет пользователям читать вложения, такие как документы, изображения и т. Д.
Программа является одним из самых надежных и мощных решений для просмотра файлов EDB вне Exchange. Кроме того, программное обеспечение можно загрузить и установить во всех доступных версиях Windows 10, включая Windows 10, 8.1, 8, 7 и более ранние версии.


Пошаговые инструкции по Просмотр / открытие файлов EDB без внешнего обмена
1: Во-первых, запуск Инструмент просмотра EDB в вашей системе
2: После этого Добавлять Обменный файл EDB
3: Следующий, предварительный просмотр Обмен Электронная почта ЕАБР файлы вместе с Вложения.
4: Последний, Выбрать на Переключить режим просмотра в качестве По горизонтали или же Вертикальный.
Заключительные строки
Однако ручной подход — это фактически бесплатный способ открыть файл EDB без Exchange. Это может привлечь пользователей, но удовлетворительные результаты не всегда гарантированы. Также существуют параметры потери данных и ограничения по размеру файла. Вот почему мы назвали профессиональную программу просмотра EDB, которая показывает пользователям, как просматривать файлы EDB вне обмена наиболее эффективным и надежным способом. Вы можете выбрать любой вариант по своему желанию
Configuring Permissions
So here are the steps taken from Meeting the ExMerge Requirements but updated for Exchange 2007:
-
On the XP/2000 Pro machine the user account only requires to be a Standard User (Power User Group).
-
To set the rights, at the server we first create a security group to hold all user accounts running ExMerge. We will call this group ExMerge to be consistent with the MS support articles. Once created, add the user account(s) to its membership list.
Note: At this stage it is easier to work with accounts that have no Administrative role in Exchange. This helps us avoid hitting into issues related to permission inheritance that too often cause confusion.
-
At the Exchange Server, delegate ‘Exchange View Only Administrator’ control to the newly created security group.
Unless we do this, ExMerge would fail on enumerating the private information stores and would return an error saying: «Error getting list of private information store databases on server…»
-
Open the Exchange 2007 Management Console and select ‘Organization Configuration’
-
At the right-hand Action pane, click on ‘Add Exchange Administrator’
-
Click on Browse to select the ExMerge security group.
-
Select ‘Exchange View-Only Administrator role’ as the role to be assigned.
-
Complete the wizard and ExMerge will now be added to the list of administrators.
Alternatively we could have done all this in a single command-shell step using Add-ExchangeAdministrator as follows:Add-ExchangeAdministrator -Identity ‘vert.local/Users/ExMerge’ -Role ‘ViewOnlyAdmin’
At this point we should be able to logon to the Windows XP machine with the user account intended for running ExMerge. We should be able to open the Exchange System Manager and browse the Exchange organization. In my case I was unable to do this until the Exchange 2007 machine was restarted. However it is worth trying this immediately in order to avoid any downtime. The following screen shots show how the Windows XP ESM looked like before and after the Exchange View-Only Administrator role took effect.
-
-
Here we are piping the results of Get-MailboxDatabase to Add-ADPermission. The database identity was in this case:
«BANG\First Storage Group\Mailbox Database»BANG is the Exchange 2007 server name.
Add-ADPermission is fed with the account (Vert\ExMerge) for which the extended rights Receive-As and Send-As are to be set.
Running successfully this command should return:
3 Steps total
Step 1: Initial ExMerge Installation Steps
In Meeting the ExMerge Requirements, we installed ExMerge on Windows XP/2000 to run against Exchange 2000/2003. The procedure for Exchange 2007 is very similar and I will refer you to various parts of this article.
In earlier Exchange versions it was possible to run ExMerge directly on the Exchange server machine. However this is not the case with Exchange 2007. Here we will employ the ExMerge included with the Exchange 2003 Tools and this cannot be mixed with Exchange 2007. Thus we will again install ExMerge on a separate Windows XP machine.
There is nothing new with the installation of ExMerge itself. We can simply follow the steps described in Meeting the ExMerge Requirements. Just read through the first page of this article including the headings Installing the Exchange System Management Tools and Install ExMerge. Yes we need to install the Exchange 200x System Management Tools. Although we don’t need a running Exchange 2000/2003 server this component is necessary to satisfy the ExMerge dependencies.
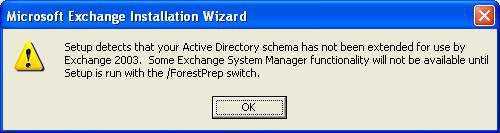
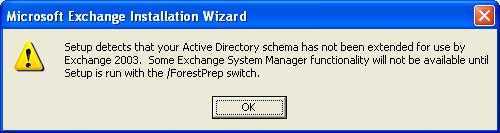
I performed this procedure on a fresh domain where no earlier Exchange version was ever installed. Because of this on installing the System Management Tools a warning popped reporting that the Schema was never extended for Exchange 2003. If you get this just ignore it.
Step 2: Configuring Permissions
So here are the steps taken from Meeting the ExMerge Requirements but updated for Exchange 2007:
1. On the XP/2000 Pro machine the user account only requires to be a Standard User (Power User Group).


2. To set the rights, at the server we first create a security group to hold all user accounts running ExMerge. We will call this group ExMerge to be consistent with the MS support articles. Once created, add the user account(s) to its membership list.
Note: At this stage it is easier to work with accounts that have no Administrative role in Exchange. This helps us avoid hitting into issues related to permission inheritance that too often cause confusion.
3. At the Exchange Server, delegate ‘Exchange View Only Administrator’ control to the newly created security group.
Unless we do this, ExMerge would fail on enumerating the private information stores and would return an error saying: «Error getting list of private information store databases on server…»
A. Open the Exchange 2007 Management Console and select ‘Organization Configuration’
B. At the right-hand Action pane, click on ‘Add Exchange Administrator’
C. Click on Browse to select the ExMerge security group.
D. Select ‘Exchange View-Only Administrator role’ as the role to be assigned.
E. Complete the wizard and ExMerge will now be added to the list of administrators.
Alternatively we could have done all this in a single command-shell step using Add-ExchangeAdministrator as follows:
Add-ExchangeAdministrator -Identity ‘vert.local/Users/ExMerge’ -Role ‘ViewOnlyAdmin’
At this point we should be able to logon to the Windows XP machine with the user account intended for running ExMerge. We should be able to open the Exchange System Manager and browse the Exchange organization. In my case I was unable to do this until the Exchange 2007 machine was restarted. However it is worth trying this immediately in order to avoid any downtime. The following screen shots show how the Windows XP ESM looked like before and after the Exchange View-Only Administrator role took effect.
Here we are piping the results of Get-MailboxDatabase to Add-ADPermission. The database identity was in this case:
«BANG\First Storage Group\Mailbox Database»
BANG is the Exchange 2007 server name.
Add-ADPermission is fed with the account (Vert\ExMerge) for which the extended rights Receive-As and Send-As are to be set.
Running successfully this command should return:(see attachment)
Final Tips
We are now set to run ExMerge against Exchange 2007. This procedure can be applied to installations where no earlier Exchange version was ever installed. However the Exchange 2000/2003 System Management Tools are still necessary to satisfy the ExMerge dependencies.
Exchange 2007 SP1 will bring the Import-Mailbox and Export-Mailbox cmdlets. These should provide a native ExMerge replacement. Although I can imagine that some will still keep on using ExMerge for its UI. Details on these cmdlets were posted on the MS Exchange Team blog in How to Export and Import mailboxes to PST files in Exchange 2007 SP1.
Initial ExMerge Installation Steps
In Meeting the ExMerge Requirements, we installed ExMerge on Windows XP/2000 to run against Exchange 2000/2003. The procedure for Exchange 2007 is very similar and I will refer you to various parts of this article.
In earlier Exchange versions it was possible to run ExMerge directly on the Exchange server machine. However this is not the case with Exchange 2007. Here we will employ the ExMerge included with the Exchange 2003 Tools and this cannot be mixed with Exchange 2007. Thus we will again install ExMerge on a separate Windows XP machine.
There is nothing new with the installation of ExMerge itself. We can simply follow the steps described in Meeting the ExMerge Requirements. Just read through the first page of this article including the headings Installing the Exchange System Management Tools and Install ExMerge. Yes we need to install the Exchange 200x System Management Tools. Although we don’t need a running Exchange 2000/2003 server this component is necessary to satisfy the ExMerge dependencies.
I performed this procedure on a fresh domain where no earlier Exchange version was ever installed. Because of this on installing the System Management Tools a warning popped reporting that the Schema was never extended for Exchange 2003. If you get this just ignore it.
Preparing the Machine
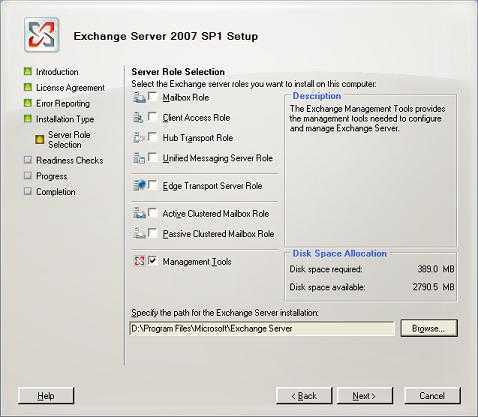
From the introductory error, we already know these cmdlets won’t run on the 64-bit Exchange 2007 server. Instead we must setup a 32-bit machine with the Exchange 2007 Management Tools. Many will remember that Exchange 2007 is not supported on 32-bit. However here we won’t install a full server. Only the Management Tools are required, a setup that MS does support on 32-bit as well.
So it is time for us to start downloading the 32-bit Exchange 2007 SP1 build. This build includes the complete Exchange install i.e. we don’t have to install the RTM version first.
While the download is in progress we will prepare a typical 32-bit XP SP2 machine with all the Exchange 2007 prerequisites:
-
.NET 2.0 Framework SP1. Again we can install SP1 straight away even if .NET 2.0 is not installed.
Next we also need to install the Microsoft Internet Information Services Common Files from the Control Panel Add/Remove Programs applet.
We should now be set to run the Exchange 2007 installation. Here we follow the wizard until reaching the Installation Type selection. At this point we go for a Custom Exchange Server Installation. This allows us to select the exact component to install from which we just select the ‘Management Tools’ option.
Finally we have to install Outlook 2003 SP2 or Outlook 2007. This is probably the most disappointing requirement. If Outlook happens to be in use for other administrative tasks this should be no problem, otherwise smaller shops won’t be happy to consume a license in this manner. In return we get the latest Personal Folders Store provider that allows us to beat the 2GB PST limit.
Account Rights
Just like in case of ExMerge it is easy to predict that access rights will be causing most headaches. The account used to run the cmdlets must be assigned:
-
Local Administrator on the XP machine.
-
Exchange Server Administrator Role on the target Exchange 2007 mailbox server.
For this article I created a new user named PSTAdmin. We can normally work with existing user accounts. However if we run into access rights problems, creating a new account helps starting afresh.


Assign the Exchange Server Administrator Role
-
Open the Management Console, right-click the Organization Configuration and select Add Exchange Administrator.
-
Click on browse to select the PSTAdmin account.
-
Select ‘Exchange Server Administrator role’
-
Complete the wizard. This will return a warning saying:
«To fully administer exchange server, you need to manually add the user or group ‘dom1.local/Users/ PSTAdmin’ to the built-in local administrators group on server ‘PCBOX’.»
From my experience this was not necessary for these cmdlets. If your experience is different please post a comment!
Allowing Mailbox Access
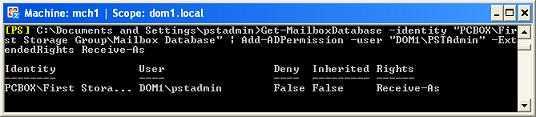
Get-MailboxDatabase -identity «PCBOX\First Storage Group\Mailbox Database» | Add-ADPermission -user «DOM1\PSTAdmin» -ExtendedRights Receive-As
Here we are piping the results of Get-MailboxDatabase to Add-ADPermission. Add-ADPermission is fed with the account (DOM1\PSTAdmin) for which the extended right Receive-As is to be set.
Initial ExMerge Installation Steps
In Meeting the ExMerge Requirements, we installed ExMerge on Windows XP/2000 to run against Exchange 2000/2003. The procedure for Exchange 2007 is very similar and I will refer you to various parts of this article.
In earlier Exchange versions it was possible to run ExMerge directly on the Exchange server machine. However this is not the case with Exchange 2007. Here we will employ the ExMerge included with the Exchange 2003 Tools and this cannot be mixed with Exchange 2007. Thus we will again install ExMerge on a separate Windows XP machine.
There is nothing new with the installation of ExMerge itself. We can simply follow the steps described in Meeting the ExMerge Requirements. Just read through the first page of this article including the headings Installing the Exchange System Management Tools and Install ExMerge. Yes we need to install the Exchange 200x System Management Tools. Although we don’t need a running Exchange 2000/2003 server this component is necessary to satisfy the ExMerge dependencies.
I performed this procedure on a fresh domain where no earlier Exchange version was ever installed. Because of this on installing the System Management Tools a warning popped reporting that the Schema was never extended for Exchange 2003. If you get this just ignore it.