
Adding Property pages
To provide the property page:
- derive a class from
- Implement for your Scope Pane or Result Pane Item
- Implement for your Scope Pane or Result Pane Item
- Enable the verb. I did it in
- Save a pointer to parent class to exchange the data if needed
-
You can use the function of your property page class
which will translate to .You have to override the
Notify function of derived class and provide the
implementation for == NULL case and handle theMMCN_PROPERTY_CHANGE
event.
(Side Note: There are different predefined MMC verbs that
can be used such as , , ,
etc… Enabling
MMC Standard Verbs (MSDN))
If you want to display Property Page and not use the MMC’s Properties menu,
you have to do so using the . Look under the Adding Wizard
section later for details. Adding
Property Pages (MSDN)
Using Cmdkey
In first two scenarios you can use Cmdkey.exe. This tools enables you to create, list and delete stored usernames and passwords or credentials. In this case you want to use cmdkey to create a stored username and password for the remote server on the client/server you want to use to remotely manage the server. The command will look something like:
cmdkey /add:ServerName /user:Servername\administrator /pass:*
Note:This command will ensure the entered username and password will be used by default to access the server over the network. In some situations this will pose a security risk.
Alternatively you can use the User Accounts portion of the Control Panel to administer these network passwords. When you open User Accounts, there is a shortcut named Manage your network passwords. When you click the shortcut you can add, remove, edit network passwords. It also alows for backing up and restoring your list with Stored User Names and Passwords.
Concluding
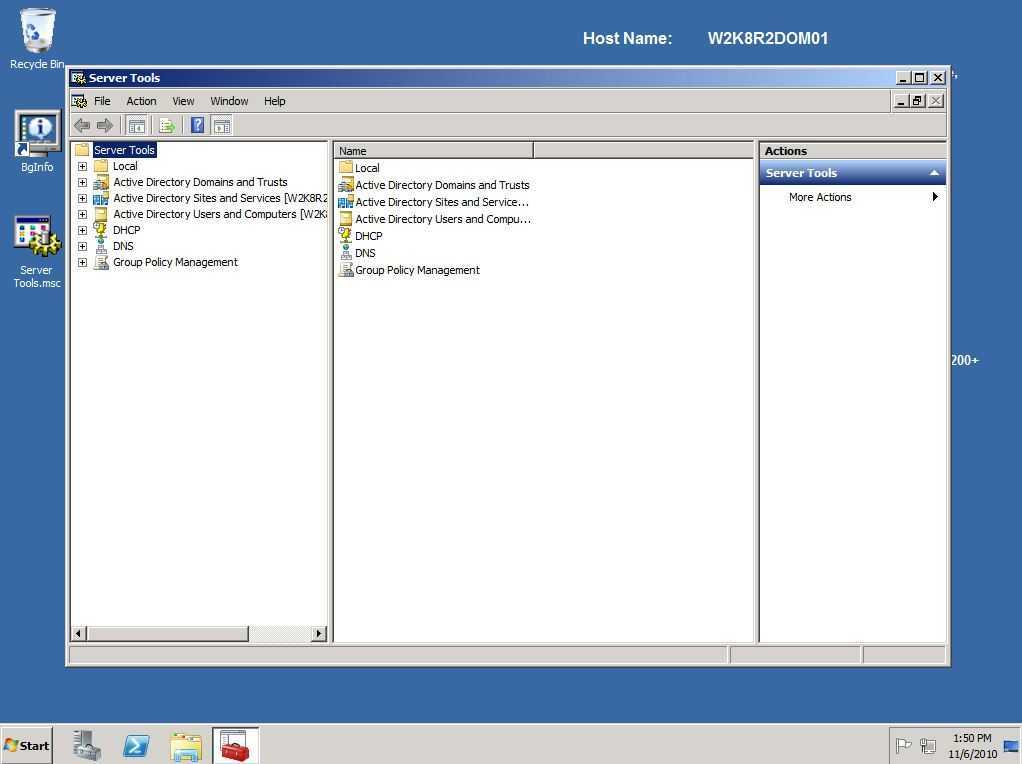
Why struggle with the command line on the console of your Server Core when you can manage it remotely using Microsoft Management Console (MMC) Snap-ins?
Stay tuned, because I’m also looking at the Remote Server Administration Tools (RSAT), and the Hyper-V Release Candidate 0 Management tools. More posts on managing Server Core usng Microsoft Management Console are definitely on their way!
Adding Property pages
To provide the property page:
- derive a class from
- Implement for your Scope Pane or Result Pane Item
- Implement for your Scope Pane or Result Pane Item
- Enable the verb. I did it in
- Save a pointer to parent class to exchange the data if needed
-
You can use the function of your property page class
which will translate to .You have to override the
Notify function of derived class and provide the
implementation for == NULL case and handle theMMCN_PROPERTY_CHANGE
event.
(Side Note: There are different predefined MMC verbs that
can be used such as , , ,
etc… Enabling
MMC Standard Verbs (MSDN))
If you want to display Property Page and not use the MMC’s Properties menu,
you have to do so using the . Look under the Adding Wizard
section later for details. Adding
Property Pages (MSDN)
Introduction
This article tries to show how to implement
basic MMC Snap-in features using ATL and gives you a starting
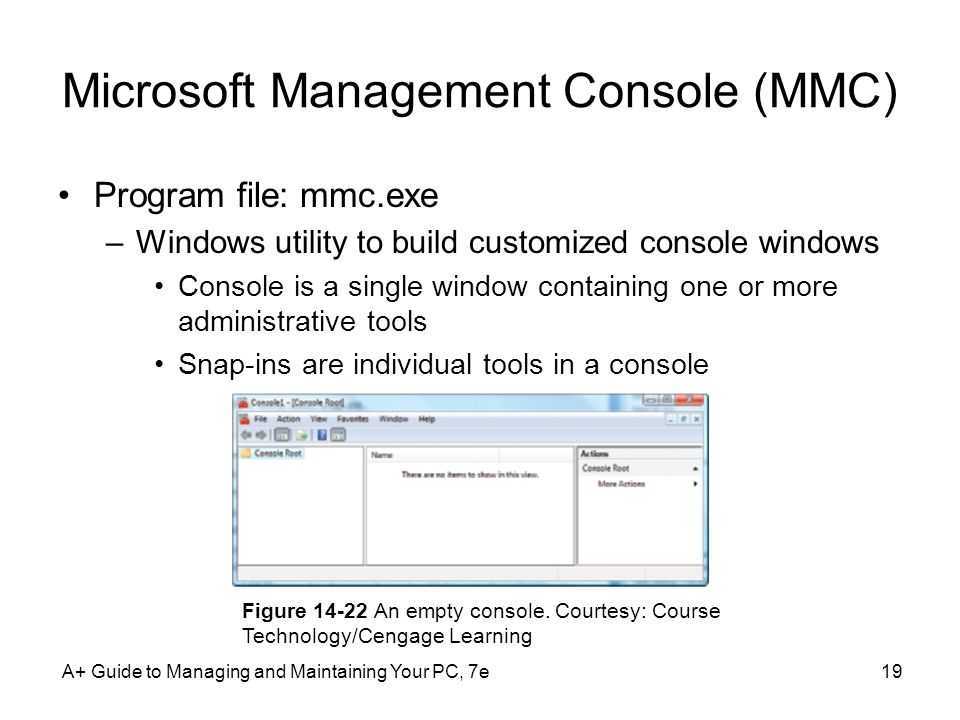
point. The MMC Snap-in is a COM in-process server DLL. MMC stands for
Microsoft Management Console and is designed to simplify and unify the different
tasks and GUI elements for the end user. Some of the examples that use MMC
as a hosting environment include Event Viewer, NT Services configuration GUI,
Indexing Service, Win2k Disk Defragmenter, Device Manager, and many
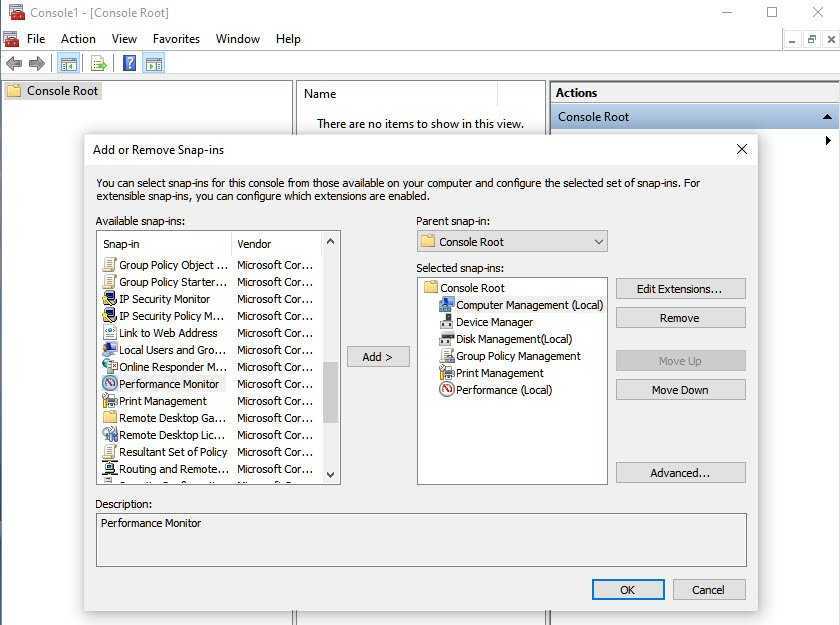
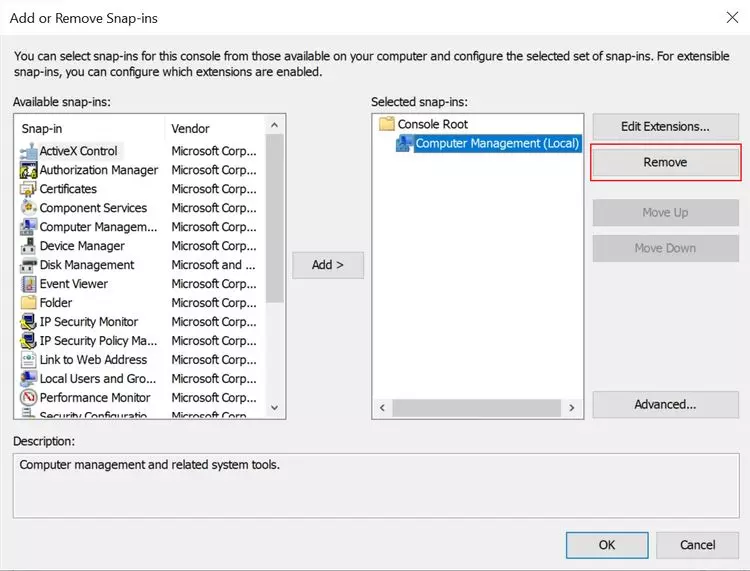
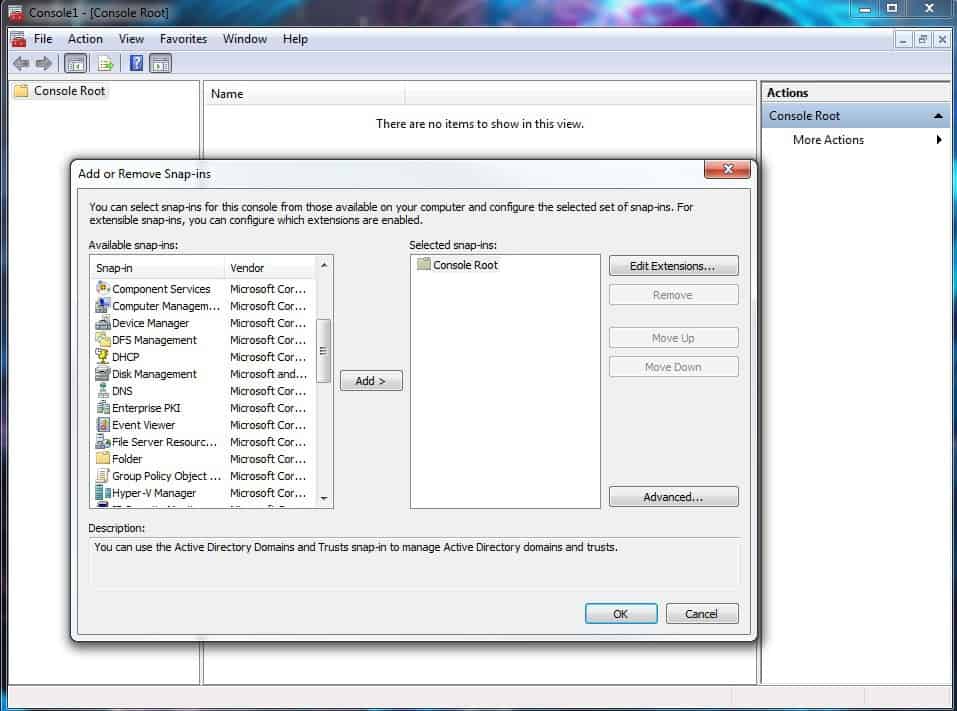
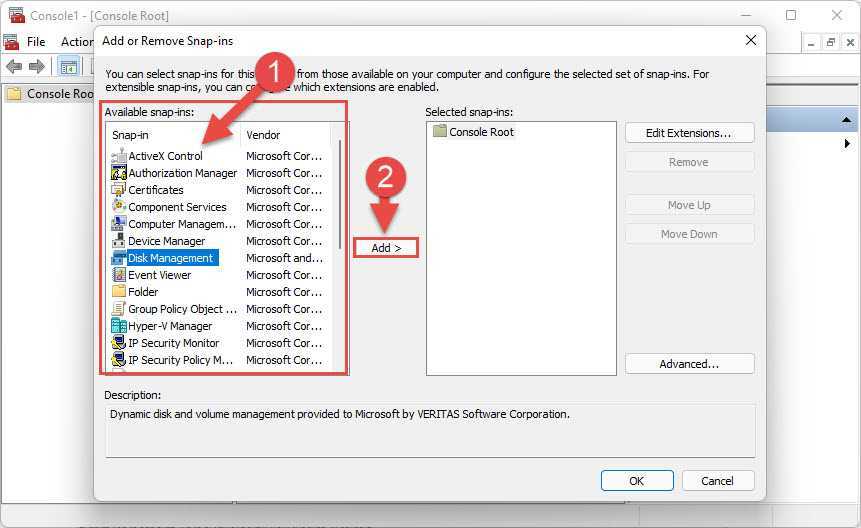
others. You can view the list on your machine by running mmc.exe and
choosing menu Console | Add/Remove Snap-in | Add. The MMC framework
provides no management by itself, but only unified graphical interface for
hosting snap-ins. MMC is not a solution for everything. It’s just
another option that you have. It’s up to you to see the applicability of
MMC to your particular needs. This article only describes Primary Snap-Ins
(Non Extension).
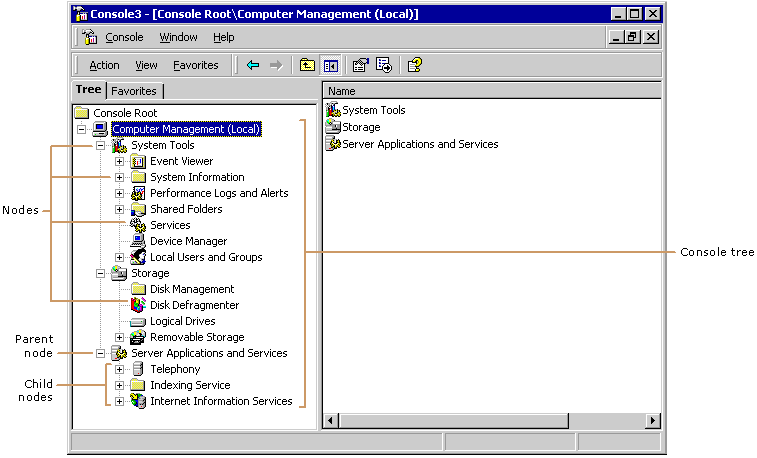
MMC GUI has several elements to it.
- Scope Panes — Console Tree which is normally on the left pane.
Starts with a Static node which can have children. - Result Panes — List View, Taskpad View, ActiveX control, and Web Page
normally on the right pane. Usually appears when user selects a node
from Console tree. - Context menus — Popup menu when user right clicks Scope Pane or Result
Pane. - Toolbars and menus
- Property Sheets — When user chooses Properties for scope or result pane
items, MMC allows developer to add property pages. - Wizards
- Taskpads
Key Required Interfaces:
Note:The following links point to MSDN pages that have UML diagrams and explain
in details the communication between MMC and your Snap-In. Even though it’s
based on the C++ samples that they provide, it can still be followed easily.
-
— Initializing
CComponentData and Displaying the Snap-in Root Node (MSDN) -
— Creating
CComponent and Expanding the Snap-in Root Node (MSDN) -
— Data
Objects and MMC (MSDN) - IConsole(2) — Implemented by MMC. Used by Snap-in to manipulate Scope or
Result panes. The IConsole passed to IComponent::Initialize represents
Result pane. The passed to represents
Scope Pane.(Note: Each and gets its own private
(2) interface pointer. Do not mix them.)
The only help I found on the subject at the time was MSDN. I strongly suggest
learning MMC Snap-Ins framework through the various C++ Samples and Diagrams at
Sample
Snap-ins Discussion (MSDN).
Adding the Items
Any new Scope Node or Result Itemwill inherit from . The
items in MMC are represented by the and
structures.To add the items to the Result Pane:
- Derive another which will represent result items. Define the
clipboard vars. I set the GUID to . -
MMCN_SHOW — respond to this message from MMC in
Notify. We simply call virtual function. Insert the
columns/items. -
— set the params depending on what you need. Listview,
Taskpad or ActiveX ctrl. -
— calls virtual to get the list
item.
To add items to the Scope Pane:
- Derive another class from which will represent scope items.
Define the clipboard vars. - Createa member of your new classin parent node class.
-
MMCN_EXPAND — handle this message from MMC. We simply
call our virtual . - Define the clipboard format values (, ,
, , )
ATL Implementation
Create a new
ATL COM AppWizard project for in-process COM server. Insert New ATL Object | MMC
Snap-in. For the name put Simple. For MMC Snap-in property page leave the
defaults and choose , , and
IExtendControlBar
All Snap-ins get installed under
HKEY_LOCAL_MACHINE\Software\Microsoft\MMC\SnapIns reg key.
The following values are valid under this key:
-
NameString — Displayed during Add/Remove Snap-in Dialog. If not
specified, Snap-in appears without name. -
About — CLSID of the about object. Used during Add/Remove Snap-in
to provide the version and copyright info as well as the Snap-in icon.
If not specified, no about information will be available to end user and
default icon for the Snap-in will be used, which is generic folder icon. -
StandAlone — The key indicatesthat this is a Primary
Snap-in; that is, it can be used stand alone and doesn’t extend any other
Snap-ins. -
NodeTypes — Contains values that represent Snap-ins nodes.
You should list your nodes here only if you want them to be extended by other
Extension Snap-ins. The wizard adds our static node here, it
assumes that we will allow Extension Snap-ins to be written for it.
ISnapInAbout
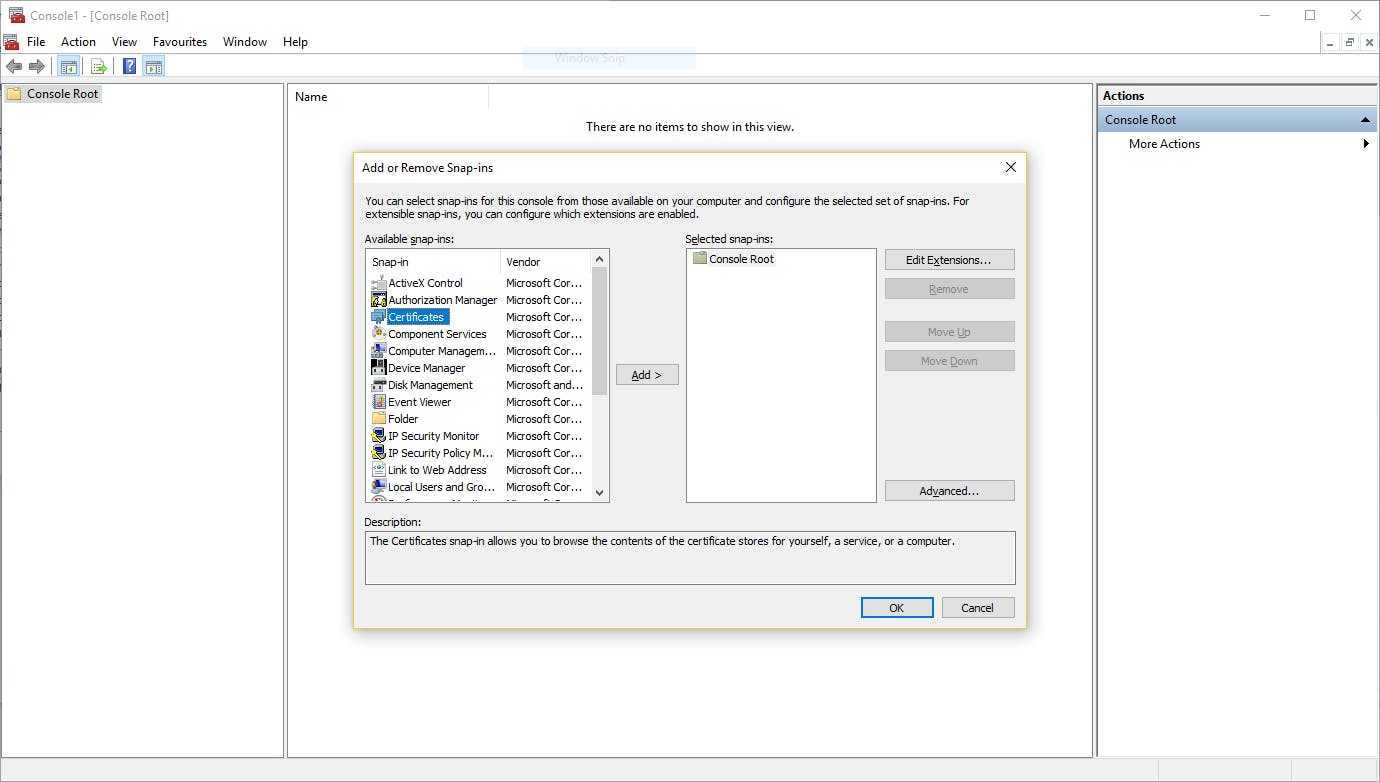
Let’s start with the simple part of MMC, the
interface. This interface is responsible for providing the copyright and
version info, etc. to the user. The info is only visible when the Snap-in
is being inserted through Add/Remove Snap-ins dialog:
It is implemented in a separate COM class for efficiency since it’s role as
you can see is very minimal. It has very trivial methods. Adding
About Information (MSDN)
![Администрирование операционной системы windows [реферат №9020]](https://robotrackkursk.ru/wp-content/uploads/4/f/1/4f1f9ae63920d0098c5607e38ad4600d.jpeg)
ATL Implementation
Create a new
ATL COM AppWizard project for in-process COM server. Insert New ATL Object | MMC
Snap-in. For the name put Simple. For MMC Snap-in property page leave the
defaults and choose , , and
IExtendControlBar
All Snap-ins get installed under
HKEY_LOCAL_MACHINE\Software\Microsoft\MMC\SnapIns reg key.
The following values are valid under this key:
-
NameString — Displayed during Add/Remove Snap-in Dialog. If not
specified, Snap-in appears without name. -
About — CLSID of the about object. Used during Add/Remove Snap-in
to provide the version and copyright info as well as the Snap-in icon.
If not specified, no about information will be available to end user and
default icon for the Snap-in will be used, which is generic folder icon. -
StandAlone — The key indicatesthat this is a Primary
Snap-in; that is, it can be used stand alone and doesn’t extend any other
Snap-ins. -
NodeTypes — Contains values that represent Snap-ins nodes.
You should list your nodes here only if you want them to be extended by other
Extension Snap-ins. The wizard adds our static node here, it
assumes that we will allow Extension Snap-ins to be written for it.
ISnapInAbout
Let’s start with the simple part of MMC, the
interface. This interface is responsible for providing the copyright and
version info, etc. to the user. The info is only visible when the Snap-in
is being inserted through Add/Remove Snap-ins dialog:
It is implemented in a separate COM class for efficiency since it’s role as
you can see is very minimal. It has very trivial methods. Adding
About Information (MSDN)
Механика Windows Console
Так что внутри консоли Windows?
Client Server Runtime Subsystem (CSRSS)
- conhost.exe — пользовательский режим консоли Windows UX и механика командной строки
- condrv.sys — драйвер ядра Windows, обеспечивающий коммуникации между conhost и одной или несколькими оболочками командной строки/инструментами/приложениями
-
ConDrv.sys — драйвер режима ядра
- Обеспечивает высокопроизводительный канал связи между консолью и любыми подключенными приложениями командной строки
- Переносит туда и обратно сообщения IO Control (IOCTL) между приложениями командной строки и консолью, к которой они «прикреплены»
- Консольные сообщения IOCTL содержат:
- Данные, представляющие запросы на выполнение вызовов API для экземпляра консоли
- Текст, отправляемый из консоли в приложение командной строки
-
ConHost.exe — приложение Win32 GUI:
-
ConHost Core — внутренности и механика
- Сервер API: преобразует сообщения IOCTL, полученные из приложений командной строки, в вызовы API и отправляет текстовые записи из консоли в приложение командной строки
- API: реализует консольный API Win32 и логику для всех операций, которые консоль может попросить выполнить
- Буфер ввода: хранит записи событий клавиатуры и мыши, генерируемые пользовательским вводом
- VT Parser: если включен, анализирует последовательности VT, извлекает их из текста и генерирует эквивалентные вызовы API
- Буфер вывода: хранит текст, отображаемый на дисплее консоли. По сути, это 2D-массив структур CHAR_INFO, которые содержат символьные данные и атрибуты каждой ячейки (подробнее о буфере ниже)
- Другое: в схему не включены инфраструктура сохранения/извлечения значений из реестра и/или файлов ярлыков и т.д.
-
Console UX App Services — слой UX и UI
- Управляет макетом, размером, положением и прочими характеристиками окна консоли на экране
- Отображает и обрабатывает параметры UI и т.д.
- Прокачивает очередь сообщений Windows, обрабатывает их и преобразует введённые пользователем данные в записи событий клавиш и мыши, сохраняя их во входном буфере
-
ConHost Core — внутренности и механика
Introduction
This article tries to show how to implement
basic MMC Snap-in features using ATL and gives you a starting
point. The MMC Snap-in is a COM in-process server DLL. MMC stands for
Microsoft Management Console and is designed to simplify and unify the different
tasks and GUI elements for the end user. Some of the examples that use MMC
as a hosting environment include Event Viewer, NT Services configuration GUI,
Indexing Service, Win2k Disk Defragmenter, Device Manager, and many
others. You can view the list on your machine by running mmc.exe and
choosing menu Console | Add/Remove Snap-in | Add. The MMC framework
provides no management by itself, but only unified graphical interface for
hosting snap-ins. MMC is not a solution for everything. It’s just
another option that you have. It’s up to you to see the applicability of
MMC to your particular needs. This article only describes Primary Snap-Ins
(Non Extension).
MMC GUI has several elements to it.
- Scope Panes — Console Tree which is normally on the left pane.
Starts with a Static node which can have children. - Result Panes — List View, Taskpad View, ActiveX control, and Web Page
normally on the right pane. Usually appears when user selects a node
from Console tree. - Context menus — Popup menu when user right clicks Scope Pane or Result
Pane. - Toolbars and menus
- Property Sheets — When user chooses Properties for scope or result pane
items, MMC allows developer to add property pages. - Wizards
- Taskpads
Key Required Interfaces:
Note:The following links point to MSDN pages that have UML diagrams and explain
in details the communication between MMC and your Snap-In. Even though it’s
based on the C++ samples that they provide, it can still be followed easily.
-
— Initializing
CComponentData and Displaying the Snap-in Root Node (MSDN) -
— Creating
CComponent and Expanding the Snap-in Root Node (MSDN) -
— Data
Objects and MMC (MSDN) - IConsole(2) — Implemented by MMC. Used by Snap-in to manipulate Scope or
Result panes. The IConsole passed to IComponent::Initialize represents
Result pane. The passed to represents
Scope Pane.(Note: Each and gets its own private
(2) interface pointer. Do not mix them.)
The only help I found on the subject at the time was MSDN. I strongly suggest
learning MMC Snap-Ins framework through the various C++ Samples and Diagrams at
Sample
Snap-ins Discussion (MSDN).
История версий
- MMC 1.0, поставляется с Windows NT 4.0 Option Pack.
- MMC 1.1, поставляется с SQL Server 7.0 и Systems Management Server 2.0, а также доступны для загрузки для версий Windows 9x и Windows NT. Новые возможности:
- Панели задач оснастки
- Листы свойств в стиле мастера
- Возможность загрузки расширений в оснастку во время выполнения
- HTML Справочная поддержка
- MMC 1.2, поставляемая с Windows 2000. Новые возможности:
- Поддержка установщика Windows и групповой политики
- Отфильтрованные представления
- Экспорт представлений списка в текстовый файл
- Сохранение настраиваемых пользователем макетов столбцов (т. е. ширины, порядка, видимости и сортировки списков)
- MMC 2.0, поставляемый с Windows XP и Windows Server 2003. Новые возможности:
- Визуальные стили, определенные операционной системой
- Объектная модель автоматизации, позволяющая программно использовать возможности оснастки MMC извне самой MMC (например, из сценария)
- 64-разрядные оснастки
- панели задач консоли
- Просмотр расширений
- многоязычный пользовательский интерфейс файлы справки
- MMC 3.0, поставляемые с Windows Server 2003 SP2, Windows XP SP3 и последующие версии Windows. Также можно загрузить для Windows XP SP2 и Windows Server 2003 SP1. Новые возможности:
- Новая «панель действий», отображаемая с правой стороны пользовательского интерфейса MMC, которая отображает доступные действия для текущего выбранного узла
- Поддержка разработки оснасток с .NET Framework, включая Windows Forms
- Уменьшение объема кода, необходимого для создания оснастки
- Улучшенные возможности отладки
- Модель асинхронного пользовательского интерфейса (Только оснастки MMC 3.0)
- Поддержка значков True Color (только для Windows Vista)
- Новый пользовательский интерфейс добавления / удаления оснастки
- DEP всегда применяется. Все оснастки должны поддерживать DEP.
Run a program as administrator or as another user
To run a program as administrator from the Start screen or Start menu
-
On the Start screen or Start menu, navigate to the app that you want to run as Administrator.
-
Right-click the app shortcut or tile, and then click Run as administrator.
To run a program as administrator from the desktop
-
Right-click the executable file in File Explorer, or right-click the program shortcut on the desktop.
-
Click Run as administrator.
To run a program as another user
-
Do one of the following.
-
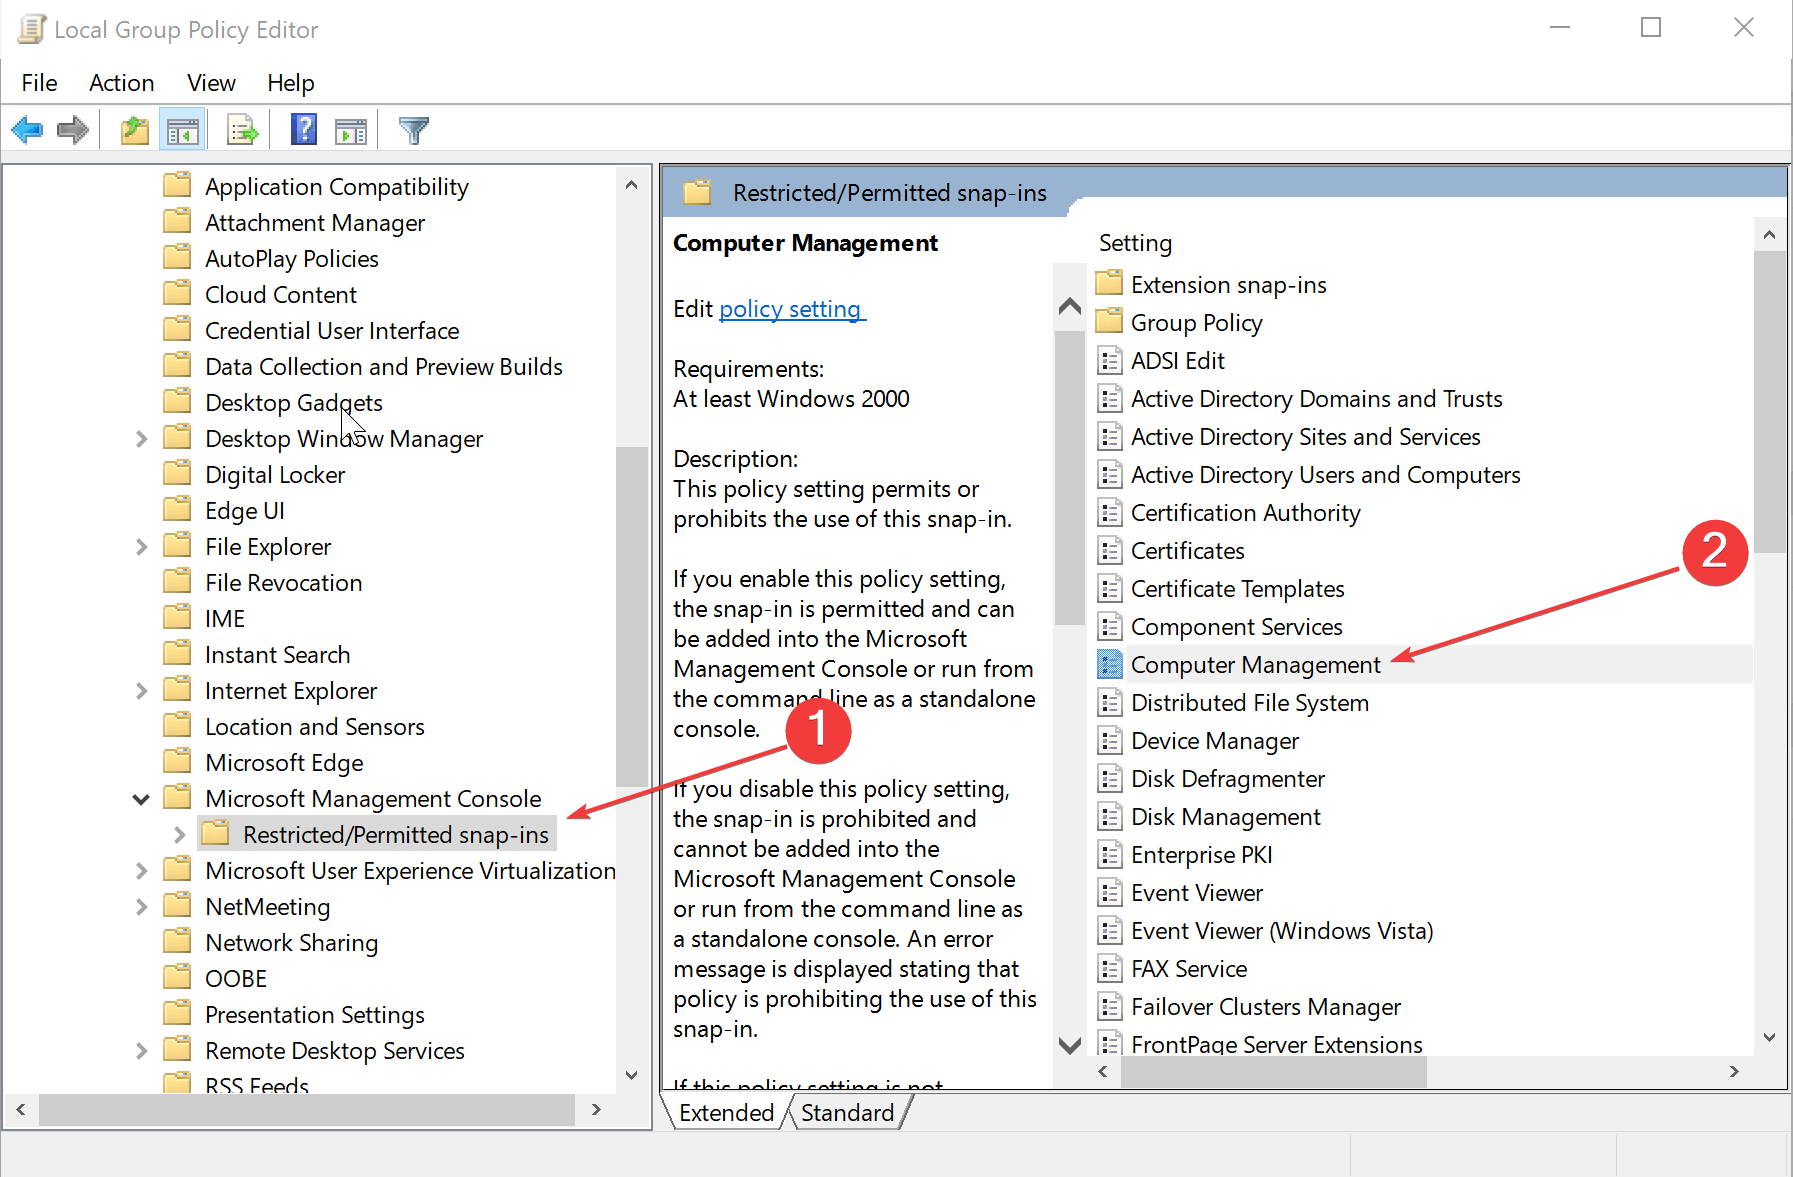
Add the Run as a different user command to the app bar by enabling the following Group Policy setting: User Configuration/Administrative Templates/Start Menu and Taskbar/Show «Run as different user» command on Start. To start Local Group Policy Editor, on the Start screen, type gpedit.msc, and then press Enter.
-
Use the runas command from a command prompt. For more information about how to use the runas command, at a command prompt, type runas /?, and then press Enter.
-
Adding Property pages
To provide the property page:
- derive a class from
- Implement for your Scope Pane or Result Pane Item
- Implement for your Scope Pane or Result Pane Item
- Enable the verb. I did it in
- Save a pointer to parent class to exchange the data if needed
-
You can use the function of your property page class
which will translate to .You have to override the
Notify function of derived class and provide the
implementation for == NULL case and handle theMMCN_PROPERTY_CHANGE
event.
(Side Note: There are different predefined MMC verbs that
can be used such as , , ,
etc… Enabling
MMC Standard Verbs (MSDN))
If you want to display Property Page and not use the MMC’s Properties menu,
you have to do so using the . Look under the Adding Wizard
section later for details. Adding
Property Pages (MSDN)
Introduction
This article tries to show how to implement
basic MMC Snap-in features using ATL and gives you a starting
point. The MMC Snap-in is a COM in-process server DLL. MMC stands for
Microsoft Management Console and is designed to simplify and unify the different
tasks and GUI elements for the end user. Some of the examples that use MMC
as a hosting environment include Event Viewer, NT Services configuration GUI,
Indexing Service, Win2k Disk Defragmenter, Device Manager, and many
others. You can view the list on your machine by running mmc.exe and
choosing menu Console | Add/Remove Snap-in | Add. The MMC framework
provides no management by itself, but only unified graphical interface for
hosting snap-ins. MMC is not a solution for everything. It’s just
another option that you have. It’s up to you to see the applicability of
MMC to your particular needs. This article only describes Primary Snap-Ins
(Non Extension).
MMC GUI has several elements to it.
- Scope Panes — Console Tree which is normally on the left pane.
Starts with a Static node which can have children. - Result Panes — List View, Taskpad View, ActiveX control, and Web Page
normally on the right pane. Usually appears when user selects a node
from Console tree. - Context menus — Popup menu when user right clicks Scope Pane or Result
Pane. - Toolbars and menus
- Property Sheets — When user chooses Properties for scope or result pane
items, MMC allows developer to add property pages. - Wizards
- Taskpads
Key Required Interfaces:
Note:The following links point to MSDN pages that have UML diagrams and explain
in details the communication between MMC and your Snap-In. Even though it’s
based on the C++ samples that they provide, it can still be followed easily.
-
— Initializing
CComponentData and Displaying the Snap-in Root Node (MSDN) -
— Creating
CComponent and Expanding the Snap-in Root Node (MSDN) -
— Data
Objects and MMC (MSDN) - IConsole(2) — Implemented by MMC. Used by Snap-in to manipulate Scope or
Result panes. The IConsole passed to IComponent::Initialize represents
Result pane. The passed to represents
Scope Pane.(Note: Each and gets its own private
(2) interface pointer. Do not mix them.)
The only help I found on the subject at the time was MSDN. I strongly suggest
learning MMC Snap-Ins framework through the various C++ Samples and Diagrams at
Sample
Snap-ins Discussion (MSDN).
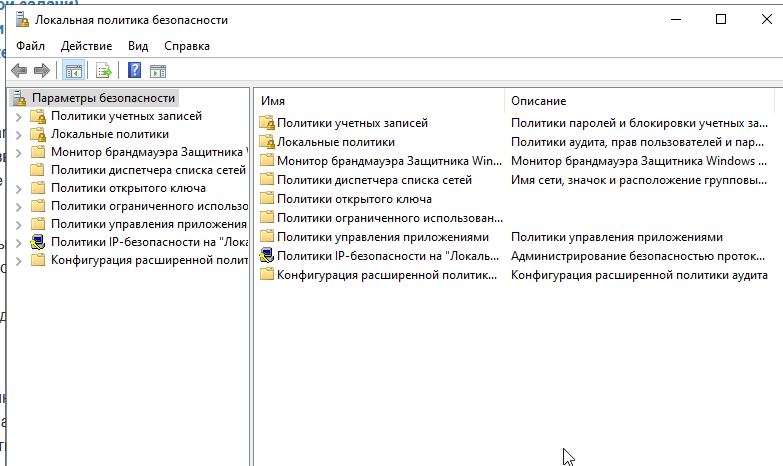
2.6 Локальная политика безопасности
Представим, что у пользователя имеется какой-либо объект. Например, рабочий стол операционной системы Windows. Он имеет определенные свойства. К ним относится и фоновый рисунок, и заставка для экрана, и тому подобное. У пользователя есть возможность изменения любого из всех этих перечисленных свойств. Политика – это точно такие же свойства какого-нибудь объекта. Только приоритет гораздо выше, оно задается администратором конкретной системы. Если она будет определена, то у вас уже не будет возможности самостоятельно изменить свойства этого объекта, поскольку в этом случае будет постоянно использоваться значение политики. Если администратором была создана политика, которая задает определенный фон для вашего рабочего стола, и она будет активна, то у вас уже не будет возможности поменять данные свойства. Пользователь уже не сможет сменить этот фон. Локальная политика безопасности Windows 7 позволяет менять политики, которые относятся к безопасности. Запуск данной функции производится через стартовое меню. Зайдя в него, вам будет необходимо перейти в администрирование, где и будет находиться локальная политика безопасности. Windows ХР позволяет точно так же изменять свойства, относящиеся к безопасности. Стоит отметить, что обычным пользователям совсем неинтересны такие настройки. Также можно вызвать (через стартовое меню и функцию «Выполнить») определенный редактор. Для этого необходимо ввести команду gpedit.msc и нажать клавишу ввода. Локальная политика безопасности может быть отредактирована данным интерфейсом. В этом окне находится множество настроек, необходимых при работе с большим числом пользователей на компьютере или в локальной сети, вплоть до установления срока работы пароля на определенной учетной записи или ограниченного числа ввода неверных данных для входа в систему. Пользователю домашнего персонального компьютера, который использует только он, в данную папку можно и не заходить.
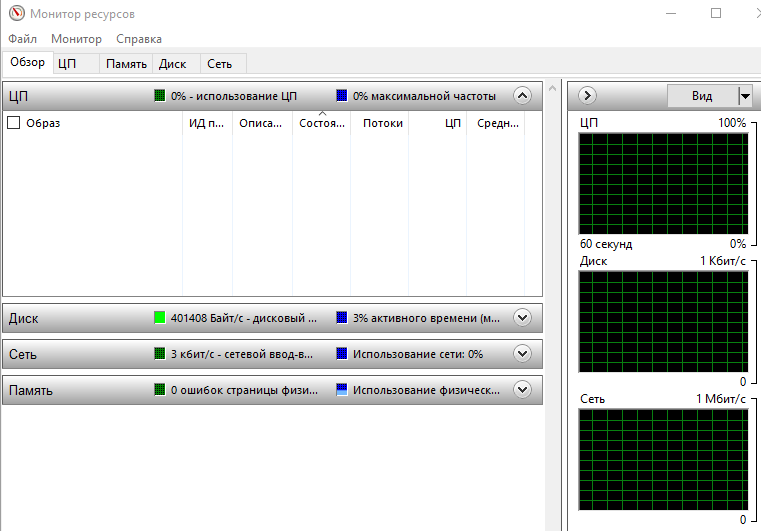
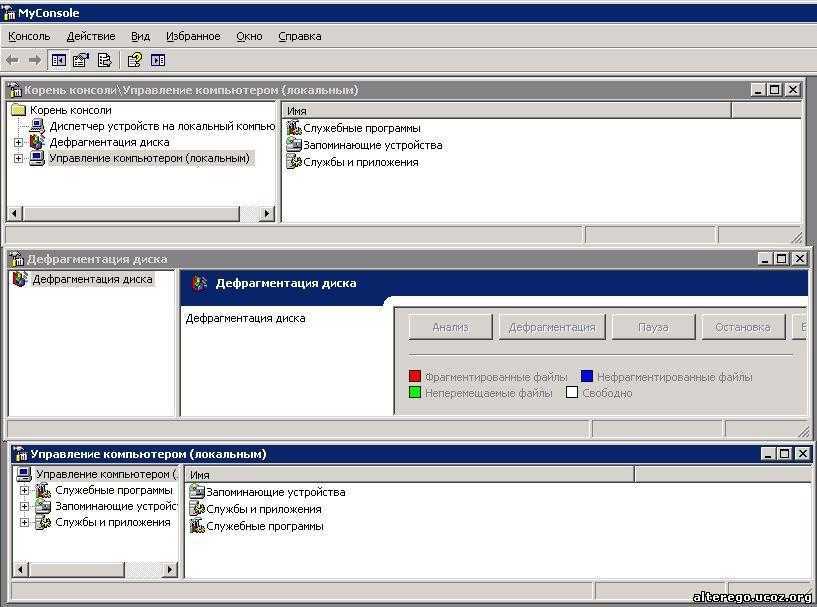
2.7 Монитор ресурсов
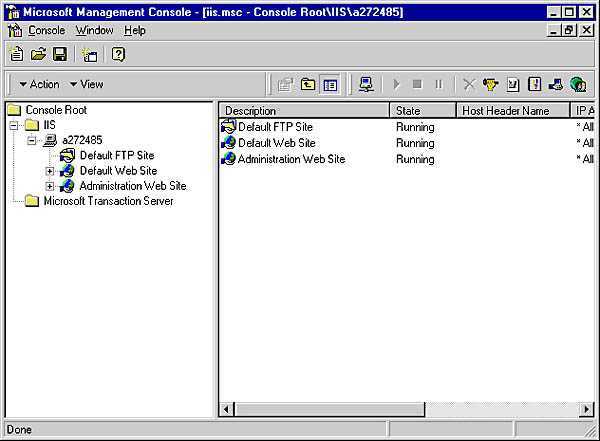
Монитор ресурсов. Для рядового пользователя ОС то же самое, что «Системный монитор», только информации о работе устройства намного больше. Очень удобно, когда нужно узнать, насколько грузит процессор оперативную память или сколько данных передает через сеть определенное приложение. При открытии программы «Монитор ресурсов» мы видим окно, экранная копия которого представлена на рисунке ниже.
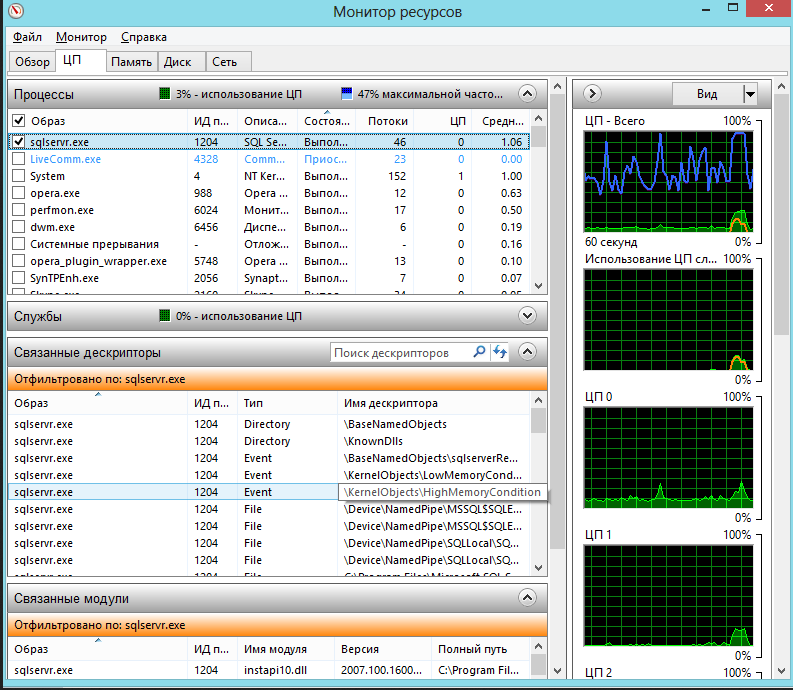
Монитор ресурсов Windows 10: вкладка «Центральный процессор». В разделе «Процессы» (ЦП) показаны процессы, которые запущены в данный момент времени. В списке показано имя исполняемого файла, а также ряд показателей, которые связаны с ним. Опишу подробнее слева-направо:
- Образ – имя исполняемого файла. Как правило, это и имя процесса, который использует ресурсы процессора.
- ИД процесса – своеобразный идентификатор процесса. Он пригождается в случае, когда управление процессами осуществляется с помощью других утилит, а также для поиска процессов в Диспетчере задач
- Описание – краткое описание, которое показывает назначение данного процесса.
- Состояние – текущее состояние процесса: обычно процесс имеет статус «Выполняется», реже – «Прерван»
- Потоки – графа показывает количество активных потоков.
- ЦП – выводится текущий процент загрузки процессора данным процессом (сколько ресурсов процессора тратится на выполнение данного процесса).
- Среднее для ЦП – показывает среднее потребление ресурсов процессора за промежуток времени (1 минута). Данный показатель показывает состояние системы в последнюю минуту.
Adding the Items
Any new Scope Node or Result Itemwill inherit from . The
items in MMC are represented by the and
structures.To add the items to the Result Pane:
- Derive another which will represent result items. Define the
clipboard vars. I set the GUID to . -
MMCN_SHOW — respond to this message from MMC in
Notify. We simply call virtual function. Insert the
columns/items. -
— set the params depending on what you need. Listview,
Taskpad or ActiveX ctrl. -
— calls virtual to get the list
item.
To add items to the Scope Pane:
- Derive another class from which will represent scope items.
Define the clipboard vars. - Createa member of your new classin parent node class.
-
MMCN_EXPAND — handle this message from MMC. We simply
call our virtual . - Define the clipboard format values (, ,
, , )
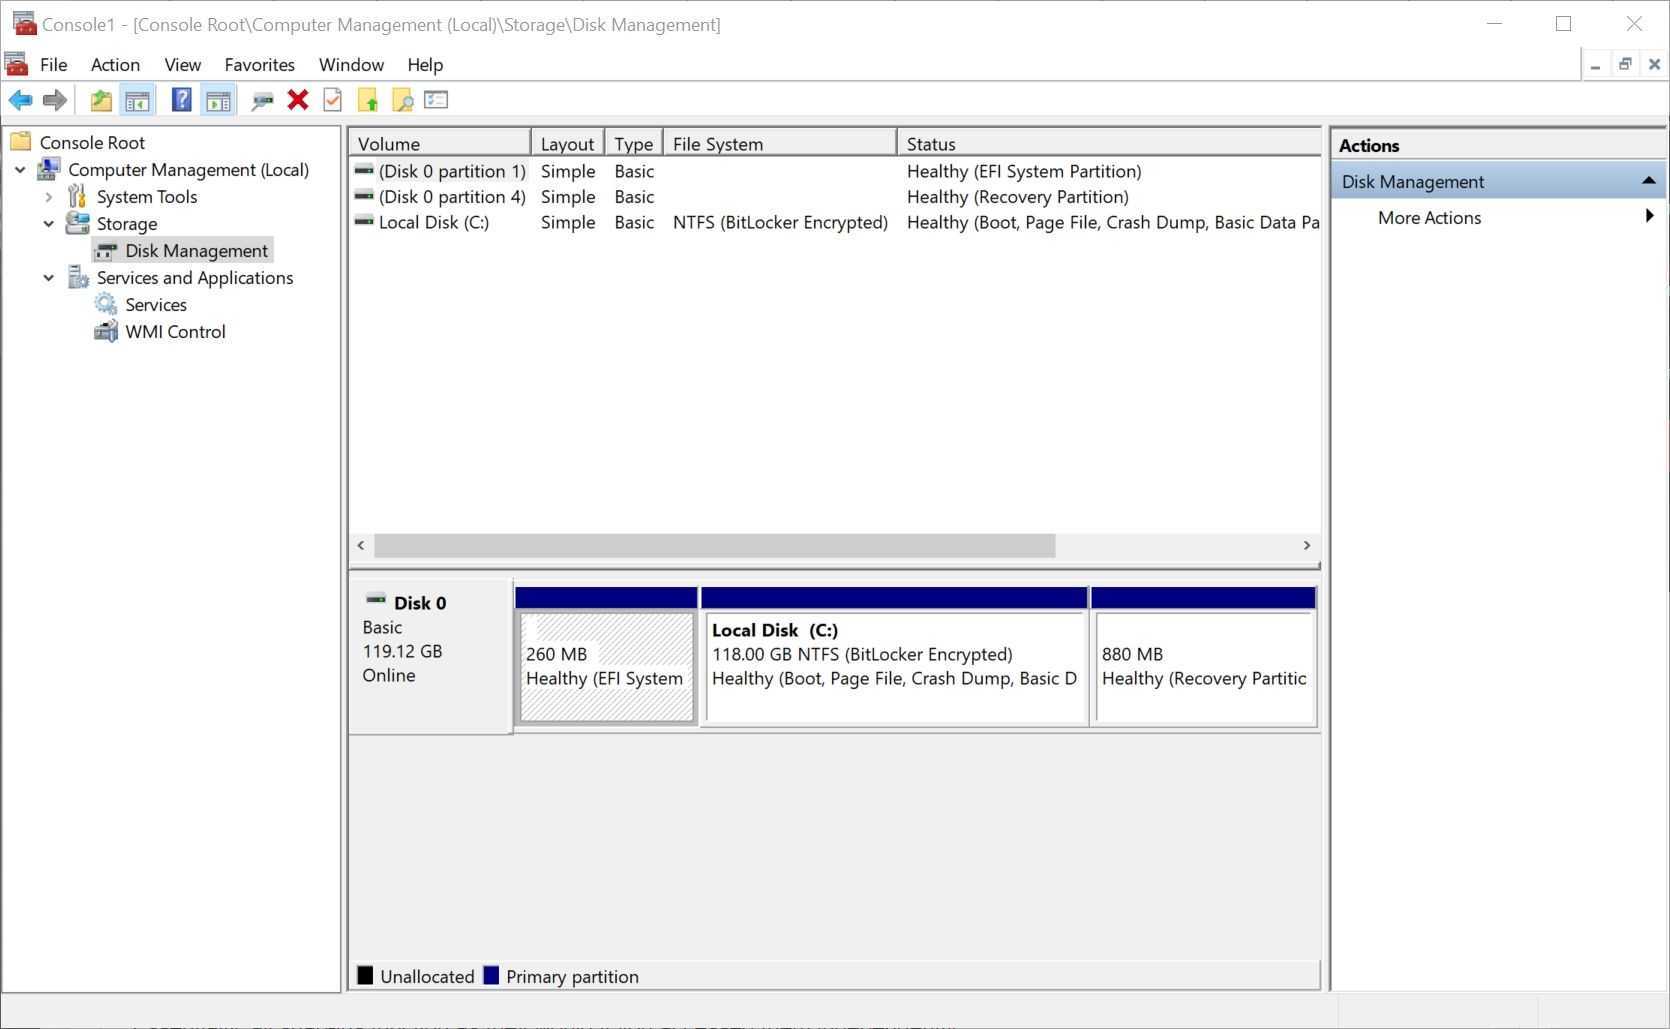
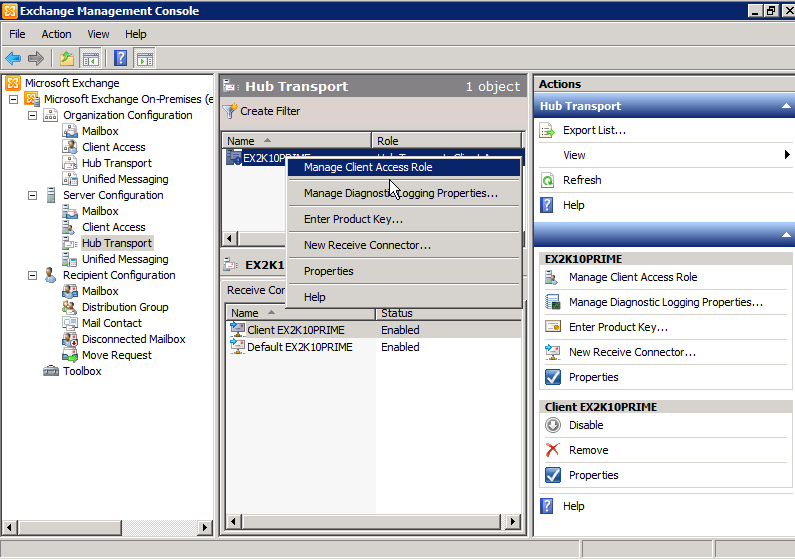
Services and Applications
In the context of Server Core management the only two interesting things to mention in the Services and Application folder of Computer Management is the Services MMC Snap-in (services.msc) and the WMI Snap-In (wmimgmt.msc). They work just like the Snap-ins on Full installations of Windows Server 2008.
Delegation Considerations
If delegation is used in your scenario you can actually use the Windows Firewall to finely grained control who from where has access to what. The Windows Firewall in Windows Server 2008 actually has a lot of firewall rules (and rule groups) that are extremely useful for delegation.
These rule groups work, without enabling any other rule group to perform specific management tasks:
- Remote Event Log Management
- Remote Scheduled Task Management
- Remote Service Management
- Windows Firewall Remote Management
- Performance Logs and Alerts
You can enable each of these groups using the command above. For example, to allow Windows Firewal Remote Management, simply type the following command on the console of your Server Core box:
netsh advfirewall firewall set rule group=»Windows Firewall Remote Management» new enable=yes
Delegation can be extremely useful when combined with the Advanced Firewall security . The latter allows you to filter the usage of the open Management firewall rules based on:
- Allow all connections, or only encrypted connections
- Specify specific programs or services the rule applies (not available for built-in rules)
- Specify specific ports or protocols the rule applies (not available for built-in rules)
- Specify which local IP address the rule applies to
- Specify which firewall profile (domain, private, local) the rule applies to
- Specify which type of connections (LAN, Wireless, Remote access) the rule applies to
- Specify which remote IP address (range) the rule applies to
- Only allow connections from specific computers
- Only allow connections from specific users
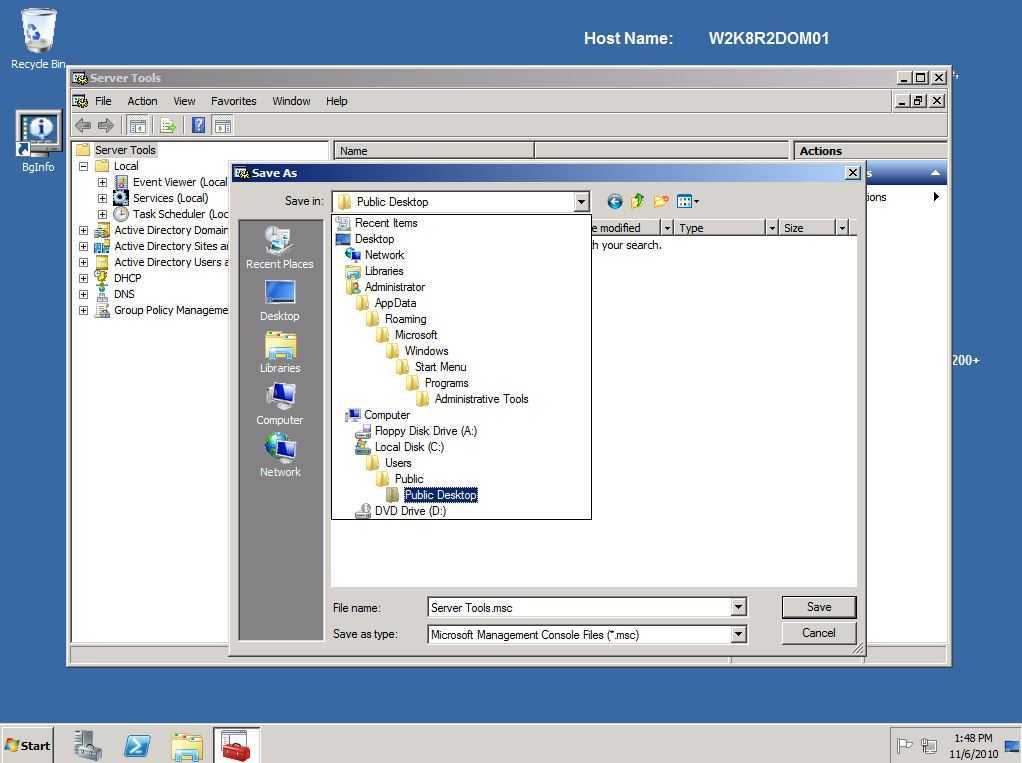
Logon Considerations
In certain scenarios you will need to provide additional credentials. These scenarios might include: (but are not limited to)
- The server to be managed and the client/server from which you want to manage the server are not part of the same domain and there is no trust between the domains.
- The server to be managed and the client/server from which you want to manage the server are part of a workgroup configuration
- You have setup your environment according to the principle of Least Administrative Privilege and use a (non-administrative) user account on your workstation and want to be able to manage your Server Core installation from the workstation.
Adding the Items
Any new Scope Node or Result Itemwill inherit from . The
items in MMC are represented by the and
structures.To add the items to the Result Pane:
- Derive another which will represent result items. Define the
clipboard vars. I set the GUID to . -
MMCN_SHOW — respond to this message from MMC in
Notify. We simply call virtual function. Insert the
columns/items. -
— set the params depending on what you need. Listview,
Taskpad or ActiveX ctrl. -
— calls virtual to get the list
item.
To add items to the Scope Pane:
- Derive another class from which will represent scope items.
Define the clipboard vars. - Createa member of your new classin parent node class.
-
MMCN_EXPAND — handle this message from MMC. We simply
call our virtual . - Define the clipboard format values (, ,
, , )
Представление общих диалоговых строк объекта ВСТАВКИ OLE
Отображаемое имя вставляемого объекта OLE можно реализовать как локализуемый строковый ресурс, связанный с кодом, реализующим этот объект. Диалоговое окно «Объект вставки OLE» получает отображаемое имя из раздела реестра HKCR\CLSID\{<GUID}, где GUID> определяет идентификатор класса вставленного объекта OLE. Windows Vista и более поздних версий реализуйте этот тип объекта локализуемым способом, используя отображаемое имя, совместимое с muI, которое позволяет настраивать язык пользовательского интерфейса. В отличие от этого, операционные системы предварительно Windows Vista реализуют отображаемое имя для этого типа объекта, используя значение по умолчанию соответствующего раздела реестра. Обычно это имя является английским (США) именем или именем в системном языке пользовательского интерфейса по умолчанию.
Примечание
Не все объекты, соответствующие подразделам раздела реестра, вставляются.
Значение по умолчанию ключа HKCR\CLSID\{<GUID>} должно сохранять понятное имя для обратной совместимости. Однако оно также должно определить значение LocalizedString в формате «», где путь определяет исполняемый файл, реализующий объект. Значение ResID указывает идентификатор ресурса локализуемой строки для отображаемого имени.
Например, скрипт регистрации для вставленного объекта Media Clip содержит следующие строки:
Первая строка обеспечивает обратную совместимость путем размещения простой текстовой строки в реестре в качестве отображаемого имени по умолчанию. Вторая строка предоставляет доступ к отображаемого имени, совместимого с muI. Он указывает идентификатор строки, хранящийся в Mplay32.exe. Строка с идентификатором 9217 в Mplay32.exe может быть связана со значениями строковых ресурсов для любого числа языков. Его английский (США) имя — Media Clip.
Adding the Items
Any new Scope Node or Result Itemwill inherit from . The
items in MMC are represented by the and
structures.To add the items to the Result Pane:
- Derive another which will represent result items. Define the
clipboard vars. I set the GUID to . -
MMCN_SHOW — respond to this message from MMC in
Notify. We simply call virtual function. Insert the
columns/items. -
— set the params depending on what you need. Listview,
Taskpad or ActiveX ctrl. -
— calls virtual to get the list
item.
To add items to the Scope Pane:
- Derive another class from which will represent scope items.
Define the clipboard vars. - Createa member of your new classin parent node class.
-
MMCN_EXPAND — handle this message from MMC. We simply
call our virtual . - Define the clipboard format values (, ,
, , )
ATL Implementation
Create a new
ATL COM AppWizard project for in-process COM server. Insert New ATL Object | MMC
Snap-in. For the name put Simple. For MMC Snap-in property page leave the
defaults and choose , , and
IExtendControlBar
All Snap-ins get installed under
HKEY_LOCAL_MACHINE\Software\Microsoft\MMC\SnapIns reg key.
The following values are valid under this key:
-
NameString — Displayed during Add/Remove Snap-in Dialog. If not
specified, Snap-in appears without name. -
About — CLSID of the about object. Used during Add/Remove Snap-in
to provide the version and copyright info as well as the Snap-in icon.
If not specified, no about information will be available to end user and
default icon for the Snap-in will be used, which is generic folder icon. -
StandAlone — The key indicatesthat this is a Primary
Snap-in; that is, it can be used stand alone and doesn’t extend any other
Snap-ins. -
NodeTypes — Contains values that represent Snap-ins nodes.
You should list your nodes here only if you want them to be extended by other
Extension Snap-ins. The wizard adds our static node here, it
assumes that we will allow Extension Snap-ins to be written for it.
ISnapInAbout
Let’s start with the simple part of MMC, the
interface. This interface is responsible for providing the copyright and
version info, etc. to the user. The info is only visible when the Snap-in
is being inserted through Add/Remove Snap-ins dialog:
It is implemented in a separate COM class for efficiency since it’s role as
you can see is very minimal. It has very trivial methods. Adding
About Information (MSDN)


