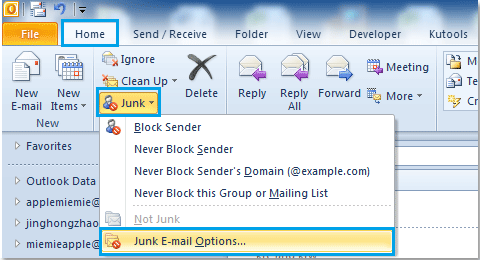
How do I stop Outlook from moving emails to Junk?
1. Mark a certain email as Not Spam/Junk
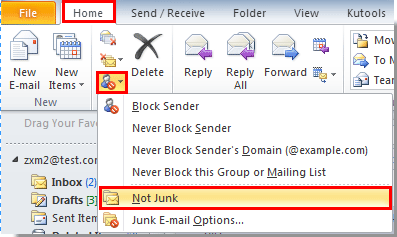
- Go to the Junk email folder.
- Select the email of interest to you.
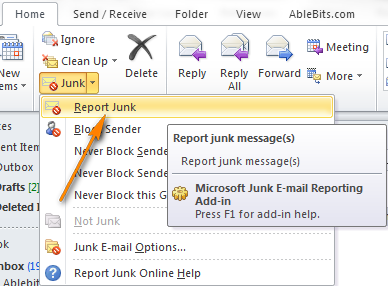
- Now go to Home tab, click on Junk and from the list that appears choose Not junk.
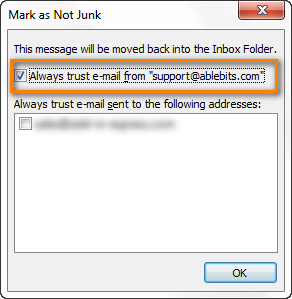
- A Mark as Not Junk window will appear. Check the Always trust email from .
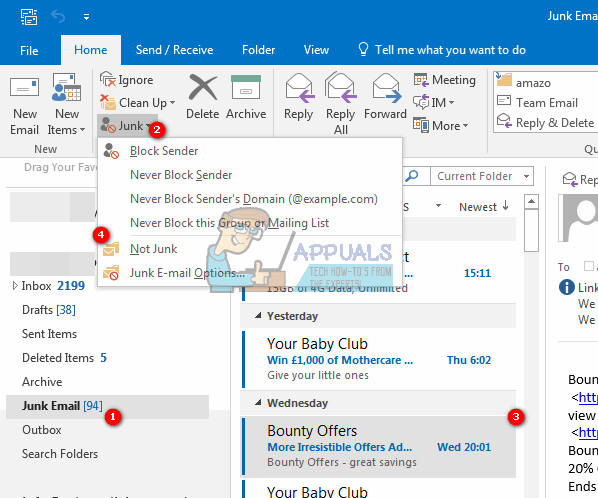
2. Add a sender to the Safe Senders List
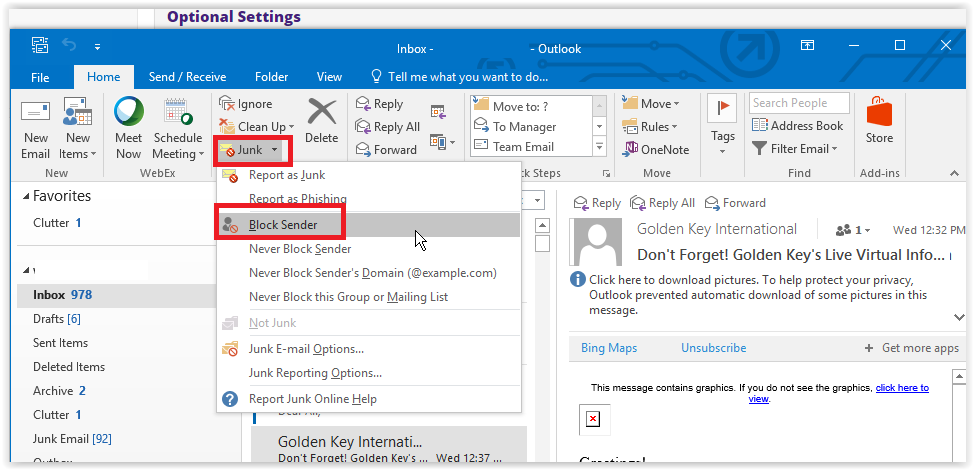
- Select a email from the sender of interest to you.
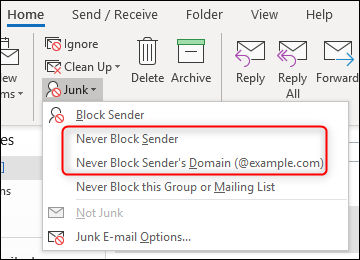
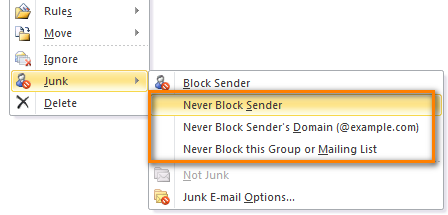
- Right-click it. In the menu that appears click on Junk > Never Block Sender.
- A new window with the message The sender of the selected message has been added to your Safe Senders List.
- Click OK.
3. Check mailing rules
- Go to your Outlook account.
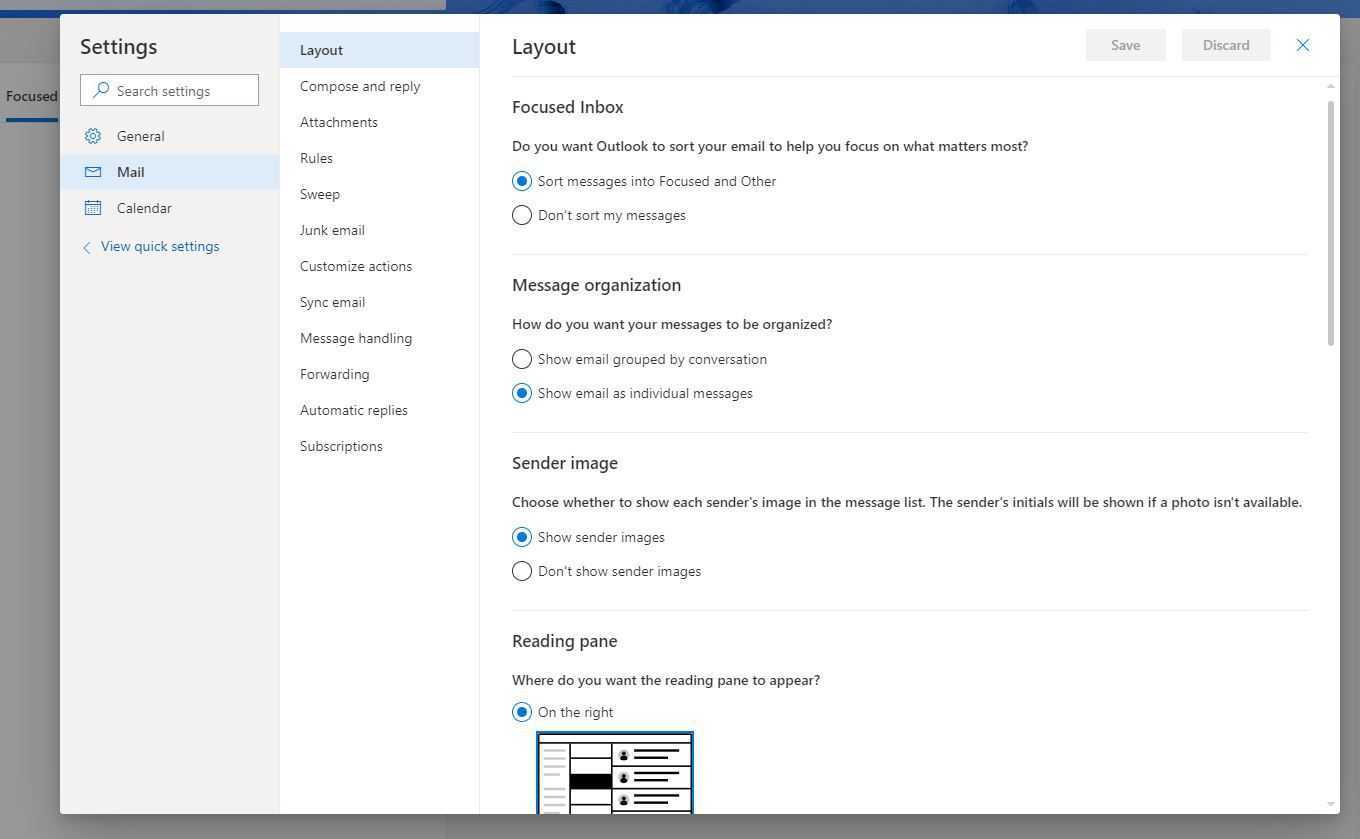
- In the upper-right corner click on Settings > View all Outlook settings.
- In the new window choose Mail, then Rules.
- Check if there are any forwarding rules to your Junk folder and erase the ones of interest to you.
Expert tip:
SPONSORED
Some PC issues are hard to tackle, especially when it comes to corrupted repositories or missing Windows files. If you are having troubles fixing an error, your system may be partially broken. We recommend installing Restoro, a tool that will scan your machine and identify what the fault is.Click here to download and start repairing.
4. Create a rule that will bypass the Junk mail filter
- Go to your Outlook account.
- In the upper-right corner click on Settings > View all Outlook settings.
- In the new window choose Mail, then Rules.
- Click on Add new rule.
- In the Add a condition section select Apply to all messages.
- In the Add an action section select Move to and Inbox.
- Create the rule.
5. Consider using a different email client
The main UI is designed to bring together the content of multiple accounts for better bulk management, and the flexible UI makes it customizable to anyone’s needs.
Their service is also extremely reliable, and their tools are frequently updated, so issues with Mailbird are next to nonexistent.
If you have more questions or solutions, just reach out to the comments section below.
Still having issues? Fix them with this tool:
SPONSORED
If the advices above haven’t solved your issue, your PC may experience deeper Windows problems. We recommend downloading this PC Repair tool (rated Great on TrustPilot.com) to easily address them. After installation, simply click the Start Scan button and then press on Repair All.
Was this page helpful?
43
MyWOT
Trustpilot
Thank you!
Not enough details
Hard to understand
Other
x
Contact an Expert
There are 1 comments
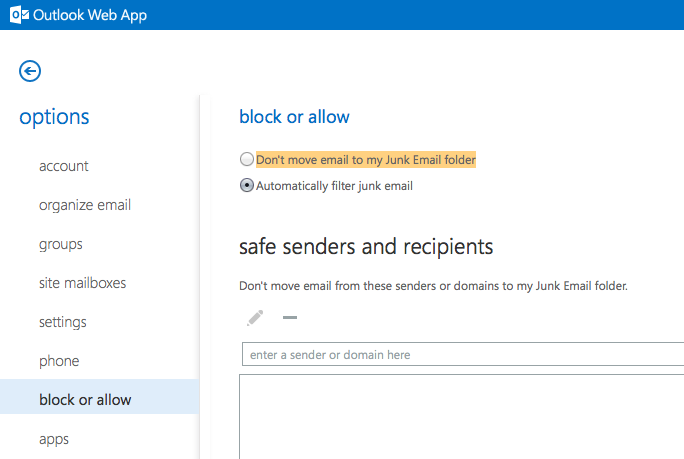
How to turn off junk e-mail filtering
If you want to completely disable automatic filtering, you can do this in 2 ways:
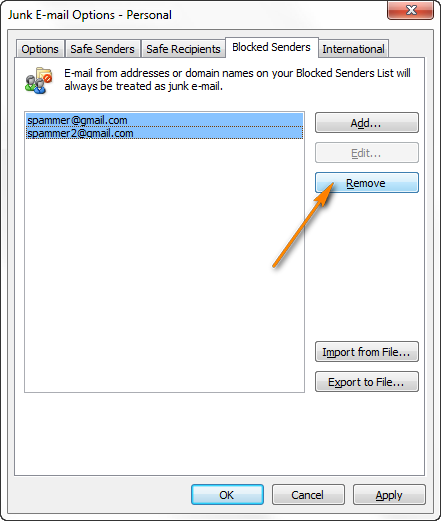
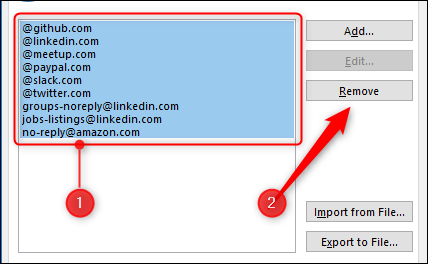
- Clean your . In the Junk E-mail Options dialog window, navigate to the Blocked Senders tab, select all the addresses and click the Remove button.
- If you think you might need the Blocked Senders list at some point in the future, then you can disable the Junk email filter in the registry.
- Open the registry (click the Start button and type regedit).
- Browse to the following registry key: HKEY_CURRENT_USER\Software\Policies\Microsoft\office\{version number}\outlook
- Right click anywhere within the right-hand pane, add the DisableAntiSpam DWORD and set it to 1 (Value 1 disables the junk filter, 0 enables it).
In this way you will have the junk filter completely disabled, including the Blocked Senders list. The Junk button on the Outlook ribbon will also be disabled and greyed out.
Best practices for junk mail management
Best practices are not necessarily an accurate label. Typically, a best practices list is an experienced person’s description of strategies they find effective.
With this statement in mind, I present my list of Junk Mail Filter best practices.
- Turn the damn thing on!
- Check your junk mail folder regularly. You decide what regularly means. At a minimum, you should check it weekly. And if you Mom sent you a cat-related email, do the right thing and respond…tell how cute it is.
- Fiddle with the settings (i.e. safe lists, blocked lists, etc.) and make the Junk Mail Filter work for you. If you like all those emails from Amazon.com trying to entice you to buy stuff you don’t need, fine, put them in the safe list. If not, block them.
- Look through your blocked senders list. Look for senders that have be incorrectly blocked. Remove them and add them to the safe senders list.
- Do the same with the safe senders list but look for senders you want to block. Remove them and add them to the blocked senders list.
- Check for updates to the junk e-mail definition files. Microsoft publishes them as they have them. You can typically find them here.
- Remind yourself that spammers don’t typically reuse email addresses. Thus, don’t spend your time trying to add every spammer to your blocked senders list. You can add it but the spammer most likely will not use that email address again.
- Ask yourself, “Is this level of protection working for me? Do I like the job the Junk Mail Filter is doing for me?”
- If you answer in the affirmative, you’re done.
- If you answer in the negative, increase or decrease the filter setting. Give a week and re-assess.
Preventing junk mail
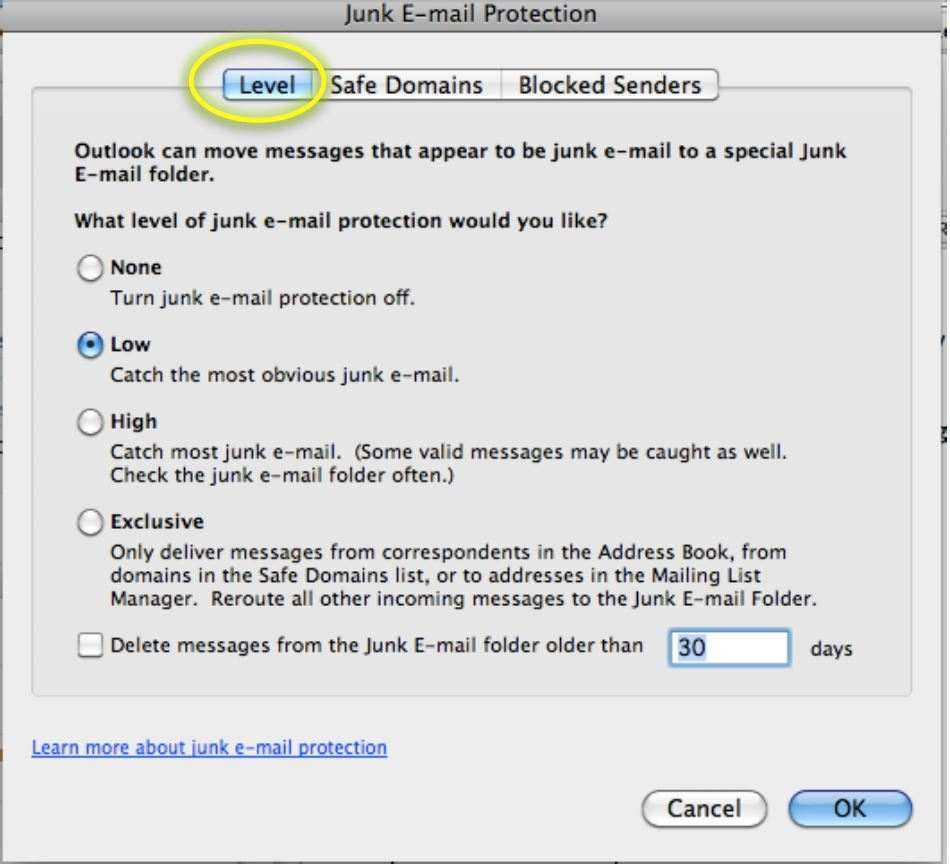
Here is brief explanation of each junk mail filter option:
- No Automatic Filtering: Very permissive. You will see all items the JMF considers to be spam. That is, unless that sender is already in your blocked senders list.
-
Low: Only “obvious” junk mail will be filtered. The rules for obvious are based upon the:
- Time sent (or date stamp)
- Content of message
- High: With this sitting, the JMF takes serious control and moves almost all junk mail to the junk folder. No filter is fool proof thus, Microsoft is unwilling to say it will catch all junk mail.
- Safe: This option enables white filtering. Only the emails listed in your safe list will safely make it to your inbox. All others will be rejected by the Junk Mail Filter and placed in the junk mail folder. This might be a good option for your kids’ email accounts. I don’t think it useful in a business context. But what do I know?
If you choose the Low, High, or Safe option, two additional options become active:
- Disable links and other functionality in phishing messages (recommended)
- Warn me about suspicious domain names in e-mail addresses (recommended)
If you opt for any of these three options, it is worth enabling these options as well.
Основные настройки на вкладке «Параметры»
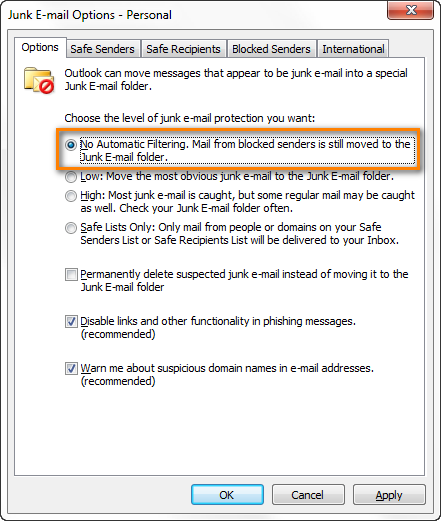
На вкладке «Параметры» в окне «Нежелательная почта» можно настроить параметры нежелательной почты Outlook для любого входящего сообщения. Электронная почта, помеченная как нежелательная, отправляется непосредственно в папку «Нежелательная почта», и вы можете выбрать, насколько агрессивно Outlook помечает электронные письма как нежелательные. По умолчанию для фильтра нежелательной почты установлено значение «Без автоматической фильтрации», поэтому в папку «Нежелательная почта» попадают только электронные письма от отправителей, которых вы намеренно добавили в список заблокированных отправителей.
Вы можете переключиться на «Низкий», чтобы перехватывать более очевидные нежелательные письма, и этого параметра должно быть достаточно для большинства людей. Если вы хотите, чтобы Outlook был более агрессивным, вы можете перейти к настройке «Высокий», но это очень вероятно, чтобы переместить некоторые законные письма в папку «Нежелательная почта», поэтому вам придется регулярно проверять их. Если законная электронная почта отправляется в папку «Нежелательная почта», вы можете настроить фильтр таким образом, чтобы он не рассматривал электронную почту этого отправителя как нежелательную, выбрав сообщение и щелкнув Главная> Нежелательная почта> Не нежелательная.

Откроется окно подтверждения с сообщением о том, что письмо будет перемещено в папку «Входящие», и предоставит вам возможность добавить отправителя в списки надежных отправителей.
Возвращаясь к параметрам нежелательной почты, последний уровень, который вы можете выбрать, – «Только безопасные списки». Это пометит как нежелательное любое сообщение от отправителя или домена, которого нет в вашем списке надежных отправителей. Это очень строгий параметр, и вам нужно будет очень регулярно проверять папку нежелательной почты. Тем не менее, в течение достаточно длительного периода времени можно довольно хорошо обучить фильтр нежелательной почты, особенно если у вас мало сообщений от неизвестных отправителей.


![Outlook keeps sending emails to junk or spam folder [full fix]
windowsreport logo
windowsreport logo
youtube](https://robotrackkursk.ru/wp-content/uploads/a/8/f/a8f6686b81fc8229be13df3b9668bac9.png)

Под уровнями фильтра находятся две дополнительные настройки.
Первый из них, «навсегда удалить подозрительную электронную почту вместо перемещения в папку нежелательной почты», – это настройка, которая, вероятно, будет наиболее полезной, если вы установите для фильтра значение «Без автоматической фильтрации». Этот фильтр будет перемещать почту только из отправители из вашего списка заблокированных отправителей попадают в нежелательную, и, поскольку они заблокированы, то, вероятно, эти электронные письма удаляются без возможности восстановления. Но на любом другом уровне фильтрации, особенно на уровне «Высокий» или «Только для безопасных отправителей», очень велика вероятность того, что Outlook обнаружит «ложное срабатывание» и пометит законную электронную почту как нежелательную. Если ваша нежелательная почта будет удалена навсегда, а не перемещена в папку «Нежелательная почта», вы потеряете законную электронную почту и никогда не узнаете, что она там была. Поэтому мы не рекомендуем включать этот параметр, если вы не уверены в том, что делаете.
Второй вариант «Предупредить меня о подозрительных доменных именах в адресах электронной почты (рекомендуется)» – это инструмент антифишинга Outlook, и он доступен только (и будет включен по умолчанию), если вы включите фильтрацию нежелательной почты. Это означает переключение с «Без автоматической фильтрации» на «Низкий», «Высокий» или «Только безопасные отправители». Как только эта опция включена, Outlook начнет фильтровать потенциальные фишинговые письма. Поскольку это довольно важный инструмент, мы позволим Microsoft объяснить, что он будет делать.

Мы много лет говорили о фишинговых письмах, показывали вам, как использовать программные функции, чтобы помочь остановить попытки фишинга, и рассказывали о новых инициативах, помогающих отделить законную почту от фишинговой. Мы не уверены, почему такой полезный инструмент а) не включен по умолчанию и б) более широко не публикуется Microsoft, но это не так.
Если вы используете Outlook в своем офисе, ваши администраторы могут использовать антифишинговую технологию, о которой вы не знаете. Но если вы используете Outlook для личной учетной записи, мы рекомендуем вам включить это.Установка уровня фильтра нежелательной почты на «Низкий» и включение «Предупреждать о подозрительных доменных именах в адресах электронной почты (рекомендуется)» сделает вас более безопасным.
Управление безопасными отправителями
Следующая вкладка «Безопасные отправители» содержит список лиц и доменов, которые Outlook никогда не будет рассматривать как нежелательную электронную почту.
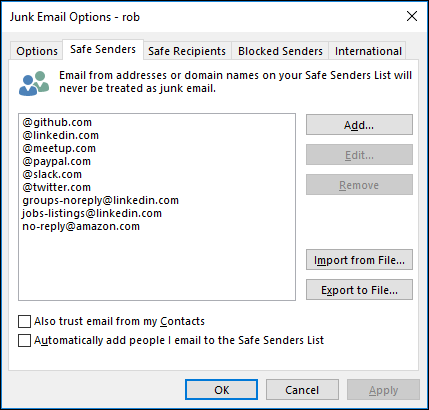
Если вы хотите убедиться, что определенный адрес или домен добавлен в список надежных отправителей, нажмите кнопку Добавить.
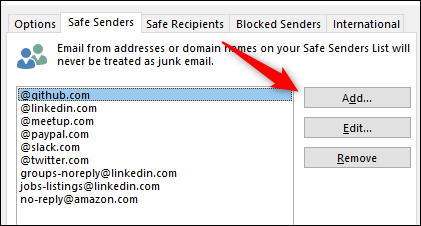
Это откроет окно, где вы можете ввести адрес или домен, который будет добавлен.
Это хорошо для одного или двух адресов или доменов, но довольно много времени, если у вас есть большое количество для добавления. Чтобы ускорить процесс, у вас есть возможность импортировать список отправителей и доменов или экспортировать список существующих безопасных отправителей и доменов.

Импортировать список – это хорошо, но если у вас нет списка в нужном формате, это не очень полезно. К счастью, Outlook ожидает только текстовый файл со списком отправителей и доменов, разделенных возвратом, и его легко собрать. Вы можете экспортировать эту информацию из другой почтовой программы или написать ее самостоятельно, что намного быстрее, чем нажать «Добавить», ввести данные, нажать «ОК», а затем повторить этот процесс для каждого отправителя. Поскольку создание списка надежных отправителей может занять много времени, вам может понадобиться время от времени экспортировать свой список, если вам потребуется переустановить Outlook или установить его на другой компьютер. Это сэкономит вам много времени и сохранит фильтр нежелательной почты так, как вы этого захотите, если вы когда-нибудь перейдете на новую версию Outlook.

![Outlook keeps sending emails to junk or spam folder [full fix]](https://robotrackkursk.ru/wp-content/uploads/d/0/a/d0ae7cd1da061a083bb320d9e5ddf13b.png)


Вы также можете использовать параметры импорта/экспорта для массовых изменений или удалений. Экспортируйте список, внесите изменения (или удалите записи) в выбранном вами текстовом редакторе и импортируйте новый список. Процесс импорта не стирает существующие записи перед импортом новых, а обрабатывает изменения как новые записи (например, если вы измените запись с ebay.co.uk на ebay.com, он добавит ebay.com вместо того, чтобы заменить ebay.co.uk), поэтому вам необходимо очистить список перед импортом измененного списка. Для этого выберите верхнюю запись, удерживайте нажатой клавишу SHIFT и выберите последнюю запись. Это выберет все записи в списке. Затем нажмите «Удалить», чтобы удалить всех надежных отправителей, готовых для импорта.
Последние два параметра на странице помогают автоматически добавлять отправителей в список, делая некоторые разумные предположения.
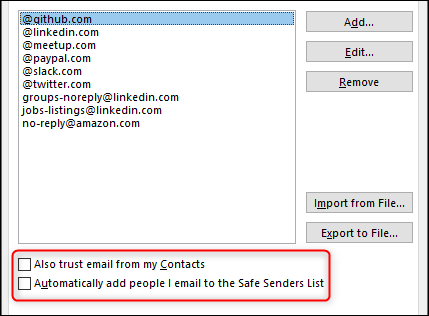
Включение «Также доверять электронной почте из моих контактов» означает, что почта с адреса, который находится в контактах Outlook, будет пропущена без фильтрации нежелательной почты. По сути, это превращает ваш список контактов во второй список надежных отправителей без необходимости вручную добавлять все адреса в список надежных отправителей.
Включение «Автоматически добавлять людей, которых я отправляю по почте, в список надежных отправителей» означает, что любой отправляемый вами по почте будет считаться безопасным отправителем, поскольку получение ответа на отправленное вами письмо является обычным делом
Однако это не всегда так, потому что вы, возможно, отвечаете кому-то, чтобы сказать им прекратить отправлять вам письма (например, отписаться от рассылки), поэтому этот параметр следует использовать с осторожностью.
Creating an Inbox Rule
Protect sensitive information
Creating an Inbox Rule in Outlook on the Web
- In Outlook on the Web, select Options under the the gear icon in the top right corner.
- Expand the Mail subheading, and then expand Automatic processing and select Inbox and Sweep Rules
-
Create a new inbox rule by clicking on the plus sign (+)
Other options
From here, you may also elect to:
- Edit the selected rule by clicking on the pencil
- Delete the selected rule by clicking on the trash can
- Adjust the order that the rules are applied using the arrows
- Once you’ve clicked the plus (+) sign, you will see a similar dialogue box to the one below
- The Name box is used to identify this rule in your list of Inbox rules on the previous page, so you should use a descriptive name
- To configure the triggers for this rule, make the proper drop-down selection under the When a message arrives, and it matches all of these conditions option
- Select It was sent or received if you want to filter messages from specific senders, or messages with specific recipients
- Select It includes these words if you want to filter messages that contain specific words or phrases
- Select My name is if you want to filter messages sent to your account, messages where your account is the only recipient, where your account is CC’d, or messages where your account is not the primary account being contacted
- Select It’s marked with if you want to filter messages that have elevated importance or sensitivity based on the message options
- Select It’s if you want to filter messages with attachments, or messages of a specific type, classification, or flag
- Select Its size is within the specified range if you want to filter messages based on size
- Select It’s received within a specific date span if you want to filter messages based on when they were received
- To configure the effects for this rule, make the proper drop-down selection under the Do all the following option
- Select Move, copy, or delete if you want the filtered messages to be moved or copied to a specific folder, or deleted
- Select Pin the message if you want to pin the filtered messages
- Select Mark the message if you want the filtered message to be marked as read, marked as junk, marked with a specific level of importance, or marked with a specific category
-
Select Forward, redirect, or send if you want the filtered message to be forwarded to a specific address, forwarded as an attachment to a specific address, redirected to a specified address, or sent as an SMS text message to another address
NOTE:
- To add an exception, click Add Exception under Except if it matches any of these conditions
- After your inbox rule is properly configured, click OK at the top of the screen to create the rule
You should now see the rule with a check mark next to it in the list of Inbox and Sweep Rules.
Creating an Inbox Rule in Outlook for Microsoft 365
- Select the Home tab
- Expand the Rules drop-down and click Manage Rules & Alerts
- In the Rules and Alerts window, click New Rule
-
Some popular rules have templates you can select; otherwise, select one of the blank rules at the bottom and click next
Editing rule descriptions
Any conditions, actions, and exceptions that contain underlined values require you to make more specific selections. For example, a condition that triggers on a message arriving “from people or public group” will require you to specify the person or public group. Click on the underlined value to open a window that will let you select the appropriate choice(s).
- On the first page of the Rules Wizard, select any conditions that you would like to trigger the rule, make any necessary edits, and click Next
- On the next page, select any actions that you would like to perform when the rule triggers, make any necessary edits, and click Next
- On the third page, select any exceptions to the rule that you would like to add (if any), make any necessary edits, and click Next
- On the final page, specify a descriptive name for the rule, ensure Turn on this rule is checked, and click Finish
Junk mail and custom solutions
Before I end this topic, let’s briefly discuss how developers can work with junk mail items in Outlook. If writing an Outlook add-in:
- The junk mail folder is an Outlook folder. Working with the junk mail folder is the same as working with any other Outlook. The objects are the same. The events are the same. In fact, it is a default folder and can be accessed with a call to Session.GetDefaultFolder(olFolderJunk).
- If you are working with MailItems, be sure and regularly scan the contents of the junk mail folder. The reason why will vary based on your business rules. But if you are looking in the inbox for certain email items and they are not there, there is a chance the junk mail filter placed them in the junk mail folder.
- There is no reason why you can’t utilize the junk mail filter in your add-in. You can create logic to implements your own junk mail rules and place the identified mail items in the junk folder.
If this guide existed, well, the spammers would use it and it wouldn’t be much of a guide. The best I can tell just follow these guidelines:
- Don’t create emails that look like spam.
- Use proper grammar
- The email needs to contain real and relevant (to the recipient) content
- Don’t send a bunch of emails late at night. Send them during normal business hours.
- Watch your formatting. Don’t create emails that look like a robot wrote them.
- Send from a valid domain name.
- Send from a valid domain name.
Basically, be a good citizen of the Internet and build tools that help the user do their job within Outlook. Of course, you can do everything correctly and still have the user manually add you to their blocked senders list. In this case, there is nothing you can do about it.
*****
For me, the Junk Mail Filter (plus the filter Office 365 provides) does the trick. I check my junk mail folder 2-3 times per month and find only a handful of items. All of the items turn out to be junk 90% of the time. Definitely, I think you should tweak your settings and find what works best for you. By doing so, you can spend less time messing with junk mail and focus on other things.
Thing like:Developers gonna develop!
You may also be interested in:
- Programming Outlook add-in: C#, VB.NET
- Sepcial features for Outlook plugin development
Outlook
Filed under Add-in Express for Office and .net
How Outlook Junk Mail filter works
Before you start setting up the Outlook Junk Mail filter, let me briefly explain, or maybe remind you, some basics of how filtering works. I am not going to waste your time digging deep in theory, just a few facts that you should keep in mind or check before you start configuring the filter settings.
- The Junk Email Filter moves suspected spam to the Junk folder but it doesn’t block junk emails from getting into your Outlook.
- The following email account types are supported:
- Two Exchange Server accounts types — accounts that deliver to an Outlook Data File (.pst) and accounts in Cached Exchange Mode (.ost)
- POP3, IMAP, HTTP,
- Outlook Connector for Outlook.com
- Outlook Connector for IBM Lotus Domino
- Junk Mail Filter is turned on by default in Outlook, the protection level is set to Low to catch only the most obvious spam emails.
- In 2007 and lower, the Junk Mail filter runs before Outlook rules. In practice, this means that your Outlook rules won’t be applied to messages moved to the Junk folder.
- Beginning with Outlook 2010, the Junk Email filter setting are applied to each e-mail account individually. If you have several accounts, the Junk Email options dialog shows the settings for the account whose folders you are currently viewing.
- And finally, while the Outlook Junk Email Filter protects against much of the spam sent to you, no filter is smart enough to catch every unsolicited email, even if set to the high level. The filter does not pick out any particular sender or a message type, it uses advanced analysis of the message structure and other factors to determine the likelihood of spam.
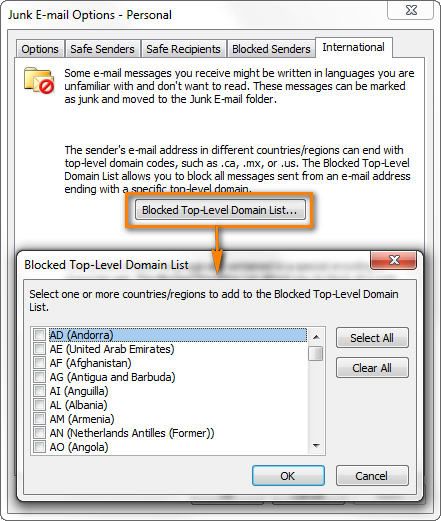
Блокировка доменов верхнего уровня и кодировок
Последняя вкладка, International, позволяет блокировать домены и электронные письма странового уровня в определенных кодировках.

Нажмите «Заблокированный список доменов верхнего уровня», чтобы открыть панель с тем же именем. Это позволяет вам выбрать домены страны для блокировки.
![Outlook keeps sending emails to junk or spam folder [full fix]
windowsreport logo
windowsreport logo
youtube](https://robotrackkursk.ru/wp-content/uploads/4/8/0/480694b7ec90e0c8ca60a829f098174e.jpeg)


![Outlook keeps sending emails to junk or spam folder [full fix]](https://robotrackkursk.ru/wp-content/uploads/2/a/8/2a862b6b131ded91bfea89196854ddc2.jpeg)

Например, если вы хотите заблокировать электронные письма из Андорры, установите флажок «AD (Андорра)», а затем нажмите «ОК». Outlook затем будет обрабатывать почту из домена, заканчивающегося «.ad», как нежелательную.
Это полезно, если вы получаете много нежелательной почты из домена определенной страны, например, .cc (Кокосовые острова), у которого на момент написания статьи было наибольшее количество интернет-провайдеров, которые разрешают рассылку спама. Если вы не ожидаете получить законное электронное письмо от домена этой страны, вы можете пойти дальше и добавить его в список нежелательных доменов. Имейте в виду, что это не остановит всю электронную почту, которая исходит от Кокосовых островов – только письма с домена, который заканчивается на .cc. Поэтому, если вам надоело получать спам от российских спамеров, блокировка .ru блокирует их только в том случае, если их домен заканчивается на .ru. Российский спамер, работающий с доменом .com, не будет подвержен блокировке домена .ru.
Если вы хотите заблокировать определенную географическую область, вы можете заблокировать целые кодировки, щелкнув «Список заблокированных кодировок». Это позволяет выбрать кодировки электронной почты для блокировки.
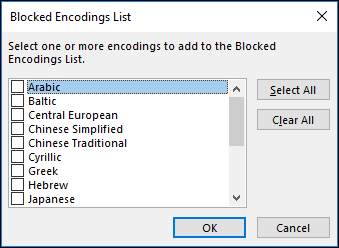
Кодировки сами по себе являются большой темой, поэтому мы не будем их здесь рассматривать (в Википедии есть хорошая статья о них, если вы хотите узнать больше), за исключением того, что в целом кодировки определяют, как символ представлен в цифровом виде. Разные кодировки представляют символы по-разному, и ваш почтовый клиент (и ваш браузер) могут переводить между (некоторыми) из наборов символов, процесс, известный как транскодирование. Если вы регулярно получаете нежелательную почту в определенной кодировке, вы можете заблокировать эту кодировку, выбрав ее в списке заблокированных кодировок и нажав «ОК». Если вы не уверены, что такое кодировки или как узнать, какие кодировки используются в полученных вами электронных письмах. в, вы, вероятно, не должны ничего устанавливать здесь, так как вы можете помешать себе получать законные письма.
Эти настройки нежелательной почты – это полезный способ сохранить ваш почтовый ящик в чистоте и под контролем. Если вы приложите усилия, чтобы заблокировать отправителей при получении электронных писем, которые вы считаете ненужными, то со временем у вас будет намного меньше мусора во входящей почте и немного меньше стресса в вашей жизни.