Step 1: Create a storage pool
You must first group available physical disks into one or more storage pools.
-
In the Server Manager navigation pane, select File and Storage Services.
-
In the navigation pane, select the Storage Pools page.
By default, available disks are included in a pool that is named the primordial pool. If no primordial pool is listed under STORAGE POOLS, this indicates that the storage does not meet the requirements for Storage Spaces. Make sure that the disks meet the requirements that are outlined in the Prerequisites section.
-
Under STORAGE POOLS, select the TASKS list, and then select New Storage Pool. The New Storage Pool Wizard will open.
-
On the Before you begin page, select Next.
-
On the Specify a storage pool name and subsystem page, enter a name and optional description for the storage pool, select the group of available physical disks that you want to use, and then select Next.
-
On the Select physical disks for the storage pool page, do the following, and then select Next:
-
Select the check box next to each physical disk that you want to include in the storage pool.
-
If you want to designate one or more disks as hot spares, under Allocation, select the drop-down arrow, then select Hot Spare.
-
-
On the Confirm selections page, verify that the settings are correct, and then select Create.
-
On the View results page, verify that all tasks completed, and then select Close.
-
Under STORAGE POOLS, verify that the new storage pool is listed.
Windows PowerShell equivalent commands for creating storage pools
The following Windows PowerShell cmdlet or cmdlets perform the same function as the preceding procedure. Enter each cmdlet on a single line, even though they may appear word-wrapped across several lines here because of formatting constraints.
The following example shows which physical disks are available in the primordial pool.
Get-StoragePool -IsPrimordial $true | Get-PhysicalDisk -CanPool $True
The following example creates a new storage pool named StoragePool1 that uses all available disks.
New-StoragePool –FriendlyName StoragePool1 –StorageSubsystemFriendlyName "Windows Storage*" –PhysicalDisks (Get-PhysicalDisk –CanPool $True)
The following example creates a new storage pool, StoragePool1, that uses four of the available disks.
New-StoragePool –FriendlyName StoragePool1 –StorageSubsystemFriendlyName "Windows Storage*" –PhysicalDisks (Get-PhysicalDisk PhysicalDisk1, PhysicalDisk2, PhysicalDisk3, PhysicalDisk4)
The following example sequence of cmdlets shows how to add an available physical disk PhysicalDisk5 as a hot spare to the storage pool StoragePool1.
$PDToAdd = Get-PhysicalDisk –FriendlyName PhysicalDisk5
Add-PhysicalDisk –StoragePoolFriendlyName StoragePool1 –PhysicalDisks $PDToAdd –Usage HotSpare
Create a Storage Space
You may already know a bit about Storage Spaces. It was introduced in Windows Server 2012 as a new way of thinking about how to pool and manage storage using just Windows. Storage Spaces is basically a storage virtualization technology that aggregates all supported storage into a pool of storage that can be managed as a single entity. Once storage is aggregated, an administrator can create volumes that leverage the space. With Storage Spaces, Microsoft seems to be pushing into the world of the storage array a bit more aggressively than they have in the past. While it remains to be seen whether or not enterprise customers will accept Storage Spaces, for lab and development use, Storage Spaces is a clear choice.
With Windows Server 2012 R2, Microsoft is doubling down on Storage Spaces and has added an impressive array of features, including:
- Storage tiering. A common method by which data is stored on different kinds of drives to meet performance targets.
- Deduplication. An enterprise-grade feature that eliminates copies of data and saves disk space.
- Write-back cache. Helps to control random spikes in I/O.
You may not be replacing your SAN quite yet with Storage Spaces, but the growing feature set may make it an eventual contender in the storage decision.
At this point, I’ve installed a brand new Windows Server 2012 R2 Preview system and I’ve added two additional virtual disks – one 30 GB in size and one 20 GB in size – to this virtual machine, but I have not yet performed any configuration against these disks. You can see these disks in Figure 1. Note that one of the disks – Disk 0 –
The high level process goes like this:
- Create a storage pool. This consists of physical disks or physical arrays.
- Create a virtual disk.
- Create a volume and choose your file system.
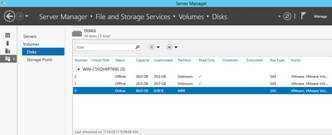 Figure 1: The disks present inside my virtual machine
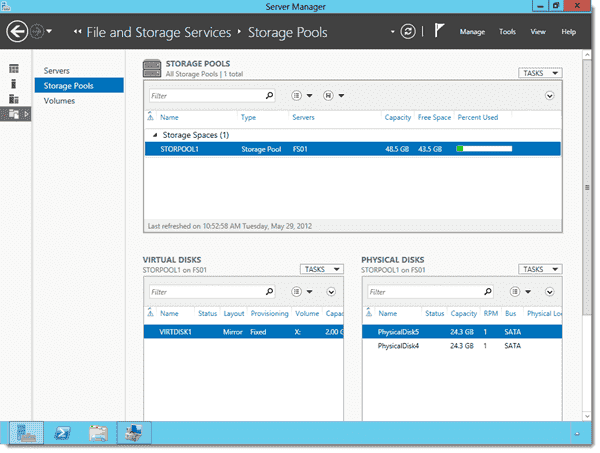
To get started with the overall process, from the Tasks menu shown in Figure 2, choose New Storage Pool. The “primordial” storage space listed simply refers to disks that are present on a physical server but that have not yet been added to a storage space. Note also that no virtual disks have been created yet.
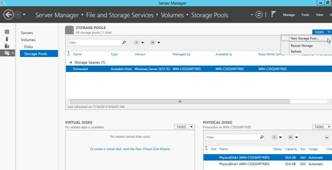 Figure 2: Create a new storage pool
Next up, provide a name for your new storage pool and, if you like, provide a description. Further, choose the primordial storage pool from which you’d like to choose physical disks to include in your new storage space.
 Figure 3: Name your storage pool and choose the set of primordial disks
Now, choose the physical disks you’d like to include in the new storage pool. In the Allocation column, you can choose from one of three options:
- Automatic. This is a disk that will play an active role in the Storage Space.
- Hot spare. A hot spare idles quietly in the background and then jumps into action in the event that a storage space suffers a disk failure. Hot spares are a very common element in the world of storage.
- Manual. If you specify a drive as manual at the creation of a storage space, it is used. Otherwise, it can be used for specific storage spaces.
You can see that I’ve selected my two spare disks and the wizard presents back to me the total aggregated raw capacity for those disks. Take a look at Figure 4.
Note that there are certain kinds of devices that can’t be included in your pool, including existing RAID arrays and iSCSI targets.
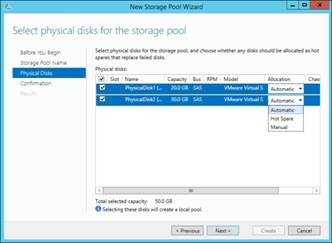 Figure 4: Select the disks that you’d like to include in your new storage pool
Once you’ve made all of your choices, it’s time to review those choices to make sure that you haven’t overlooking something. When you’re ready, click the Create button.
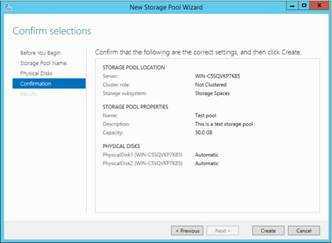 Figure 5: Review your selections
There are multiple steps that the wizard performs to accomplish your administrative goals. You can track their progress on the results screen shown in Figure 6. This process typically goes pretty quickly.
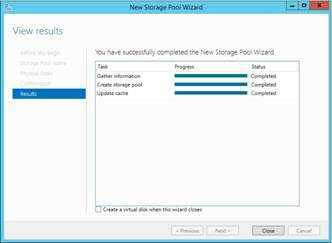 Figure 6: Make sure everything goes well:
Step 3: Update key settings on the cluster nodes
There are some settings that we recommend changing based on our experience with Storage Spaces in large-scale environments, as discussed in the following tasks.
All users should update the following settings:
-
Storage Spaces repair registry updates — There are some manual steps that you must take to update the way Storage Spaces repairs virtual disks — see Optimize Storage Spaces repair settings on Scale-Out File Servers for more information.
-
Windows file-delete notification (trim/unmap) — Although Windows has built-in support for file-delete notification (issuing trim commands to reclaim SSD storage), we recommend disabling Windows file-delete notification on servers that use Storage Spaces. To do so, from an elevated command prompt, use the following command on each node of the cluster:
And these settings are set automatically by ProvisionStorageConfiguration.ps1, so if you used that to setup your storage, you can safely skip them:
-
Multipath I/O (MPIO) settings — If you’re using multiple SAS connections to your storage enclosure, enable MPIO on each node of the cluster so that Storage Spaces can communicate with the enclosures over multiple cables. You’ll also want to set the global MPIO policy — Round Robin is the default policy, but according to our internal testing, Least Blocks provides increased performance under most circumstances.
To max out your performance, you can also set the policy on individual SSDs to Round Robin (which has the effect of using Least Blocks for your HDDs, and Round Robin for SSDs). To set the MPIO policy for individual SSDs, use the Mpclaim.exe command from each node to set the MPIO policy for each SSD. For example, to set the MPIO policy to Round Robin (represented by a 2 in MPclaim) for disk 10, use this command from an elevated command prompt: .
-
Physical disk caches — In some cases leaving disk-based write-caches enabled can decrease performance so we recommend disabling them on all disks. To do so, use the Diskcache.exe tool, as described in Microsoft Knowledge Base article .
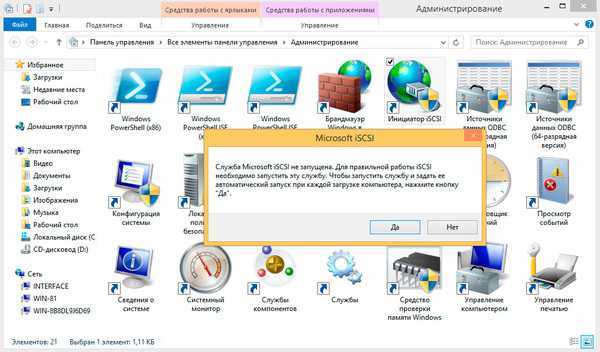
Настройка iSCSI-хранилища в Windows Server 2012 R2
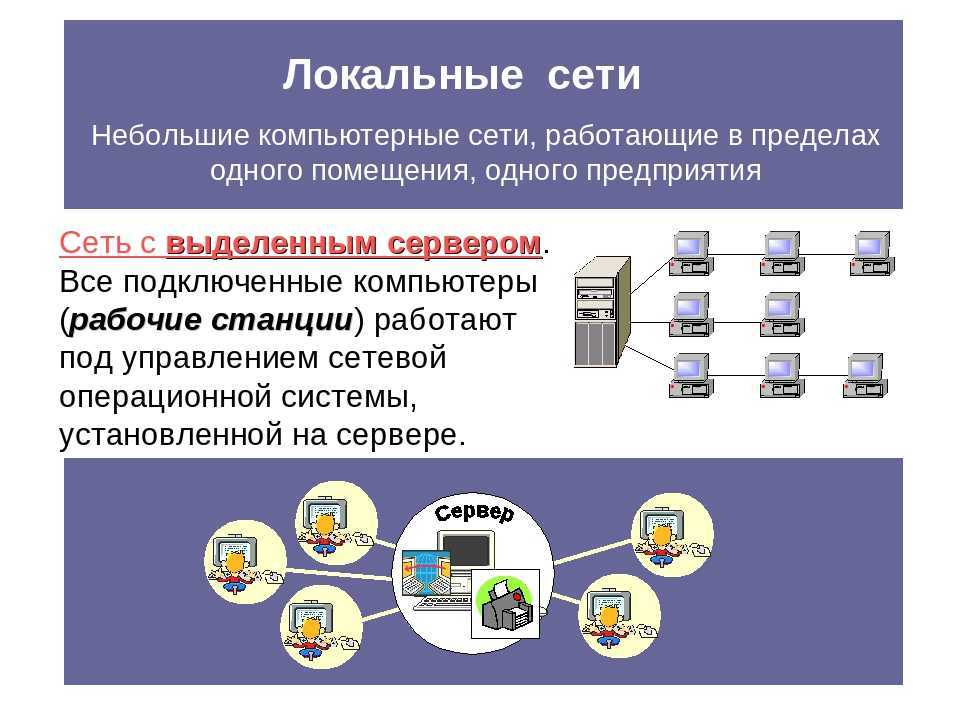
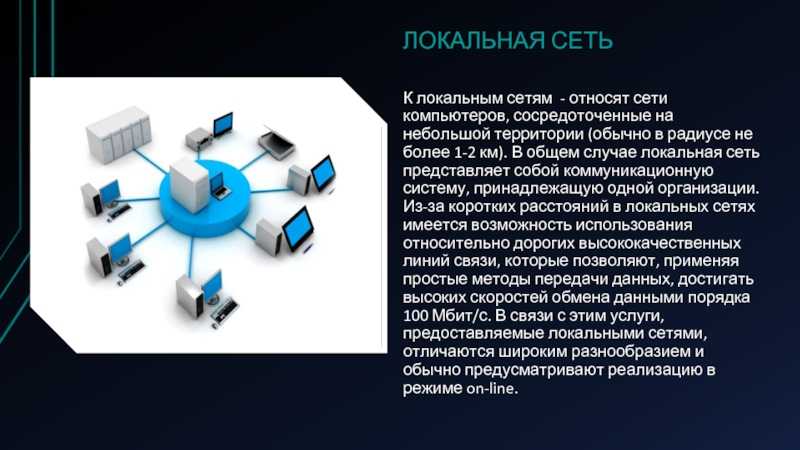
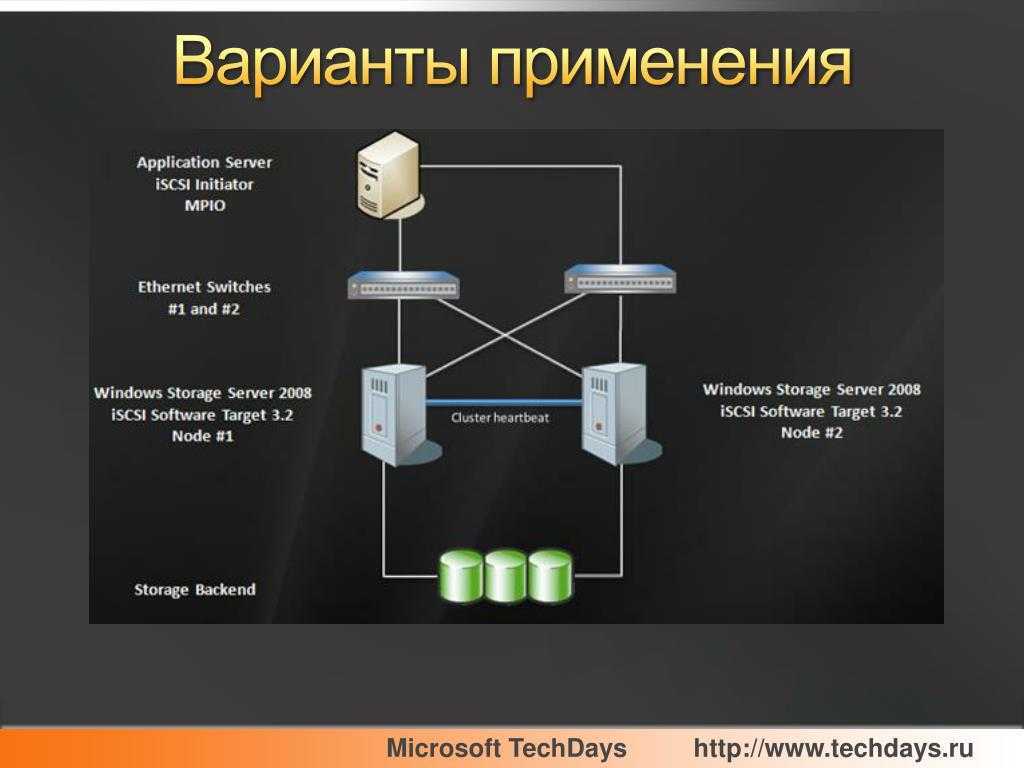
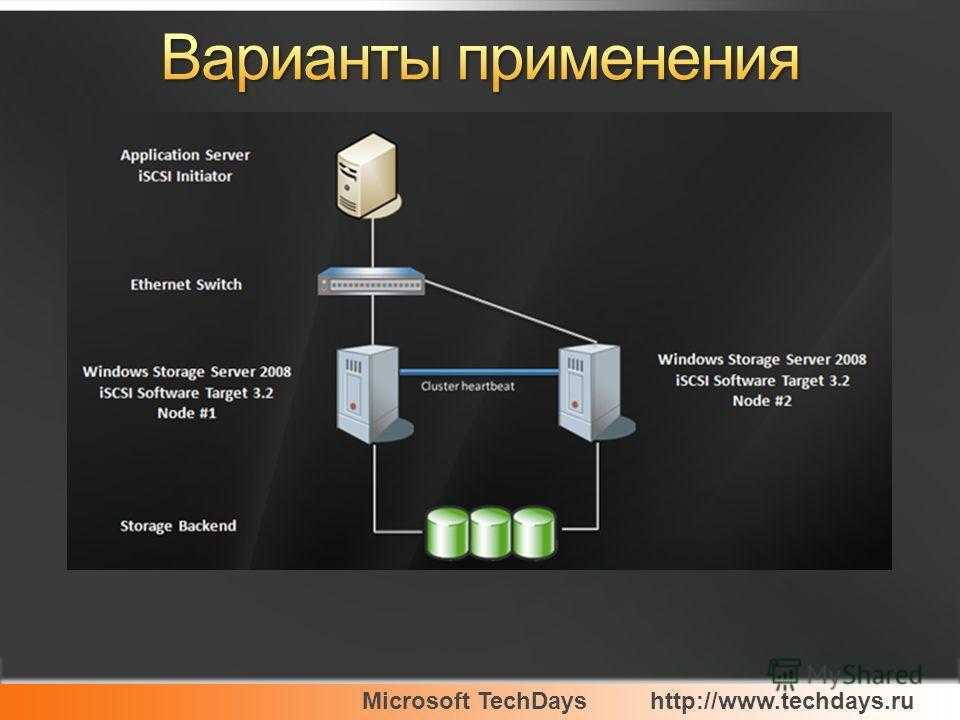
Продолжая тему создания систем высокой доступности, в данном материале мы рассмотрим настройку iSCSI-хранилищ в современной версии серверных ОС от Microsoft. Мы не будем повторяться и снова обсуждать общие вопросы, поэтому, если вы только начинаете работать с iSCSI, то настоятельно рекомендуем ознакомиться с вступительной частью к нашему предыдущему материалу.
Широкое распространение виртуализации и потребности в создании отказоустойчивых систем даже при небольших внедрениях заставили компанию Microsoft пересмотреть свое отношение к доступным из коробки ролям Windows Server и политике лицензирования. Если раньше iSCSI Target предлагался только в редакции Windows Storage Server, то начиная с Server 2008 R2 он стал доступен в виде отдельно устанавливаемого компонента, а с выходом Windows Server 2012 закономерно стал частью ОС.
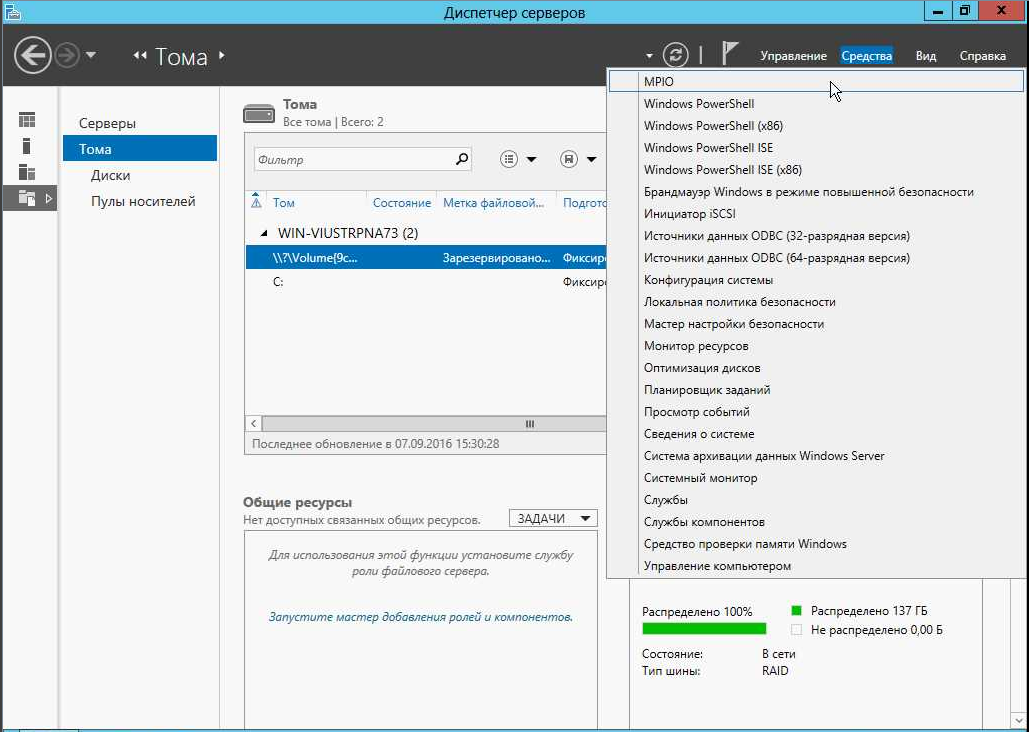
Для установки роли Cервера цели iSCSI запустите Мастер добавления ролей и компонентов, затем последовательно разверните пункты Файловые службы и службы хранилища – Файловый службы и службы iSCSI и укажите одноименную роль.
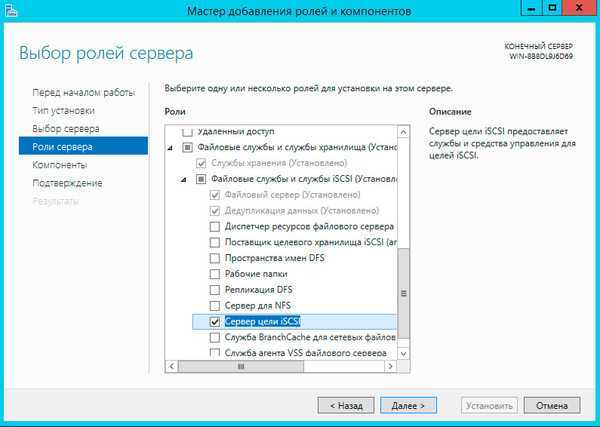
Диспетчера серверовФайловые службы и службы хранилищаiSCSI
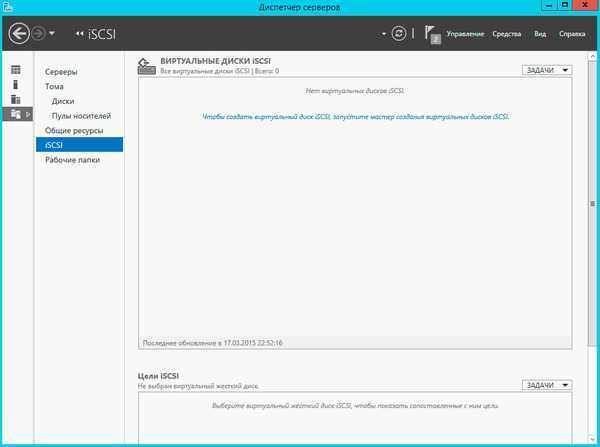
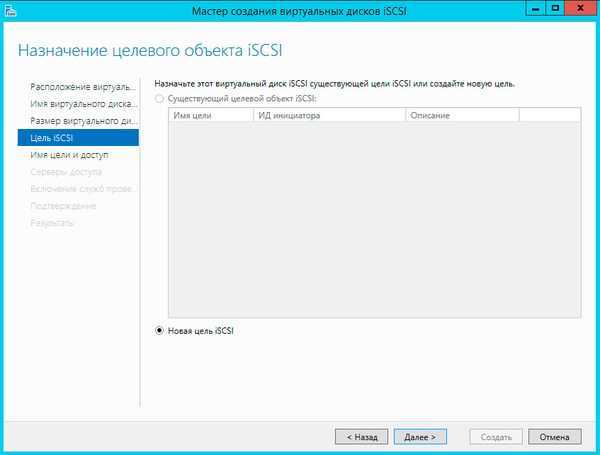
ЗадачиМастер создания виртуальных дисков iSCSI
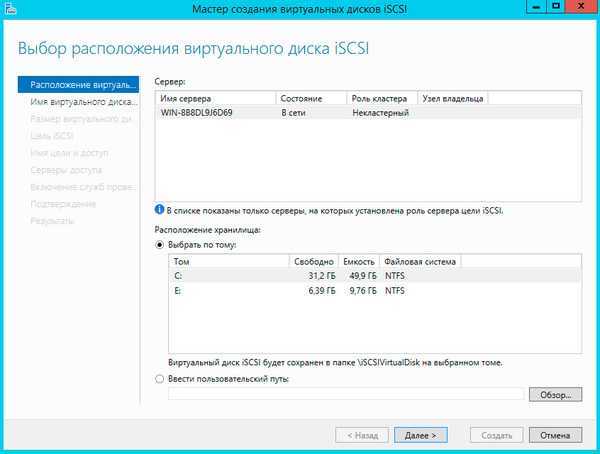
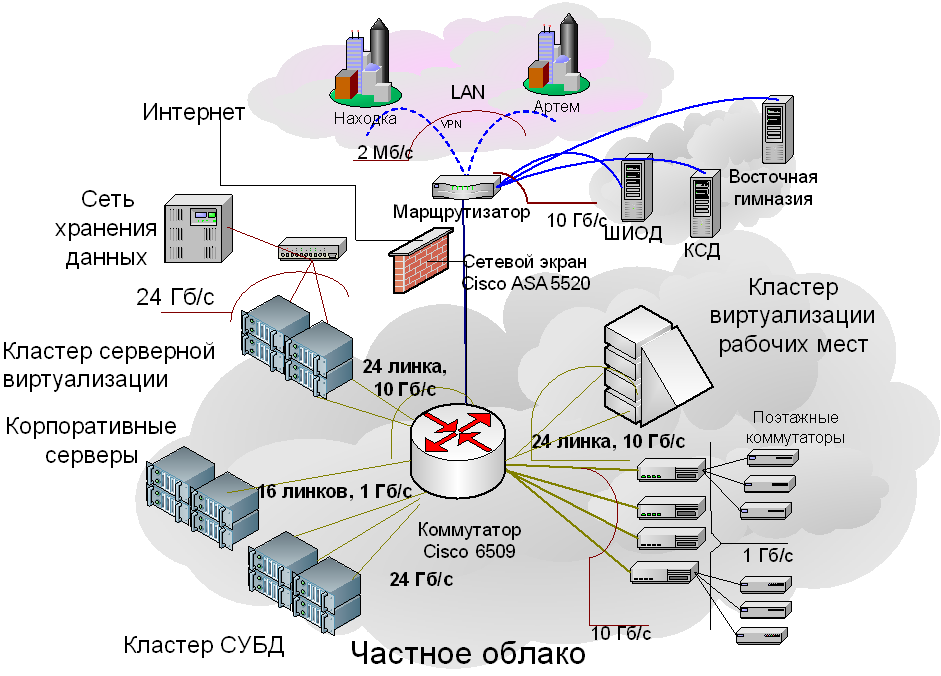
сети хранения данных (SAN)
Следующим шагом укажите имя и размер создаваемого диска. Windows Server 2012 поддерживает новый формат виртуальных дисков – VHDX, а также динамически расширяемые диски. Если доступные ранее диски фиксированного размера резервировали дисковое пространство хранилища сразу при создании, то динамически расширяемые диски увеличивают размер согласно реально записанным в них данным. Это позволяет существенно экономить дисковое пространство хранилища, нарезая виртуальные диски с запасом.
Не рекомендуется данный тип дисков для систем с высокой дисковой активностью, так как за счет возможной фрагментации и операций по приращению размера диска производительность будет ниже, чем у дисков фиксированного размера. В тоже время динамически расширяемые диски неплохо подходят для файловых хранилищ, резервного копирования и т.п. задачам, где в первую очередь требуется хранение данных, а не скорость доступа к ним.

Еще один поддерживаемый тип дисков – разностный, когда все изменения пишутся не на исходный виртуальный диск, а на вновь созданный, к использованию в производственных средах не рекомендуется ввиду существенно более низкой производительности, но может оказаться полезным при отладке и разного рода экспериментах, когда надо иметь возможность быстро откатиться к исходному состоянию.

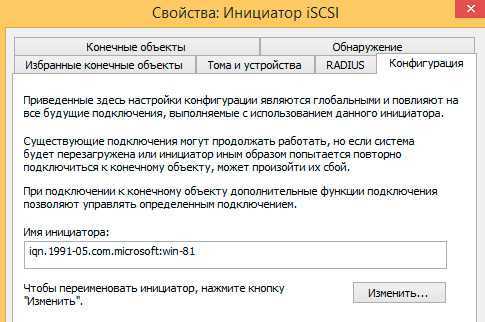
Панель управления – Администрирование – Инициатор iSCSI
Конфигурация
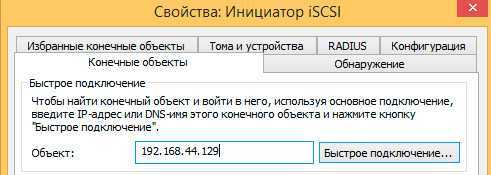
Конечные объектыБыстрое подключение
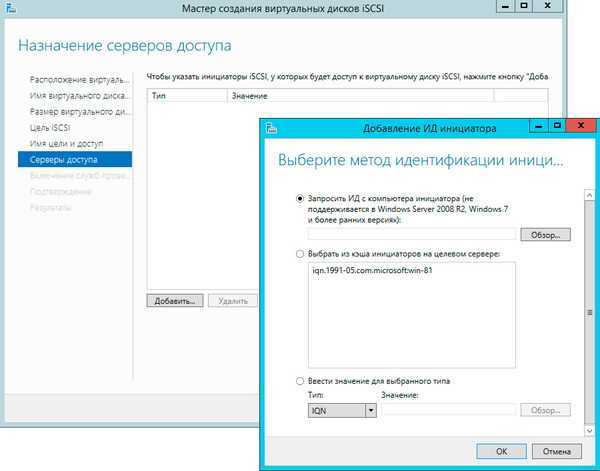
Вернемся на сервер и нажав кнопку Добавить выберем IQN инициатора из кэша, для современных систем вы также можете получить IQN инициатора выполнив подключение к нему по IP-адресу или имени хоста:
ОбнаружениеОбнаружить портал
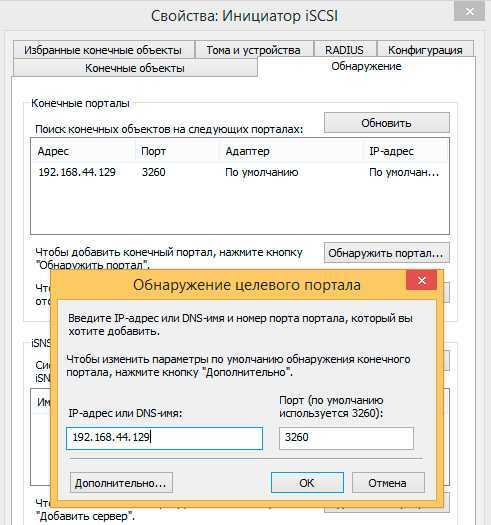
Конечные объектыДополнительно
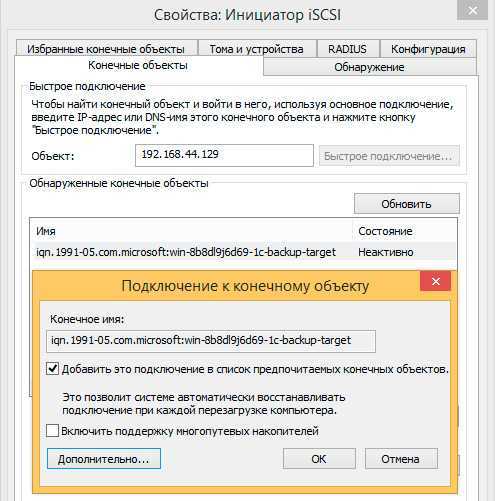
Если вам потребуется изменить параметры подключения уже подключенного объекта, то его следует отключить и подключить заново. После выполнения всех этих действий подключенное устройство будет обнаружено системой как еще один локальный диск и последующая работа с ним ничем не отличается от работы с обычным жестким диском.
Step 3: Create clustered storage pools
Create the storage pools specified by your storage design. If you used the ProvisionStorageConfiguration.ps1 script to provision your storage, skip this step.
You can use Failover Cluster Manager to create a simple storage pool, or Windows PowerShell if you want to automate creating multiple pools to create or need to change advanced pool settings.
To create storage pools by using Failover Cluster Manager
-
In Failover Cluster Manager, go to <ClusterName> > Storage > Pools.
-
Right-click Pools, and then click New Storage Pool.
The New Storage Pool wizard appears.
-
On the Specify a storage pool name and subsystem page, enter a name for the storage pool, and then select the group of available physical disks (also known as a primordial pool) that you want to use. In the Available to column, verify that the cluster name is listed.
-
On the Select physical disks for the storage pool page, select each physical disk that you want to include in the storage pool.
For a failover cluster, you must select at least three physical disks. If you’re using enclosure awareness and multiple pools, make sure that you evenly allocate disks from all enclosures to each pool.
-
Select any SSDs that you want to use as journal disks for use by parity spaces in the pool (see Software-Defined Storage Design Considerations Guide for more details), and then in the Allocation column, choose Journal from the drop-down list.
-
Repeat these steps for any additional pools you’re creating.
To create storage pools by using Windows PowerShell
If you didn’t use the ProvisionStorageConfiguration.ps1 script to provision your storage, from a management computer on one of the subnets connected to the nodes, open a Windows PowerShell session and then use the following commands to create a single storage pool with all physical disks, and 4 KB logical sectors.
You can also use the ProvisionStorageConfiguration.ps1 script to automatically create storage pools and virtual disks according to recommended best practices. For more information, see Storage Spaces Deployment Guide for Automation Scripts .
Шаг 2. Создание виртуального диска
Затем необходимо создать один или несколько виртуальных дисков из пула носителей. При создании виртуального диска можно выбрать способ размещения данных на физических дисках. Это влияет как на надежность, так и на производительность. Также можно выбрать, создавать ли диски с тонкой или фиксированной подготовкой.
-
Если мастер создания виртуального диска еще не открыт, на странице Пулы носителей в диспетчере серверов в разделе ПУЛЫ НОСИТЕЛЕЙ выберите нужный пул носителей.
-
В разделе «Виртуальные диски» выберите список задач и выберите новый виртуальный диск. Откроется мастер создания виртуального диска.
-
На странице «Перед началом работы » нажмите кнопку «Далее».
-
На странице «Выбор пула носителей » выберите нужный пул носителей и нажмите кнопку «Далее».
-
На странице «Укажите имя виртуального диска » введите имя и необязательное описание, а затем нажмите кнопку «Далее».
-
На странице «Выбор макета хранилища » выберите нужный макет, а затем нажмите кнопку «Далее».
Примечание
Если выбрать макет, в котором недостаточно физических дисков, при нажатии кнопки «Далее» появится сообщение об ошибке. Сведения о том, какой макет следует использовать и требования к диску, см. «).
-
Если вы выбрали mirror в качестве макета хранилища и имеете пять или более дисков в пуле, откроется страница «Настройка параметров устойчивости «. Выберите один из следующих вариантов.
- Двухстороннее зеркало
- Трехстороннее зеркало
-
На странице «Укажите тип подготовки » выберите один из следующих параметров, а затем нажмите кнопку «Далее».
-
Тонкая
При тонкой подготовке пространство выделяется по необходимости. Это оптимизирует использование доступного хранилища. Однако поскольку такой вариант делает возможным чрезмерное выделение пространства хранения, необходимо внимательно следить за доступным дисковым пространством.
-
Фиксированный формат
При фиксированной подготовке емкость хранилища выделяется немедленно в момент создания виртуального диска. Таким образом, при фиксированной подготовке используется пространство из пула носителей, эквивалентное размеру виртуального диска.
Совет
Для дисковых пространств можно создавать виртуальные диски с тонкой и фиксированной подготовкой в одном пуле носителей. Например, можно использовать виртуальный диск с тонкой подготовкой для размещения базы данных, а виртуальный диск с фиксированной подготовкой для размещения связанных файлов журнала.
-
-
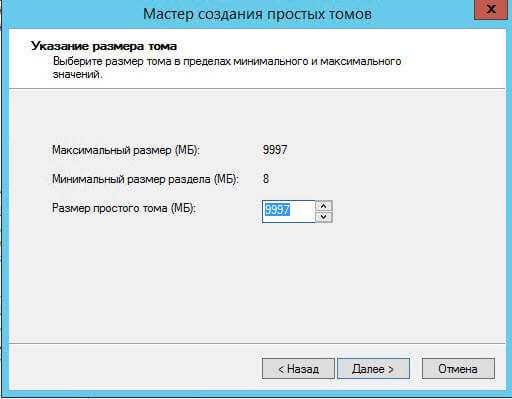
На странице Указание размера виртуального диска выполните следующие действия.
Если вы выбрали фиксированную подготовку на предыдущем шаге, выберите один из следующих вариантов:
-
Задать размер
Если используется структура хранилища, отличная от простой, виртуальный диск использует больше свободного пространства, чем будет указано. Во избежание возможной ошибки, когда размер тома превышает свободное пространство пула носителей, можно установить флажок Создать максимально большой виртуальный диск вплоть до указанного размера.
-
Максимальный размер
Выберите этот вариант, чтобы создать виртуальный диск, который использует максимальную емкость пула носителей.
-
-
На странице «Подтверждение выбора» проверьте правильность параметров и нажмите кнопку «Создать».
-
На странице «Просмотр результатов » убедитесь, что все задачи завершены, а затем нажмите кнопку «Закрыть».
Совет
По умолчанию флажок Создать том при закрытии мастера установлен. После этого вы перейдете сразу же к следующему шагу.
Windows PowerShell эквивалентные команды для создания виртуальных дисков
Следующие командлеты Windows PowerShell выполняют ту же функцию, что и предыдущая процедура. Вводите каждый командлет в одной строке, несмотря на то, что здесь они могут отображаться разбитыми на несколько строк из-за ограничений форматирования.
В следующем примере создается виртуальный диск размером 50 ГБ с именем VirtualDisk1 в пуле носителей с именем StoragePool1.
В следующем примере создается зеркальный виртуальный диск с именем VirtualDisk1 в пуле носителей с именем StoragePool1. Диск использует максимальную емкость хранилища пула носителей.
В следующем примере создается виртуальный диск размером 50 ГБ с именем VirtualDisk1 в пуле носителей с именем StoragePool1. Для диска используется тонкая подготовка.
В следующем примере создается виртуальный диск с именем VirtualDisk1 в пуле носителей с именем StoragePool1. Для диска используется трехстороннее зеркальное отображение, а его размер фиксирован и равен 20 ГБ.
Примечание
Для работы этого командлета в пуле носителей должно быть по крайней мере пять физических дисков. (Сюда не относятся диски, выделенные для горячего резерва.)
Interoperability with Azure virtual machines
You can use Storage Spaces inside an Azure virtual machine to combine multiple virtual hard drives, creating more storage capacity or performance than is available from a single Azure virtual hard drive.
There are three supported scenarios for using Storage Spaces in Azure virtual machines, but there are some limitations and best practices that you should follow, as described below.
-
As high performance and/or capacity storage for a virtual machine
-
As backup targets for System Center Data Protection Manager
-
As storage for Azure Site Recovery (see Can’t recover VMs in Azure with volumes greater than 1TB? Use Storage Spaces!)
When using Storage Spaces to pool multiple Azure virtual hard drive (VHD) files for use with an Azure virtual machine, follow these guidelines:
-
Create a single virtual disk per pool with the Simple resiliency type. Azure already provides resiliency for its .vhd files, so we don’t support adding another layer on top of this.
-
When creating virtual disks from more than eight pooled .vhd files (which appear as physical disks to Storage Spaces), use the New-Volume or New-VirtualDisk cmdlet to create the virtual disk with the same number of columns as physical disks (in this case, .vhd files) in the pool — the New Virtual Disk Wizard in Server Manager won’t create virtual disks with more than eight columns.
-
After creating the virtual disk, use the Format-Volume cmdlet with the parameters to format the volume with a 64 KB NTFS allocation unit size and enable large FRS support. Doing so reduces the likelihood of file system fragmentation causing issues.
-
Install the hotfix described in Microsoft Knowledge Base article .
-
We don’t support Storage Spaces with shared storage and Failover Clustering in Azure at this time.
When using Microsoft SQL Server AlwaysOn in Azure virtual machines with Storage Spaces, refer to the best practices described in Extending SQL Server 2014 AlwaysOn Resource Groups with Storage Spaces on Microsoft Azure and Using Storage Spaces on an Azure VM cluster for SQL Server storage.
Enable storage bus cache in PowerShell
This section is a step-by-step guide on how to enable the storage bus cache for your stand-alone server in PowerShell.
-
Import the module
-
Configure storage bus cache settings
Default settings are recommended, skip this step to continue with the defaults.
Important
If configuration is needed, do so before enabling the storage bus cache. Refer to Feature overview section for details of the fields.
-
Check the drive status
The output should resemble the image below, where the Number column shows values under 500 and the CanPool column shows True for all non-boot drives.
-
Enable storage bus cache
This step will:
- Create a storage pool with all the available drives
- Bind the fast and slow media and form the cache
- Add the storage bus cache with default or custom settings
You can run to see the name of the storage pool and again to see the effects of enabling storage bus cache. The output should resemble the image below, where the Number column shows values over 500 (indicating the drive is claimed by the storage bus) and the CanPool column now shows False for all non-boot drives. If the ProvisionMode was set to Cache prior to enabling, the Usage column will show as Journal for the faster drives.
-
Check the storage bus cache state
Check that the fields are correct and the Enabled field is now set to true.
The output should resemble below:
Now the storage bus cache has been successfully enabled, the next step is to create a volume.
Preamble
Before I get started discussing the creation of a storage space in Windows Server 2012 R2, bear in mind that I’m using the Preview version of the operating system that Microsoft made available. Further, I wanted to comment on the overall installation experience for the new operating system. I’ve installed Windows Server 2012 R2 as a virtual machine running under Fusion on a MacBook Pro Retina. I carry a spare solid state drive and Thunderbolt cable with me and I use that drive to store all of my “mobile lab” virtual machines. I still have other virtual machines running in my more complete home lab, but as I travel a lot, and was writing this article from the beach, my mobile lab was more than sufficient.
I’m extremely impressed as just how fast the overall install process performed. While I didn’t expect it to be slow since I’m using all solid state storage on my system, I was still surprised that the time from the beginning of the installation to first login was only seven minutes. Microsoft has made good progress on making the installation experience a lot faster than it used to be!
Step 1: Create a storage pool
You must first group available physical disks into one or more storage pools.
To create a storage pool
-
In the Server Manager navigation pane, click File and Storage Services.
-
In the navigation pane, click the Storage Pools page.
By default, available disks are included in a pool that is named the primordial pool. If no primordial pool is listed under STORAGE POOLS, this indicates that the storage does not meet the requirements for Storage Spaces. Make sure that the disks meet the requirements that are outlined in the Prerequisites section.
Tip
If you select the Primordial storage pool, the available physical disks are listed under PHYSICAL DISKS.
-
Under STORAGE POOLS, click the TASKS list, and then click New Storage Pool.
The New Storage Pool Wizard opens.
-
On the Before you begin page, click Next.
-
On the Specify a storage pool name and subsystem page, enter a name and optional description for the storage pool, select the group of available physical disks that you want to use, and then click Next.
-
On the Select physical disks for the storage pool page, do the following, and then click Next:
-
Select the check box next to each physical disk that you want to include in the storage pool.
-
If you want to designate one or more disks as hot spares, under Allocation, click the drop-down arrow, and then click Hot Spare.
-
-
On the Confirm selections page, verify that the settings are correct, and then click Create.
-
On the View results page, verify that all tasks completed, and then click Close.
Note
Optionally, to continue directly to the next step, you can select the Create a virtual disk when this wizard closes check box.
-
Under STORAGE POOLS, verify that the new storage pool is listed.
Windows PowerShell equivalent commands
The following Windows PowerShell cmdlet or cmdlets perform the same function as the preceding procedure. Enter each cmdlet on a single line, even though they may appear word-wrapped across several lines here because of formatting constraints.


The following example shows which physical disks are available in the primordial pool.
The following example creates a new storage pool that is named StoragePool1. It uses all available disks.
The following example creates a new storage pool StoragePool1 that uses four of the available disks.
The following example sequence of cmdlets shows how to add an available physical disk PhysicalDisk5 as a hot spare to the storage pool StoragePool1.
Шаг 1. Создание пула носителей
Сначала необходимо сгруппировать доступные физические диски в один или несколько пулов носителей.
-
В области навигации диспетчер сервера выберите «Файл» и «Службы служба хранилища».
-
В области навигации выберите страницу служба хранилища Пулы.
По умолчанию доступные диски включаются в пул под названием primordial. Если в разделе ПУЛЫ НОСИТЕЛЕЙ нет пула primordial, это значит, что хранилище не соответствует требованиям к дисковым пространствам. Убедитесь, что диски соответствуют требованиям, перечисленным в разделе «Предварительные условия».
Совет
Если выбрать пул носителей Primordial, доступные физические диски будут представлены в разделе ФИЗИЧЕСКИЕ ДИСКИ.
-
В разделе ПУЛЫ НОСИТЕЛЕй выберите список задач и выберите «Создать пул служба хранилища». Откроется мастер создания пула служба хранилища.
-
На странице «Перед началом работы » нажмите кнопку «Далее».
-
На странице «Укажите имя пула носителей и подсистему » введите имя и необязательное описание пула носителей, выберите группу доступных физических дисков, которые вы хотите использовать, а затем нажмите кнопку «Далее».
-
На странице «Выбор физических дисков» для пула носителей выполните следующие действия и нажмите кнопку «Далее».
-
Установите флажок рядом с каждым физическим диском, который нужно включить в пул носителей.
-
Если вы хотите назначить один или несколько дисков горячими запасными, в разделе «Выделение» щелкните стрелку раскрывающегося списка, а затем выберите «Горячая резервная».
-
-
На странице «Подтверждение выбора» проверьте правильность параметров и нажмите кнопку «Создать».
-
На странице «Просмотр результатов » убедитесь, что все задачи завершены, а затем нажмите кнопку «Закрыть».
Примечание
Либо, чтобы перейти непосредственно к следующему шагу, можно установить флажок Создать виртуальный диск при закрытии мастера.
-
Убедитесь, что новый пул носителей представлен в списке ПУЛЫ НОСИТЕЛЕЙ.
Windows PowerShell эквивалентные команды для создания пулов носителей
Следующие командлеты Windows PowerShell выполняют ту же функцию, что и предыдущая процедура. Вводите каждый командлет в одной строке, несмотря на то, что здесь они могут отображаться разбитыми на несколько строк из-за ограничений форматирования.
В следующем примере показано, какие физические диски доступны в пуле primordial.
В следующем примере создается пул носителей с именем StoragePool1 , использующий все доступные диски.
В следующем примере создается новый пул носителей StoragePool1, который использует четыре доступных диска.
Следующая серия командлетов демонстрирует, как добавить доступный физический диск PhysicalDisk5 в горячий резерв для пула носителей StoragePool1.
Step 4: Set storage pool defaults
After creating your storage pools there are a few settings that you should use Windows PowerShell to change (if you used the ProvisionStorageConfiguration.ps1 script to provision your storage, skip this step):
-
When to retire missing physical disks
-
Enclosure awareness
-
Default number of columns
The first one you should change if you want Storage Spaces to automatically repair virtual disks after a disk failure (we recommend this for all but the smallest environments); the other two are necessary only if you use a GUI to create virtual disks.
Consult your storage design, open a Windows PowerShell session with administrative permissions on the file server cluster, and then use this chunk of code to change these settings, modifying the first three lines to suit your design.
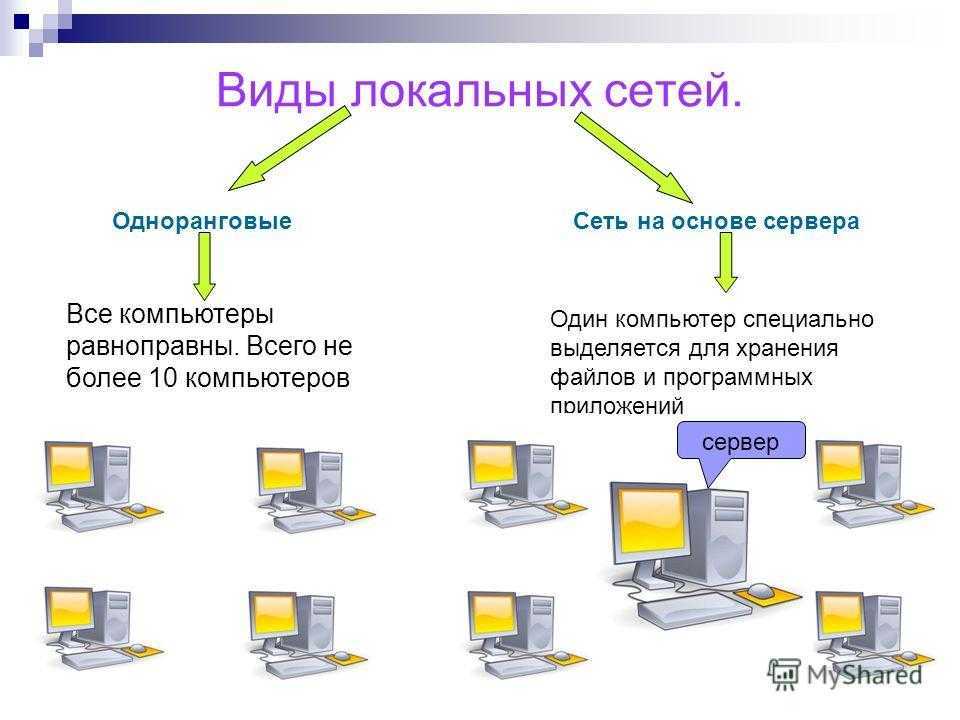
Storages Spaces / Storage Pools ^
I already described Storage Spaces in my Windows 8 feature list article: Storages Spaces allow you to combine multiple disks into one storage pool. The new technology is comparable to RAID, but it is more flexible and easier to configure. Probably the coolest thing is that disks can be of different size and connected through USB, SATA, and SAS (Serial Attached SCSI). Storage pools support thin provisioning (physical space is only used when the capacity is needed) and resiliency (mirroring for fault tolerance).
Virtualizing storage for scale, resiliency, and efficiency
Windows Server 2012 — Storage Spaces — Storage Pools