
Обновление RouterOS MikroTik
Первым делом, при новой настройке маршрутизатора, нужно установить пароль и обновить MikroTik (Более подробно о том, как обновить MikroTik через winbox или через web-интерфейс, можете прочитать в нашей статье «Обновление MikroTik RouterOS и Firmware»).
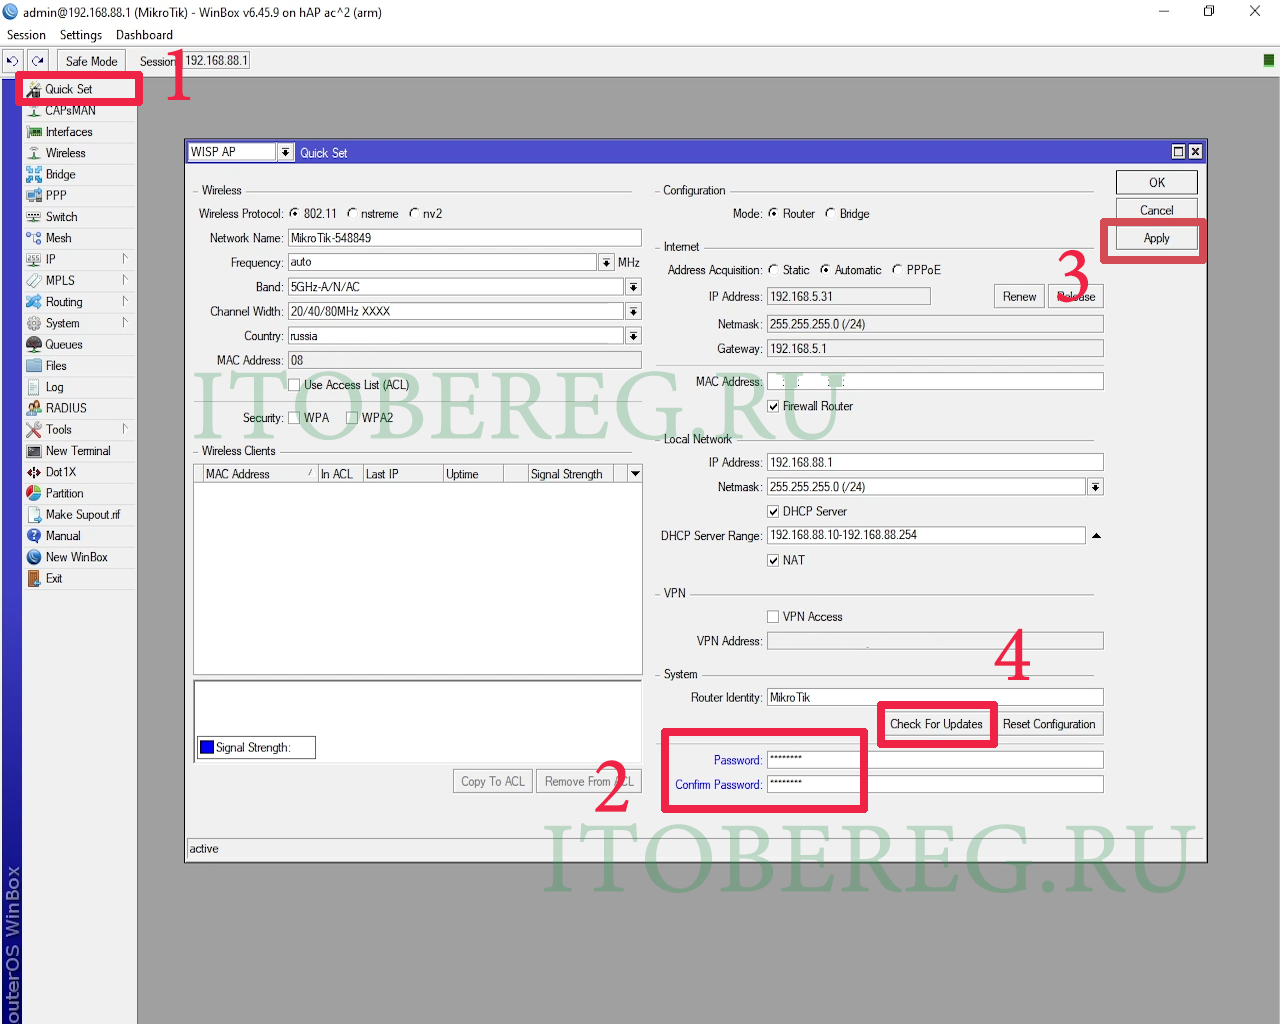
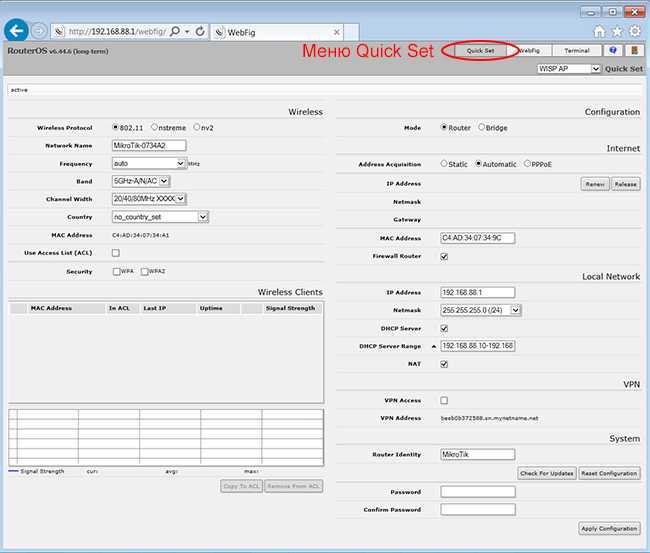
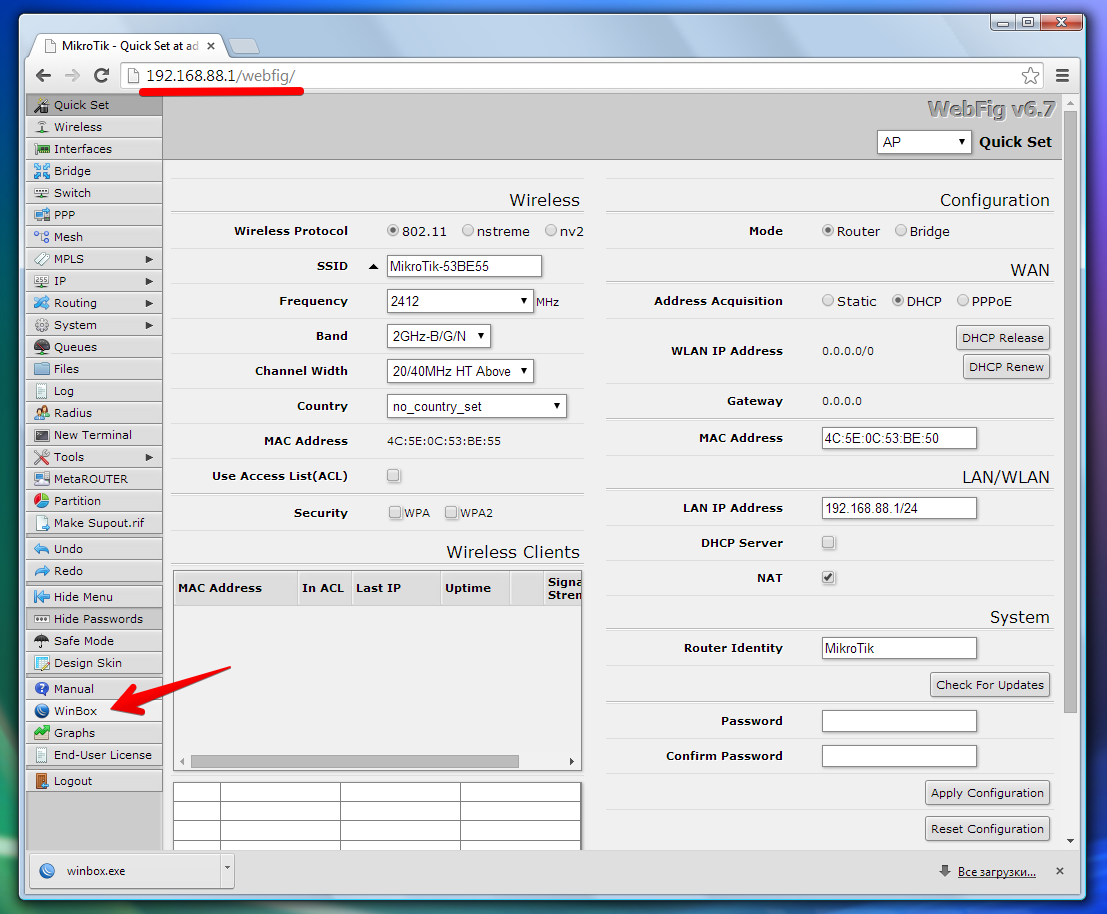
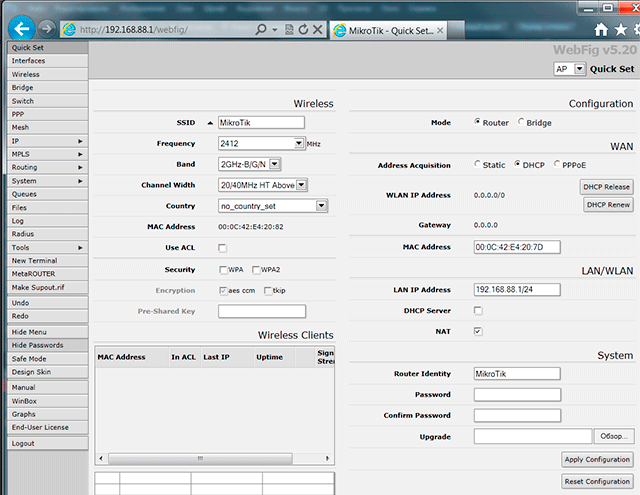
Для обновления заходим на маршрутизатор через утилиту Winbox (Более подробно о том, как это сделать, можно прочитать в нашей статье «Подключение к MikroTik через WinBox») и переходим на вкладку Quick Set.
В поле «Password» вводим пароль, в поле «Confirm Password» вводим пароль ещё раз для подтверждения и нажимаем кнопку «Apply». Пароль установлен. Про то как выбрать хороший пароль рассказывать не будем, перейдем к обновлению.
Для обновления нажимаем кнопку «Check For Update»
 Winbox Quick Set Update
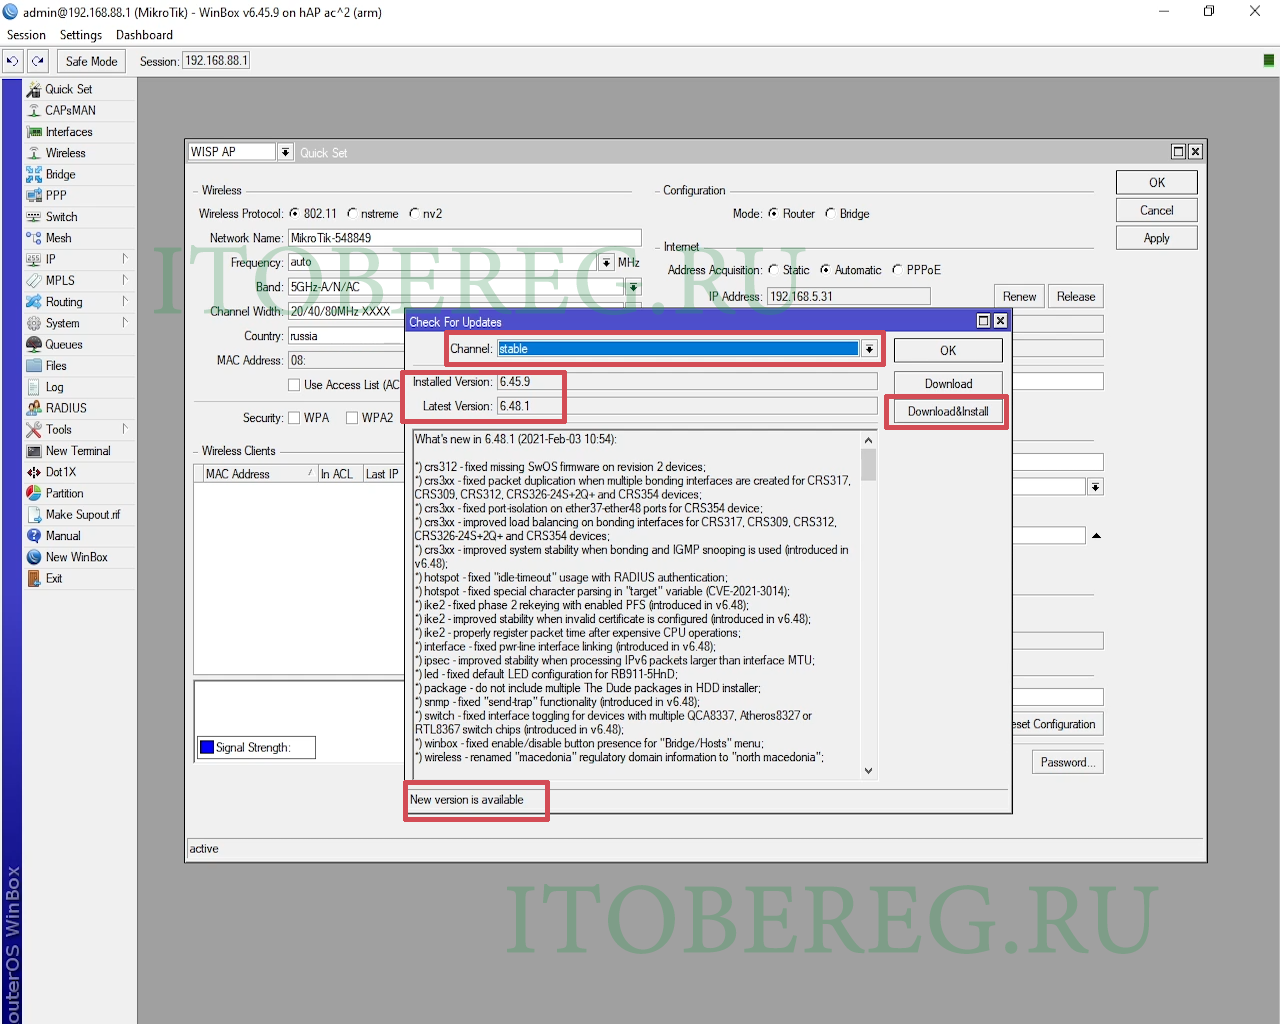
В открывшемся окне, в поле «Chanel» выбираем «Stable». Этим мы указываем маршрутизатору, что искать обновления нужно среди стабильных сборок. Если доступна более новая версия, нажимаем кнопку «Download&Install». После этого будет скачена и установлена последняя версия RouterOS
Обратите внимание, что при этом маршрутизатор будет перезагружен автоматически
 Winbox Update RouterOS
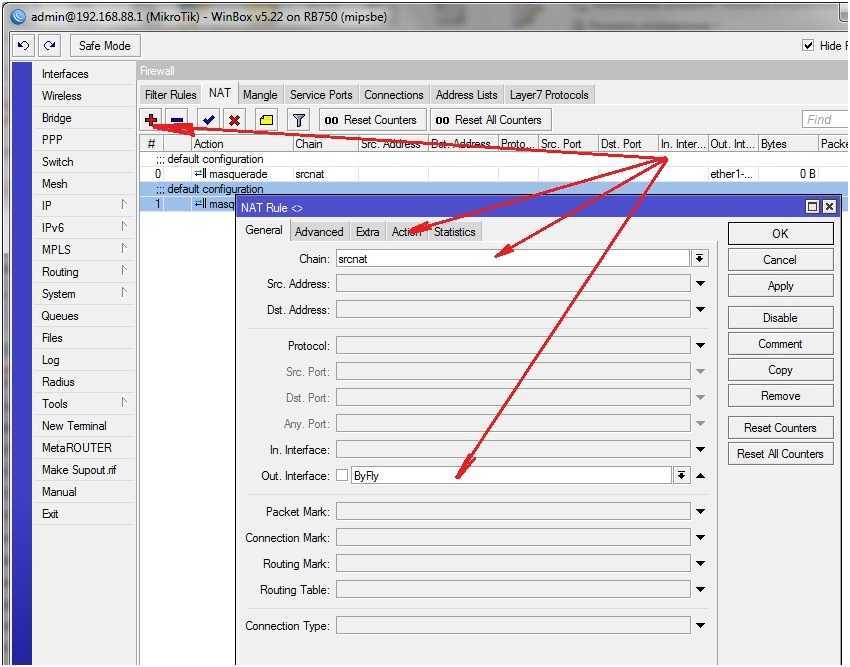
Настройка NAT на Микротике
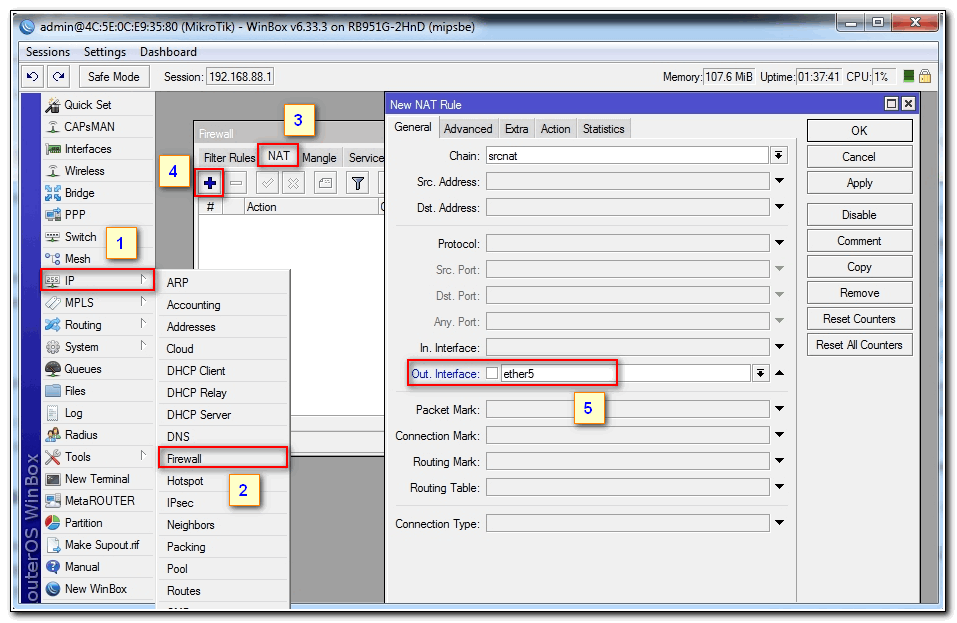
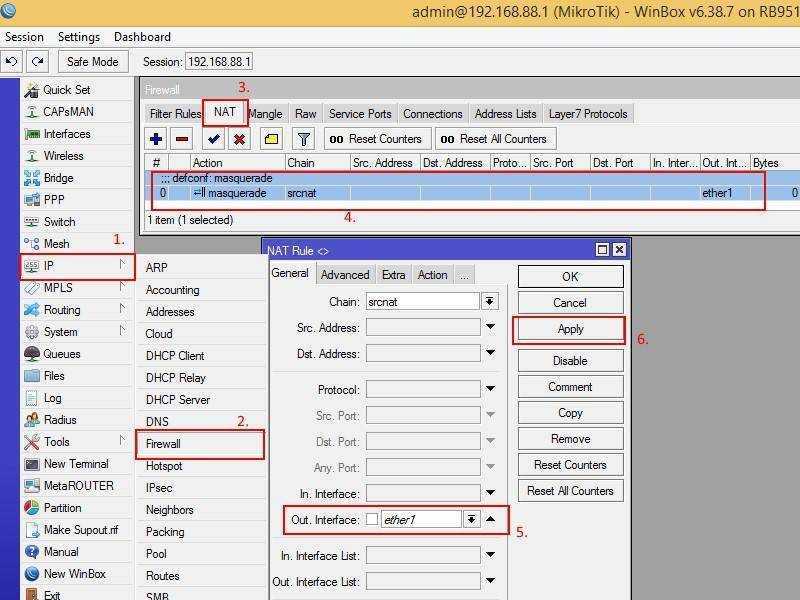
NAT это технология придуманная из-за нехватки ipv4, в дословном переводе означает «трансляция сетевых адресов». Простыми словами роутер будет подменять все запросы от локальной сети и отправлять их со своего ip. Дополнительный плюс — это закрывает внутреннюю сеть и защищает ее. Все ее настройки делаются в IP-> Firewall вкладка NAT. Добавляем правило:
- Chain – srcnat
- Interface – ether5
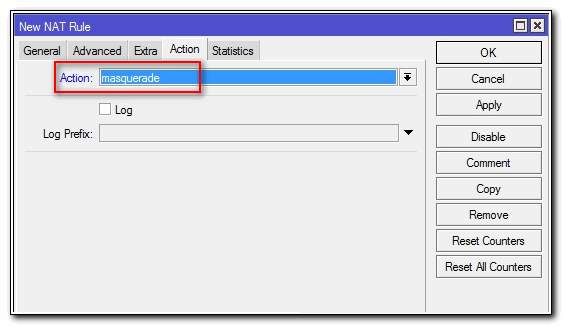
- На вкладке Action выбираем – masquerade.
Жмем ОК и на компьютерах в сети должен появится интернет. То есть они получат все необходимые настройки от микротока по DHCP, отработает NAT, DNS и запрос уйдет на шлюз по умолчанию. Но как же Wi-Fi?, его по-прежнему нет, сейчас мы это исправим.
Варианты установки Mikrotik RouterOS на ПК
- ISO-образ — установка с помощью компакт-диска (CD) или флешки. Скачайте ISO-файл, который доступен, и запишите его на флешку или CD диск.
- Сетевая установка — эта установка выполняется через компьютерную сеть (LAN). Сетевую установку можно выполнить на операционной системе Windows 95/98 / NT4 / 2000 / XP/Windows 7/Windows 8 / Windows 10.
Из этих вариантов установки, первый с использования ISO — образа является самым популярным и наиболее широко используемым.Установить Mikrotik с помощью образа ISO довольно просто. Вам нужно только скачать ISO RouterOS и записать его на флешку или компакт-диск, далее установить на ПК. .
Загрузите ISO — файл Mikrotik. Чтобы скачать нажмите здесь .
1. Скачав образ ISO его требуется записать его флешку или CD диск.
2. Настройте BIOS для установки операционной системы.
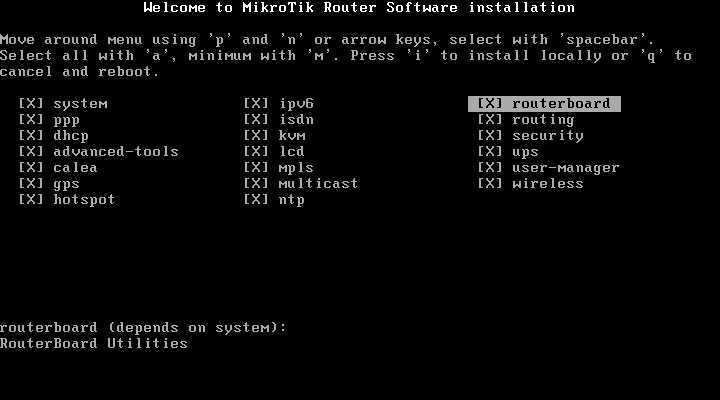
3. После настройки ваш компьютер загрузится с CD / DVD. В случае правильной загрузки образа, экран будет выглядеть следующим образом.
Установите Mikrotik RouterOS на ПК
Назначение пакетов Mikrotik RouterOS:
| Пакет | Назначение |
|---|---|
| advanced-tools | расширенные инструменты ping, netwatch, ip-scan, sms tool, wake-on-LAN |
| calea | инструмент для сбора данных для «Communications Assistance for Law Enforcement Act» в США |
| dhcp | Dynamic Host Control Protocol клиент и сервер |
| gps | поддержка GPS устройств |
| hotspot | управление HotSpot |
| ipv6 | поддержка адресации IPv6 |
| mpls | поддержка Multi Protocol Labels Switching |
| multicast | Protocol Independent Multicast — Sparse Mode; Internet Group Managing Protocol — Proxy |
| ntp | Network protocol client and service |
| ppp | MlPPP клиент, PPP, PPTP, L2TP, PPPoE, ISDN PPP клиенты и серверы |
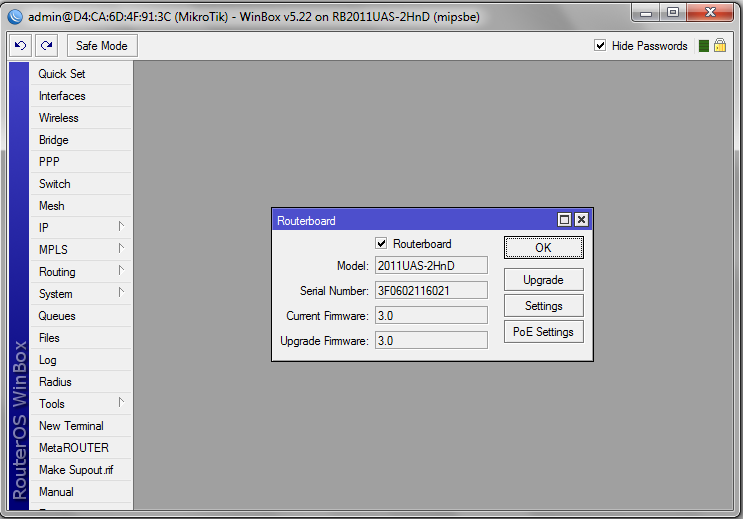
| routerboard | доступ и управление RouterBOOT |
| routing | поддержка динамических протоколов RIP, BGP, OSPF и утилит маршрутизации BFD, filters for routes. |
| security | IPSEC, SSH, Secure WinBox |
| system | базовые возможности маршрутизации like static routing, ip addresses, sNTP, telnet, API, queues, firewall, web proxy, DNS cache, TFTP, IP pool, SNMP, packet sniffer, e-mail send tool, graphing, bandwidth-test, torch, EoIP, IPIP, bridging, VLAN, VRRP и др.). Также для платформы RouterBOARD — MetaROUTER | Virtualization |
| ups | поддержка источников бесперебойного питания APC |
| user-manager | MikroTik User Manager |
| wireless | поддержка беспроводных интерфейсов |
| isdn | поддержка ISDN |
| lcd | поддержка сенсорных LCD экранов |
| kvm | виртуализация KVM |
Выберите пакеты, которые требуется установить.
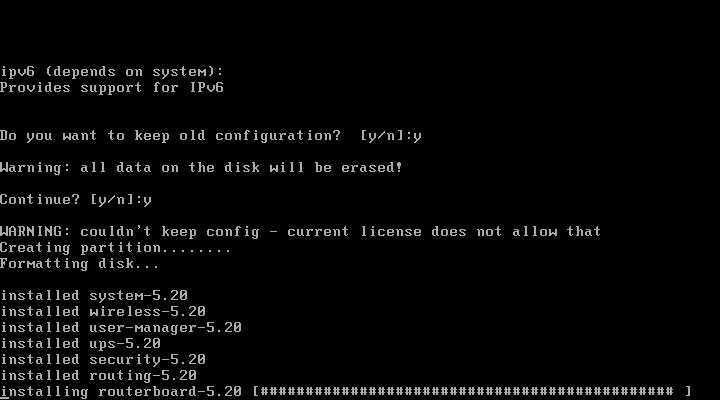
4. Выполните процесс установки Mikrotik, выбрав все опции которые доступны с помощью кнопки «a«. Теперь для установки Mikrotik нажмите кнопку » i «.
5. Подождите несколько минут, не завершится процесс установки. Если он уже завершен, нажмите клавишу Enter для перезагрузки
Установите Mikrotik RouterOS на ПК
6. После перезагрузки появится сообщение, с требованием ввести логин и пароль. Ведите логин: admin. Пароль по умолчанию отсутствует. Его вы установити сами во время настройки Router OS.
7. В случае успеха ПК отобразит командную строку Mikrotik Router OS. Это означает что все прошло успешно.

Установите Mikrotik RouterOS на ПК
Теперь Mikrotik RouterOS установлен на вашем компьютере. Но его можно использовать только в течение 24 часов. Так как RouterOS все еще находится в пробном периоде. Чтобы иметь возможность сделать полную версию с использованием лицензии уровня 6, требуется выполнить регистрацию. Файл лицензии уровня 6 был в пакете ISO. Пожалуйста, найдите этот файл.
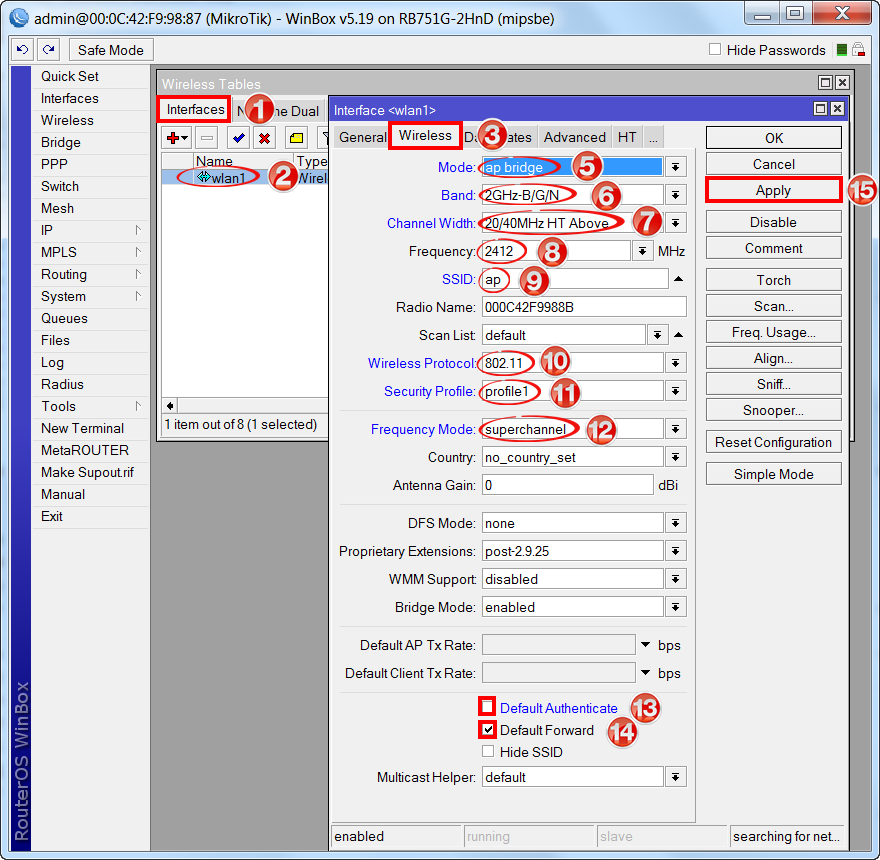
Начальная настройка WiFi 2.4ГГц и 5ГГц
В данной статье мы не будем глубоко погружаться в настройку WiFi. Для этого будет отдельная статья.
Остановимся на основных настройках. Этого будет достаточно, чтобы быстро запустить wifi дома или в небольшом офисе.
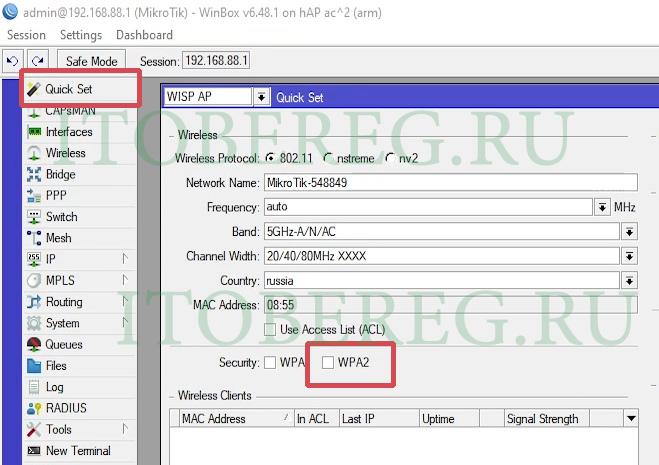
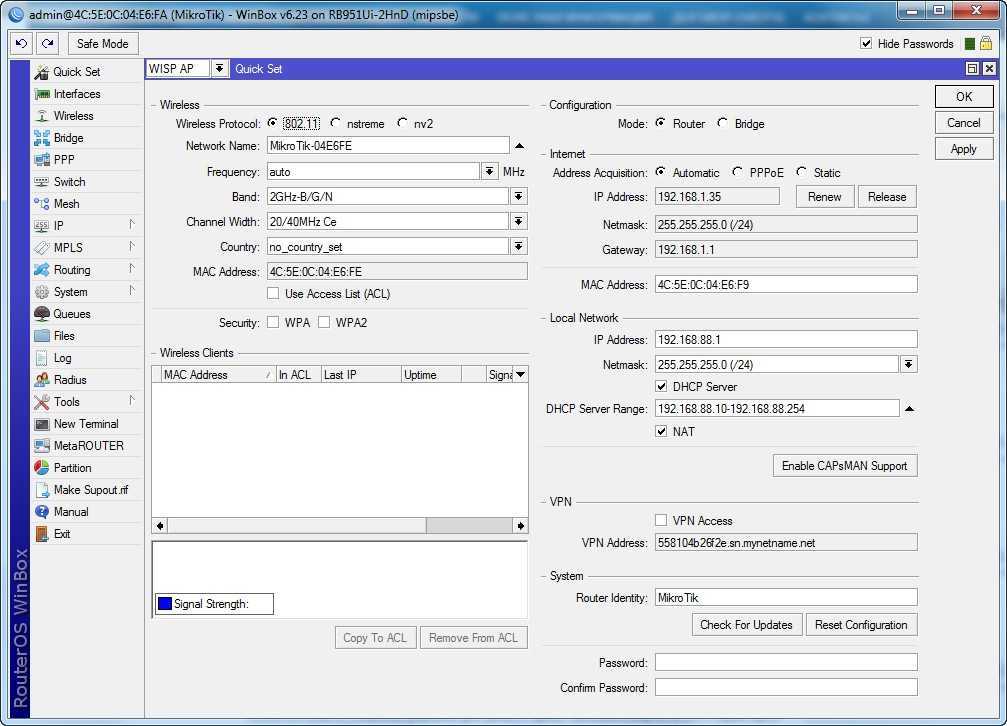
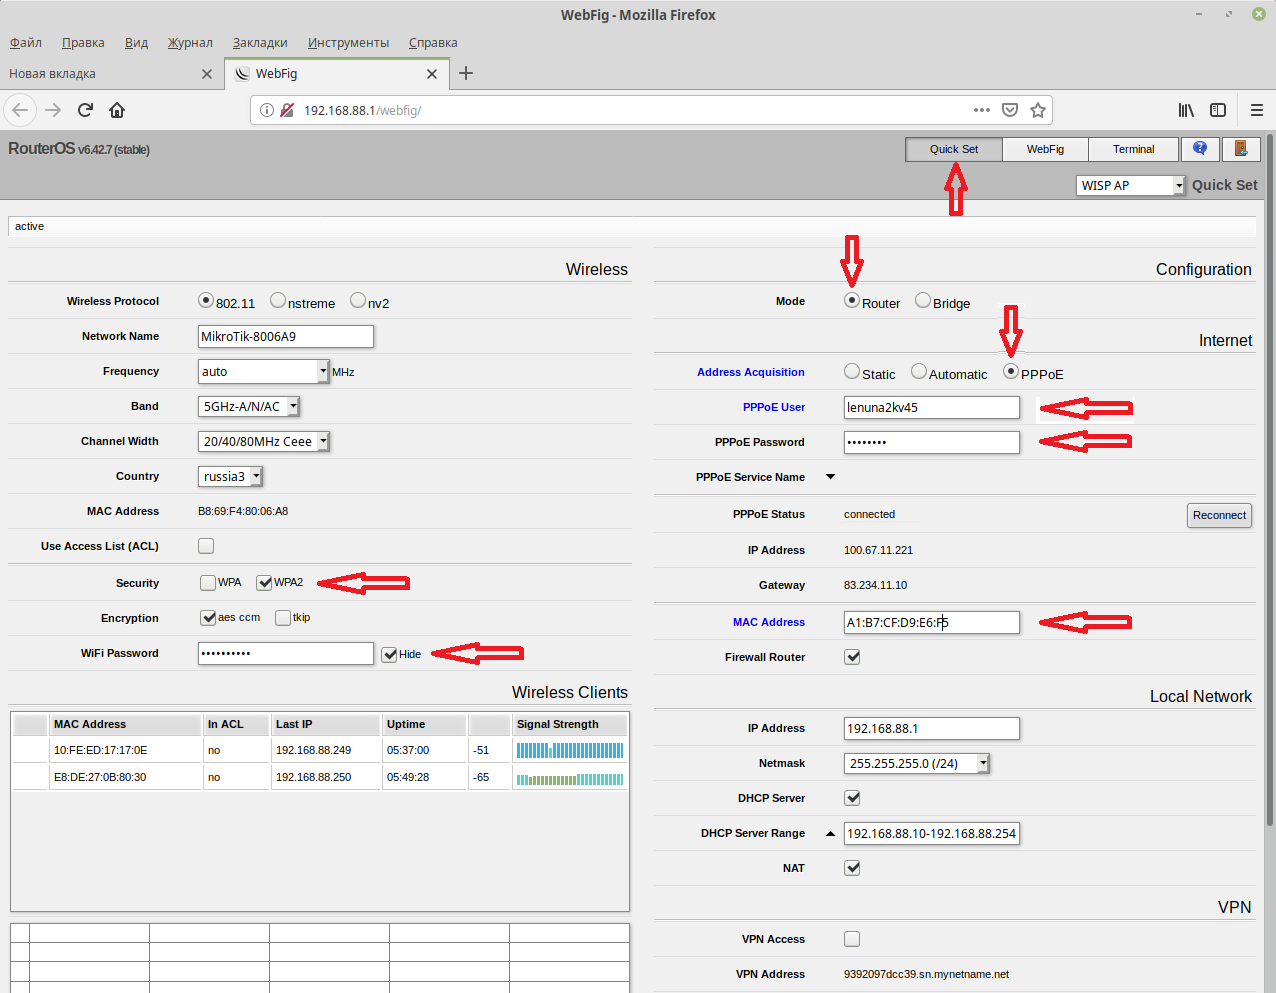
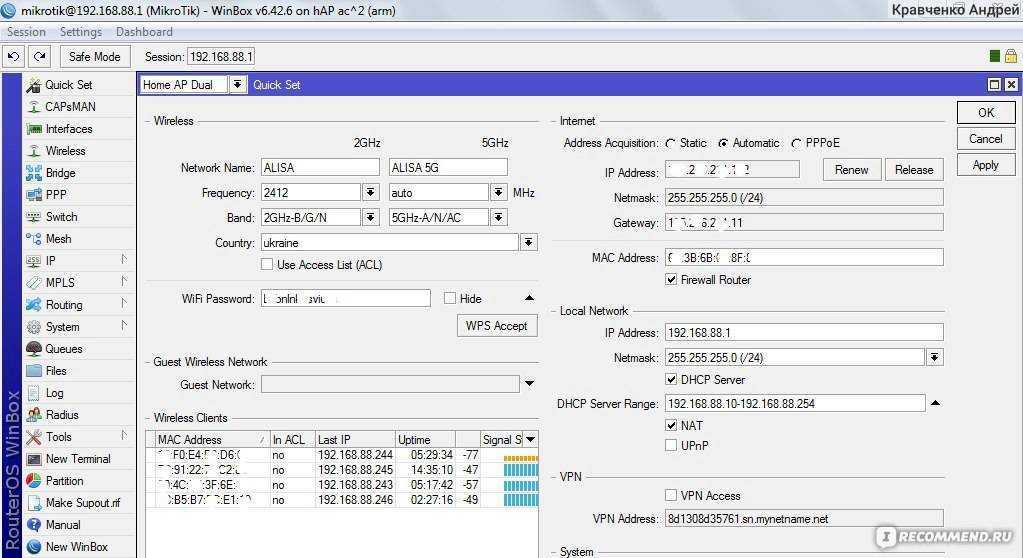
Первым делом переходим на вкладку Quick Set и устанавливаем пароль. Для этого нужно выбрать стандарт безопасности WPA2 (для старых устройств, возможно, потребуется установить и WAP).
 Winbox wifi wisp ap
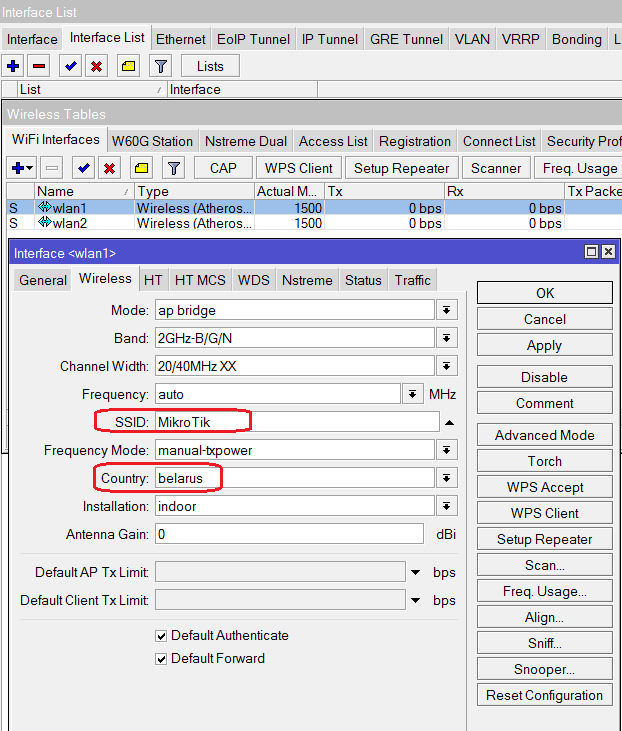
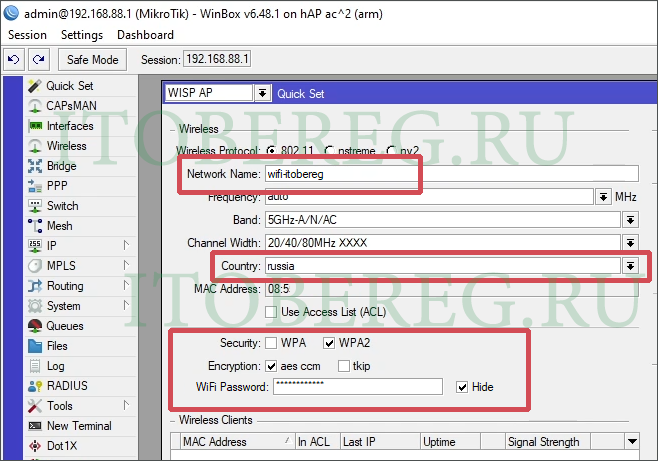
После выбора типа шифрования откроется поле для ввода пароля и выбора алгоритма шифрования. Вводим пароль, выбираем алгоритм шифрования «aes ccm», в поле «Country» (Страна) выбираем «russia» и не забываем указать название нашей сети в поле «Network Name» (в нашем примере это wifi-itobereg)
Обратите внимание, что длина пароля обязательно должна быть от 8 символов. . Winbox WiFi WISP AP WPA2 aes
 Winbox WiFi WISP AP WPA2 aes
Если Ваш маршрутизатор работает только на частоте 2.4ГГц, остается нажать кнопку «Apply» (применить) и на этом настройку можно закончить.
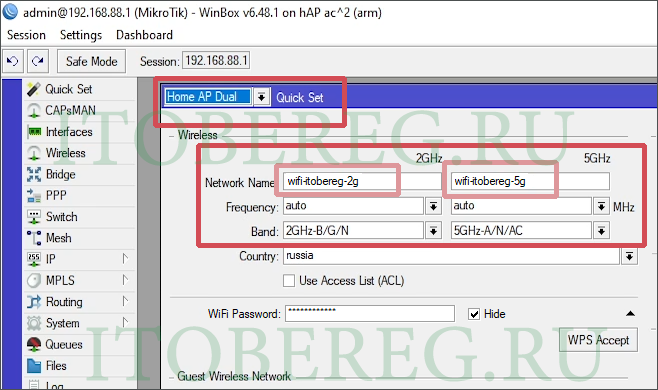
Но если у Вас, как в нашем случае, двухдиапазонный маршрутизатор (работает на частотах 2.4ГГц и 5 ГГц), нужно выполнить ещё несколько действий. Если вы обратили внимание, имя для wifi сети в варианте настроек «WISP AP» указывается только для одной wifi-сети, которая работает на частоте 5ГГц, а имя для второй wifi-сети указать негде. Для того, чтобы настроить вторую wifi-сеть, нужно изменить режим настроек «Quick Set» с «WISP AP» на «Home AP Dual». В этом режиме появляется возможность настроить оба wifi интерфейса на 2.4ГГц и 5 ГГц
Указываем имена сетей и нажимаем кнопку «Apply» (применить).
Мы рекомендуем в названиях сетей указывать их частоту. В нашем примере это wifi-itobereg-2g и wifi-itobereg-5g.
 Winbox Wifi Home AP Dual
На этом первоначальная настройка маршрутизатора закончена.
Важно понимать, что это всего лишь небольшой начальный набор действий для быстрого запуска локальной сети и wifi-сети дома или в небольшом офисе.
Маршрутизаторы MikroTik имеют очень большой функционал, который может помочь решить вам самые сложные задачи. Об этом вы можете узнать у нас на сайте в разделе MikroTik
What is MikroTik RouterOS™?
- What does MikroTik RouterOS do?
- MikroTik RouterOS is a router operating system and software which turns a regular Intel PC or MikroTik RouterBOARD hardware into a dedicated router.
- What features does RouterOS have?
- RouterOS feature list
- Can I test the MikroTik RouterOS functionality before I buy the license?
- Yes, you can download the installation from MikroTik’s webpage and install your own MikroTik router. The router has full functionality without the need for a license key for 24h total running time. That’s enough time to test the router for 3 days at 8h a day, if you shut down the router at the end of each 8h day.
- Where can I get the License Key?
- Create an account on MikroTik’s webpage (the top right-hand corner of www.mikrotik.com). You can use a credit card to pay for the key.
- Can I use MikroTik router to hook up to a service provider via a T1, T3, or other high speed connection?
- How fast will it be?
- An Intel PC is faster than almost any proprietary router, and there is plenty of processing power even in a 100MHz CPU.
- How does this software compare to using a Cisco router?
- You can do almost everything that a proprietary router does at a fraction of the cost of such a router and have flexibility in upgrading, ease of management and maintenance.
- What OS do I need to install the MikroTik RouterOS?
- No Operating System is needed. The MikroTik RouterOS is standalone Operating System. The OS is Linux kernel based and very stable. Your hard drive will be wiped completely by the installation process. No additional disk support, just one PRIMARY MASTER HDD or FlashDisk, except for WEB proxy cache.
- How secure is the router once it is setup?
- Access to the router is protected by username and password. Additional users can be added to the router, specific rights can be set for user groups. Remote access to the router can be restricted by user, IP address. Firewall filtering is the easiest way to protect your router and network.
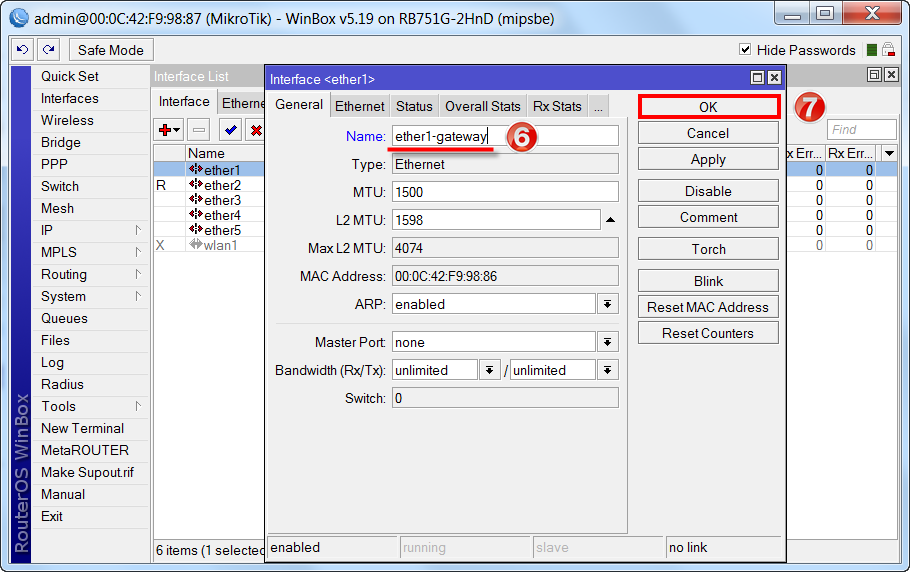
Настройка WAN интерфейса MikroTik
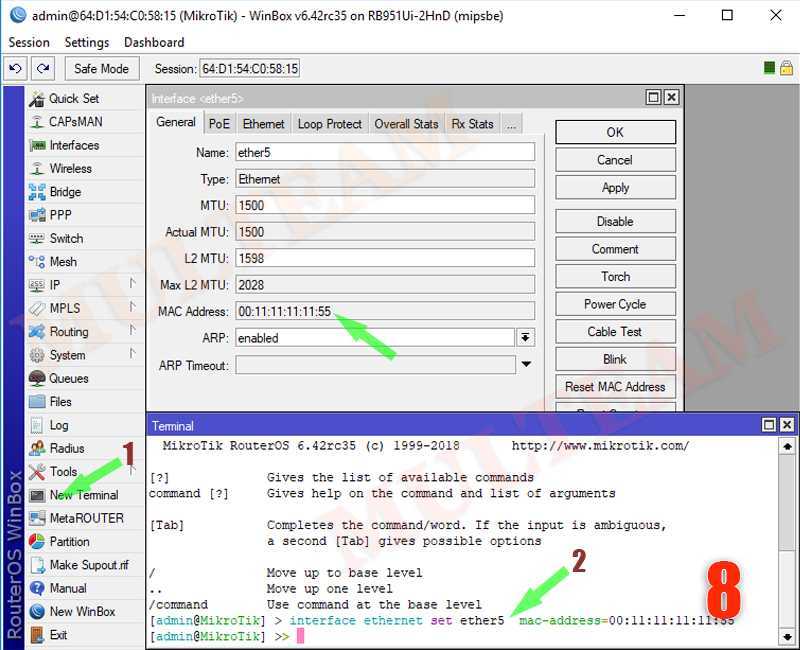
Смена MAC адреса WAN порта
Если Ваш провайдер блокирует доступ к сети по MAC адресу, то необходимо сначала изменить MAC адрес WAN порта роутера MikroTik. В противном случае пропустите этот пункт.
Чтобы изменить MAC адрес порта MikroTik, открываем в программе Winbox меню New Terminal и вводим команду:
/interface ethernet set ether1 mac-address=00:01:02:03:04:05
, где ether1 — имя WAN интерфейса, 00:01:02:03:04:05 — разрешенный MAC адрес.
Чтобы вернуть родной MAC адрес порта, нужно выполнить команду:
/interface ethernet reset-mac ether1
, где ether1 — имя интерфейса.
Настройка Dynamic IP
Если интернет провайдер выдает Вам сетевые настройки автоматически, то необходимо настроить WAN порт роутера MikroTik на получение настроек по DHCP:
- Открываем меню IP;
- Выбираем DHCP Client;
- В появившемся окне нажимаем кнопку Add (плюсик);
- В новом окне в списке Interface: выбираем WAN интерфейс ether1;
- Нажимаем кнопку OK для сохранения настроек.
Теперь мы получили IP адрес от провайдера, который отображается в столбце IP Adress.
Проверим, что есть связь с интернетом:
- Открываем меню New Terminal;
- В терминале пишем команду ping 8.8.8.8 (пингуем сайт google) и жмем Enter на клавиатуре.
Как видим, идут пинги по 60ms, значит интернет подключен и работает. Остановить выполнение команды можно комбинацией клавиш на клавиатуре Ctrl+C.

На компьютерах, подключенных к роутеру MikroTik, интернет не будет работать, пока вы не настроите локальную сеть, Firewall и NAT.
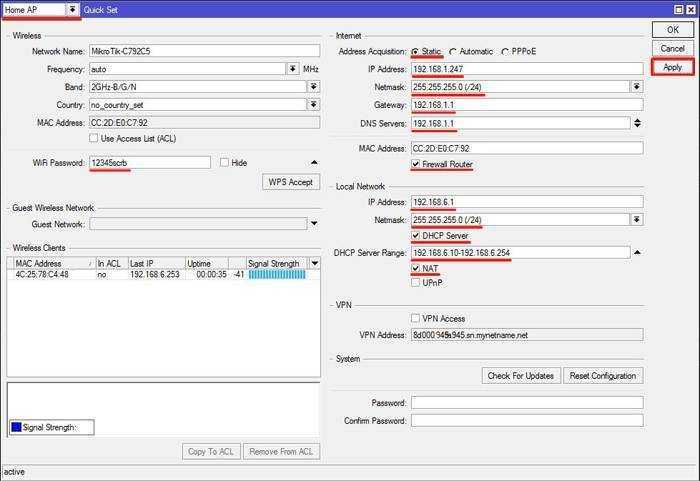
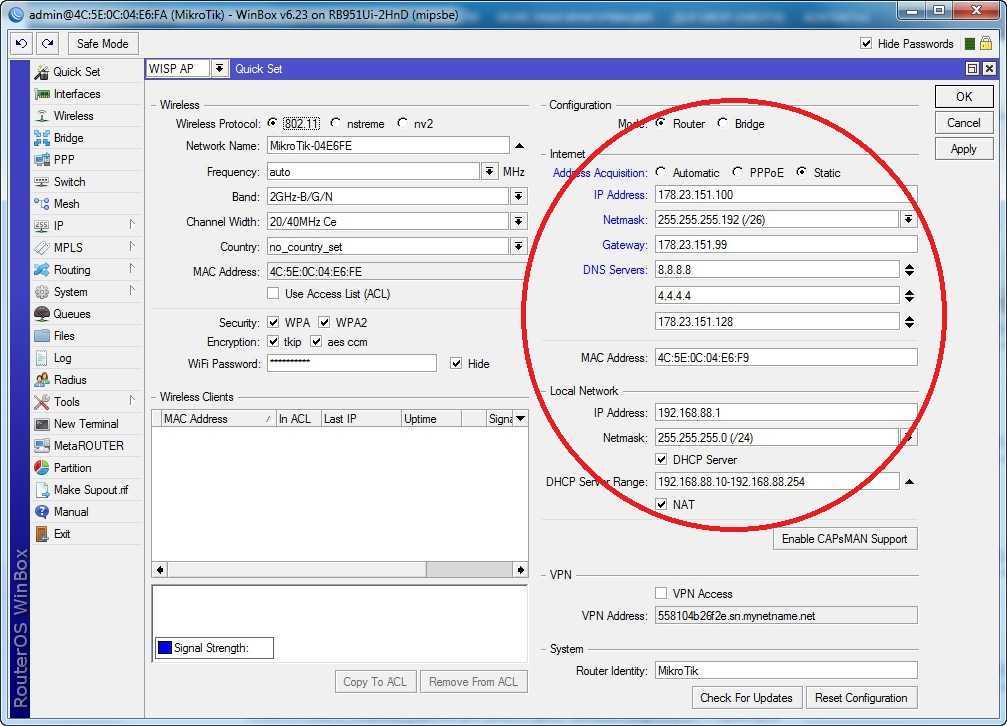
Настройка Static IP
Если вы используете статические сетевые настройки, необходимо настроить WAN порт роутера MikroTik вручную.
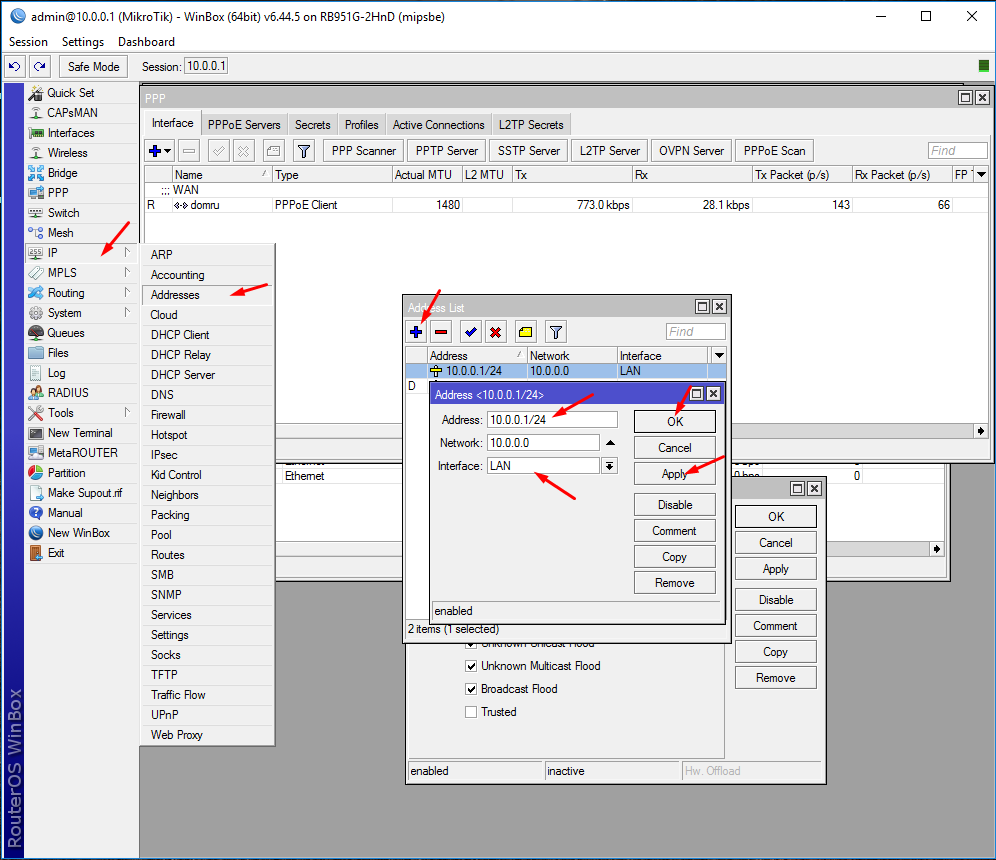
Настроим статический IP адрес и маску подсети WAN порта MikroTik :
- Открываем меню IP;
- Выбираем Addresses;
- В появившемся окне нажимаем кнопку Add (плюсик);
- В новом окне в поле Address: прописываем статический IP адрес / маску подсети;
- В списке Interface: выбираем WAN интерфейс ether1;
- Для сохранения настроек нажимаем кнопку OK.
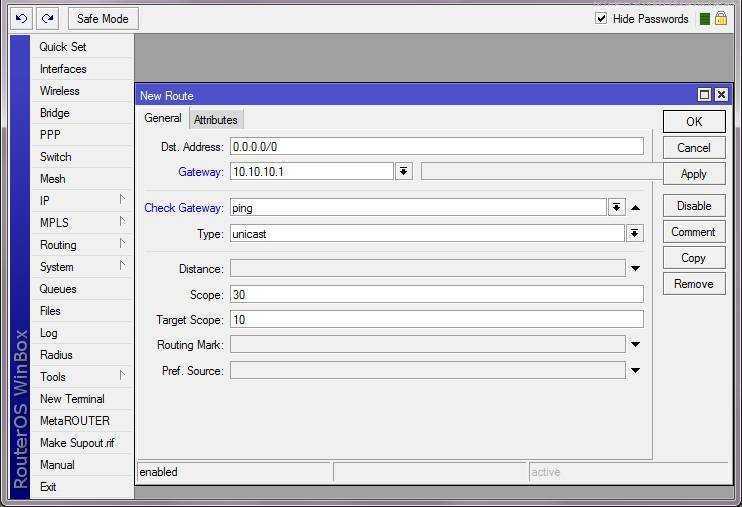
Настроим адрес интернет шлюза MikroTik:
- Открываем меню IP;
- Выбираем Routes;
- В появившемся окне нажимаем кнопку Add (плюсик);
- В новом окне в поле Gateway: прописываем IP адрес шлюза;
- Нажимаем кнопку OK для сохранения настроек.
Добавим адреса DNS серверов MikroTik:
- Открываем меню IP;
- Выбираем DNS;
- В появившемся окне нажимаем кнопку Settings;
- В новом окне в поле Servers: прописываем IP адрес предпочитаемого DNS сервера;
- Нажимаем кнопку «вниз» (черный треугольник), чтобы добавить еще одно поле для ввода;
- В новом поле прописываем IP адрес альтернативного DNS сервера;
- Ставим галочку Allow Remote Requests;
- Нажимаем кнопку OK для сохранения настроек.
Проверим, что есть доступ к интернету:
- Открываем меню New Terminal;
- В терминале пишем команду ping 8.8.8.8 (пингуем сайт google) и жмем Enter на клавиатуре.
Как видим, идут пинги по 60ms, значит интернет подключен и работает. Остановить выполнение команды можно комбинацией клавиш на клавиатуре Ctrl+C.
На компьютерах, подключенных к роутеру MikroTik, интернет не будет работать, пока вы не настроите локальную сеть, Firewall и NAT.
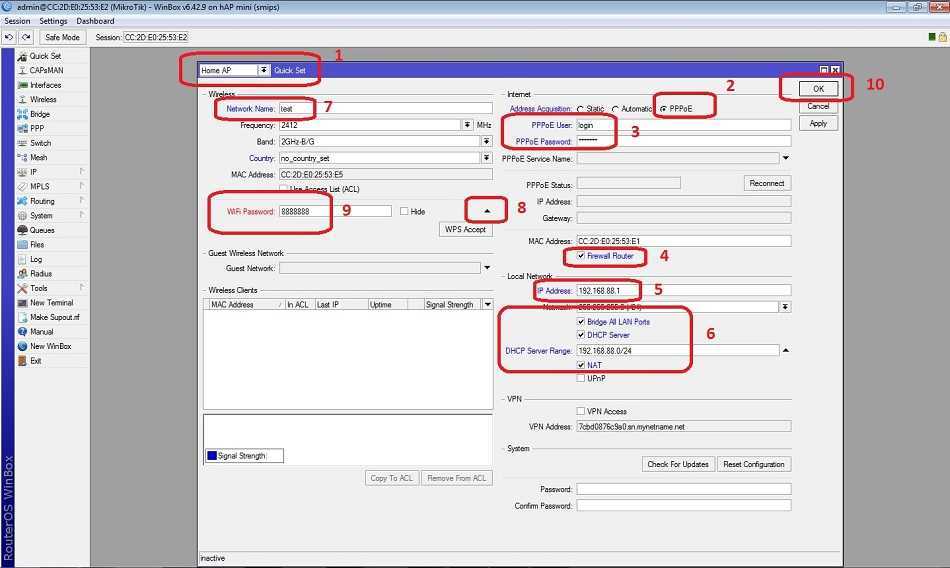
Настройка PPPoE
Если вы используете ADSL модем, к которому по сетевому кабелю подключен роутер MikroTik, сначала необходимо настроить ADSL модем в режим Bridge (мост).
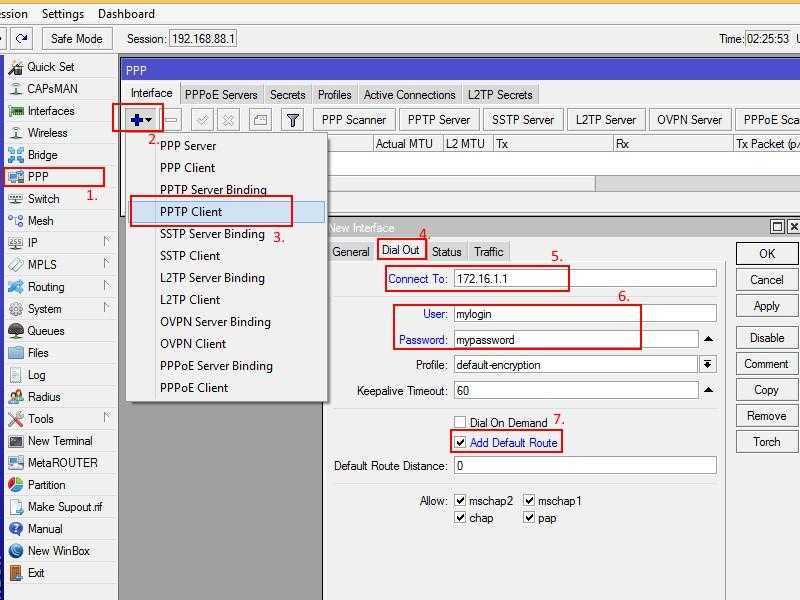
Настроим клиентское PPPoE соединение на роутере MikroTik:
- Слева выбираем меню PPP;
- Нажимаем кнопку Add (плюсик);
- Выбираем PPPoE Client.
Настраиваем параметры PPPoE соединения MikroTik:
- В поле Name указываем имя соединения;
-
В списке Interfaces выбираем первый WAN порт ether1, который подключен к провайдеру;
- Переходим на вкладку Dial Out;
- В поле User указываем имя пользователя;
- В поле Password вводим пароль;
- Ставим галочку Use Peer DNS;
- Нажимаем кнопку OK.
После создания PPPoE соединения напротив него должна появиться буква R, которая говорит о том, что соединение установлено.
Проверим, что есть связь с интернетом:
- Открываем меню New Terminal;
- В терминале пишем команду ping 8.8.8.8 (пингуем сайт google) и жмем Enter на клавиатуре.
Как видим, идут пинги по 60ms, значит интернет подключен и работает. Остановить выполнение команды можно комбинацией клавиш на клавиатуре Ctrl+C.
На компьютерах, подключенных к роутеру MikroTik, интернет не будет работать, пока вы не настроите локальную сеть, Firewall и NAT.
Sorting out displayed items
Almost every window has a Sort button. When clicking on this button several options appear as illustrated in the screenshot below
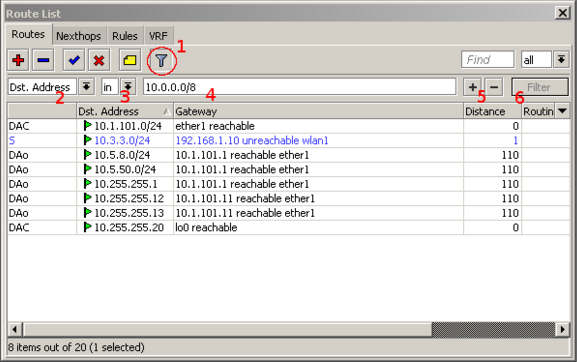
The example shows how to quickly filter out routes that are in the 10.0.0.0/8 range
- Press Sort button
- Chose Dst.Address from the first drop-down box.
- Chose in form the second drop-down box. «in» means that filter will check if DST address value is in range of the specified network.
- Enter the network against which values will be compared (in our example enter «10.0.0.0/8»)
- These buttons are to add or remove another filter to the stack.
- Press the Filter button to apply our filter.
As you can see from the screenshot Winbox sorted out only routes that are within the 10.0.0.0/8 range.
Comparison operators (Number 3 in the screenshot) may be different for each window. For example «Ip Route» window has only two is and in. Other windows may have operators such as «is not», «contains», «contains not».
Winbox allows building a stack of filters. For example, if there is a need to filter by destination address and gateway, then
- set the first filter as described in the example above,
- press button to add another filter bar in the stack.
- set up a second filter to filter by the gateway
- press the Filter button to apply filters.
You can also remove unnecessary filters from the stack by pressing the button.
Troubleshooting
Changing MTU
VMware ESXi supports MTU of up to 9000 bytes. To get the benefit of that, you have to adjust your ESXi installation to allow a higher MTU. Virtual Ethernet interface added after the MTU change will be properly allowed by the ESXi server to pass jumbo frames. Interfaces added prior to MTU change on the ESXi server will be barred by the ESXi server (it will still report old MTU as maximum possible size). If you have this, you have to re-add interfaces to the virtual guests.
Example. There are 2 interfaces added to the ESXi guest, auto-detected MTU on the interfaces show MTU size as it was at the time when the interface was added:
 > interface ethernet print
Flags: X - disabled, R - running, S - slave
 #    NAME           MTU MAC-ADDRESS       ARP
 0 R  ether1        9000 00:0C:29:35:37:5C enabled
 1 R  ether2        1500 00:0C:29:35:37:66 enabled
Using bridge on Linux
If Linux bridge supports IGMP snooping, and there are problems with IPv6 traffic it is required to disable that feature as it interacts with MLD packets (multicast) and is not passing them through.
echo -n 0 > /sys/class/net/vmbr0/bridge/multicast_snooping
Packets not passing from guests
The problem: after configuring a software interface (VLAN, EoIP, bridge, etc.) on the guest CHR it stops passing data to the outside world beyond the router.
The solution: check your VMS (Virtualization Management System) security settings, if other MAC addresses allowed to pass if packets with VLAN tags allowed to pass through. Adjust the security settings according to your needs like allowing MAC spoofing or certain MAC address range. For VLAN interfaces, it is usually possible to define allowed VLAN tags or VLAN tag range.
Enable Promiscuous mode in port group or virtual switch that you will use for specific VM.
ESX documentation:
Hyper-V documentation:
https://technet.microsoft.com/en-us/library/cc816585(v=ws.10).aspx#Anchor_2
Linode
When creating multiple Linodes with the same disk size, new Linodes will have the same systemID. This will cause issues to get a Trial/Paid license. To avoid this, run the command after the first boot and before you request a trial or paid license. This will make sure the ID is unique.
Some useful articles:
Specific vlan is untagged by nic interface:
Allow passing other vlans:
https://social.technet.microsoft.com/Forums/windows/en-US/79d36d5b-c794-4502-8ed4-b7a4183b1891/vlan-tags-and-hyperv-switches?forum=winserverhyperv
IP Connectivity Access
Besides the fact that the firewall protects your router from unauthorized access from outer networks, it is possible to restrict username access for the specific IP address
/user set 0 allowed-address=x.x.x.x/yy
x.x.x.x/yy — your IP or network subnet that is allowed to access your router.
IP connectivity on the public interface must be limited in the firewall. We will accept only ICMP(ping/traceroute), IP Winbox, and ssh access.
/ip firewall filter
  add chain=input connection-state=established,related action=accept comment="accept established,related";
  add chain=input connection-state=invalid action=drop;
  add chain=input in-interface=ether1 protocol=icmp action=accept comment="allow ICMP";
  add chain=input in-interface=ether1 protocol=tcp port=8291 action=accept comment="allow Winbox";
  add chain=input in-interface=ether1 protocol=tcp port=22 action=accept comment="allow SSH";
  add chain=input in-interface=ether1 action=drop comment="block everything else";
The first two rules accept packets from already established connections, so we assume those are OK to not overload the CPU. The third rule drops any packet which connection tracking thinks is invalid. After that, we set up typical accept rules for specific protocols.
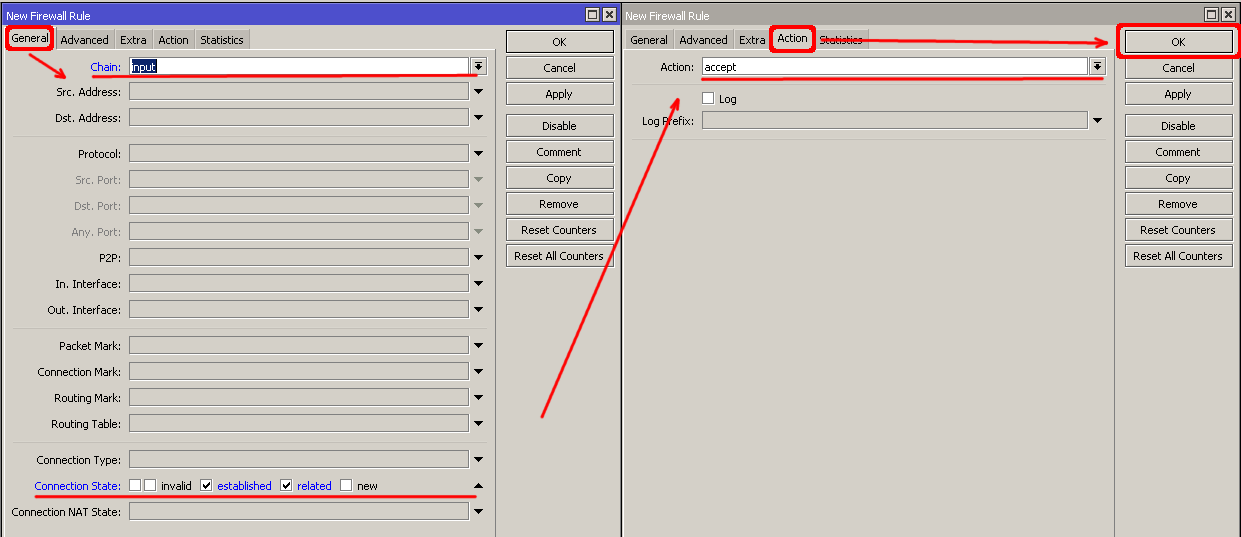
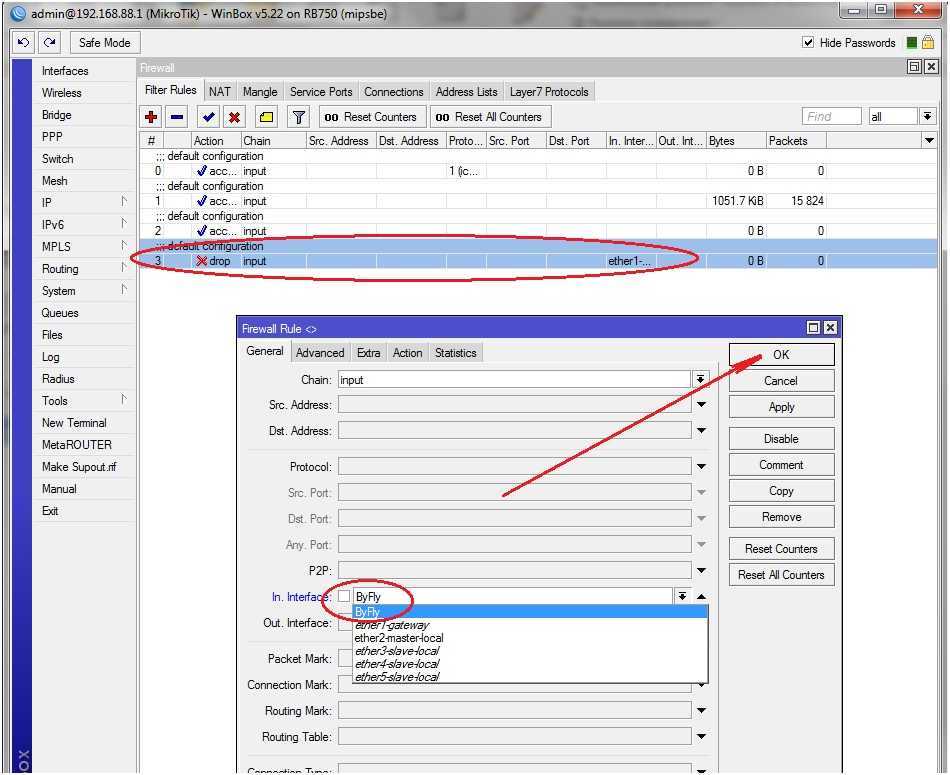
If you are using Winbox/Webfig for configuration, here is an example of how to add an established/related rule:
- Open Ip -> Firewall window, click on Filter rules tab;
- Click on the + button, a new dialog will open;
- Select chain input, click on Connection state, and select checkboxes for established and related;
- Click on the Action tab and make sure action accept is selected;
- Click on the Ok button to apply settings.

To add other rules click on + for each new rule and fill the same parameters as provided in the console example.
MAC Connectivity Access
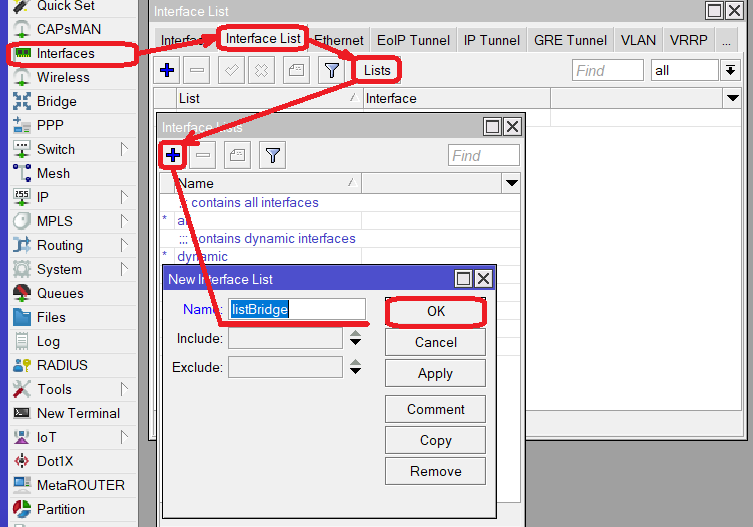
By default mac server runs on all interfaces, so we will disable default all entry and add a local interface to disallow MAC connectivity from the WAN port. MAC Telnet Server feature allows you to apply restrictions to the interface «list».

![[openwrt wiki] mikrotik routerboard — общие процедуры для всех моделей](https://robotrackkursk.ru/wp-content/uploads/9/e/f/9eff54ac671e7bd63fa51a16f8694a96.png)
First, create an interface list:
> /interface list add name=listBridge
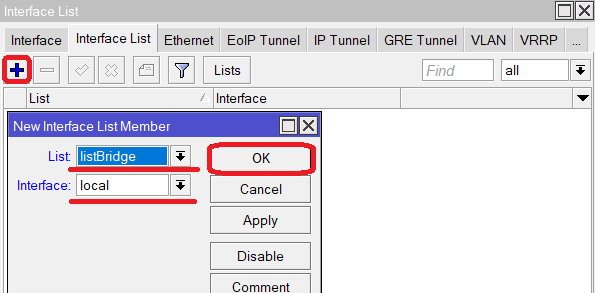
Then, add your previously created bridge named «local» to the interface list:
> /interface list member add list=listBridge interface=local
Apply newly created «list» (of interfaces) to the MAC server:
> tool mac-server set allowed-interface-list=listBridge
Do the same for Winbox MAC access
> tool mac-server mac-winbox set allowed-interface-list=listBridge
Winbox/Webfig actions:
- Open Interfaces → Interface List → Lists window and add a new list by clicking «+»;
- Input the interface list name «listBridge» into the Name field and click OK;
- Go back to the Interfaces → Interface List section and click «+»;
- Select «listBridge» from the dropdown List options and select «local» from the dropdown Interface options and click OK;
- Open Tools -> Mac Server window;
- Click on the «MAC Telnet Server» button, a new dialog will open;
- Select the newly created list «listBridge» from the dropdown list and click on OK button to apply settings.
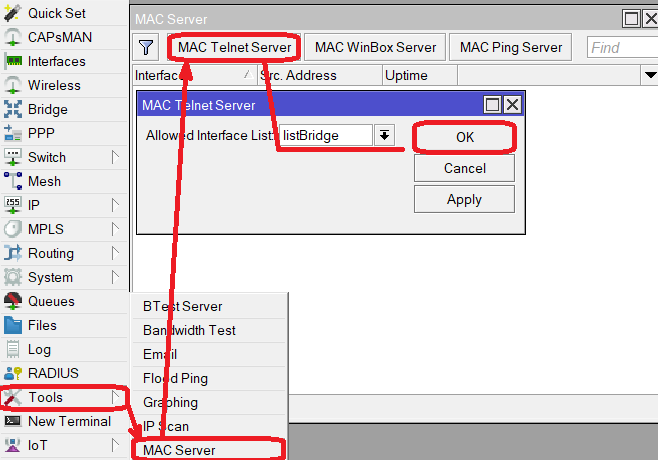
Do the same in the MAC Winbox Server tab to block Mac Winbox connections from the internet.
Advanced mode
Additional Winbox loader parameters are revealed when an advanced mode is enabled with Tools → Advanced Mode:

Buttons/check-boxes and Other Fields
Buttons/check-boxes
- Browse — Browse file directory for some specific session
- Keep Password — if unchecked, the password is not saved to the list
- Secure mode — if checked, Winbox will use DH-1984 for key exchange and modified and hardened RC4-drop3072 encryption to secure the session.
- Autosave session — Saves sessions automatically for devices to which connections are made.
Fields:
- Session — Saved router session.
- Note — Note that is assigned to save router entry.
- Group — Group to which saved router entry is assigned.
- RoMON Agent — Select RoMON Agent from the available device list
IPv6 connectivity
Winbox supports IPv6 connectivity. To connect to the router’s IPv6 address, it must be placed in square braces the same as in web browsers when connecting to the IPv6 server. Example:
when connecting to the link-local address interface index must be entered after the %:
Port number is set after the square brace when it is necessary to connect Winbox to other port than the default:
:8299
Winbox neighbor discovery is capable of discovering IPv6 enabled routers. There are two entries for each IPv6 enabled router, one entry is with IPv4 address and another one with IPv6 link-local address. You can easily choose which one you want to connect to.
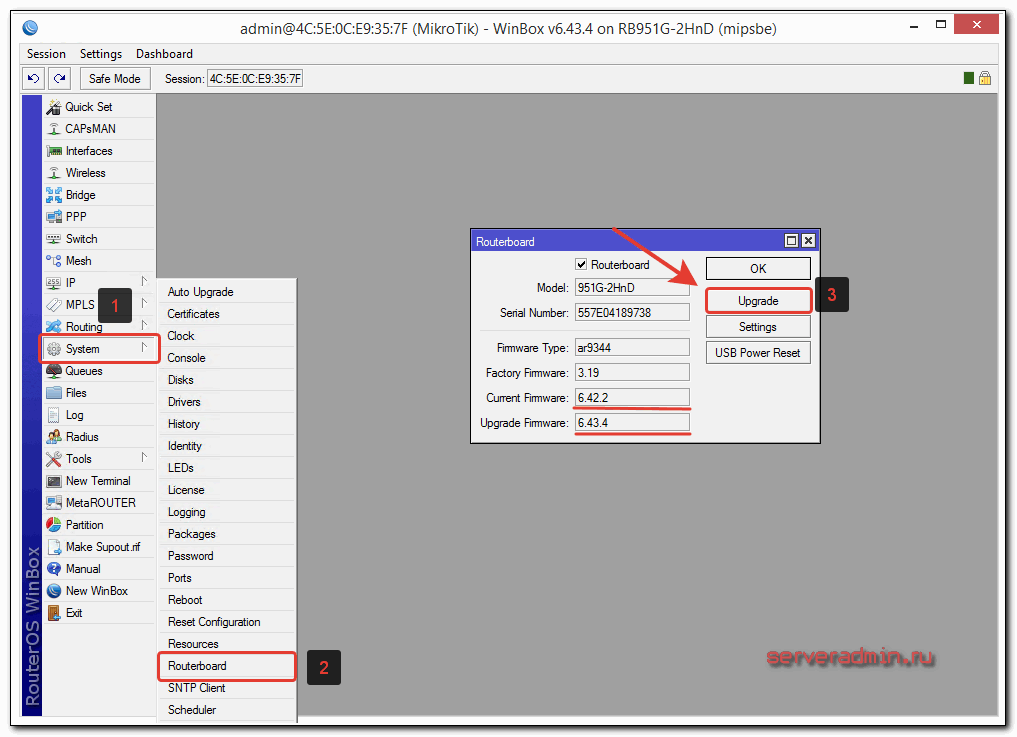
Ручное обновление прошивки
Обновить прошивку можно вручную. Для этого нужно скачать файл прошивки с официального сайта, скопировать его в роутер и перезагрузить устройство.
Перед обновлением MikroTik RouterOS посмотрите, какая версия операционной системы установлена в роутере.
Выберите меню NewTerminal и в открывшемся окне вы увидите версию RouterOS. В нашем случае в роутере установлена RouterOS версии 6.43.12.
Скачаем последнюю версию прошивки MikroTik RouterOS:
- Ниже есть три столбца с ветками прошивки: Long-term (самая стабильная), Stable (стабильная + новые функции) и Testing (для тестирования). Нас интересует стабильная прошивка из столбца Stable.
- Далее ищем нужную серию для своего устройства. Мы будем прошивать роутер MikroTik hAP ac lite tower, поэтому нам подойдет прошивка для серии hAP ac lite.
- Нажмите дискету напротив строки Main package и сохраните файл прошивки routeros-mipsbe-x.xx.npk на компьютер.
Приступим к прошивке роутера MikroTik:
- В программе WinBox откройте меню Files.
- Откройте на компьютере папку, в которую сохранили файл прошивки с расширением .npk.
- Перетащите кнопкой мыши файл прошивки в окно File List программы WinBox.
Подождите, пока файл прошивки загрузится в роутер MikroTik.
После загрузки, файл прошивки отобразится в окне File List.
Далее перезагружаем роутер через меню System — Reboot.
После перезагрузки откройте меню NewTerminal и проверьте версию RouterOS.
Как видим, операционная система MikroTik RouterOS обновилась до версии 6.44.2.
Если по каким-то причинам вас не устраивает работа новой прошивки, можно откатиться к старой прошивке, прочитав статью Как вернуть старую прошивку MikroTik.
User Password Access
MikroTik routers require password configuration, we suggest using a password generator tool to create secure and non-repeating passwords. With secure password we mean:
- Minimum 12 characters;
- Include numbers, Symbols, Capital and lower case letters;
- Is not a Dictionary Word or Combination of Dictionary Words;
/user set 0 password="!={Ba3N!40TуX+GvKBzjTLIUcx/,"
Another option to set a password,
/password
We strongly suggest using a second method or Winbox interface to apply a new password for your router, just to keep it safe from other unauthorized access.
 > / password
old password:
new password: ******
retype new password: ******
Make sure you remember the password! If you forget it, there is no recovery. You will need to reinstall the router!
You can also add more users with full or limited router access in /user menu
/user add name=myname password=mypassword group=full
/user remove admin
Other Services
A bandwidth server is used to test throughput between two MikroTik routers. Disable it in the production environment.
/tool bandwidth-server set enabled=no
A router might have DNS cache enabled, which decreases resolving time for DNS requests from clients to remote servers. In case DNS cache is not required on your router or another router is used for such purposes, disable it.
/ip dns set allow-remote-requests=no
Some RouterBOARDs have an LCD module for informational purposes, set pin or disable it.
/lcd set enabled=no
It is good practice to disable all unused interfaces on your router, in order to decrease unauthorized access to your router.
/interface print
/interface set x disabled=yes
Where «X» is a number of the unused interfaces.
RouterOS utilizes stronger crypto for SSH, most newer programs use it, to turn on SSH strong crypto:
/ip ssh set strong-crypto=yes
Following services are disabled by default, nevertheless, it is better to make sure that none of then were enabled accidentally:
MikroTik caching proxy,
/ip proxy set enabled=no
MikroTik socks proxy,
/ip socks set enabled=no
MikroTik UPNP service,
/ip upnp set enabled=no
MikroTik dynamic name service or IP cloud,
/ip cloud set ddns-enabled=no update-time=no
NAT Configuration
At this point, PC is not yet able to access the Internet, because locally used addresses are not routable over the Internet. Remote hosts simply do not know how to correctly reply to your local address.


The solution for this problem is to change the source address for outgoing packets to routers public IP. This can be done with the NAT rule:
/ip firewall nat
  add chain=srcnat out-interface=ether1 action=masquerade
Another benefit of such a setup is that NATed clients behind the router are not directly connected to the Internet, that way additional protection against attacks from outside mostly is not required.
Running on VMware ESXi
Changing MTU
VMware ESXi supports MTU of up to 9000 bytes. To get the benefit of that, you have to adjust your ESXi installation to allow a higher MTU. Virtual Ethernet interface added after the MTU change will be properly allowed by the ESXi server to pass jumbo frames. Interfaces added prior to MTU change on the ESXi server will be barred by the ESXi server (it will still report old MTU as maximum possible size). If you have this, you have to re-add interfaces to the virtual guests.
Example. There are 2 interfaces added to the ESXi guest, auto-detected MTU on the interfaces show MTU size as it was at the time when the interface was added:
 > interface ethernet print
Flags: X - disabled, R - running, S - slave
 #    NAME           MTU MAC-ADDRESS       ARP
 0 R  ether1        9000 00:0C:29:35:37:5C enabled
 1 R  ether2        1500 00:0C:29:35:37:66 enabled
Using bridge on Linux
If Linux bridge supports IGMP snooping, and there are problems with IPv6 traffic it is required to disable that feature as it interacts with MLD packets (multicast) and is not passing them through.
echo -n 0 > /sys/class/net/vmbr0/bridge/multicast_snooping
Packets not passing from guests
The problem: after configuring a software interface (VLAN, EoIP, bridge, etc.) on the guest CHR it stops passing data to the outside world beyond the router.
The solution: check your VMS (Virtualization Management System) security settings, if other MAC addresses allowed to pass if packets with VLAN tags allowed to pass through. Adjust the security settings according to your needs like allowing MAC spoofing or a certain MAC address range. For VLAN interfaces, it is usually possible to define allowed VLAN tags or VLAN tag range.
Enable Promiscuous mode in a port group or virtual switch that you will use for specific VM.
ESX documentation:
Hyper-V documentation:
https://technet.microsoft.com/en-us/library/cc816585(v=ws.10).aspx#Anchor_2
Linode
When creating multiple Linodes with the same disk size, new Linodes will have the same systemID. This will cause issues to get a Trial/Paid license. To avoid this, run the command after the first boot and before you request a trial or paid license. This will make sure the ID is unique.
Some useful articles:
Specific VLAN is untagged by NIC interface:
Allow passing other VLANs:
https://social.technet.microsoft.com/Forums/windows/en-US/79d36d5b-c794-4502-8ed4-b7a4183b1891/vlan-tags-and-hyperv-switches?forum=winserverhyperv


