
Является ли Linux лучшей операционной системой для программирования Arduino? Преимущества и преимущества
В общих чертах, линукс выделяется как операционная система, обеспечивает высокий уровень безопасности, стабилен и надежен, а также быстр и эффективен. Кроме того, благодаря своим возможностям он не ограничивается людьми с большими навыками работы с компьютером и, следовательно, удается обеспечить качественный пользовательский опыт. Однако, Ардуино внесен в каталог как мультиплатформенное решение.
Обладая полной независимостью, он предлагает своим пользователям возможность работать с микроконтроллерами и, таким образом, создавать передовые проекты, которые очень интересны в разных областях. К этому добавилось, Он имеет прямую и простую среду программирования с открытым исходным кодом и возможностью расширения.. Тогда, учитывая характеристики обеих систем, их можно эффективно связать с гарантировать строительство высококвалифицированных проектовиз простой и практичной среды для обработки.
Благодаря этому есть несколько преимуществ, раскрывающих факт программирования Arduino через Linux, и здесь мы укажем самое ценное:
По умолчанию СДИ Ардуино принимает языки программирования C и C++, используя специальные правила, основанные на структурировании кода. Это компьютерные языки, которые можно легко запрограммировать через Linuxв отличие от других ОС.
Arduino является признанной электронной платформой для прототипирования. на основе гибкого аппаратного и программного обеспечения с открытым исходным кодом
Принимая во внимание, что Linux бесплатен и не имеет ограничений в своем коде. Так что и Ардуино, и линукс могут прекрасно дополнять друг друга адаптироваться к требованиям каждого пользователя.
При создании проектов с Ардуино, создатели стараются получить хорошее соотношение между качеством и временем
Причина, почему им нужна спешка при составлении необходимых кодов в Ардуино IDE и сказал скорость, может быть предложено Ubuntu Linux по самой своей природе.
Благодаря терминалу, который поддерживает бесконечность команд в Linux, дизайнеры или любители, использующие Arduino IDE будет намного проще запускать программное обеспечение и даже принять меры по этому поводу. Что также обеспечивает большую эффективность для компиляции проектов.
Wrap up
This tutorial explained in detail how to install the Arduino IDE on your Linux system. We opted for installing the Flatpak version of the Arduino IDE from Flathub. That way the installation instructions are Linux distribution agnostic, because Flatpaks work on all Linux distributions. Furthermore, you get the latest version of the Arduino IDE.
After installing the Arduino IDE on your Linux system, we also made sure your user belongs to group . Otherwise you (and the Arduino IDE) cannot access the serial port, for communicating with the Arduino board. You need this to upload programs to your Arduino board.
To test that everything works as expected, the last section presented the source code of a blinking LED example program. After building it, we uploaded the binary of the example program to the Arduino board. A visual check that the LED actually blinks verified the successful completion of all steps in this tutorial.
For more Arduino related tutorial, follow this link:
Arduino articles on the PragmaticLinux blog
Узнайте шаг за шагом, как загрузить и установить Arduino IDE в Linux.
К счастью, в отличие от других платформ, доступных на рынке, Ардуино Это означает предоставить мультиплатформенную среду, разработанную с помощью Java и благодаря этому его можно использовать на любой операционной системе самостоятельно (Windows, Mac и Linux).
Это означает, что при загрузке Ардуино IDEпользователи линукс найти конкретный вариант получить программное обеспечение на свой компьютер бесплатно. Но, помимо загрузки рассматриваемой программы, многие линуксоиды задаются вопросом как они могут выполнить правильную установку этой среды на своей машине.
Причина, по которой в этом разделе поста мы подробно расскажем о каждом из шагов, которые необходимо выполнить при загрузке и установке Arduino IDE в Ubuntu Linux:
Скачать программу
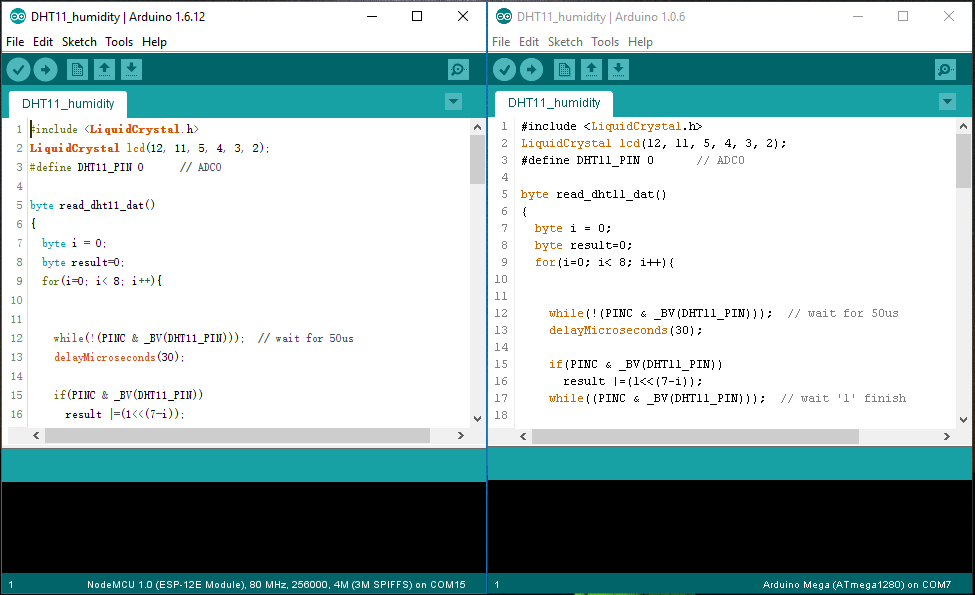
Со своей стороны, одна из самых современных версий Arduino IDE. соответствуют ветке «1.8.x» и другой ветке, относящейся к версии «1.0.x». Ценя, что среди них главное отличие заключается в моделях пластин Ардуино с теми, у кого есть совместимость. Поэтому, как правило, рекомендуется скачать ветку «1.8.x»благодаря тому, что он поддерживает наибольшее количество последних плат по сравнению с другими версиями.
Разархивируйте загруженный файл
Вслед за вышеизложенным пора начинать . Это целесообразно провести через дом а не из раздела «Загрузки». Так как таким образом можно избежать определенных проблем при чистке системы, в последствии.
Как только вы это сделаете, вы увидите пакет с несколькими файлами, которые имеют два исполняемых файла. Который, они не нужны при установке Arduino IDE на Ubuntu Linux, в частности. Ну, скорее, вам придется открыть терминал в папке, чтобы продолжить следующее.
Установите Arduino IDE из терминала
С помощью этой команды или команды Linux перейдет к запустить соответствующий установочный файлбез использования учетная запись пользователя root. Наряду с этим уместно запустите в терминале следующее: . Ну и с последней инструкцией, наконец, установка среды разработки Ардуино в тебе Убунту линукс.
Следуйте инструкциям мастера
После всего вышесказанного самое главное на данный момент, он основан на следовании или подчинении каждому из приказов, установленных системным помощником.. Таким образом, по прошествии нескольких секунд или минут вы полностью установите Arduino IDE на вашем Linux. Оценив это, вы автоматически увидите на рабочем столе ярлык для начните программировать все проекты Maker, которые вы хотите.
Запустите Arduino IDE из Linux
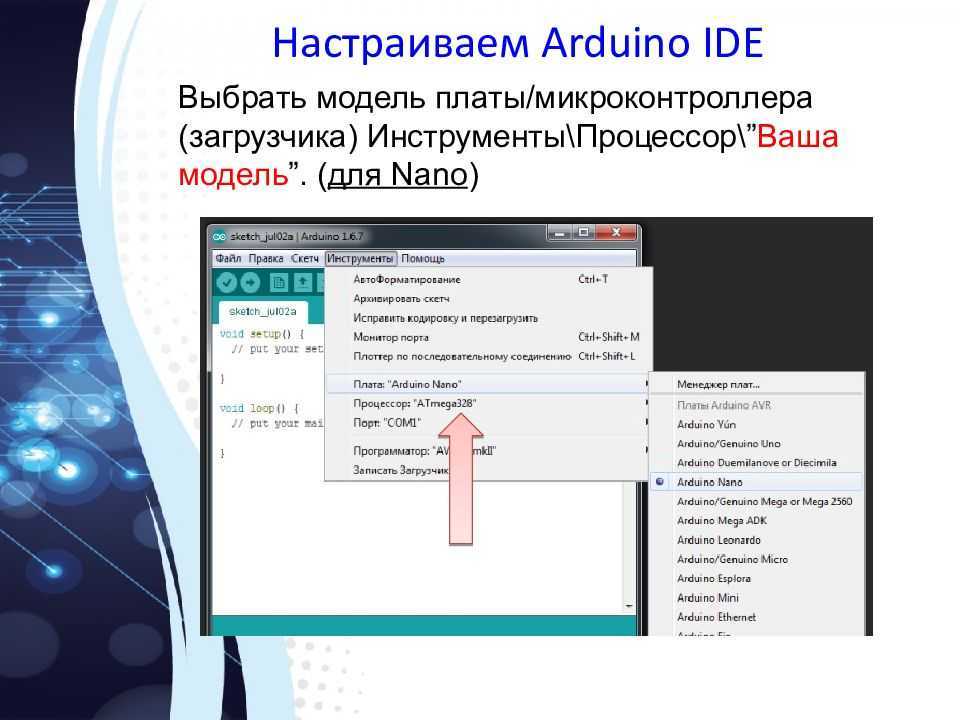
После установки программного обеспечения Ардуино в твоей команде линукс, вы встретитесь редактор кода. Которая для своевременного функционирования требует подключения некоторых компонентов к оборудованию. Среди них выделим: шнур питания 5 В, кабель USB для принтера и плата разработки Arduino (любая модель). При этом программа сможет предложить все свои функциональные возможности.
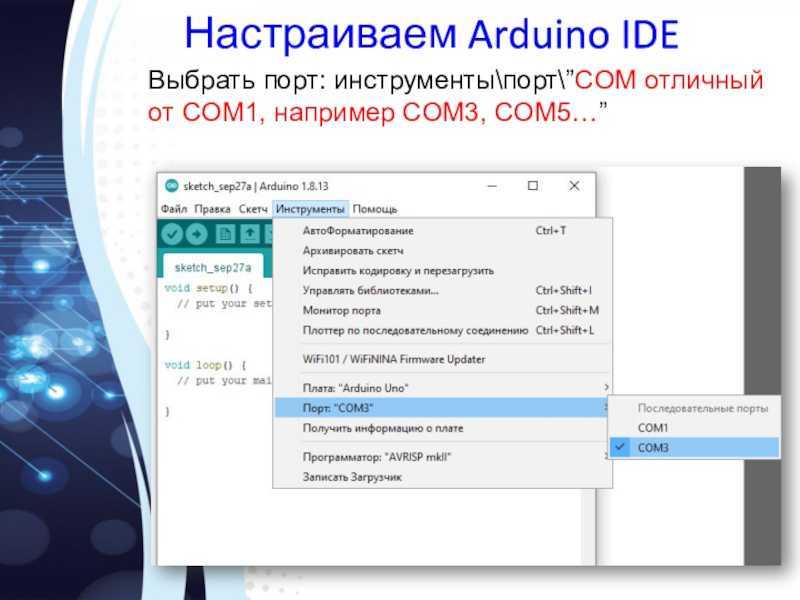
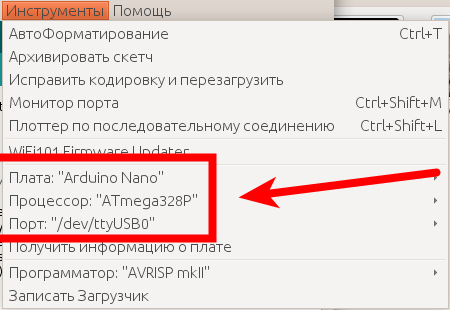
Кроме того, как только указанные элементы будут у вас под рукой, рекомендуем перейти в раздел “Инструменты” из Arduino IDE и в опции написано “Номерной знак”Тебе придется выберите используемую модель, чтобы проверить ее совместимость
Кроме того, важно также выберите порт, через который вы будете общаться с платой и до тех пор, включите опцию «Получить информацию о номерном знаке» чтобы проверить правильность связи
What do you need
For this article you need three things:
- A Linux based PC with desktop environment, for installing the Arduino IDE on.
- One of the Arduino boards. For example an Arduino Uno or Nano.
- For powering and connecting your Arduino board, a USB cable.
I decided on using my Arduino Uno (rev 3) board in combination with Fedora 35 workstation. Simply because Fedora 35 was released about a week ago and I wanted to take it for a spin. However, the procedure outlined in this article works for any type of Linux distribution, because we’ll be using the Flatpak version of the Arduino IDE.
If you don’t yet have Linux installed, consider setting up Ubuntu as a virtual machine:
- How to install Ubuntu Desktop 20.04 LTS in VirtualBox
- Install VirtualBox guest additions in Ubuntu 20.04
Steps to install Arduino IDE on Ubuntu 22.04 or 20.04
The procedure given here to install Arduino IDE will be the same for other Ubuntu versions including Linux OS such as Debian, Linux Mint, POP OS, MX Linux, and more…
1. Requirements
To follow this tutorial, we require these key things:
• Ubuntu Linux• Internet Connectivity• Terminal and non-root user access rights
2. Run System Update
Well, this is not necessary, if your system is up to date. However, to ensure our system packages source repository has the latest cache, run the given command:
sudo apt update
#1st Method using Tar file
3. Install Arduino IDE on Ubuntu 22.04 | 20.04
We don’t need to download any package manually to install Arduino IDE because it is already available via the default package repository of Ubuntu Linux. Therefore, we can install it using the default APT package manager via the command terminal.
sudo apt install arduino

4. Run Arduino IDE
Once the installation is completed, go to the Ubuntu Application launcher and find this installed application. As its icon appears, click to run the Arduino IDE.

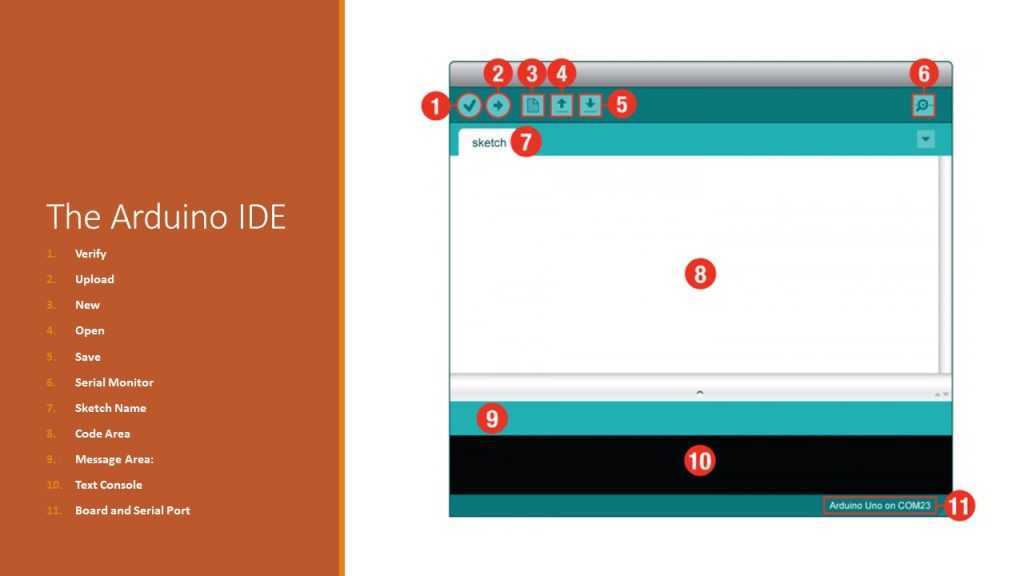
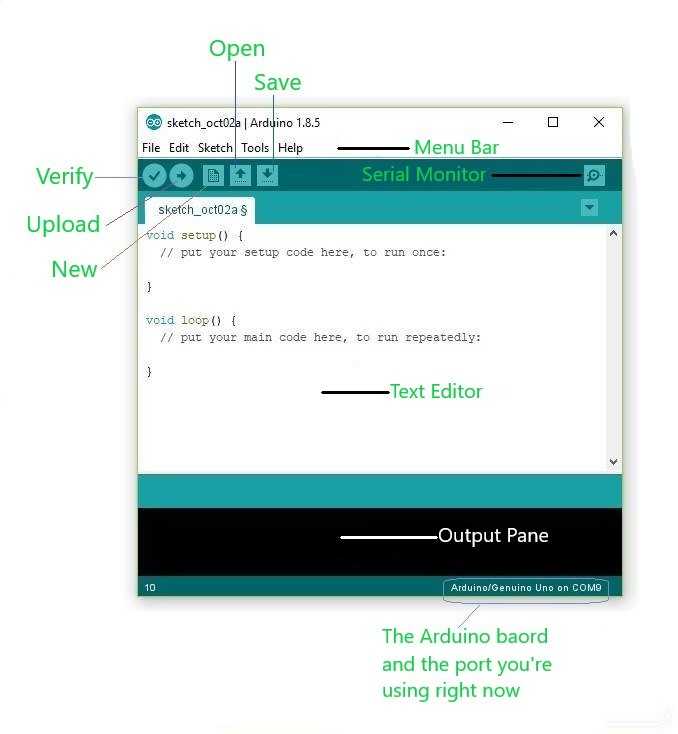
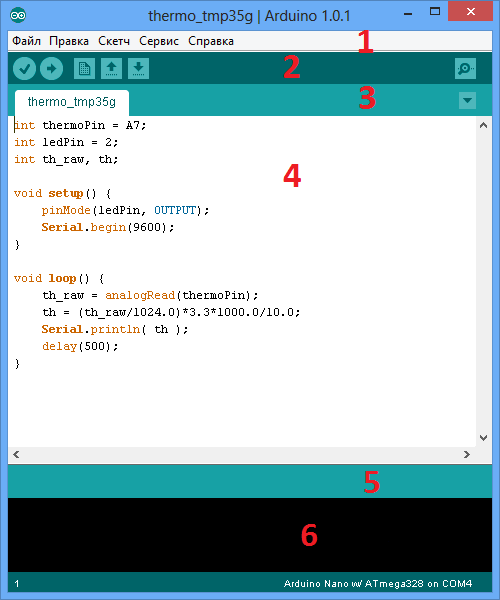
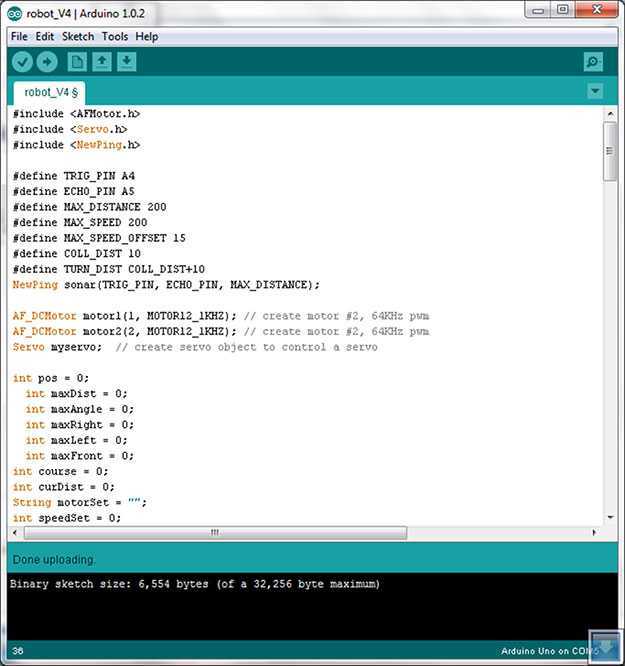
The interface of the editor is simple and clean with functions to cut/paste and find/replace text. The message area gives feedback when saving and exporting and also displays errors.
The console displays text output from the Arduino IDE. This includes full error messages as well as other information. In the lower right corner of the window, information about the connected board and the serial port is displayed. With the buttons in the toolbar, you can check and upload programs, create sketches, open and save and open the serial monitor. The editing functions can be found in the menu bar.
5. How to update Arduino on Ubuntu 22.04
As we have used the APT package manager to install this IDE application, hence we can use the same to update it in the future with the help of the update command.
sudo apt update && sudo apt upgrade
6. Uninstall or Remove
Well, after some time if you don’t require the Integrated Development Environment for your Arduino board anymore; again use the APT package manager to remove the same.
sudo apt remove arduino
#2nd-way use SNAP
7. Use SNAP to install Arduino IDE
Well, those who don’t want to use the APT package manager to get the Arduino IDE on Ubuntu can use the SNAP package manager that fetches the software packages from its library.
The SNAPD is already enabled and ready to use on Ubuntu operating systems, hence, we can simply use the given command:
sudo snap install arduino
To update:
sudo snap refresh arduino
For removing the IDE app:
sudo snap remove arduino
#3rd method using Flatpak
8. Use Flatpak
Well, if you don’t want to use any of the above-given methods, we can use the Flatpak package manager to easily get the Arduino IDE package on our Ubuntu 22.04/20.04 system.
sudo apt install flatpak -y
flatpak install flathub cc.arduino.arduinoide -y
To remove:
flatpak uninstall --delete-data cc.arduino.arduinoide -y
flatpak remove --unused
Other Articles:
• How to install Rstudio Desktop or server in Debian 11 • 3 Ways to Install KDE Kate Text Editor on Ubuntu 22.04• Install AngularJS in Ubuntu 22.04 • How to Enable SSH server on Ubuntu 22.04• 2 ways to install a LAMP server on Ubuntu 22.04
Set up permissions to access the serial port on Linux
Your Arduino’s USB cable has a double function. It powers your Arduino and also creates a serial communication link between your Arduino and PC. The Arduino IDE relies on this serial communication link for uploading new software programs to your Arduino. Before we start coding in Arduino IDE, we need to take care of one more thing. Namely, making sure your user has the permissions needed for accessing the serial port. Otherwise you won’t be able to upload new firmware to your Arduino.
Let’s first determine the serial port device that your Linux system assigned to your Arduino. Assuming that you connected your Arduino to your PC, with a USB cable, it shows up as either:
Where the stand for a number depending on the amount of serial devices currently connected. Run the following command to list all of these serial devices:
ls -l /dev/ttyUSB* /dev/ttyACM*
As you can see in the above screenshot, the Arduino Uno shows up as device on my system. That’s the device name to specify, when attempting to connect to it later on. More importantly, the permissions show you that only the user and members of group have permission to access it. This means that you need to add your user to group in order to communicate with your Arduino. To add your user to group , open the terminal and run command:
sudo usermod -a -G dialout $USER
Afterwards it’s best to reboot your system, to make sure the group change activates.
For more information about using the serial port under Linux, refer to this article:
How to monitor the serial port in Linux
Ардуино. Развёрнутая инструкция для начинающих. Ubuntu 14.04.
Меня удивляет отсутствие собранной ПОЛНОЙ инструкции по подключению
Arduino в рунете. Особенно для начинающих. Особенно в Linux. ))) Поэтому вот
она, на примере одной из возможных конфигураций.
Для удешевления процесса мной были куплены простейшие компоненты «Ардуино» и
программатор для неё.
Это: Китайская atmega 168 — Arduinо pro mini 5v 16mhz.
и USB to TTL D-SUN на микросхеме pl2303hx — для заливки скетчей.
За всё отдал 288 рублей. Покупал через интернет на aliexpress.
Проводники были соединены так:
USB to UART это и есть наш программатор USB to TTL, а USB это металлический квадратный
конектор программатора.
Кнопка S1 это та кнопка, которая есть на платке atmega168. На программаторе вместо VCC
может быть написано просто 5в+.
В Ubuntu 14.04 для установки програмного обеспечения для Ардуино выполните в консоли
комманды:
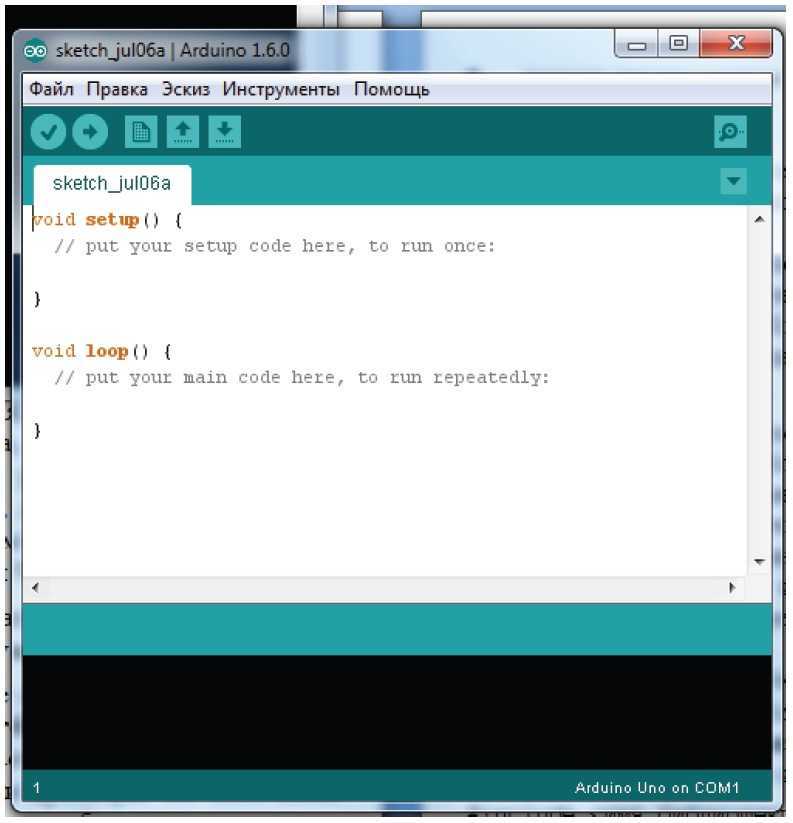
После установки откройте появившееся ПО — Arduino IDE.
Сначала программа предложит добавить имеющиеся у вас устройства. Это она намекает на ваш
программатор и необходимые для него пакеты. Согласитесь нажав add, сделайте всё, что требует
программа путём согласия. Теперь выйдите из сеанса и снова войдите. Или перезагрузитесь.
Теперь подключив ваш программатор к компьютеру вы сможете найти его в Arduino IDE в
списке устройств:
*сервис->последовательный порт->ttyUSB0.
Цифра у USB может быть другая. Ядро Ubuntu уже знает эту микросхему. ) Никакие драйвера не
нужны. Чтобы этот программатор начал работать с программой Arduino IDE и платкой atmega
168 5v 16 mhz, нужно выбрать в меню программы:
сервис->программатор->USBtinyISP,
а также корректную плату, в моём случае это:
сервис->плата->Arduino Pro or Pro mini (5V, 16Mhz) w/ ATmega168.
Всё !!! Каких то других настроек больше
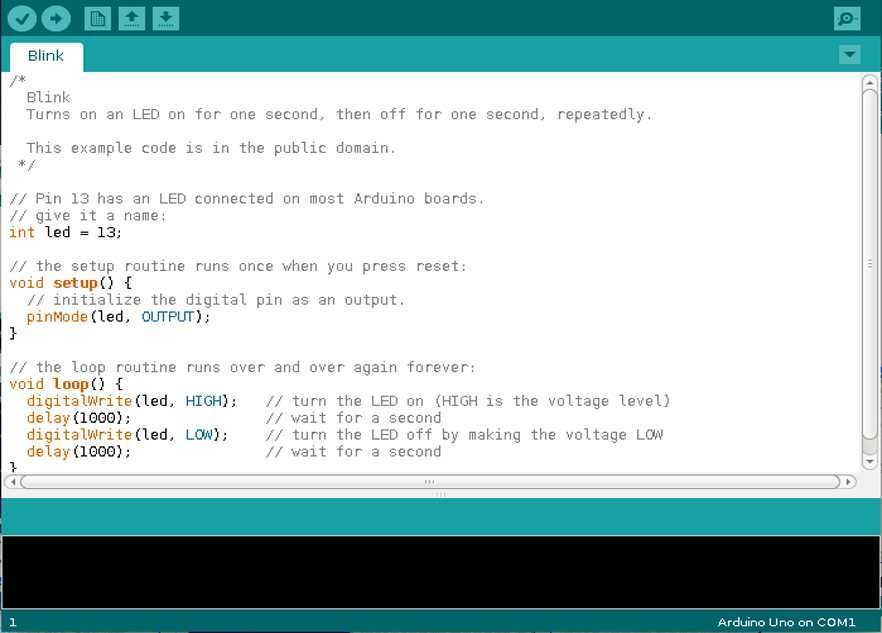
Откройте пример Blink, немного подредактируйте время зажигания и потухания светодиода и
прошейте свою «Ардуино». Для этого нажмите в программе Arduino IDE кнопку загрузить и
как только светодиоды у программатора начнут мигать, нажмите кнопку S1 — reset у atmega. C
первого раза скетч может и не загрузиться, потому, что нужно наловчиться нажимать reset
вовремя. О не успешной загрузке будет свидетельствовать надпись:
Об успешной сильное/активное мигание светодиодов программатора и надпись Загрузка
завершена.
…И да, atmega будет мигать так, как вы хотели. Всё. Вы готовы заливать скетчи.
В случае если в вашей версии Linux нет в репозитории этих пакетов, можно скачать на сайте
Arduino или на похожих порталах посвящённых Arduino, архив с программой Arduino IDE, в
виде бинарных компонентов. Так же возможно подключить репозитории Ubuntu или другого
дистрибутива, в котором присутствуют эти пакеты. Придётся настроить работу программатора,
последние ядра linux знают этот чип и программатор определяется сразу после подключения.
Проверить можно одной из команд в консоли:
$ dmesg | tail
$ lsusb
В выводе этих комманд вы сможете убедиться, что устройство обнаружено, а подключено оно
будет как /dev/ttyUSB0 или 1,2,3…
Сделайте симлинк на это устройство и определите его как com. Дальше всё будет так же как в
инструкции выше.
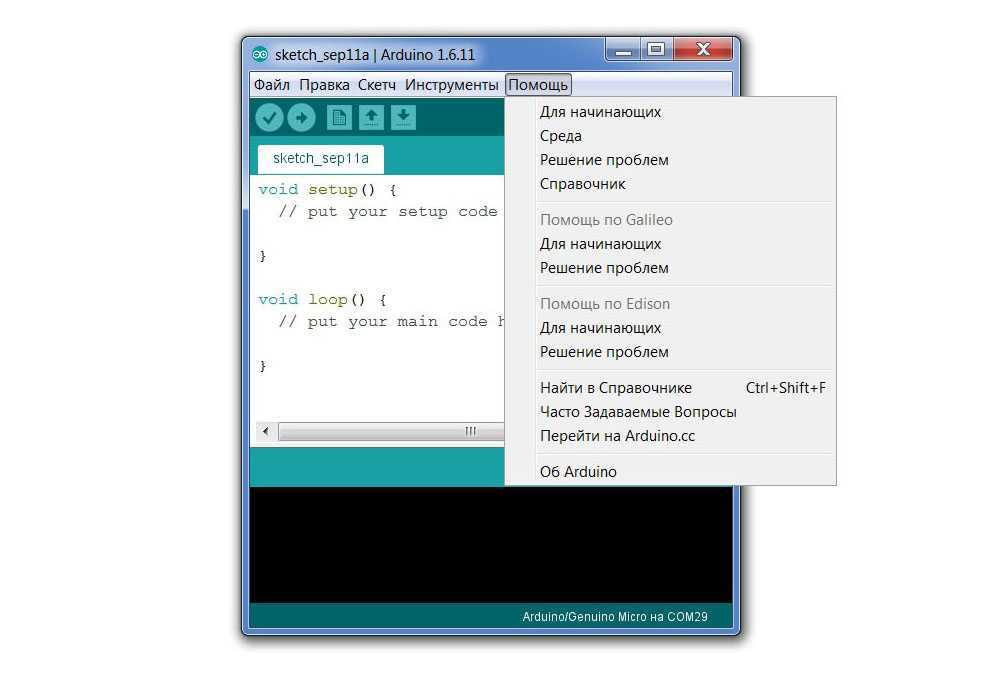
* Разные элементы меню программы могут называться и по другому, и на иностранном языке, в
зависимостиот версии, и перевода этой программы. Но разобраться в своей версии не составит
труда, построение меню разных версий аналогично.
07
Мар
Posted:
Март 7, 2015 Суббота at 5:56 пп
Sfeed
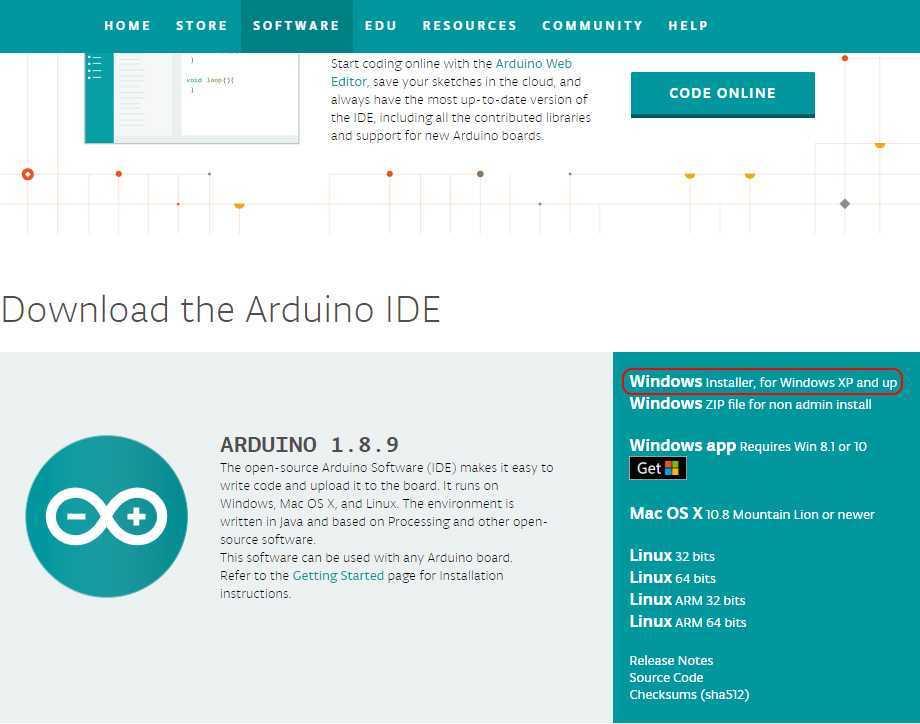
Установка Arduino IDE с официального сайта:
Проще установить Arduino IDE из официальный репозиторий пакетов Debian 10, но поскольку версия IDE очень старая, это может вызвать у вас много проблем. Но не волнуйтесь. Вы можете загрузить и установить последнюю версию Arduino IDE с официального сайта Arduino.
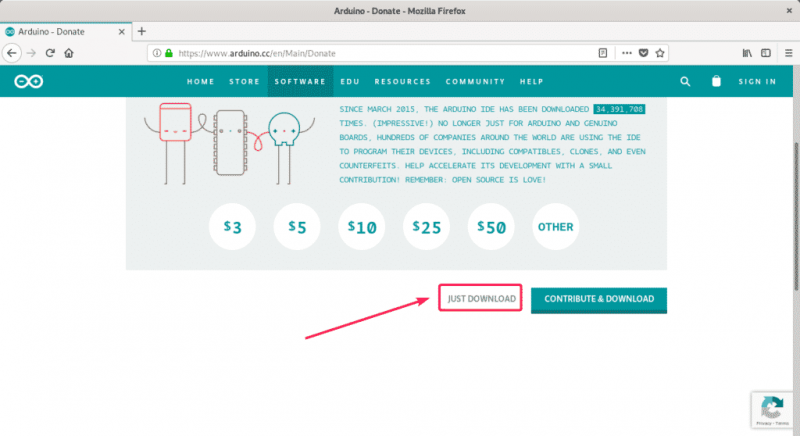
Сначала посетите официальную страницу Arduino IDE в своем любимом веб-браузере. Теперь прокрутите немного вниз и нажмите ссылку Linux 64 bit , как отмечено на скриншоте ниже.
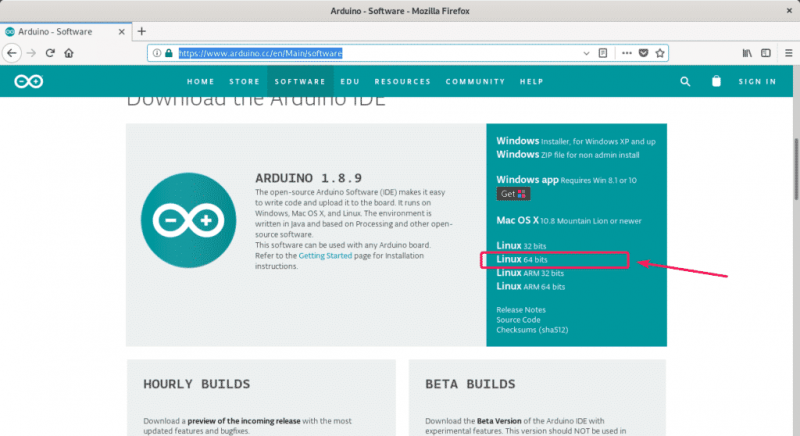
Если хотите, вы можете сделать пожертвование проекту Arduino. Если вы не хотите делать пожертвование, просто нажмите кнопку ПРОСТО ЗАГРУЗИТЬ , как отмечено на скриншоте ниже.
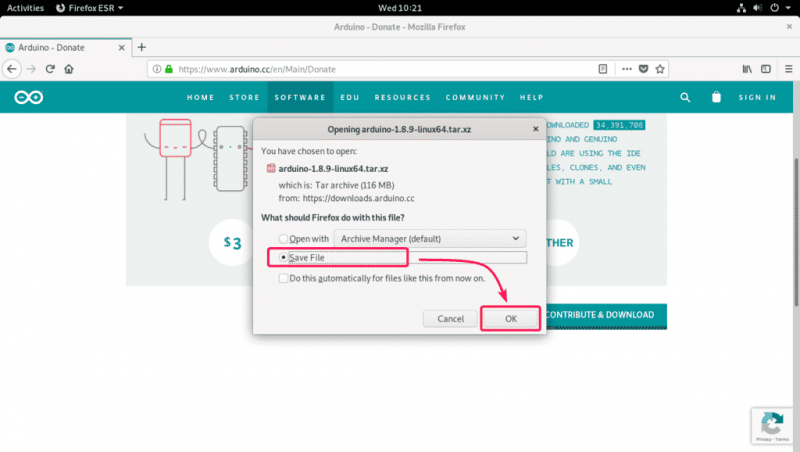
Ваш браузер должен предложить вам сохранить архив Arduino IDE. Выберите Сохранить файл и нажмите OK .
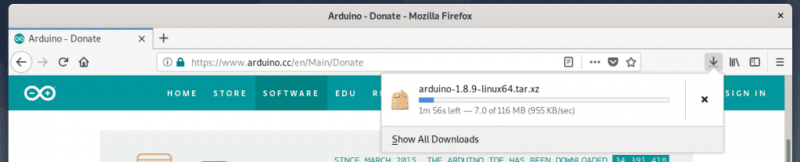
Ваш браузер должен начать загрузку архива Arduino IDE. Это может занять некоторое время.
Теперь перейдите в каталог ~/Downloads с помощью следующей команды:
$ cd ~/Downloads

Вы сможете найти архив Arduino IDE, который вы только что скачали, когда вы можете увидеть на скриншоте ниже. Запомните имя архива.
$ ls -lh

Теперь извлеките архив в каталог /opt с помощью следующей команды:
$ sudo tar xvJf arduino-1.8.9-linux64.tar.xz -C/opt

Архив необходимо извлечь в каталог /opt .

В каталоге /opt должен быть создан новый каталог, как вы можете видеть в скриншот ниже. Запомните имя каталога.
$ ls -lh/opt

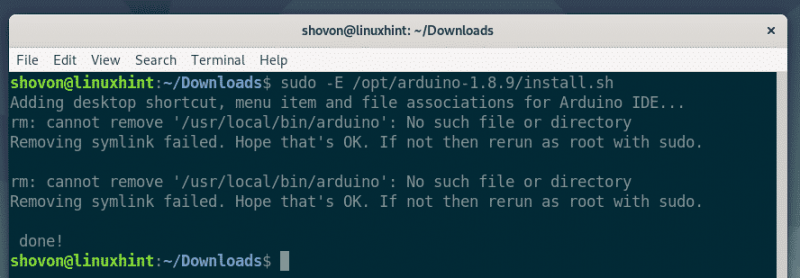
Теперь выполните следующую команду, чтобы создать средство запуска рабочего стола для Arduino IDE и добавить символическую ссылку на исполняемый файл Arduino в PATH.
$ sudo -E/opt/arduino-1.8.9/install.sh

Должна быть создана панель запуска/ярлык Arduino IDE на рабочем столе. Вы также можете получить доступ к исполняемому файлу Arduino из командной строки.

Теперь вам нужно добавить пользователя для входа в Debian 10 в dialout , tty , uucp и plugdev . В противном случае вы не сможете загрузить свой код Arduino в микроконтроллер Arduino.
Чтобы добавить Пользователь Debian 10 войдет в группу dialout , выполните следующую команду:
$ sudo usermod -aG dialout $ (whoami)

Чтобы добавить пользователя для входа в Debian 10 в tty , выполните следующую команду:
$ sudo usermod -aG tty $ (whoami)

Чтобы добавить пользователя для входа в Debian 10 в uucp group, выполните следующую команду:
$ sudo usermod -aG uucp $ (whoami)

Чтобы добавить пользователя для входа в Debian 10 в plugdev g roup, выполните следующую команду:
$ sudo usermod -aG plugdev $ (whoami)

Теперь перезапустите компьютер Debian 10 с помощью следующей команды:
$ sudo reboot

После запуска компьютера , вы сможете найти Arduino IDE в меню приложений Debian 10, как вы можете видеть на снимке экрана ниже. Щелкните по нему, чтобы запустить IDE Arduino.

Arduino IDE должен начаться.
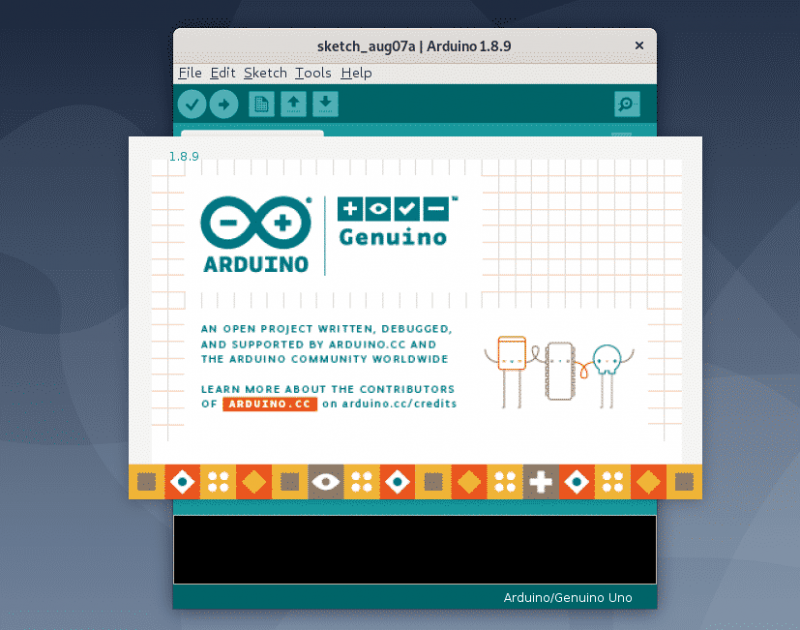
Как видно из Справка > Об Arduino , я использую Arduino IDE 1.8.9. Это последняя версия IDE Arduino на момент написания.
Итак, вот как вы устанавливаете Arduino IDE на Debian 10. Спасибо, что прочитали эту статью.
Test the Arduino IDE with an example program
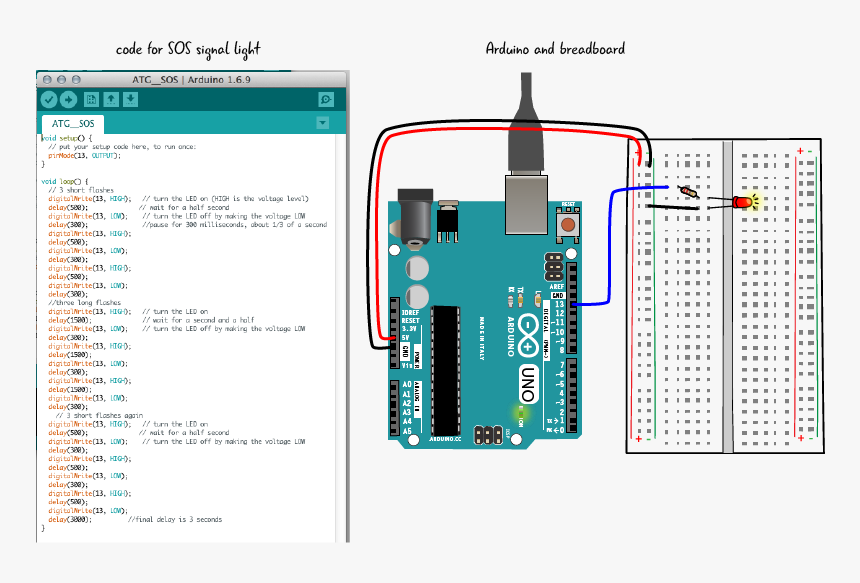
If you made it all the way to here, then you are all set. The Arduino IDE is installed on your Linux system and ready for action. In this section we’ll build a basic blinking LED program for testing purposes and to help you get started.
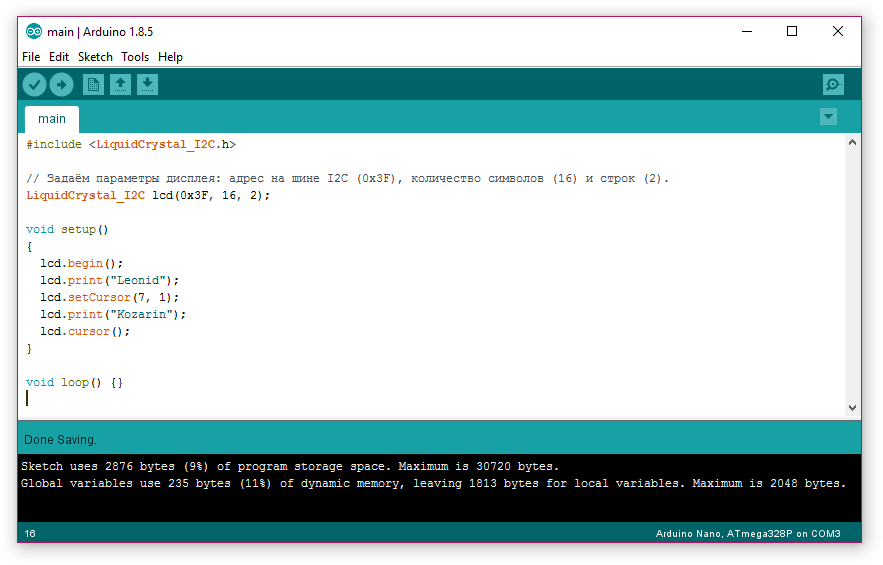
Write, compile and link the example program
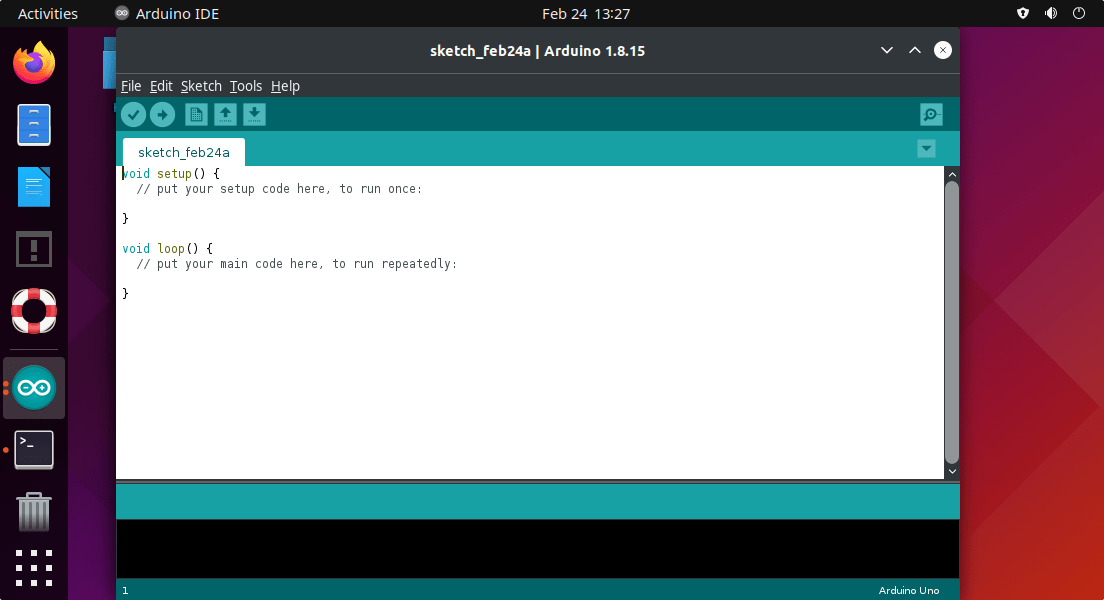
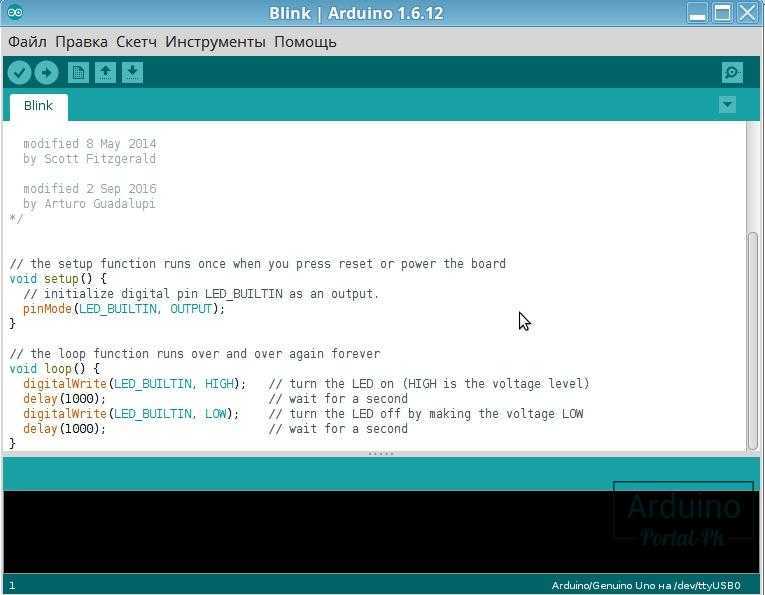
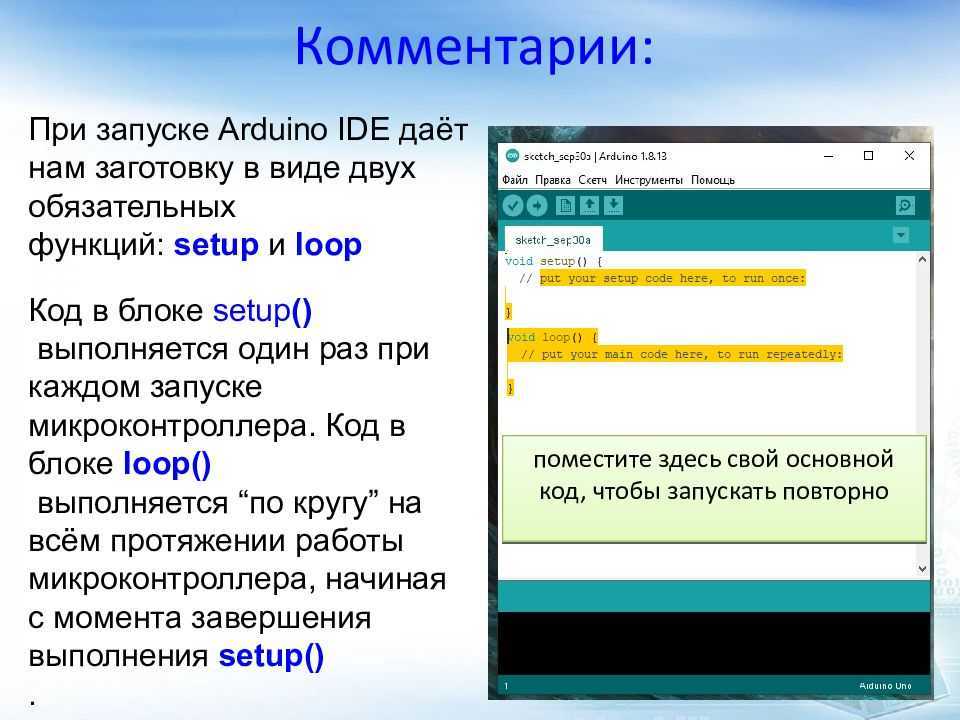
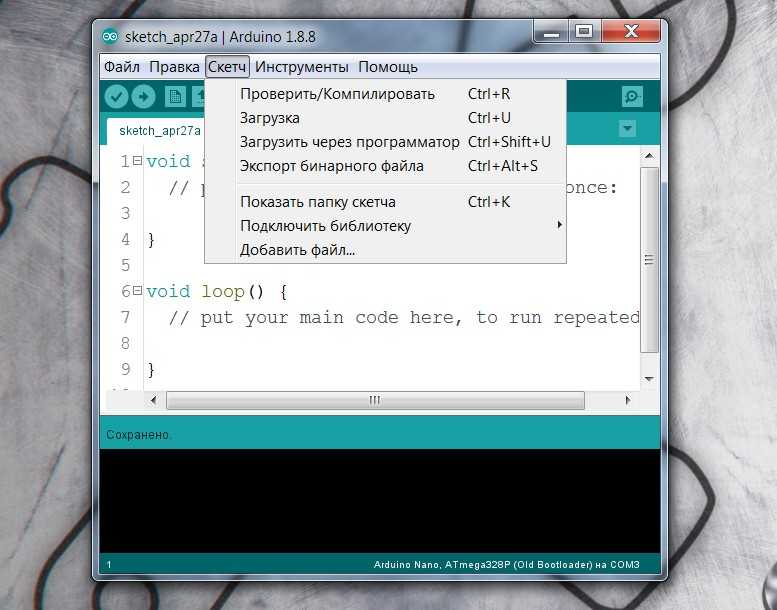
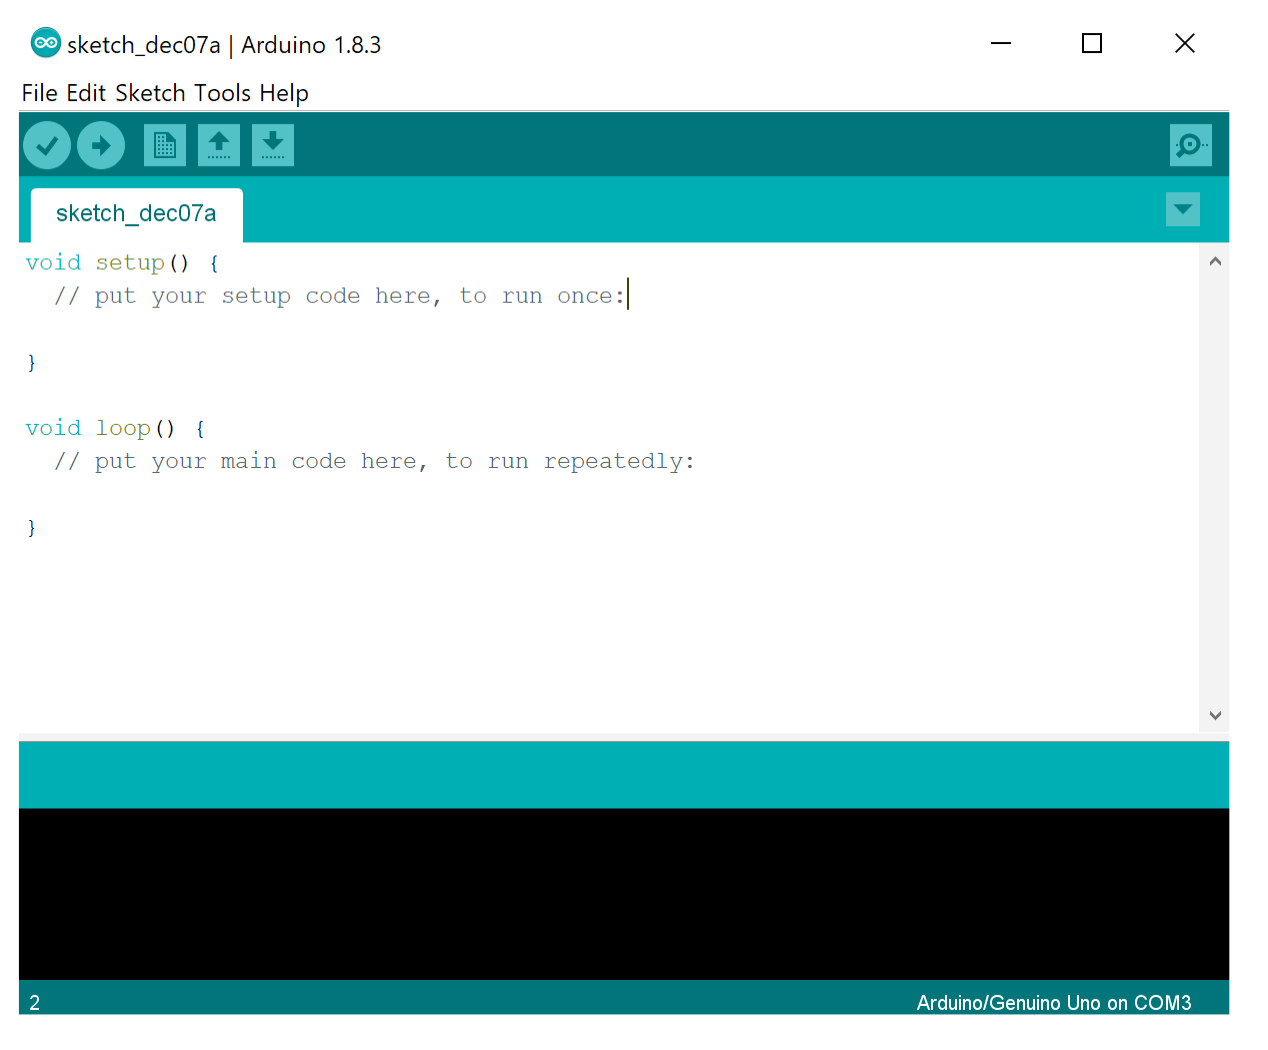
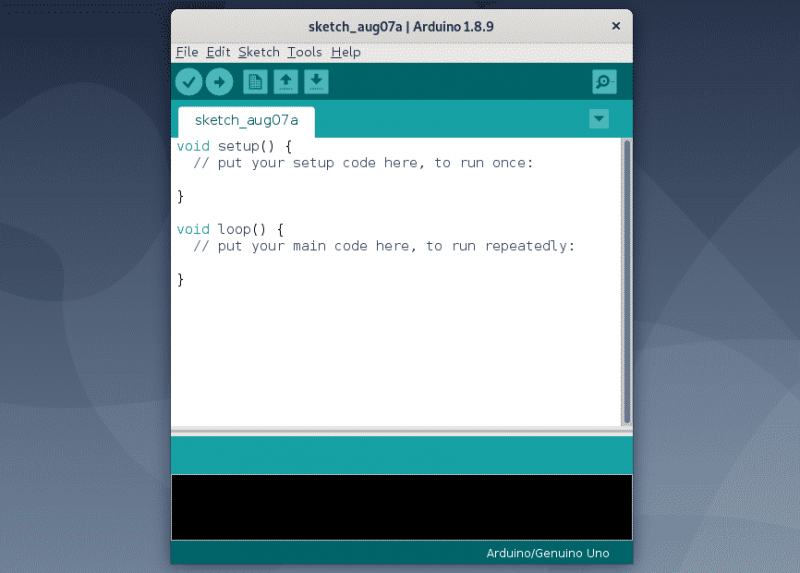
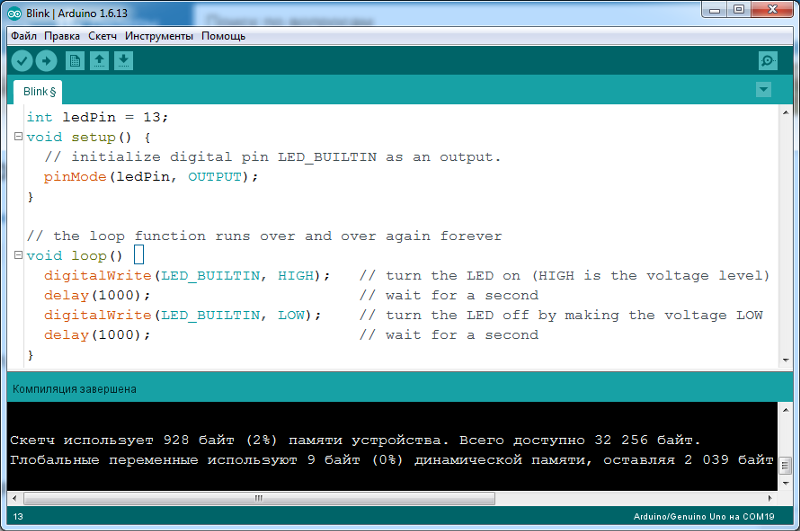
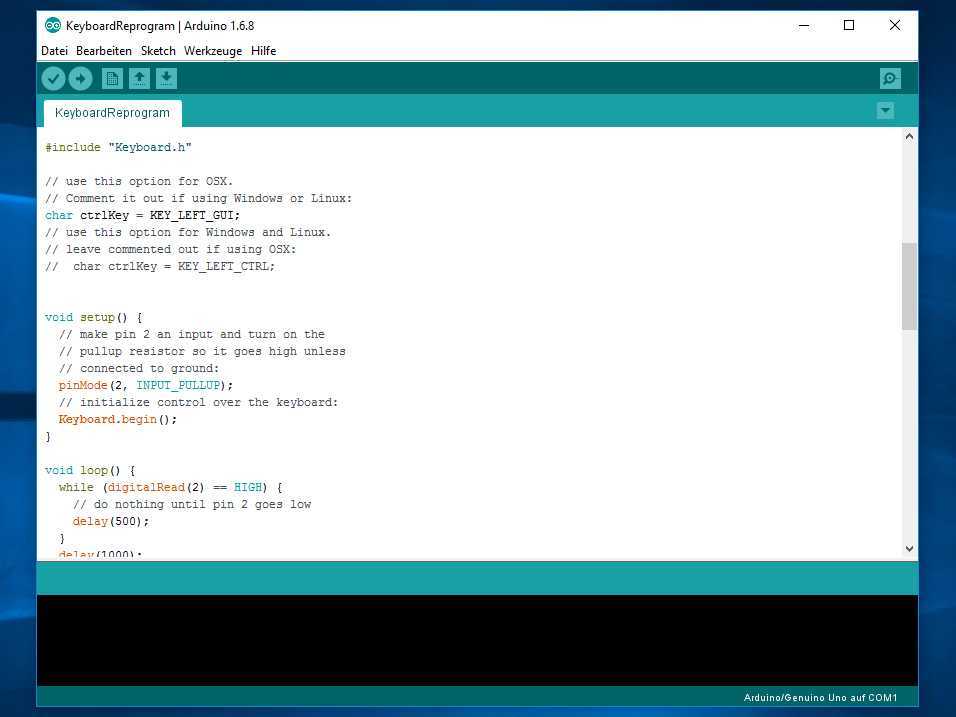
Start the Arduino IDE. You’ll find a launcher for this in your desktop environment’s application menu. The Arduino IDE presents you with the code of an empty software program, also called a sketch:
Update the code inside the and functions to implement the blinking LED functionality:
void setup() {
  /* Initialize digital pin LED_BUILTIN as an output. */
  pinMode(LED_BUILTIN, OUTPUT);
}

void loop() {
  /* Toggle the LED every 500 milliseconds. */
  digitalWrite(LED_BUILTIN, HIGH);
  delay(500);
  digitalWrite(LED_BUILTIN, LOW);
  delay(500);
}
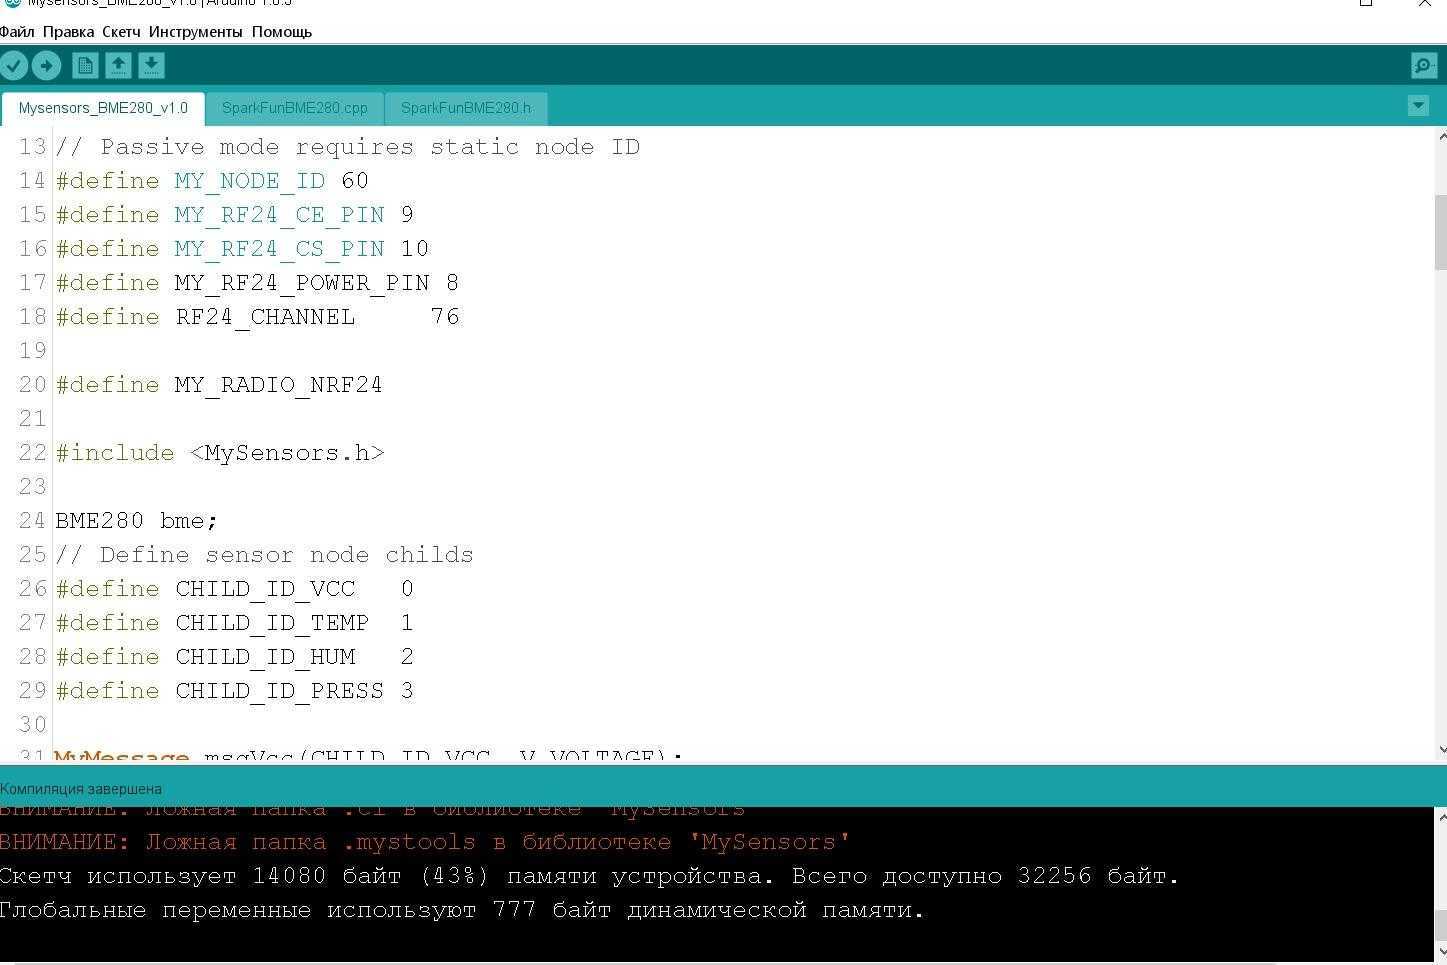
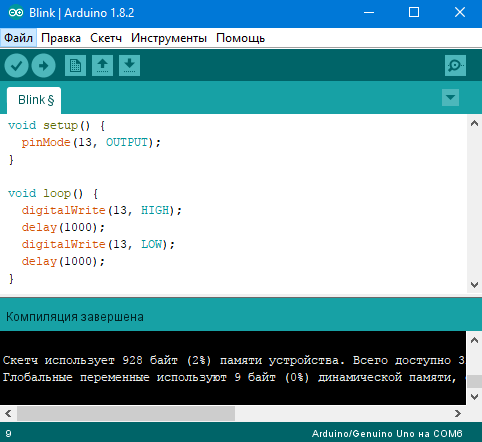
To convert this source code to a binary program, select Sketch → Verify/Compile from the program menu. Alternatively, you can use the CTRL+r keyboard combination. The Arduino IDE will ask you to first save the file. The default proposed location and name are fine. You can follow the progress in the output window at the bottom:
Upload the example program
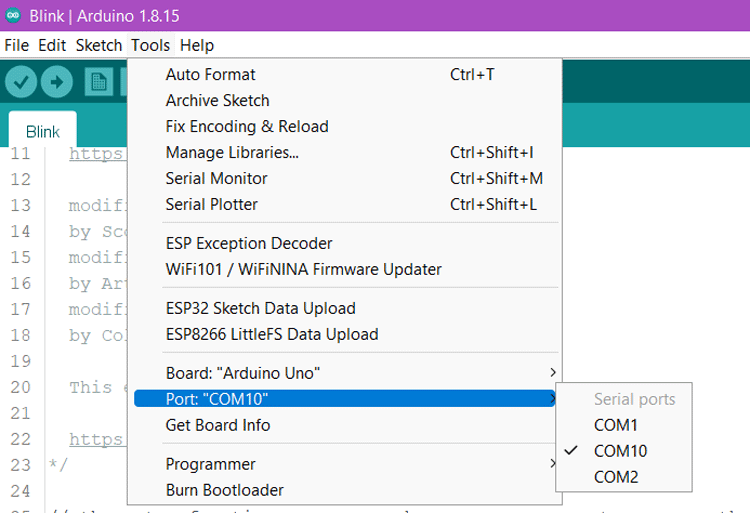
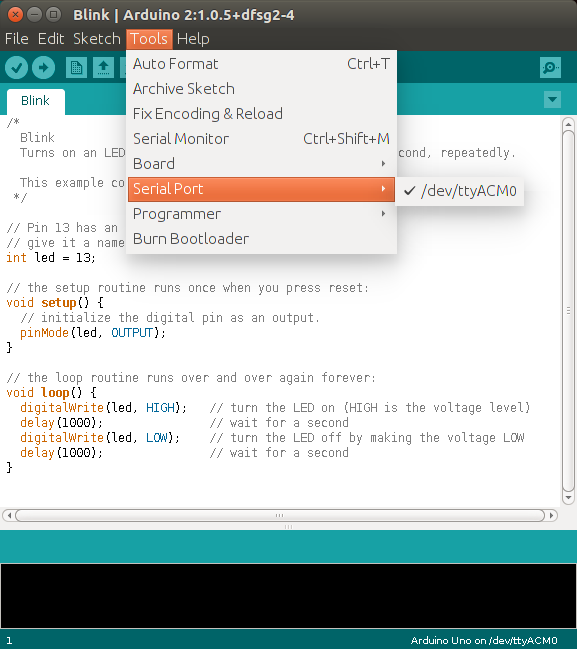
Now that the example program’s binary is ready, it’s time to upload it and run it on the Arduino. We just need to configure the Arduino IDE such that it can communicate with your Arduino. Select Tools → Board from the program menu and select the Arduino board type. In my case the Arduino Uno:
Next, we select the serial port device to use from program menu Tools → Port. In my case as we saw in a previous section:
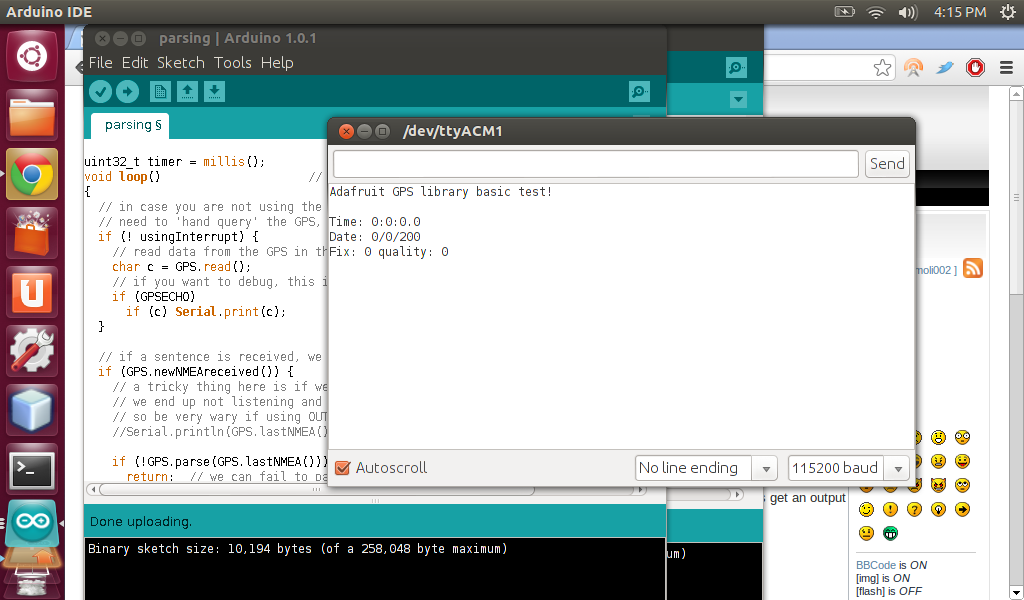
You only have to make this configuration once. Afterwards you can upload the binary of the example program to your Arduino, by selecting Sketch → Upload from the program menu. Or using the keyboard shortcut CTRL+u. The program starts running automatically, as you can tell by the LED blinking.
The dialout group
This is happening because the IDE doesn’t have sufficient permissions to access the Arduino device.
Permissions
We can look at the Arduino device by running
in a terminal. The output looks mostly like this:
The ‘0’ at the end of ‘ACM’ might be different, and multiple entries might be listed, but the parts we need to focus on are the string of letters and dashes in front, and the two names and .
The first name is the owner of the device, and is the owner group of the device.
The letters and dashes in front, starting after ‘c’, represent the permissions for the device by user: — The first triplet mean that the owner () can read and write to this device — The second triplet mean that members of the owner group () can read and write to this device — The third triplet means that other users have no permissions at all (meaning that nobody else can read and write to the device)
In short, nobody except and members of can do anything with the Arduino; since we aren’t running the IDE as or as a member of , the IDE can’t access the Arduino due to insufficient permissions.
Adding yourself to the group
But wait! Earlier, when we were launching the IDE, we did add ourselves to the group!
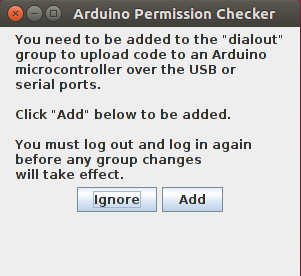
So why does the IDE still not have permission to access the Arduino?
The changes that the prompt makes don’t apply until we log out and log back in again, so we have to save our work, log out, and log back in again.
After you log back in and launch the Arduino IDE, the Serial Port option should be available; change that, and we should be able to upload code to the Arduino.
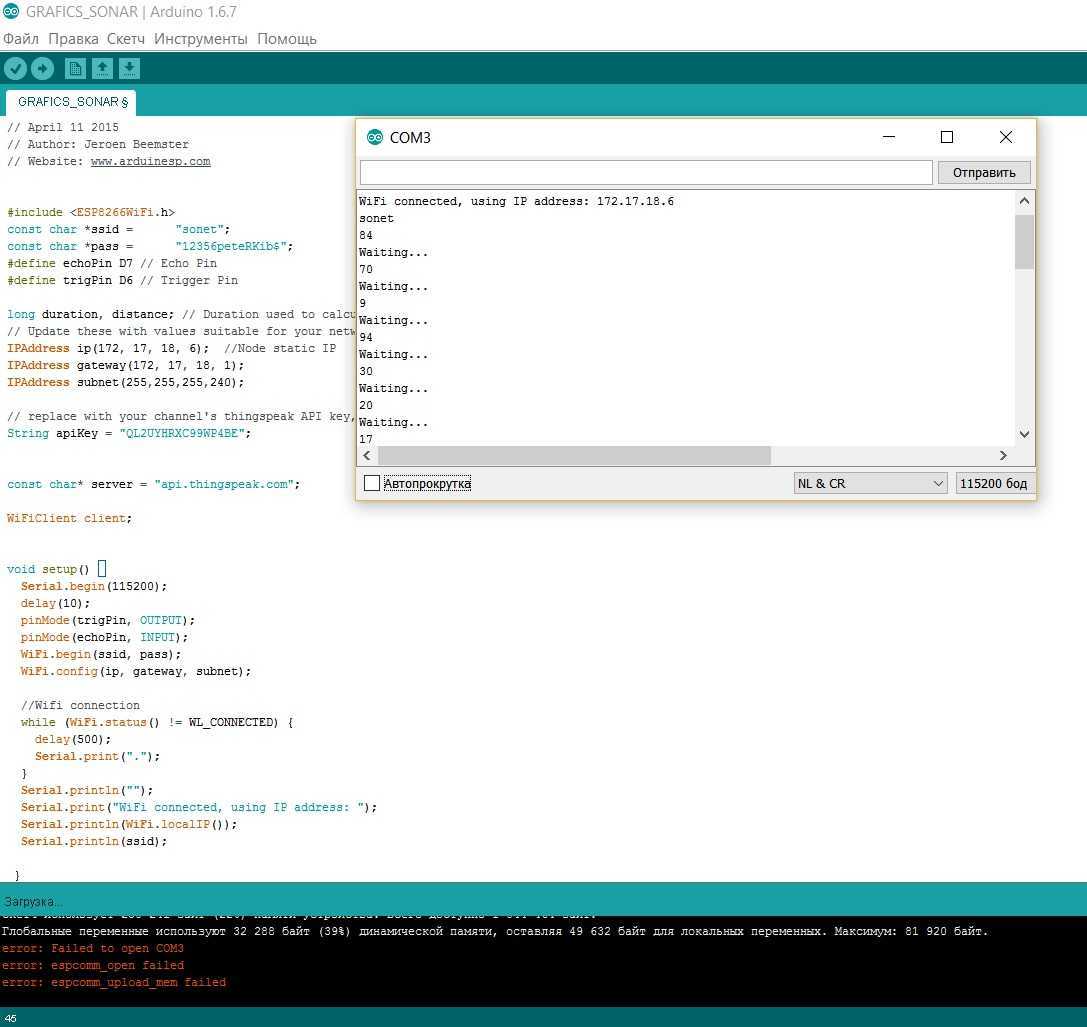
Настройка
К сожалению свежеустановленная IDE не начнет работать с платой Arduino. Для того, чтобы IDE смогла работать с нашим контроллером, нам необходимо произвести ряд не хитрых действий как с IDE, так и с системой. Первым делом настроим IDE, для этого кликаем «Инструменты» и выбираем модель нашей платы, модель контроллера и порт, на котором висит наш контроллер.
Вроде бы все хорошо, можно приступать к написанию скетча, но проблемы начнутся когда мы захотим загрузить скетч в плату. Выскочит ошибка доступа к COM-порту. И это не удивительно, ведь у порта права суперпользователя. Просто поменяв права командой chmod, мы изменим сутуацию ненадолго, до следующего подключения платы.
Для устранения проблемы нам надо внести коррективы в правила монтирования порта. В этом нет ничего сложного, для этого нам потребуется всего лишь создать файл с правилом в папке /etc/udev/rules.d. Но прежде нам необдхимо узнать некоторую информацию, это пара цифробуквенных значений. Их можно узнать выполнив команду lsusb. После выполнения мы увидим список устройств подключенных к компьютеру. В моем случае моя плата отобразилась как:
Bus 002 Device 009: ID 1a86:7523 QinHeng Electronics HL-340 USB-Serial adapter
Определить как именно называется наша плата можно простым способом, выполнив команду не подключая плату и выполнив команду после подключения.
Теперь нам необходимо создать файл с правилами, для этого нам потребуется выполнить следующую команду:
sudo nano /etc/udev/rules.d/10-arduino.rules
Добавим в него следующий текст:
SUBSYSTEMS==»usb», ATTRS{idVendor}==»1a86«, ATTRS{idProduct}==»7523«, \
MODE:=»0666″, GROUP:=»users»
Я отметил красным места, куда необходимо воткнуть значения, не забудьте поменять эти значения на свои и поменять GROUP:=»users», где «users» нужно заменить на свое, как правило группа соответствует имени пользователя в системе. Если сомневаетесь, то можете выполнить команду groups и самой первой будет та, которая нам нужна. Сохраняем изменения и выполняем ещё одну команду:
Этим самым мы перезагружаем правила. На этом собственно и все, теперь при подключении нашей платы, её COM-порт будет доступен нам для записи. До того как я перешел на Ubuntu 17.10, я просто запускал IDE под sudo, но в 17.10 у меня вылезла ошибка «Can’t connect to X11 window server using ‘:0’ as the value of the DISPLAY variable» и я решил таки заморочиться с правилами монтирования порта.
Удачных Вам проектов!
Installing via a tarball
We can download the latest version of the Arduino IDE from the Arduino website (here) as a tarball. A tarball is a type of compressed folder, like a file, commonly used to distrubute software in Linux; its file extension is usually (or , if it uses Z compression. We’ll get to this later).
In order to extract the files we need from the tarball, we can open a terminal, to where the downloaded tarball is, then run
where is the name of the download (typically arduino-(version number)-linux64.tar.xz).
The command can be read as * eXtract from an archive… * Verbosely (meaning it prints the name of every file it finds)… * from a file given by .
When the command finishes, run again; should have created a new folder named arduino-(version number).
into the folder; there will be a file named in the folder. To install the IDE, execute with
If the script executes correctly and outputs at the end of its output, the IDE was installed correctly! Let’s try to launch it in the next step.
Select a source to install the Arduino IDE on your Linux system
When it comes to installing software on a Linux system, I prefer to install from the following sources, in this particular order:
- The Linux distribution’s online package repository.
- Flatpaks hosted on Flathub.
- Build and install directly from sources.
I stay away from Snaps, because these are mostly an Ubuntu only thing. openSUSE recommends against Snaps, for example. I also do not like the auto-update feature of Snaps. Sure, a workaround exists for bypassing the Snap auto-update feature, but I’d rather not use them at all. Then AppImages are another option. Unfortunately, AppImages do not offer functionality to update the installed AppImages all in one go.
On the Arduino website, you’ll find a link for downloading a Linux version of the Arduino IDE. If contains pre-built binaries and a Bash installer script. So option basically. Personally, I am not a big fan of this solution. It works okay for an initial installation, but what if you want to update to a newer version later on?
You could use your Linux distribution’s online package repository, if it offers the Arduino IDE. This is definitely an option, so . However, the Arduino IDE is not yet packaged by all Linux distributions. And if it is, you’ll most likely end up with an older version of the Arduino IDE on your system. At the time of this writing, the latest version available Arduino IDE is 1.8.16. The version packaged for Ubuntu’s 20.04 LTS is 1.0.5.
For these reasons, I decided on using the Flatpak version to install the Arduino IDE on Linux in this tutorial.


